


Visitors
Every person with a car and access rights to the car park is a visitor.
This section is about the Visitors tab in the user interface. This tab allows you to quickly find visitors and perform frequently used actions. For more in-depth functionality on visitors, navigate to Contracts > Visitors.
|
Quickly go to:
|
Finding a visitor
To find a visitor, click Visitors in the menu bar.
Use the search bar and enter the name of the visitor, the identifier number or the group of the visitor. Wait for the results to appear on screen and click on one of the results to go directly to the visitor or click Search.
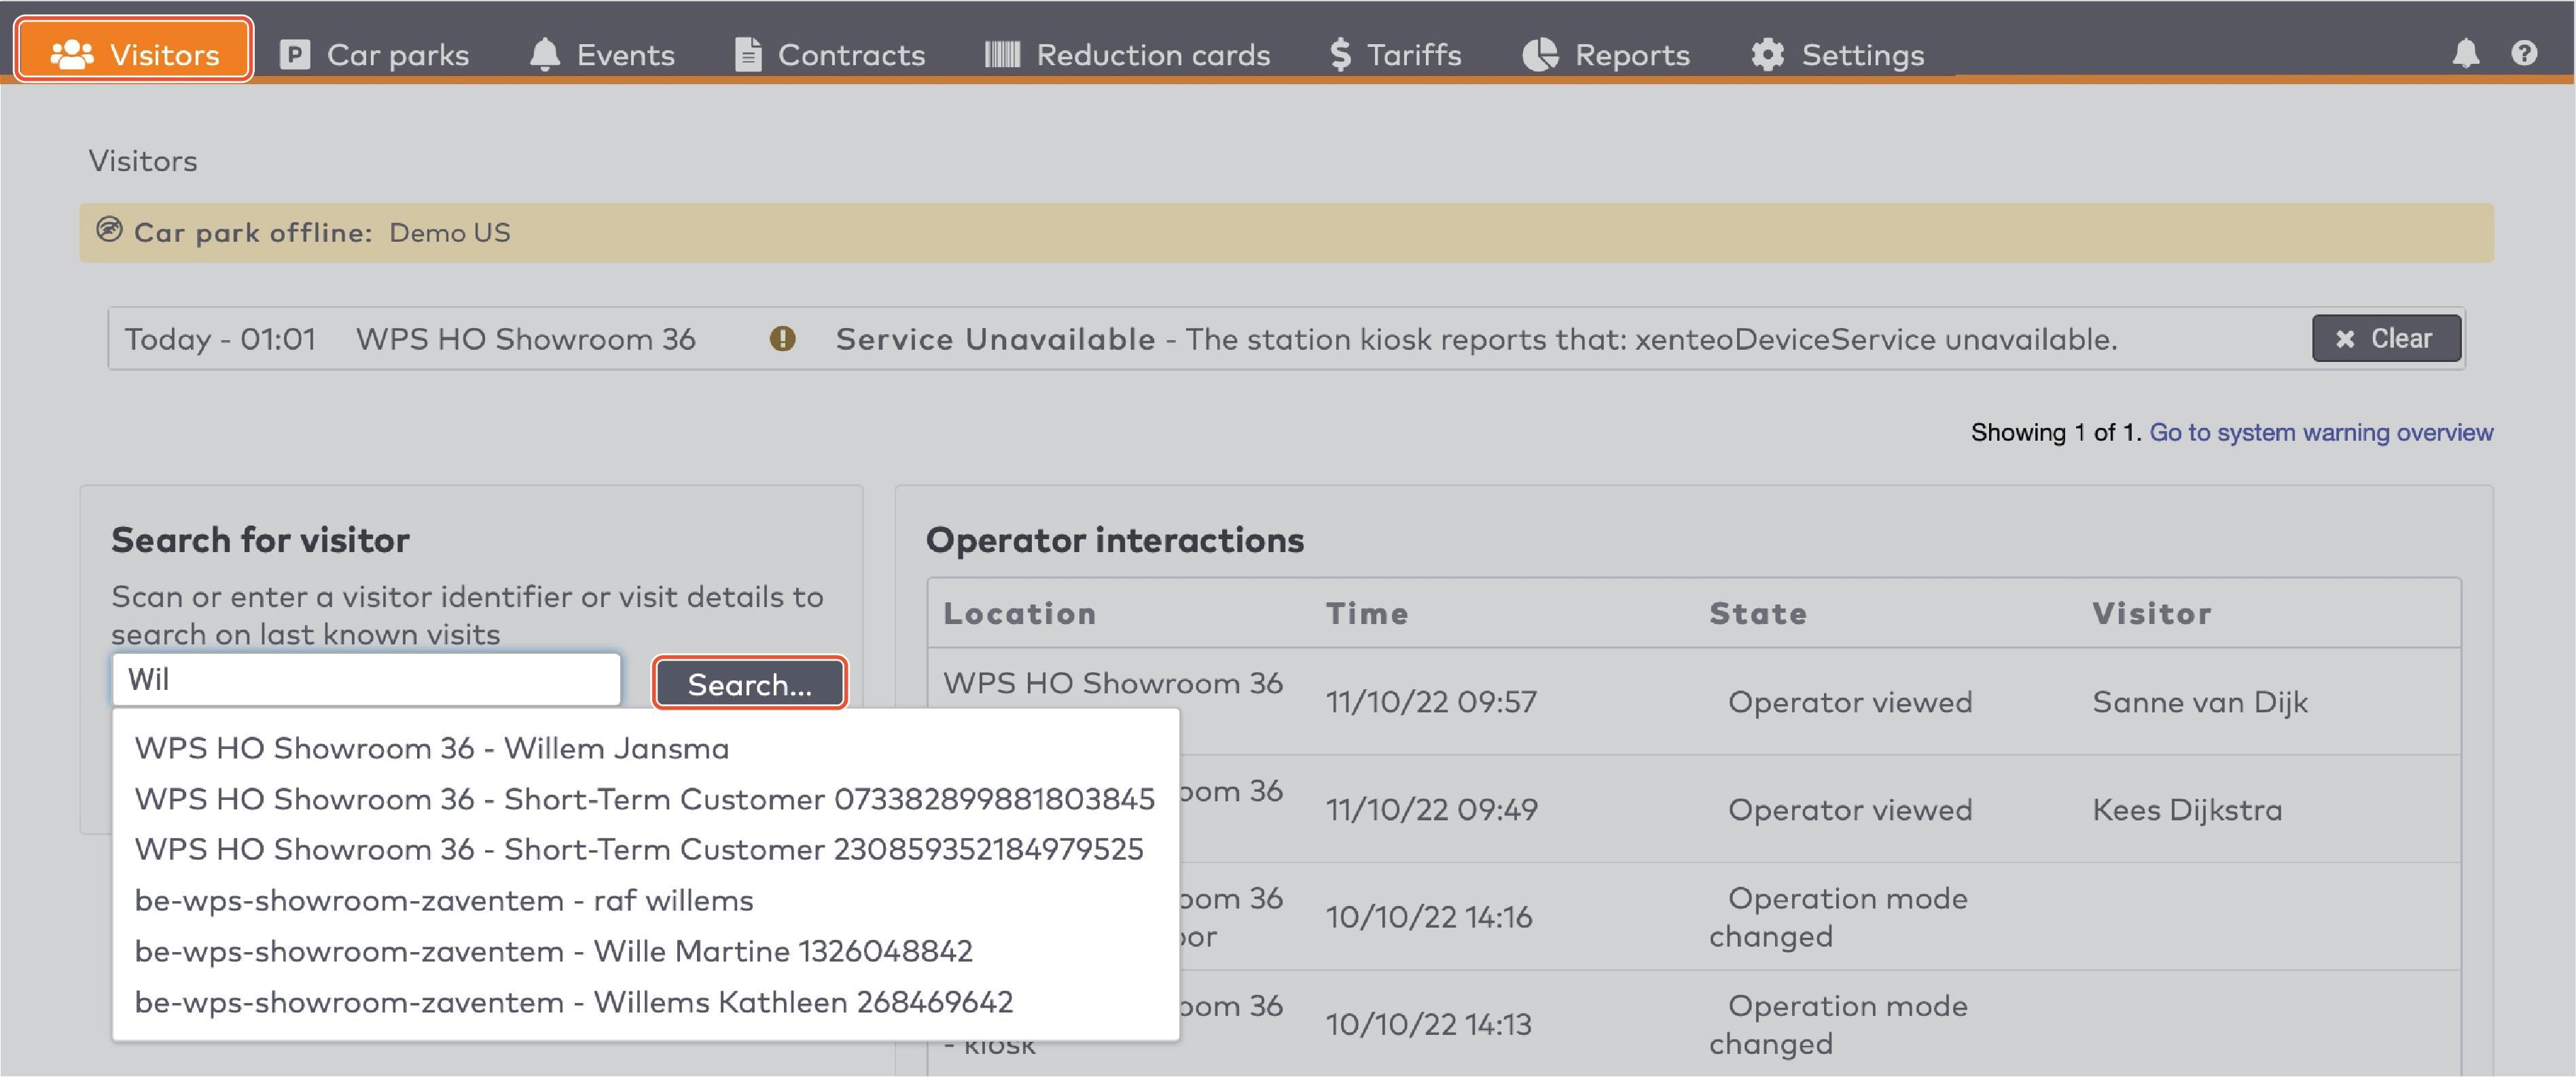
|
If you clicked Search, a list of results is shown. By default, you are shown visitors who entered in the last 7 days only.
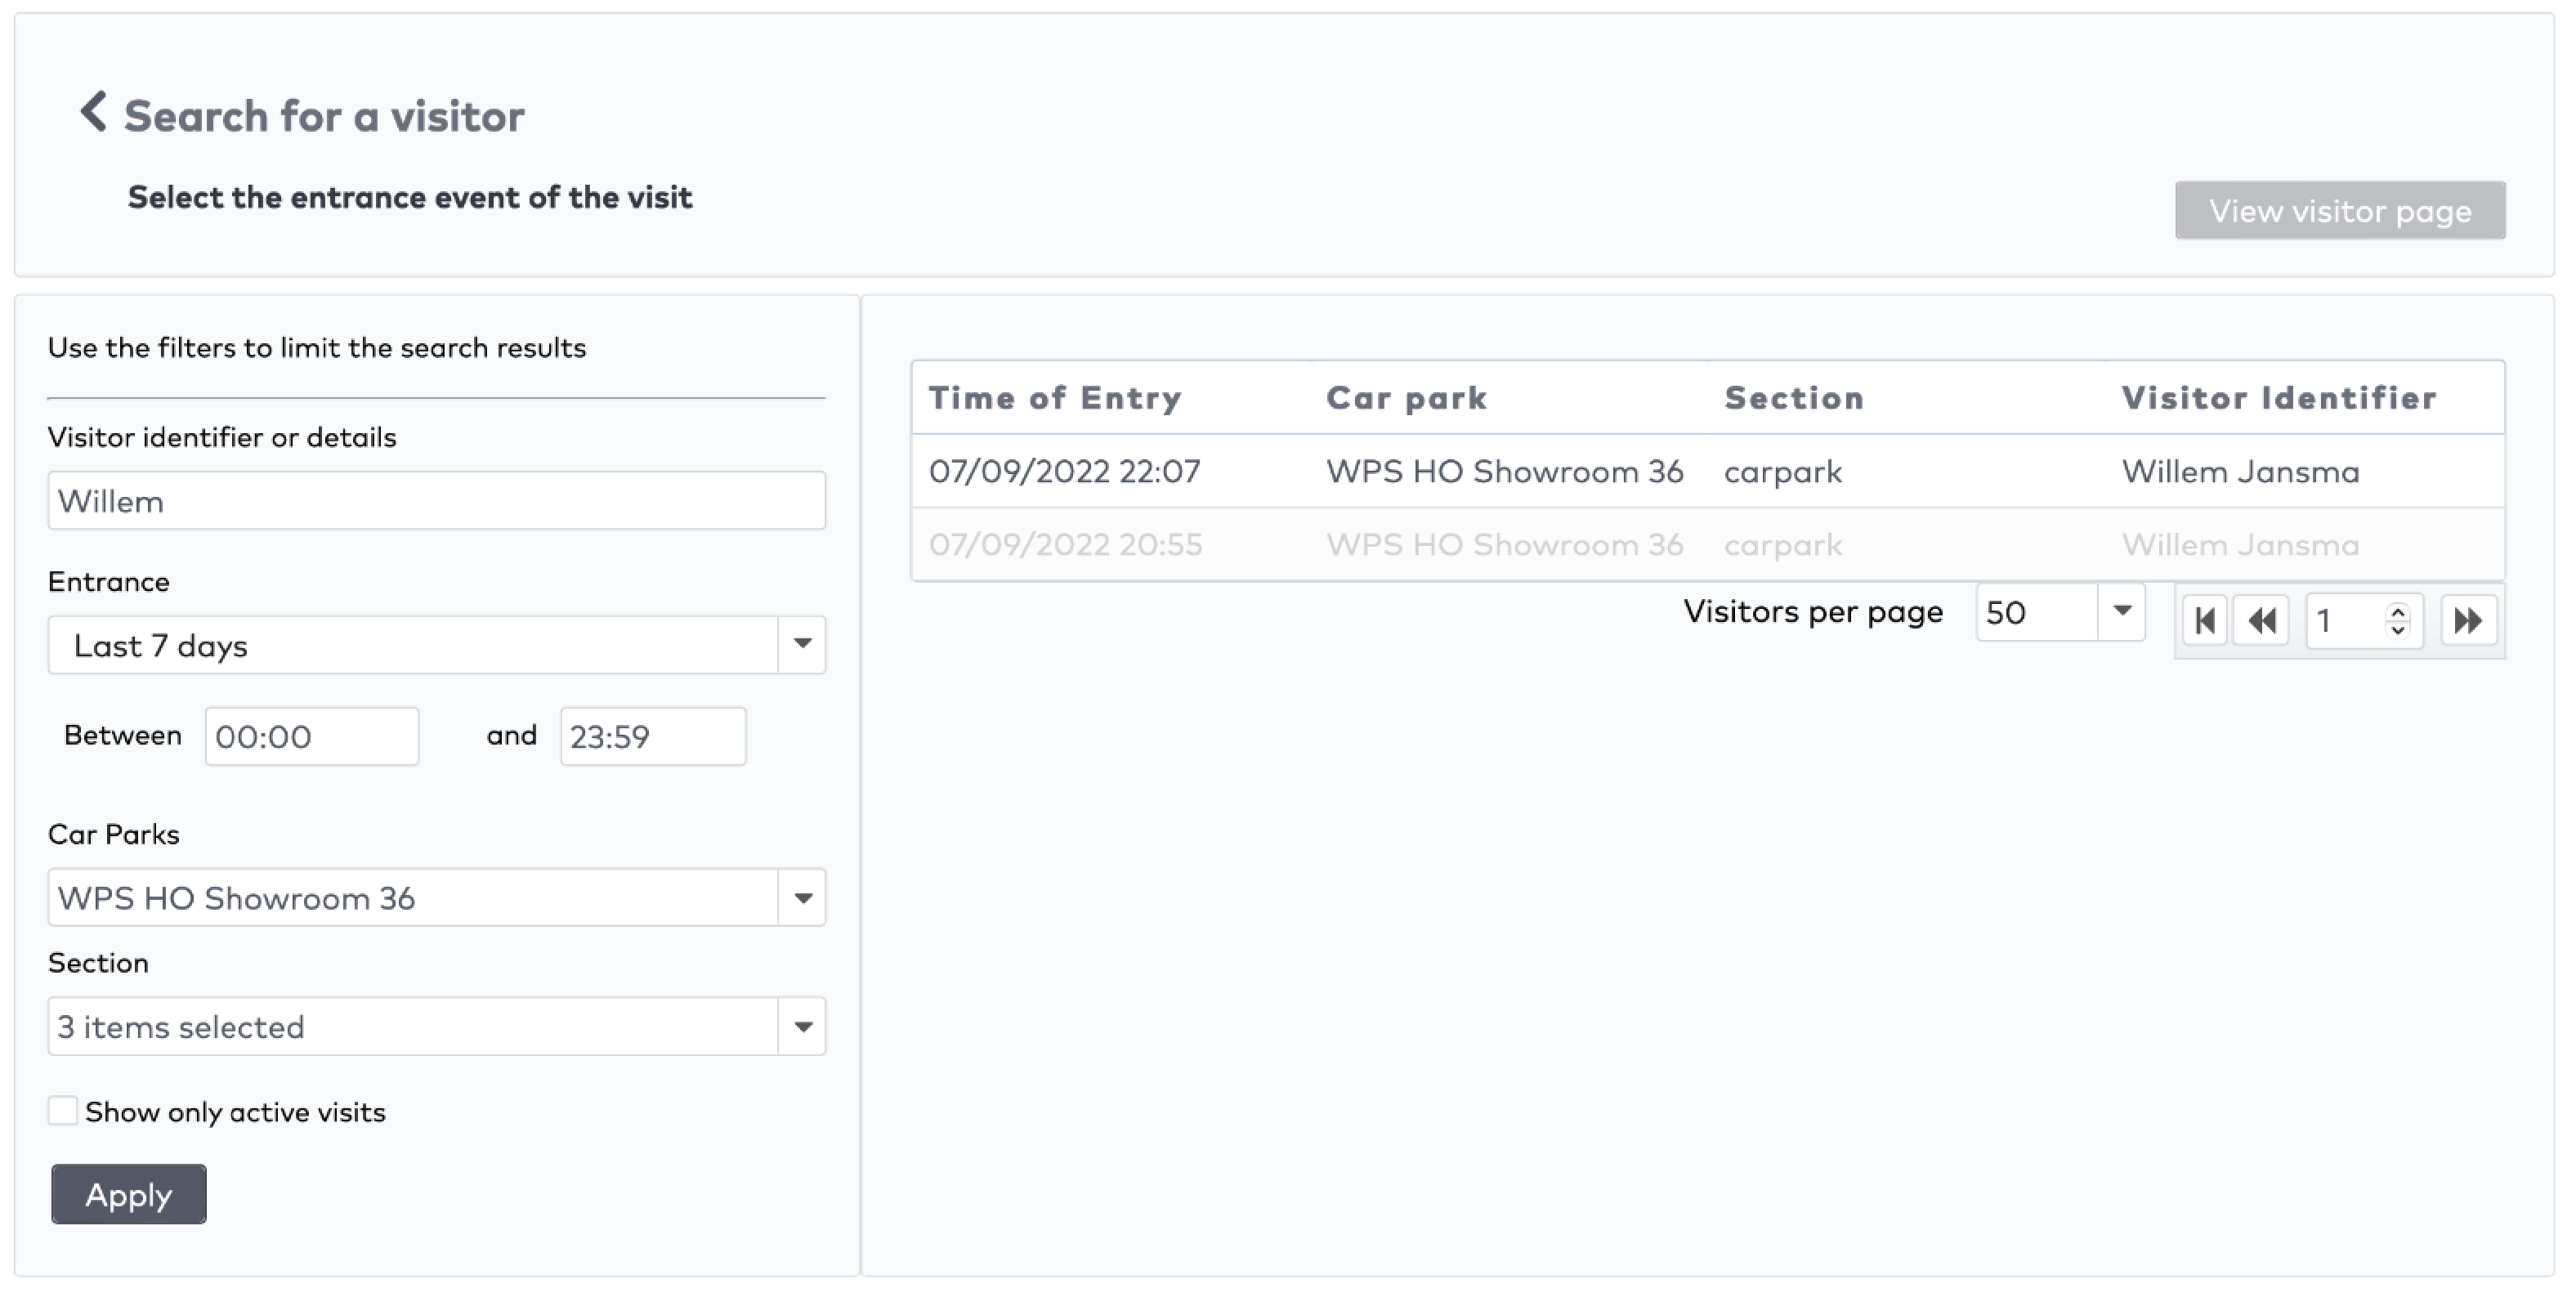
|
Use the Entrance dropdown menu to select a different window.
Use the Car parks dropdown to exclude one or more car parks from the search.
Use the Section dropdown to filter results by section. This option is available only when you selected only one car park from the Car park dropdown.
Check Show only active visits to exclude visitors who have left the car park.
Click Apply to refresh the search results.
Click View visitor page to access the visitor’s page.
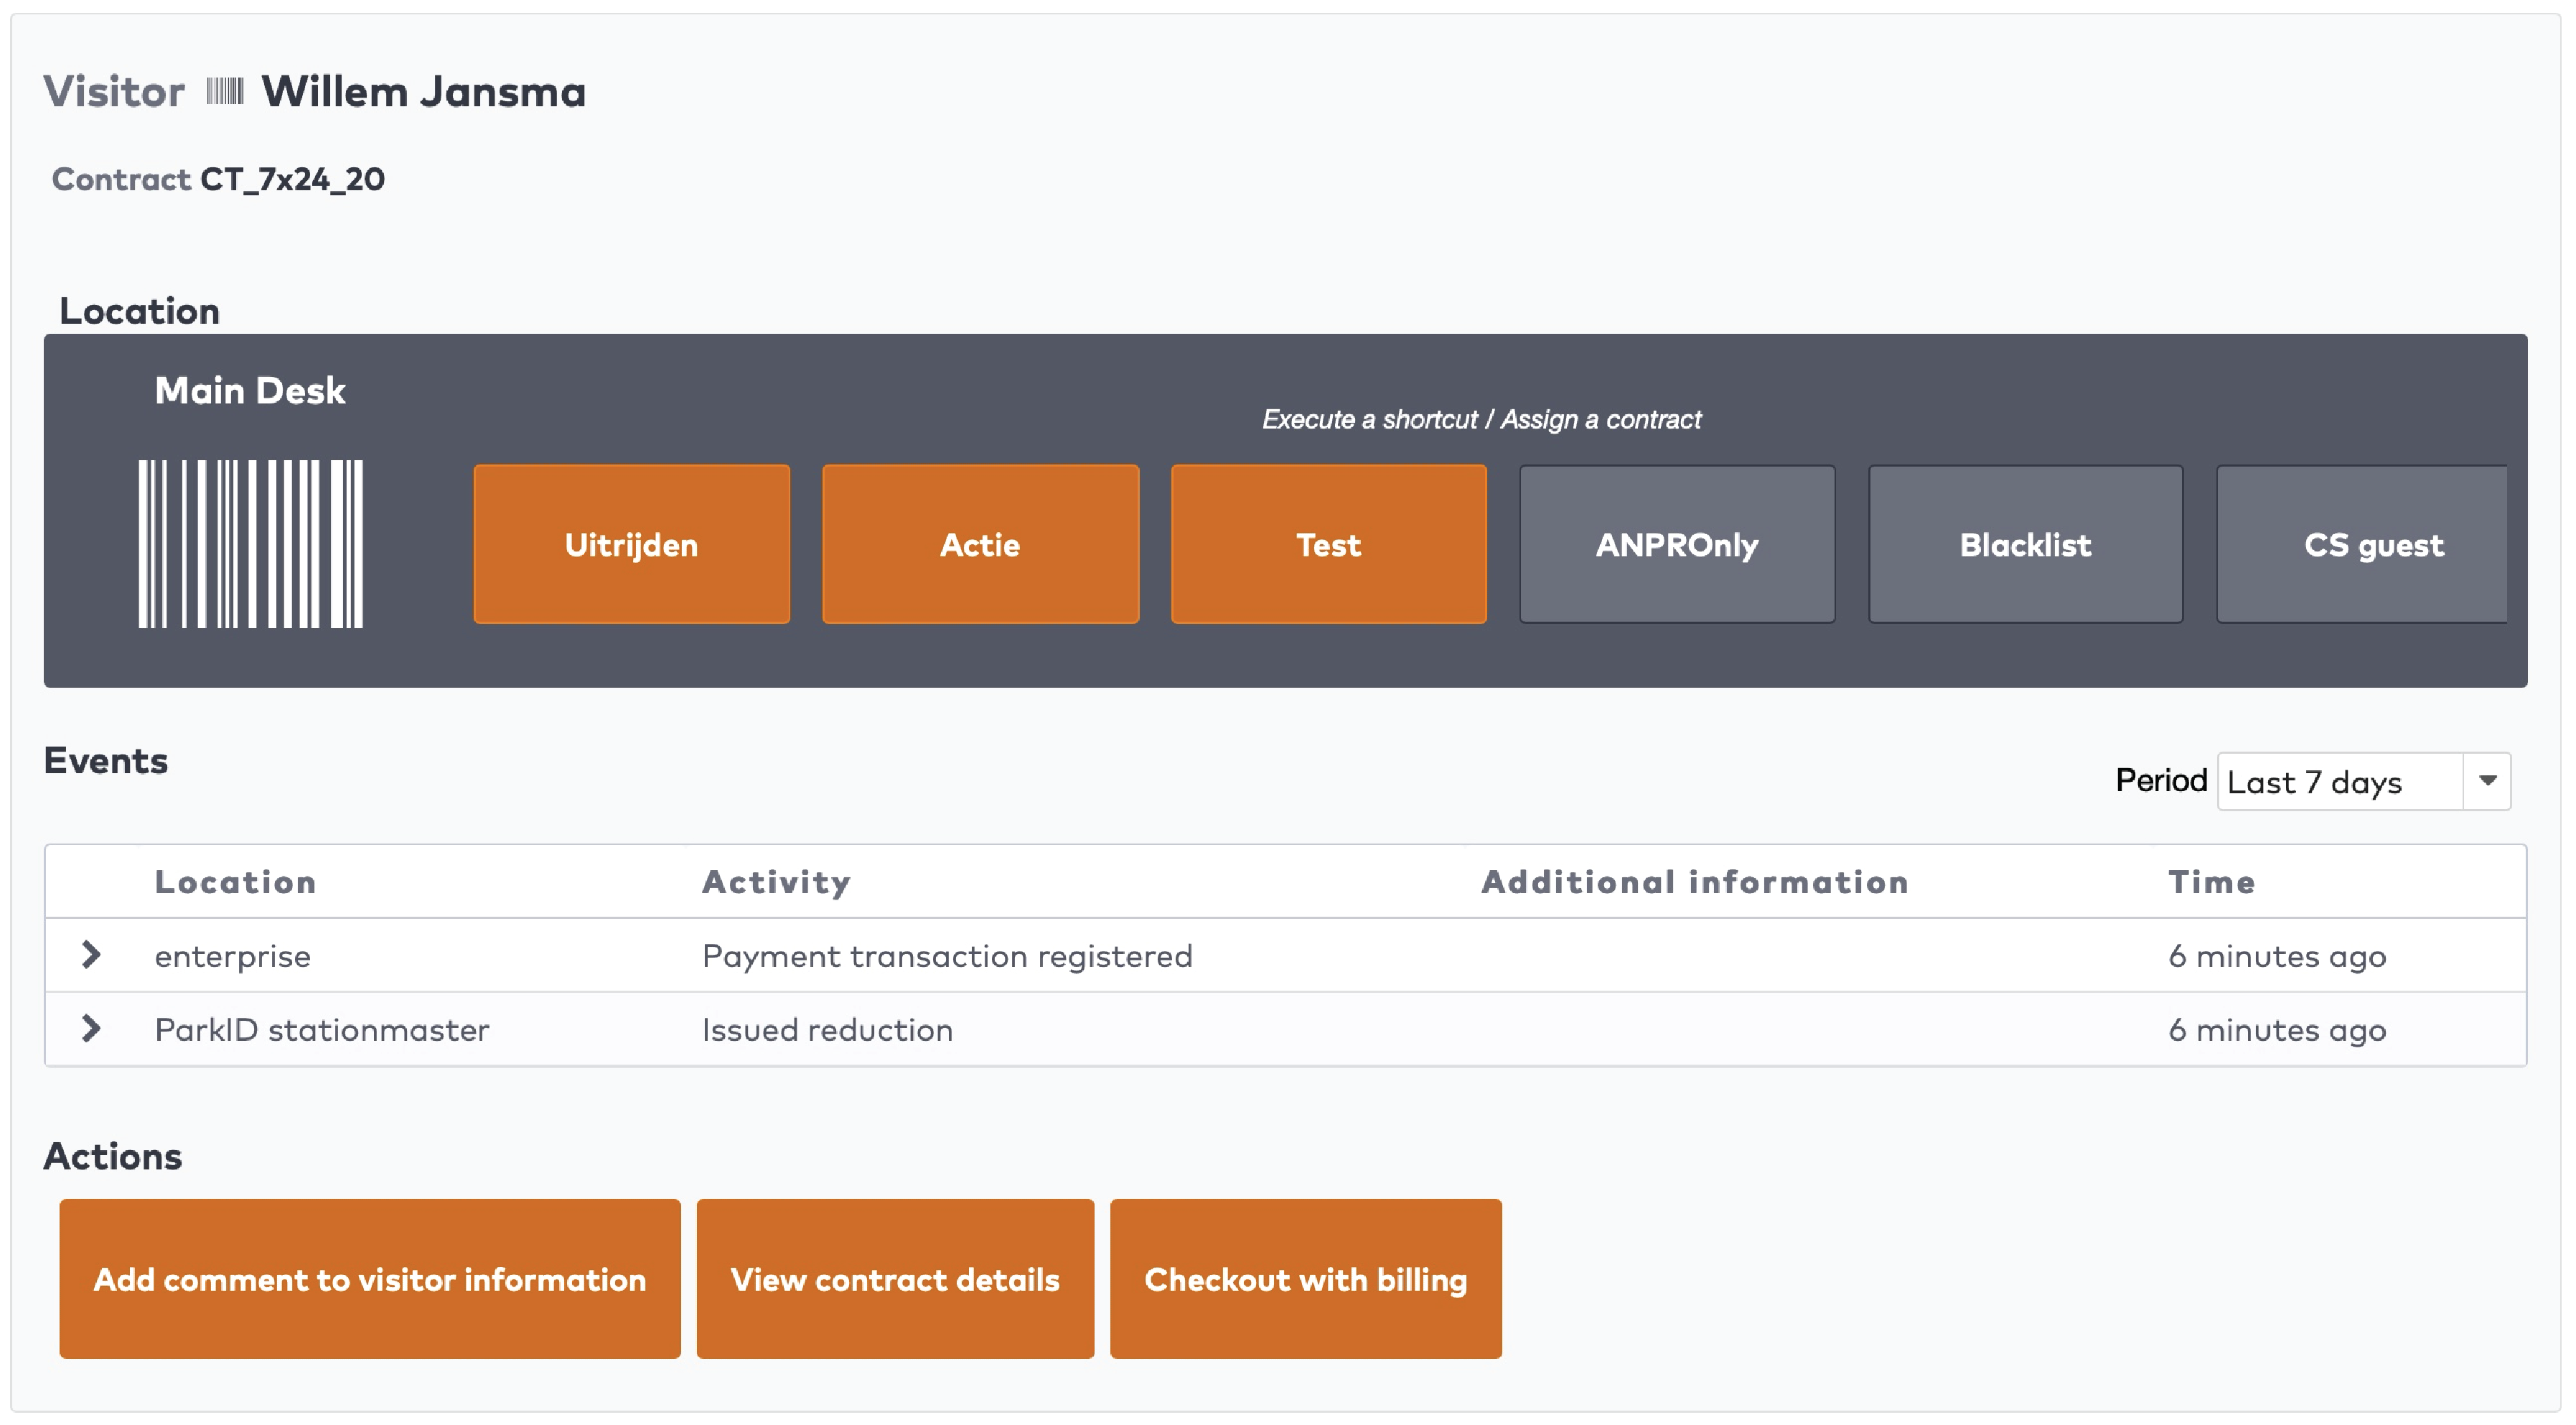
Using the visitor page
If you access a visitor’s record through the Visitors tab, you will see a view containing:
The visitor’s name or number
A set of shortcuts and contract types to assign
A list of events regarding the visitor
A set of actions
|
Using shortcuts
In the visitor’s record, shortcuts allow you to
Make a change to the current contract of a visitor or
Change the contract type of the visitor
Shortcuts in orange are used to make a change to the current contract of the visitor. For example:
Giving a reduction on the price
Changing the validity of the contract
Clearing the visitor to leave the car park
Etc.
Shortcuts in grey are used to change the contract type of the visitor. For example:
Changing a short term visitor to a multiple day subscription
Changing a short term visitor to a one time exit card
Etc.
Learn how to configure shortcuts in Shortcut settings.
Viewing visitor events
In events, a log of events is shown. By default, this is a log from the last seven days.
To view events prior to the last seven days, click the dropdown menu and select a different range.

|
Performing actions
You can:
Perform an anti-pass back reset
Add comments to visitor information
View and edit contract details
Perform a manual checkout with billing
Performing an anti-pass back reset
ParkID detects misuse of visitor identifiers. This is called anti-pass back. For example: when the same visitor identifier is used by two or more visitors at the same time.
Anti-pass back detection information can be incorrect in the following cases:
After an emergency, when exits have not been properly registered.
After a station malfunction or maintenance update.
To perform an anti-pass back for a visitor:
Click Anti-pass back reset
You will receive a notification once the anti-pass back reset is performed successfully.
Adding a comment to visitor information
Comments are displayed in the list of Events. To add a comment:
Click Add comment to visitor information.
Type your comment in the bar.

|
Click Save.
The comment is saved and visible in Events.
Viewing and editing contract details
To view and edit contract details, click View contract details. The contract screen is displayed.
To learn more about editing a visitor’s details, see Editing details.
To learn more about editing contracts, see Editing a contract.
Performing a manual checkout with billing
Please note that a manual checkout with billing can only be performed if billing details of a visitor are known. Billing details can be for example: a value card, a subscription, a bank account number, a credit card number, or a group account.
To perform a manual checkout with billing:
Click Checkout with billing.
Select an Outside section you want to move this visitor to.

|
Either enter an Amount and select a Currency, or
Enter an Exit date and time. The system will calculate the costs based on the rules of the visitor’s contract.
Click Submit.
The visitor’s exit is registered and the visit will be billed.
Car parks
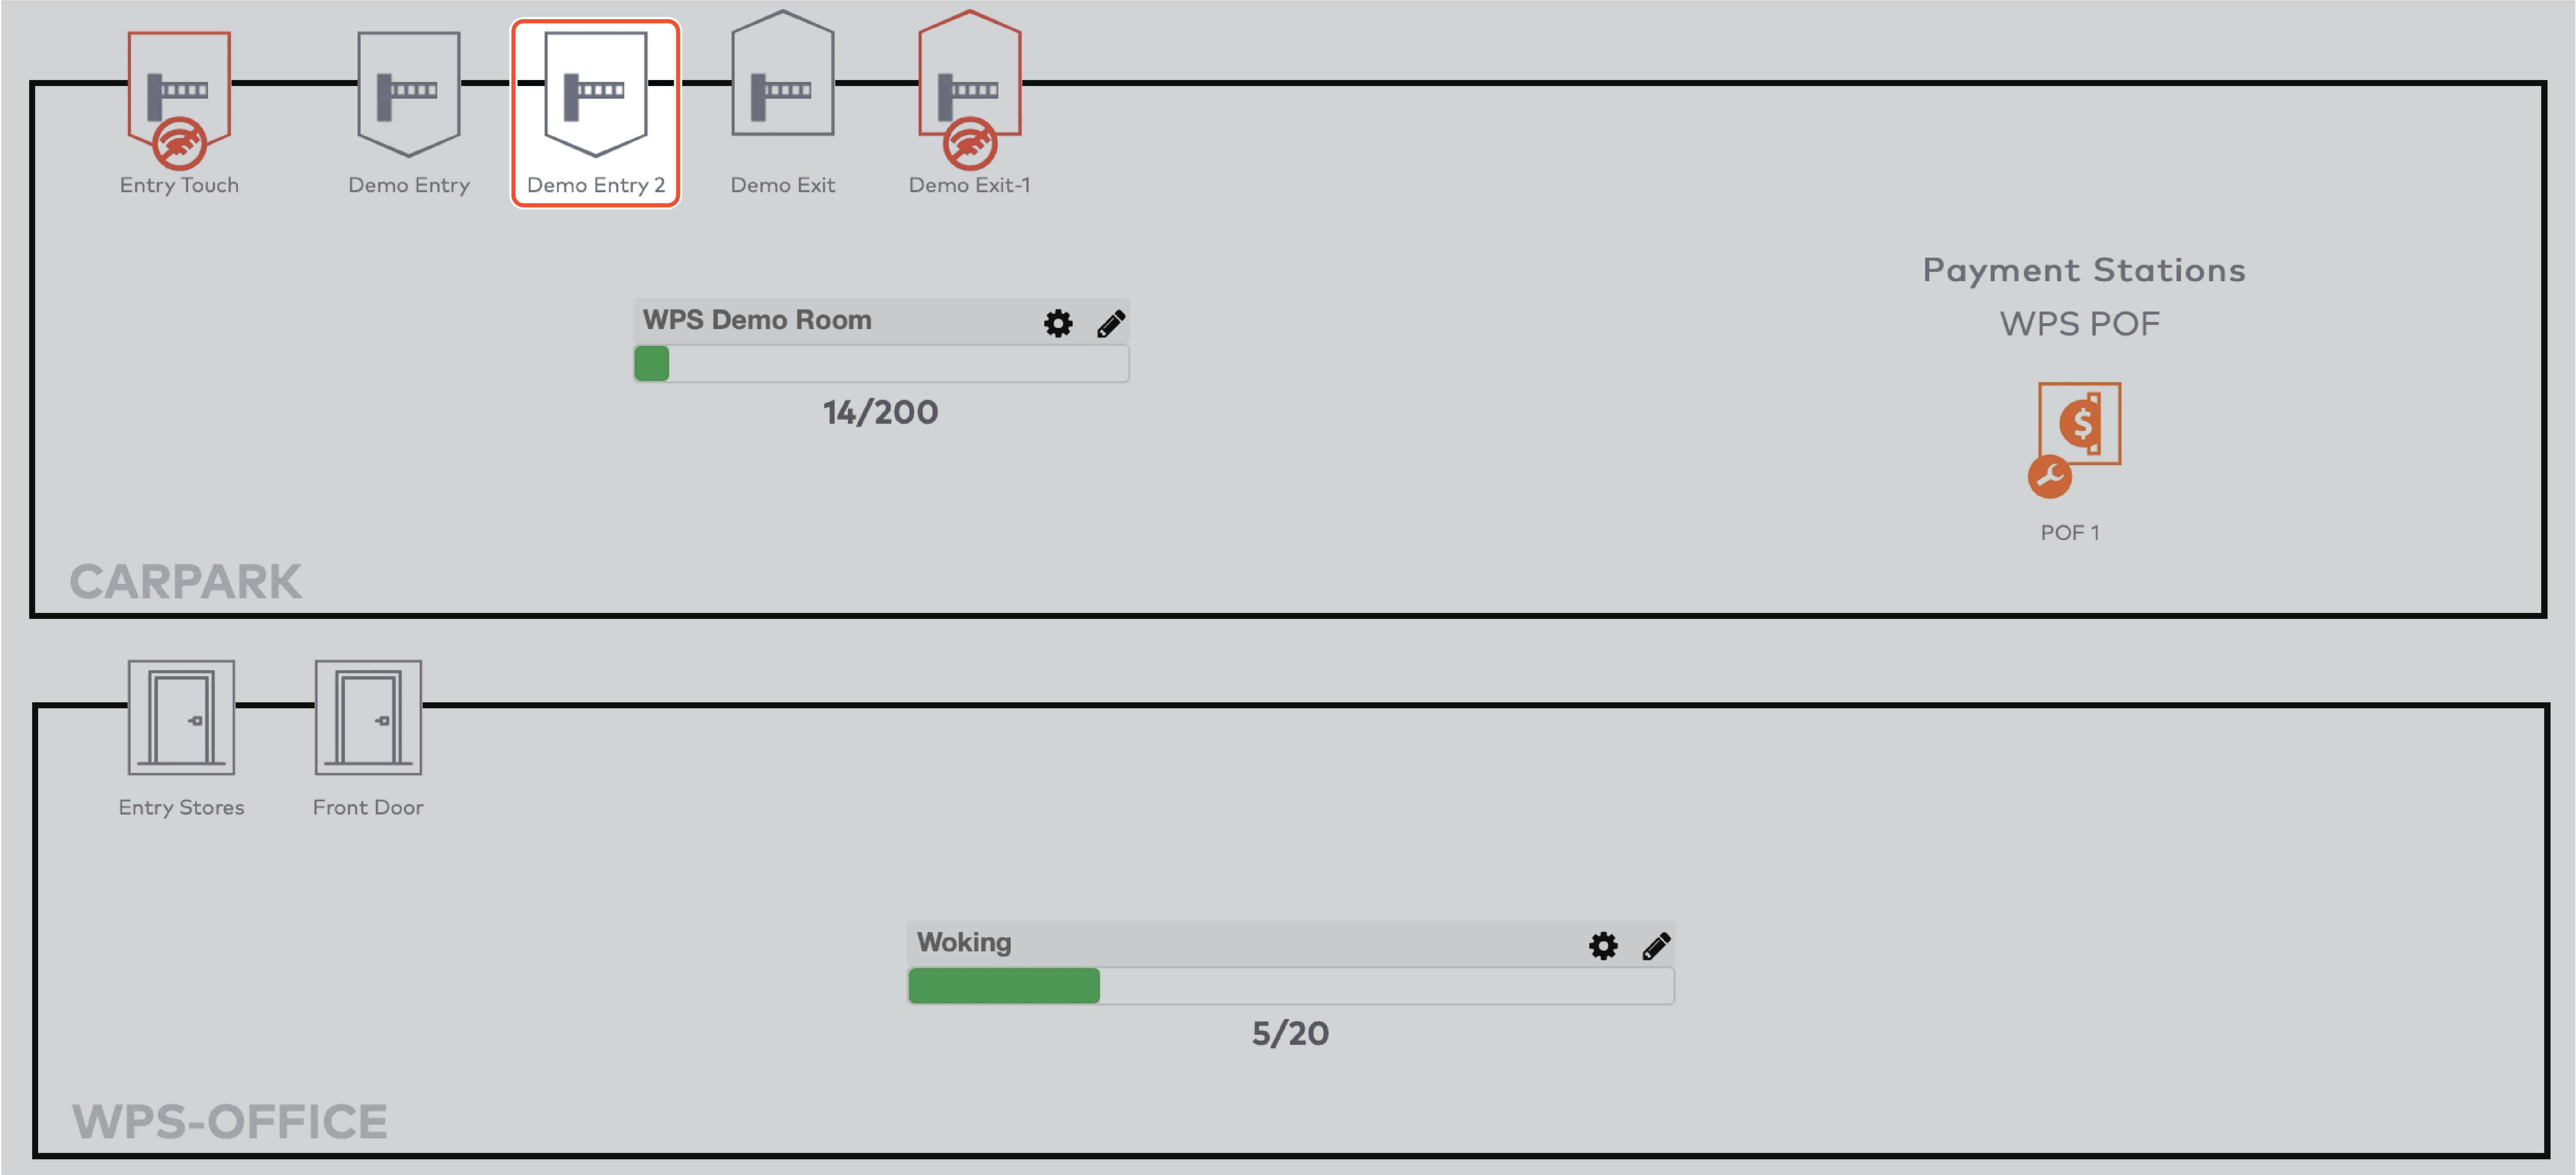
From the Car parks tab, you can operate your car parks.
Car parks overview
To get an overview of the car parks, click Car parks in the menu bar.

|
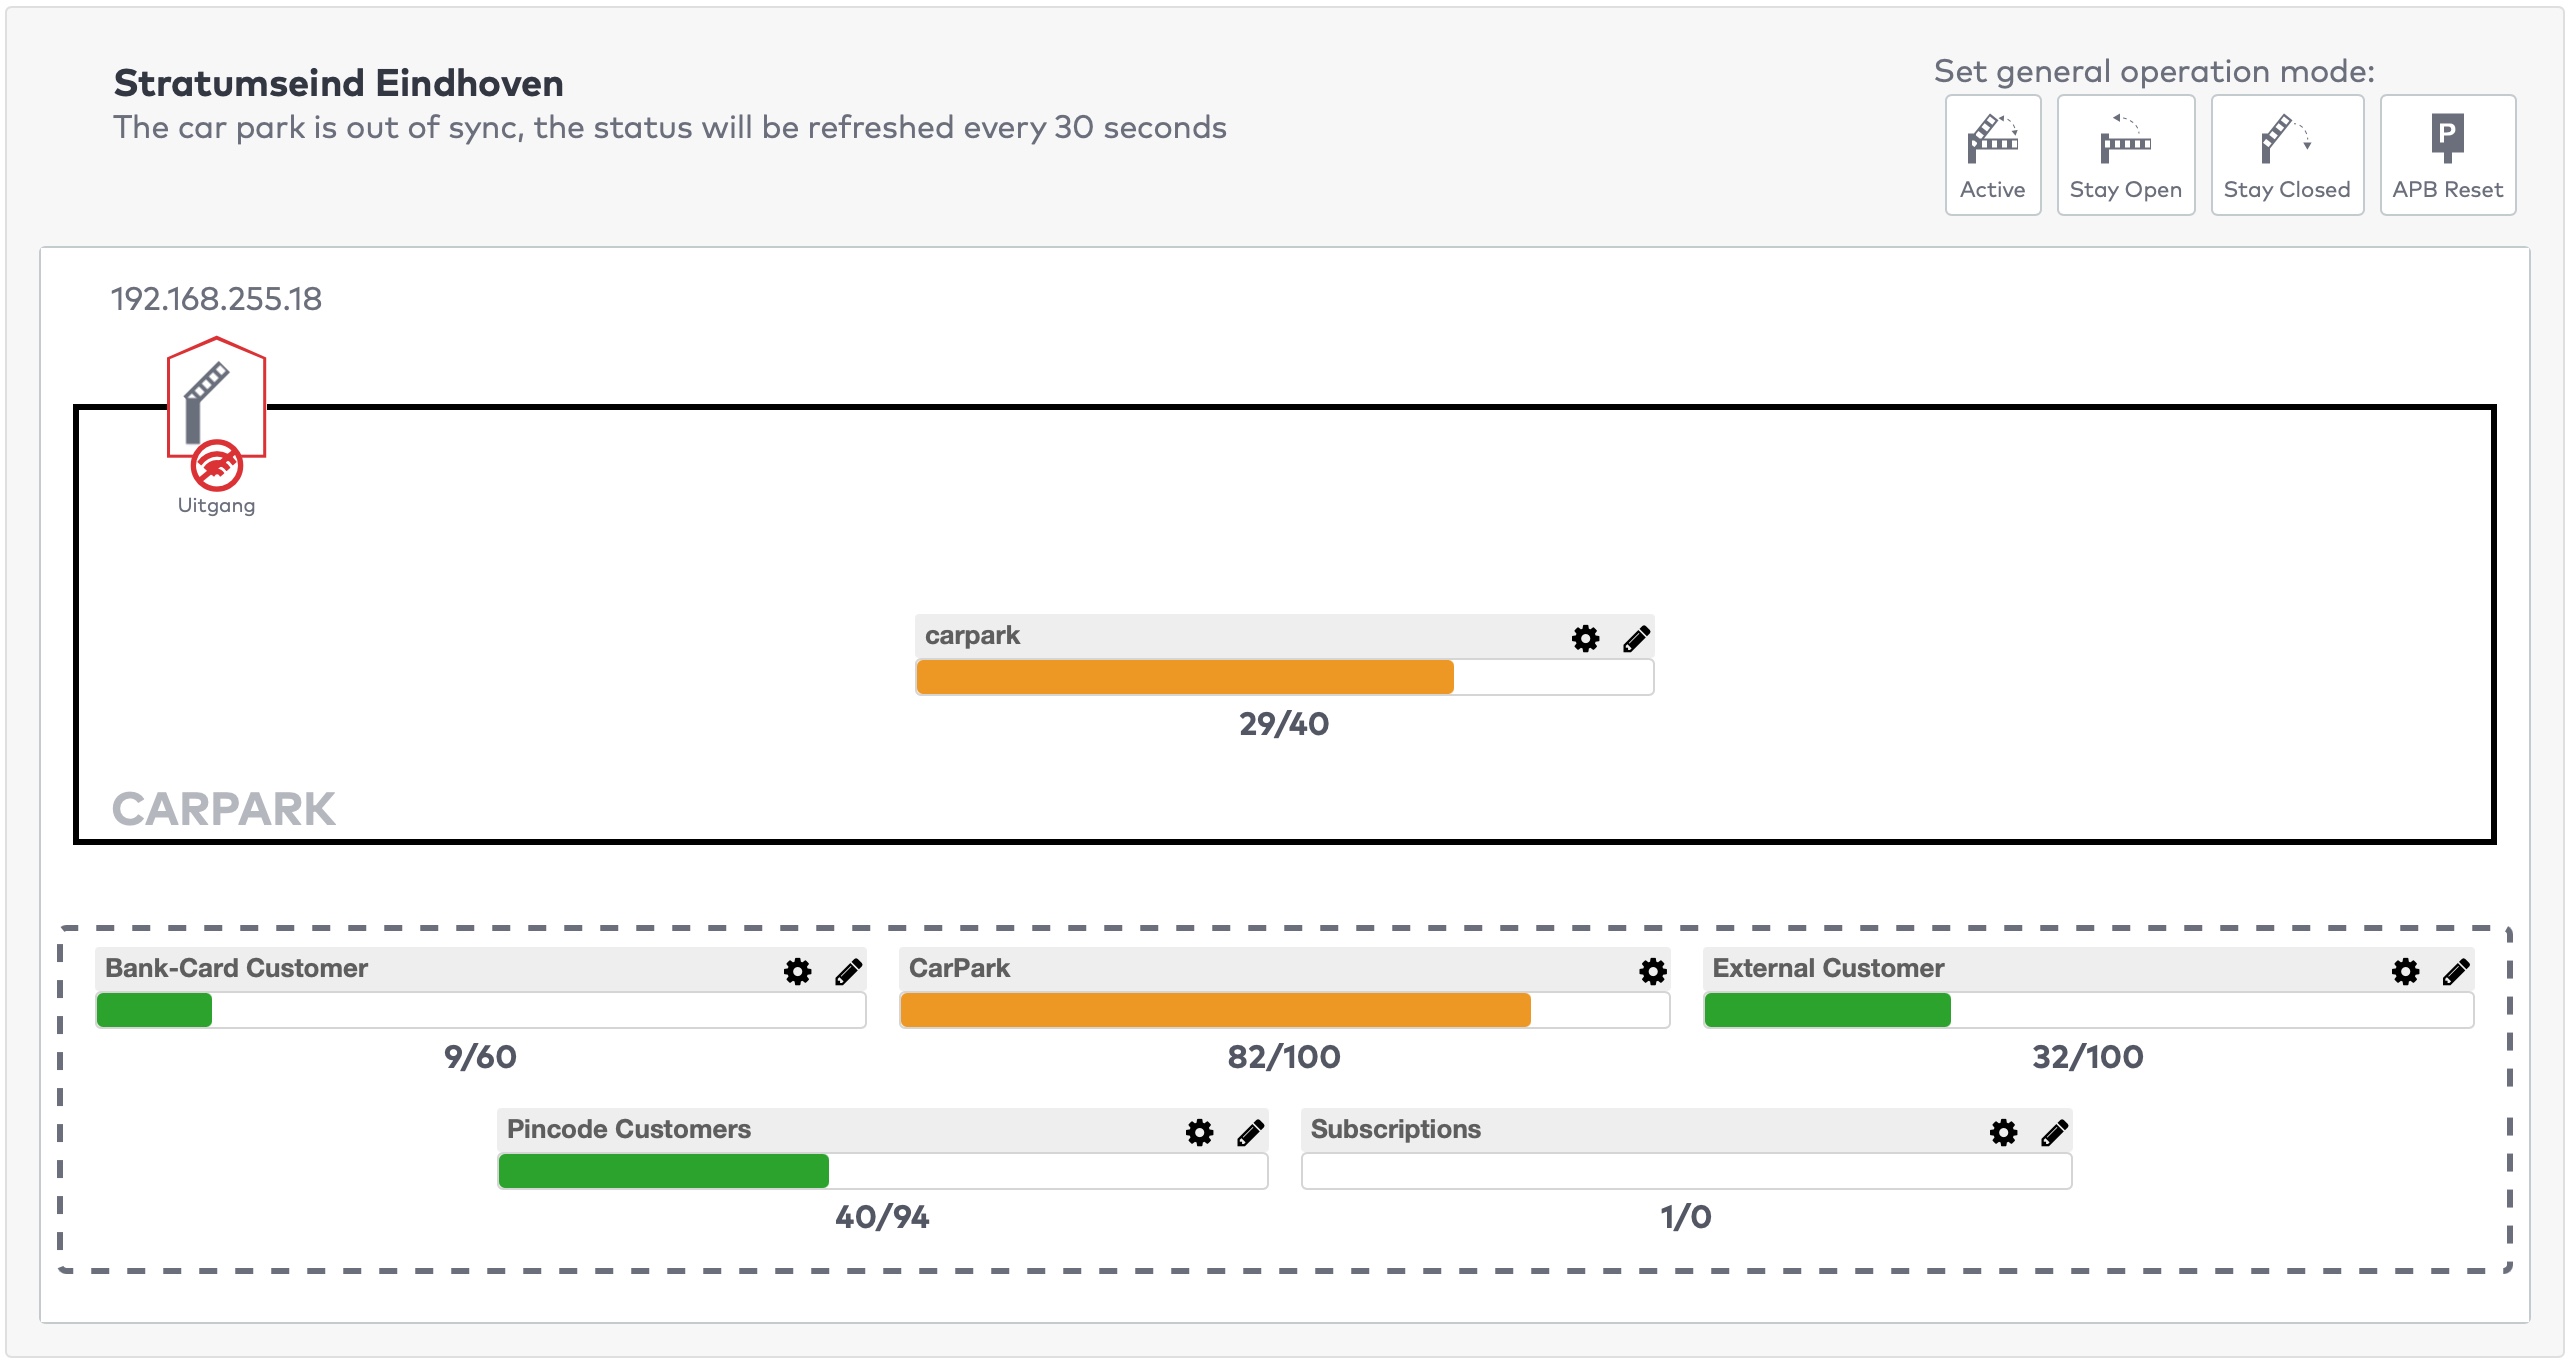
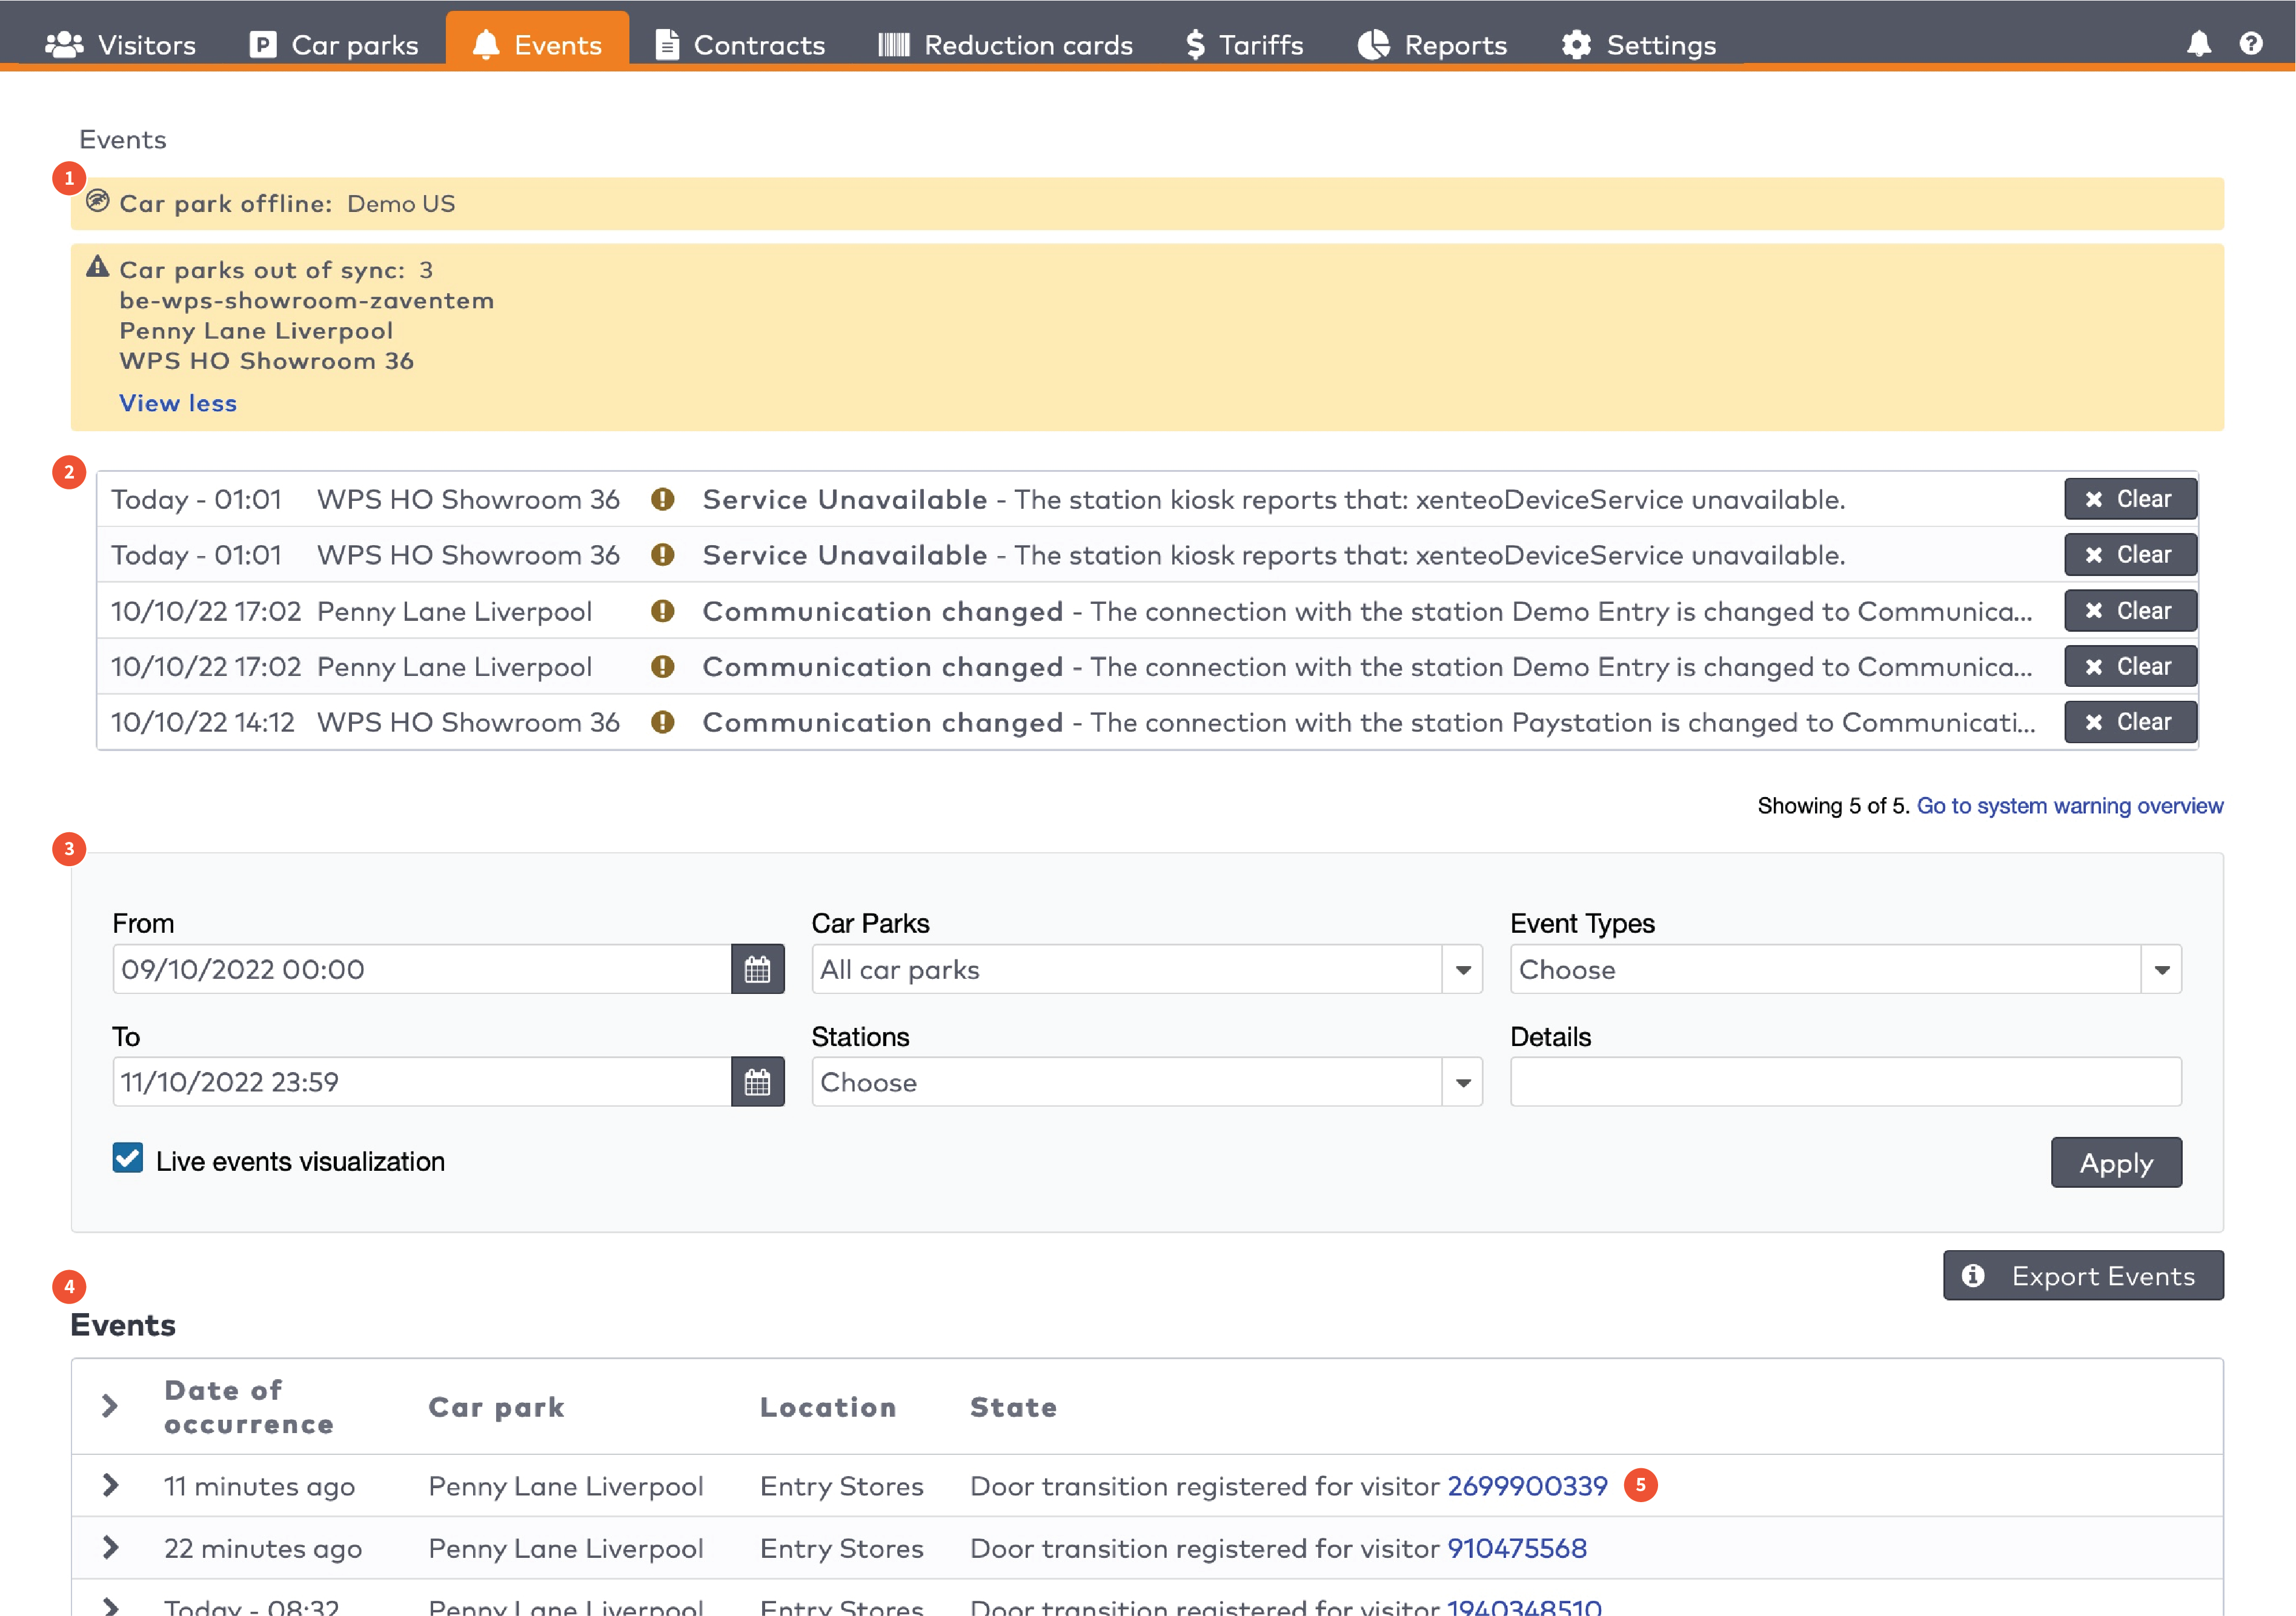
You’ll see status and warning messages from the system in a yellow bar (1). When a car park is offline, it can’t be operated. When a car park is out of sync, it can be operated, but feedback from the car park might not be accurate. For example, the status of barriers might be incorrect, and entries and exits might not be properly displayed.
To display a specific car park, select one from the dropdown menu Show (2). Select all car parks from the dropdown menu to display all car parks.
To change which car parks are displayed by default, change your preferences.
|
In this article:
Operate the individual stations. Stations are grouped by section in the car park (5)
|
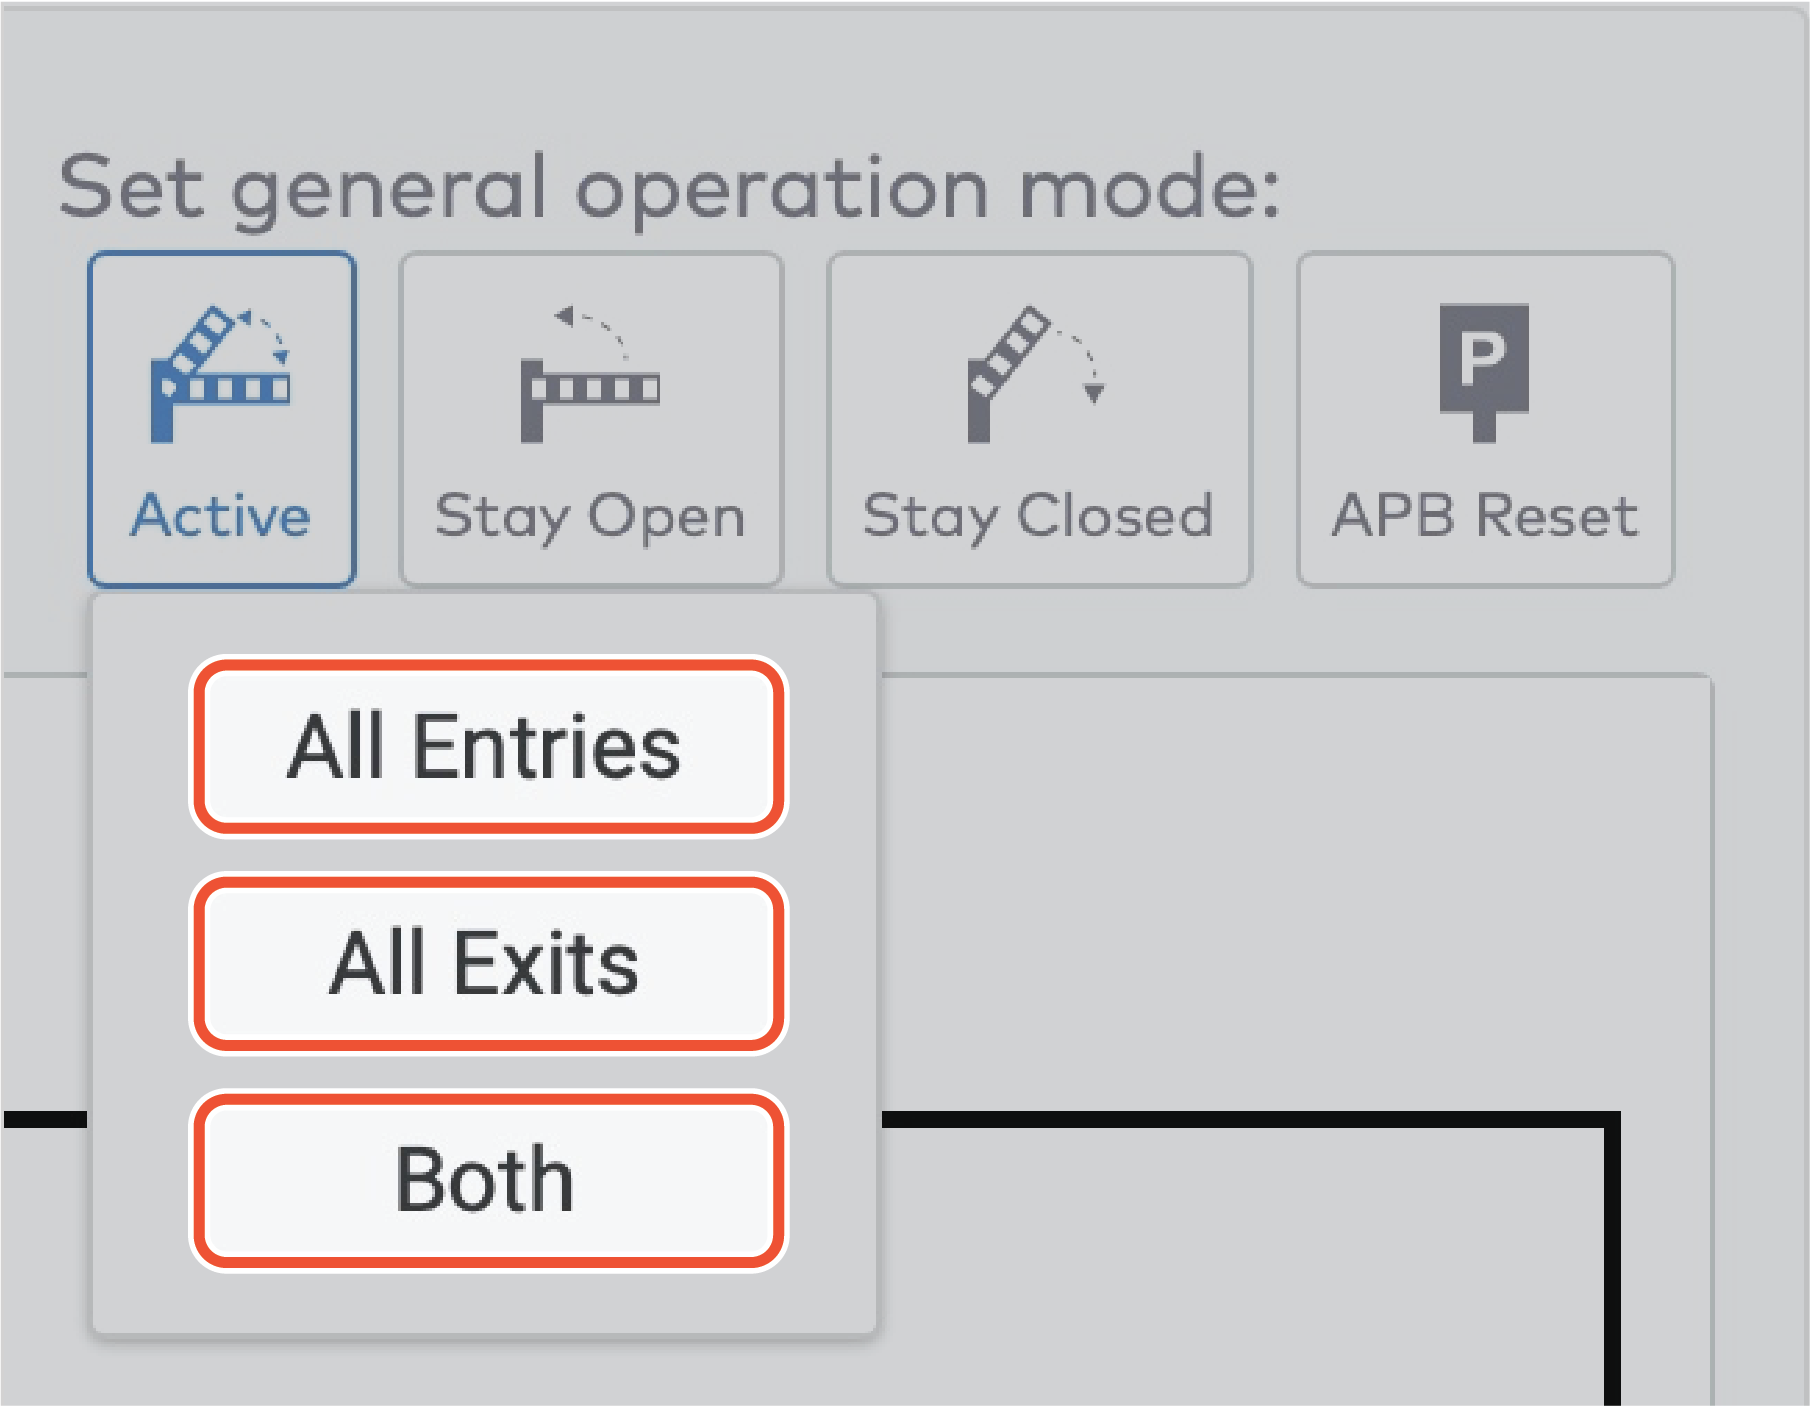
Changing the general operation mode
There are three operation modes for car parks:
Active. All stations are operating normally.
Stay open. All stations stay open. Visitors can freely enter and exit.
Stay closed. All stations stay closed. Visitors can’t enter or exit.
To change the operation mode:
Click Active, Stay Open or Stay Closed.

|
Click All entries, All exits or Both.
|
Performing an anti-pass back reset
ParkID detects misuse of access identifiers. This is called anti-pass back. For example: when the same access identifier is used by two or more visitors at the same time.
Anti-pass back detection information can be incorrect in the following cases:
After an emergency, when exits have not been properly registered.
After a station malfunction or maintenance update.
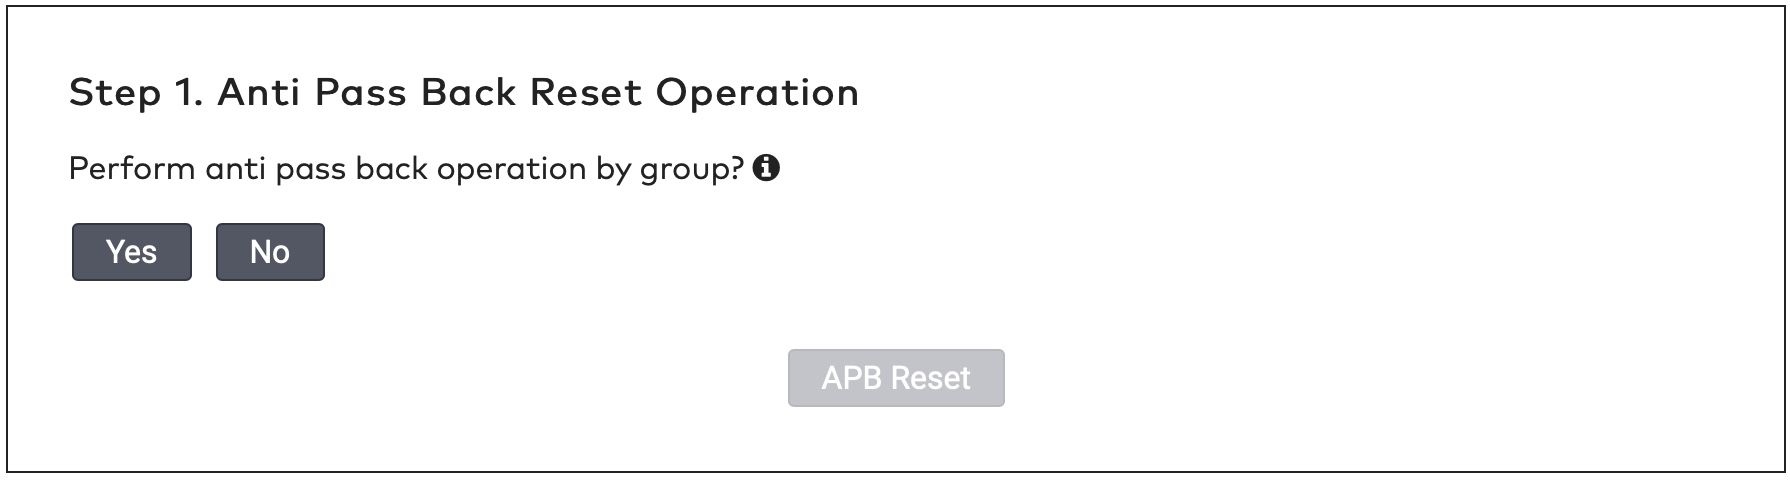
To perform a reset:
Click APB Reset.

|
To perform a general anti-pass back reset, click No.
To perform an anti-pass back reset by group, click Yes.
|
If you clicked Yes, Select the group from the dropdown menu. All visitors from this group will be moved to an outside section. Choose an outside section from the Select the section the dropdown menu.
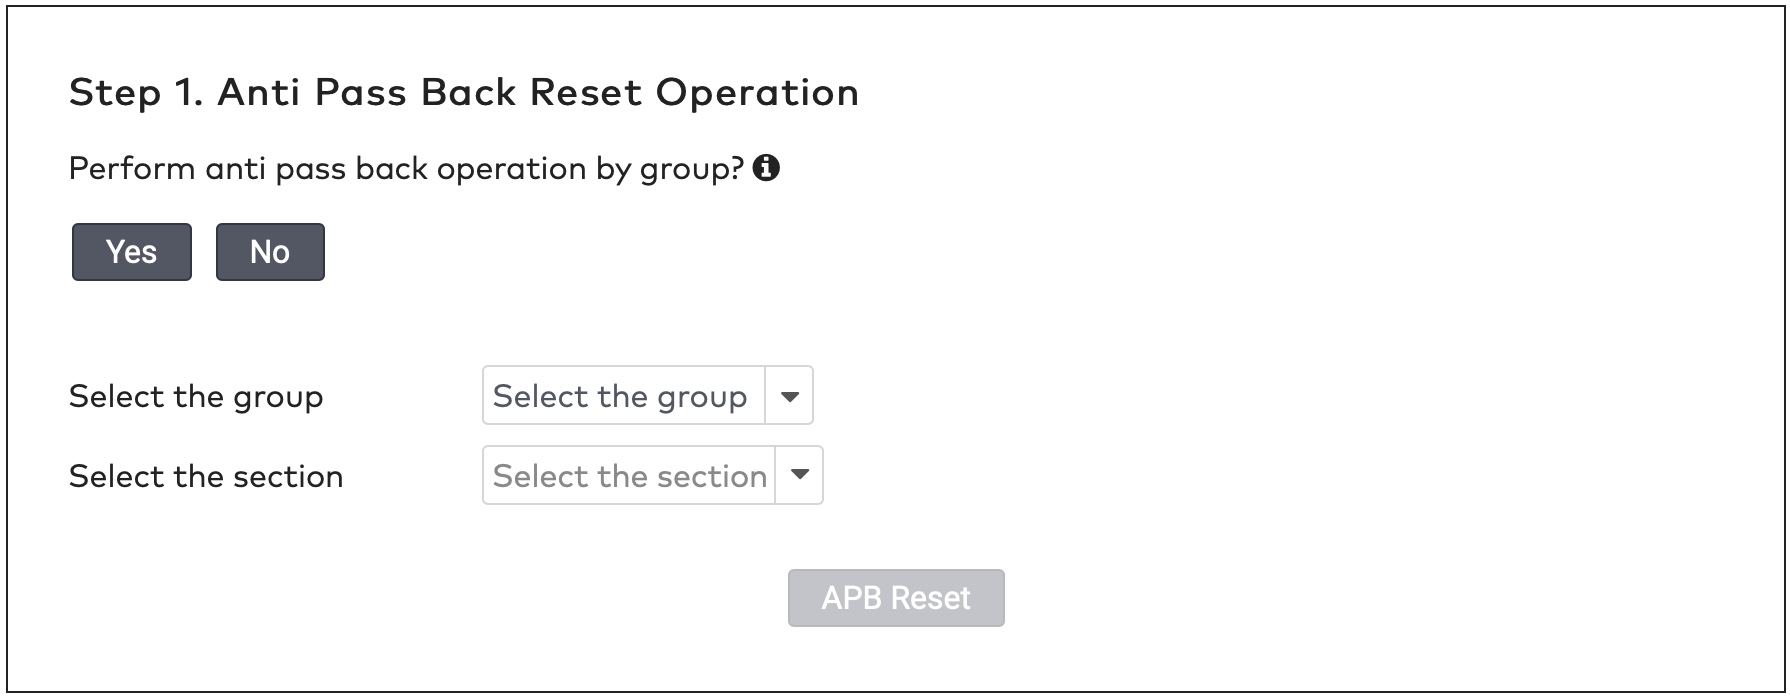
|
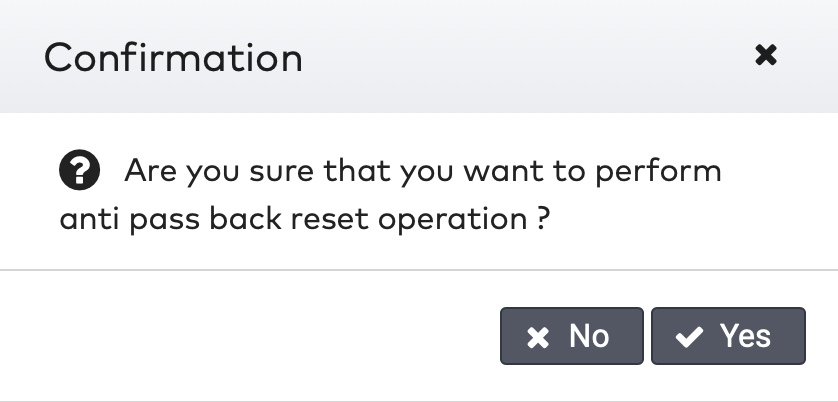
Click APB Reset.
Click Yes to confirm the anti-pass back reset operation.
|
Operating stations
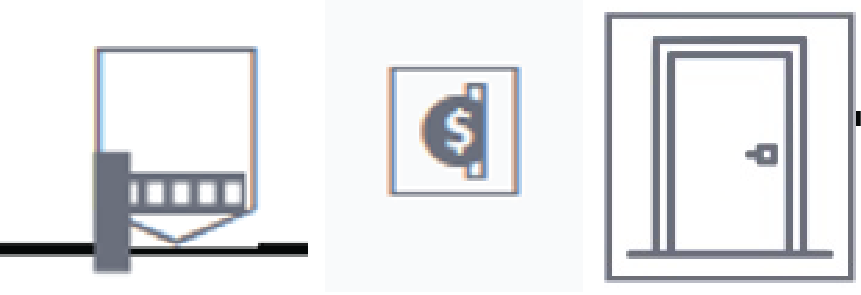
There are five different types of stations:
Entry stations (1)
Exit stations (2)
Payment stations (3)
Doors (4)
Bidirectional lanes (5)

|
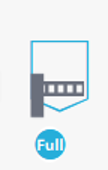
The icons representing the stations show their status:
|
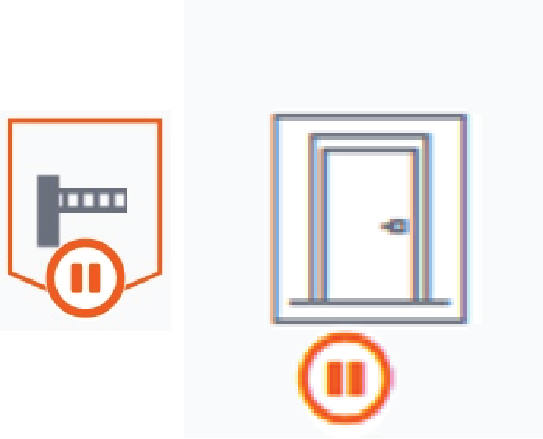
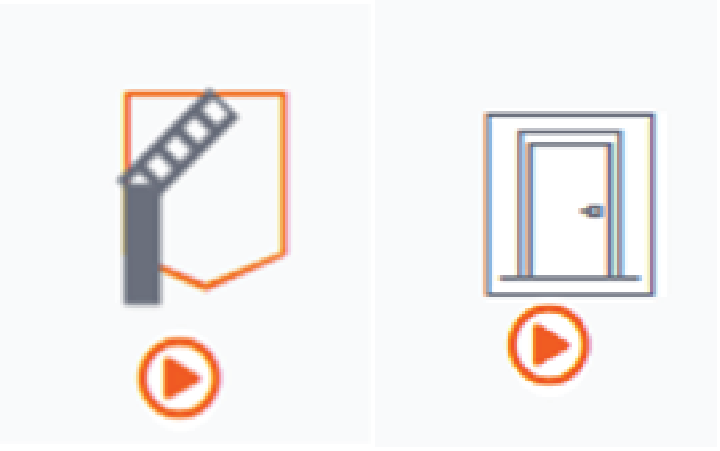
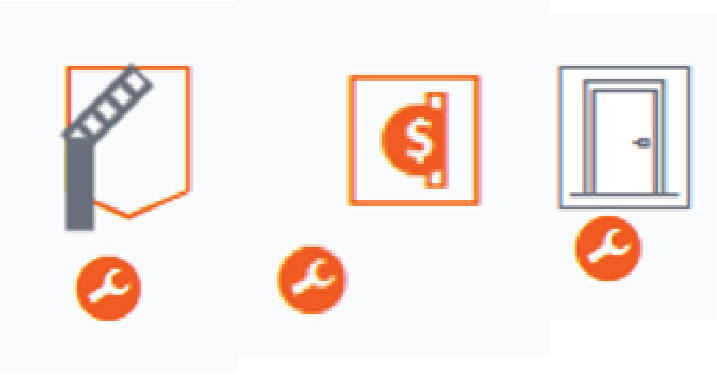
The station is active and operating normally.
|
|
The operation mode of this station is set to Stay closed. Visitors cannot pass.
|
|
The operation mode of this station is set to Stay open. Visitors can freely enter or exit.
|
|
The operation mode of this station is set to Service. The station is in maintenance mode. The station does not accept visitors.
|
|
The operation mode of this station is set to Full. The barrier only opens for visitors who are allowed to access car parks when they are full. For example, staff, service personnel, or other people who need to be able to access the car park at all times.
|
|
The operation mode of this station is set to Free to pass. Accepting visitors without checking their validity, clearance or schedule.
|
|
The operation mode of this station is set to Out of order. The station is out of order and the barrier is closed.
|
|
The station is offline and the status is unknown.
|
|
The operation mode of the station is enforced. Any schedules for this station are overridden.
|
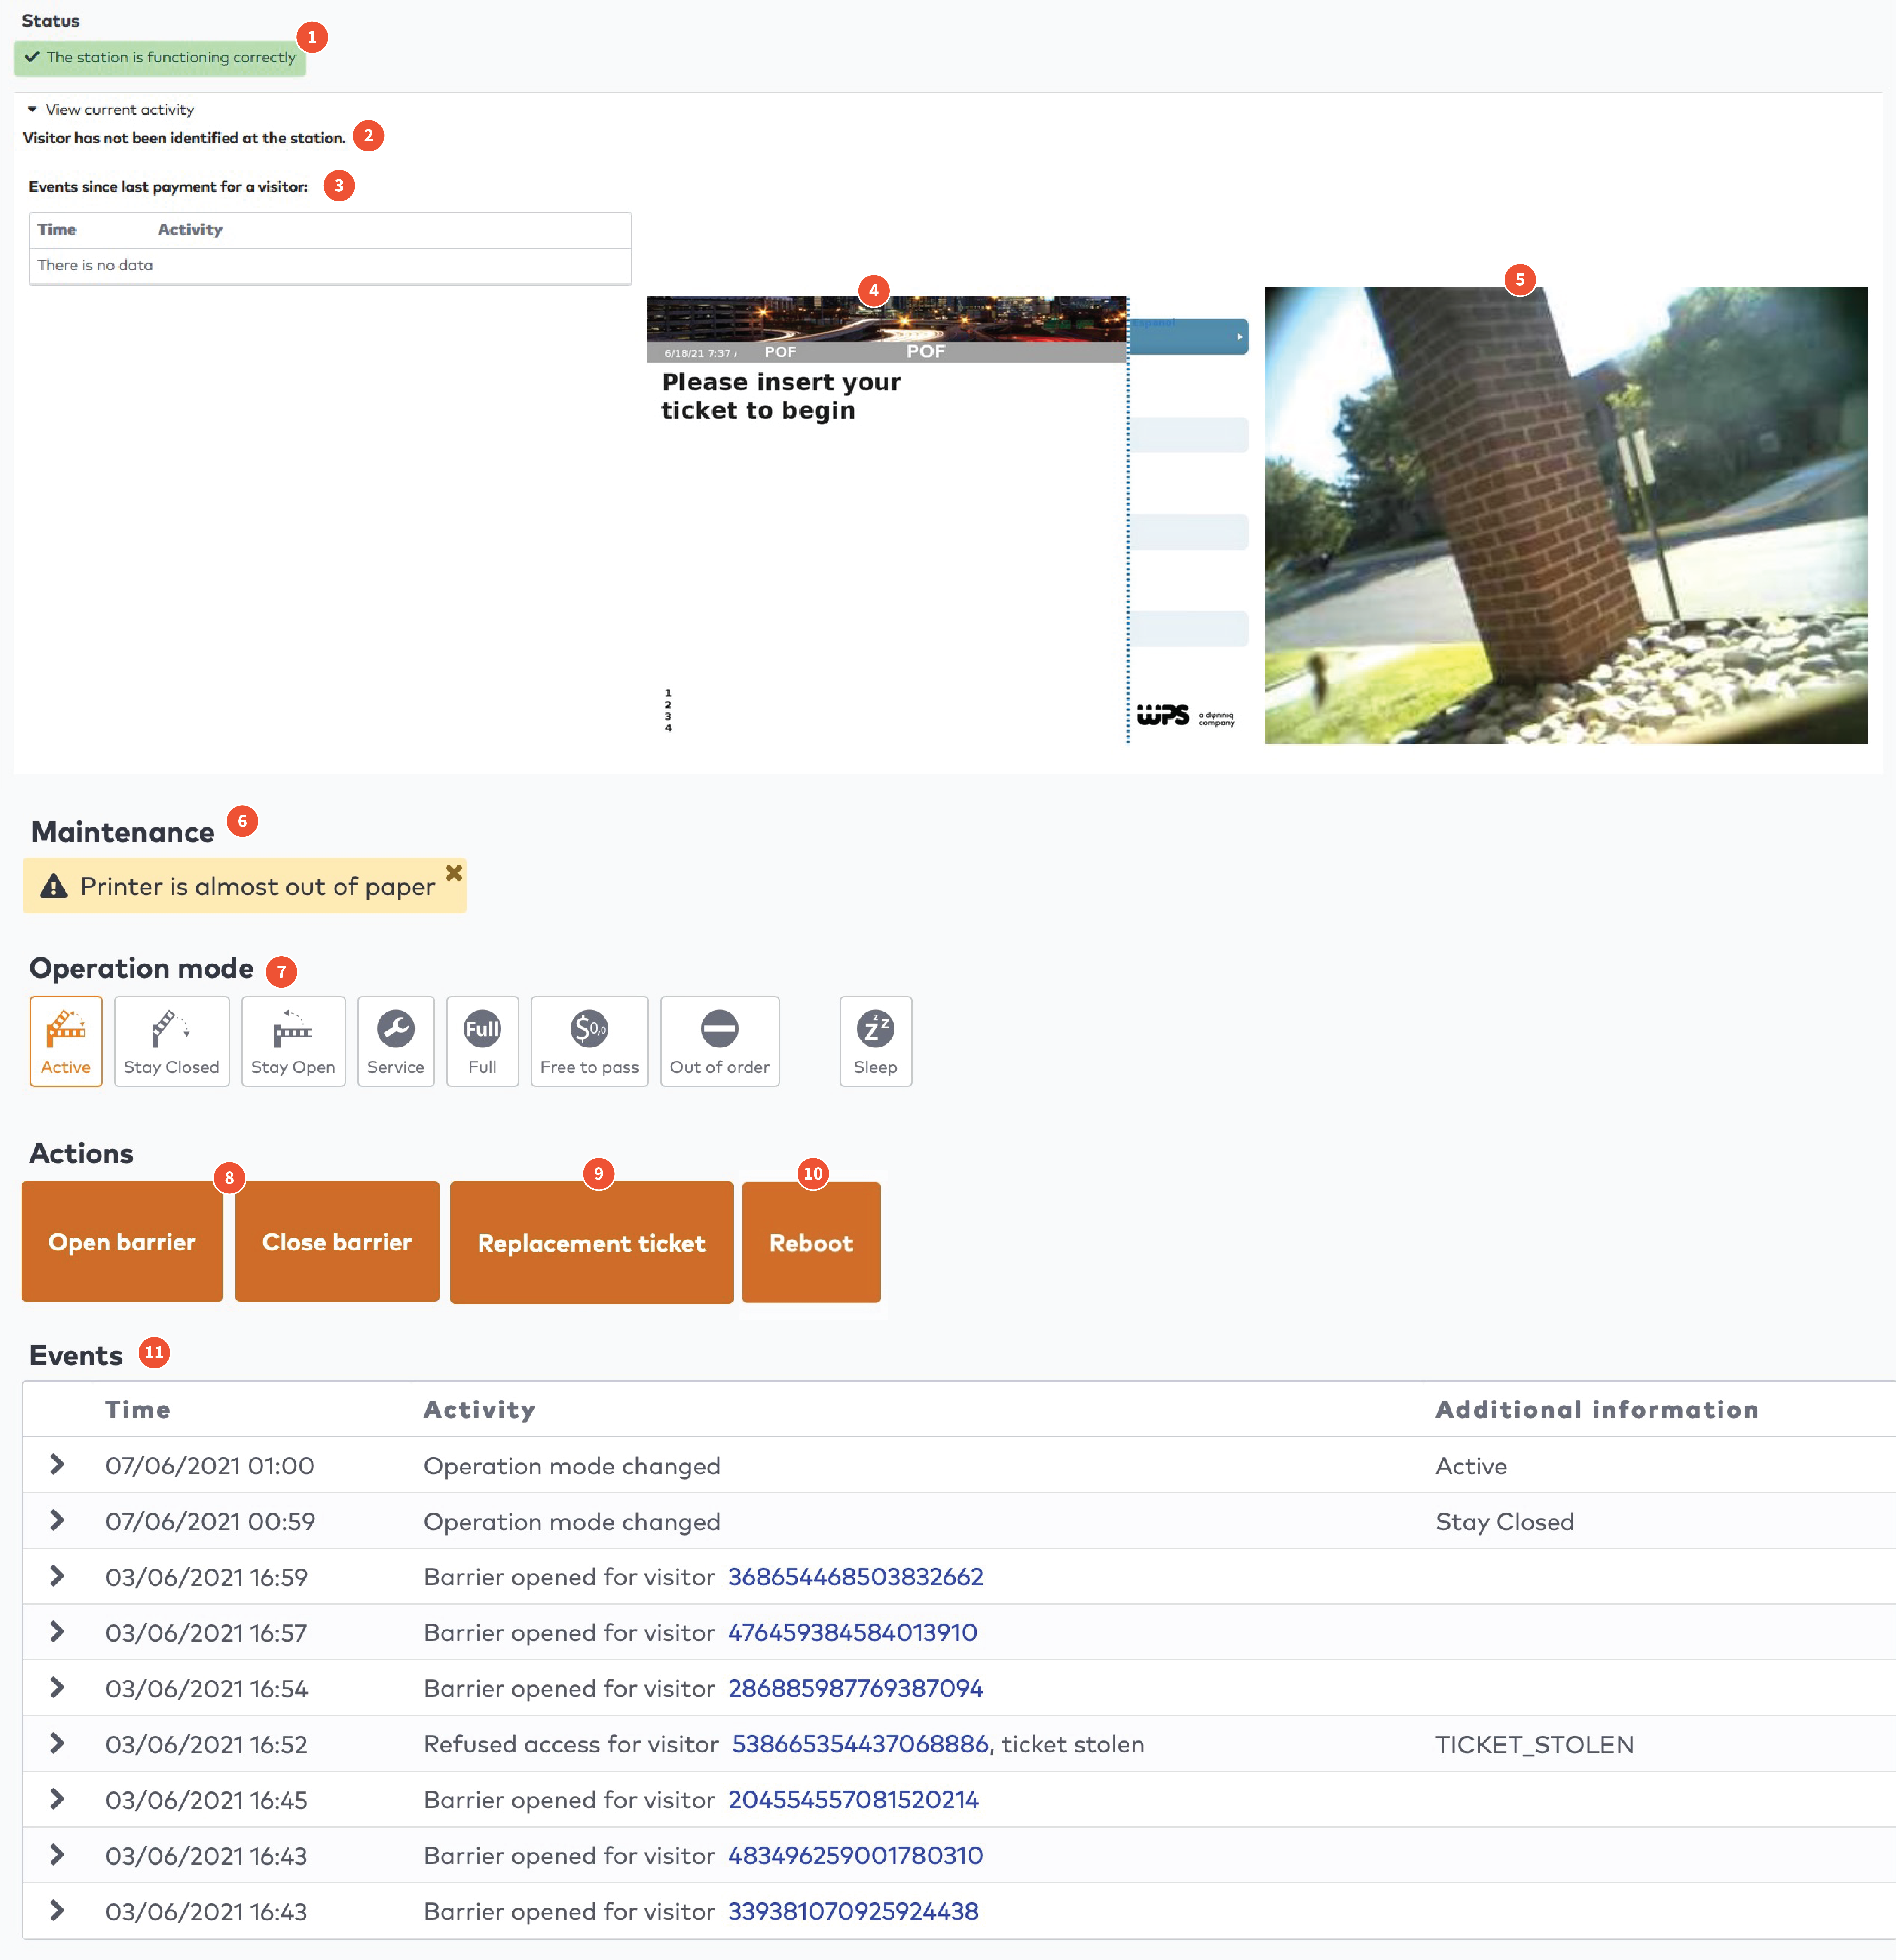
Opening the station’s page
To open the station’s page:
Click a station’s icon in the car park.
|
The station page is displayed.
|
You can:
See popup messages from the intercom system.
Check the status of this station (1).
Check the last identified visitor (2).
Check the latest significant events (3).
See a picture of the station (4).
Check the CCTV video feed from this station (5).
Reboot the station (10).
Check a longer list of events (11).
* This is a separate system. Calls are not being logged in ParkID.
Checking and clearing maintenance messages
Maintenance messages are displayed in the maintenance section:

|
Once the issue is solved, you can clear the message by clicking  . This action is logged in the system as an event.
Changing the operation mode of a station
You can set stations to the following operation mode:
|
Operation mode
|
Entry station
|
Exit station
|
Payment station
|
Door
|
|
Active. The station is operating normally.
|
X
|
X
|
X
|
X
|
|
Stay closed. The station is always closed. Visitors cannot pass.
|
X
|
X
|
X
|
|
|
Stay open. The station is always open. Visitors can freely enter or exit.
|
X
|
X
|
X
|
|
|
Service. The station is in maintenance mode. The station does not accept visitors.
|
X
|
X
|
X
|
X
|
|
Full. The barrier only opens for visitors who are allowed to access car parks when they are full. For example, staff, service personnel, or other people who need to be able to access the car park at all times.
|
X
|
|||
|
Free to pass. Accepting visitors without checking their validity, clearance or schedule.
|
X
|
X
|
X
|
|
|
Out of order. The station is out of order and the barrier is closed.
|
X
|
X
|
X
|
X
|
The following operation modes are managed by the system:
Sleep. The station’s display is switched off to save energy. The display is switched on when a visitor arrives, and the operation mode is switched to Active.
Offline. The connection between the system and the station is lost. The functionality of the station is limited.
To change the operation mode of a station:
Click Active, Stay Closed, Stay Open, Service, Full, Free to pass or Out of order. You can’t manually activate Sleep mode from this screen.
Select Enforce operation mode if you want to override a schedule, for example.
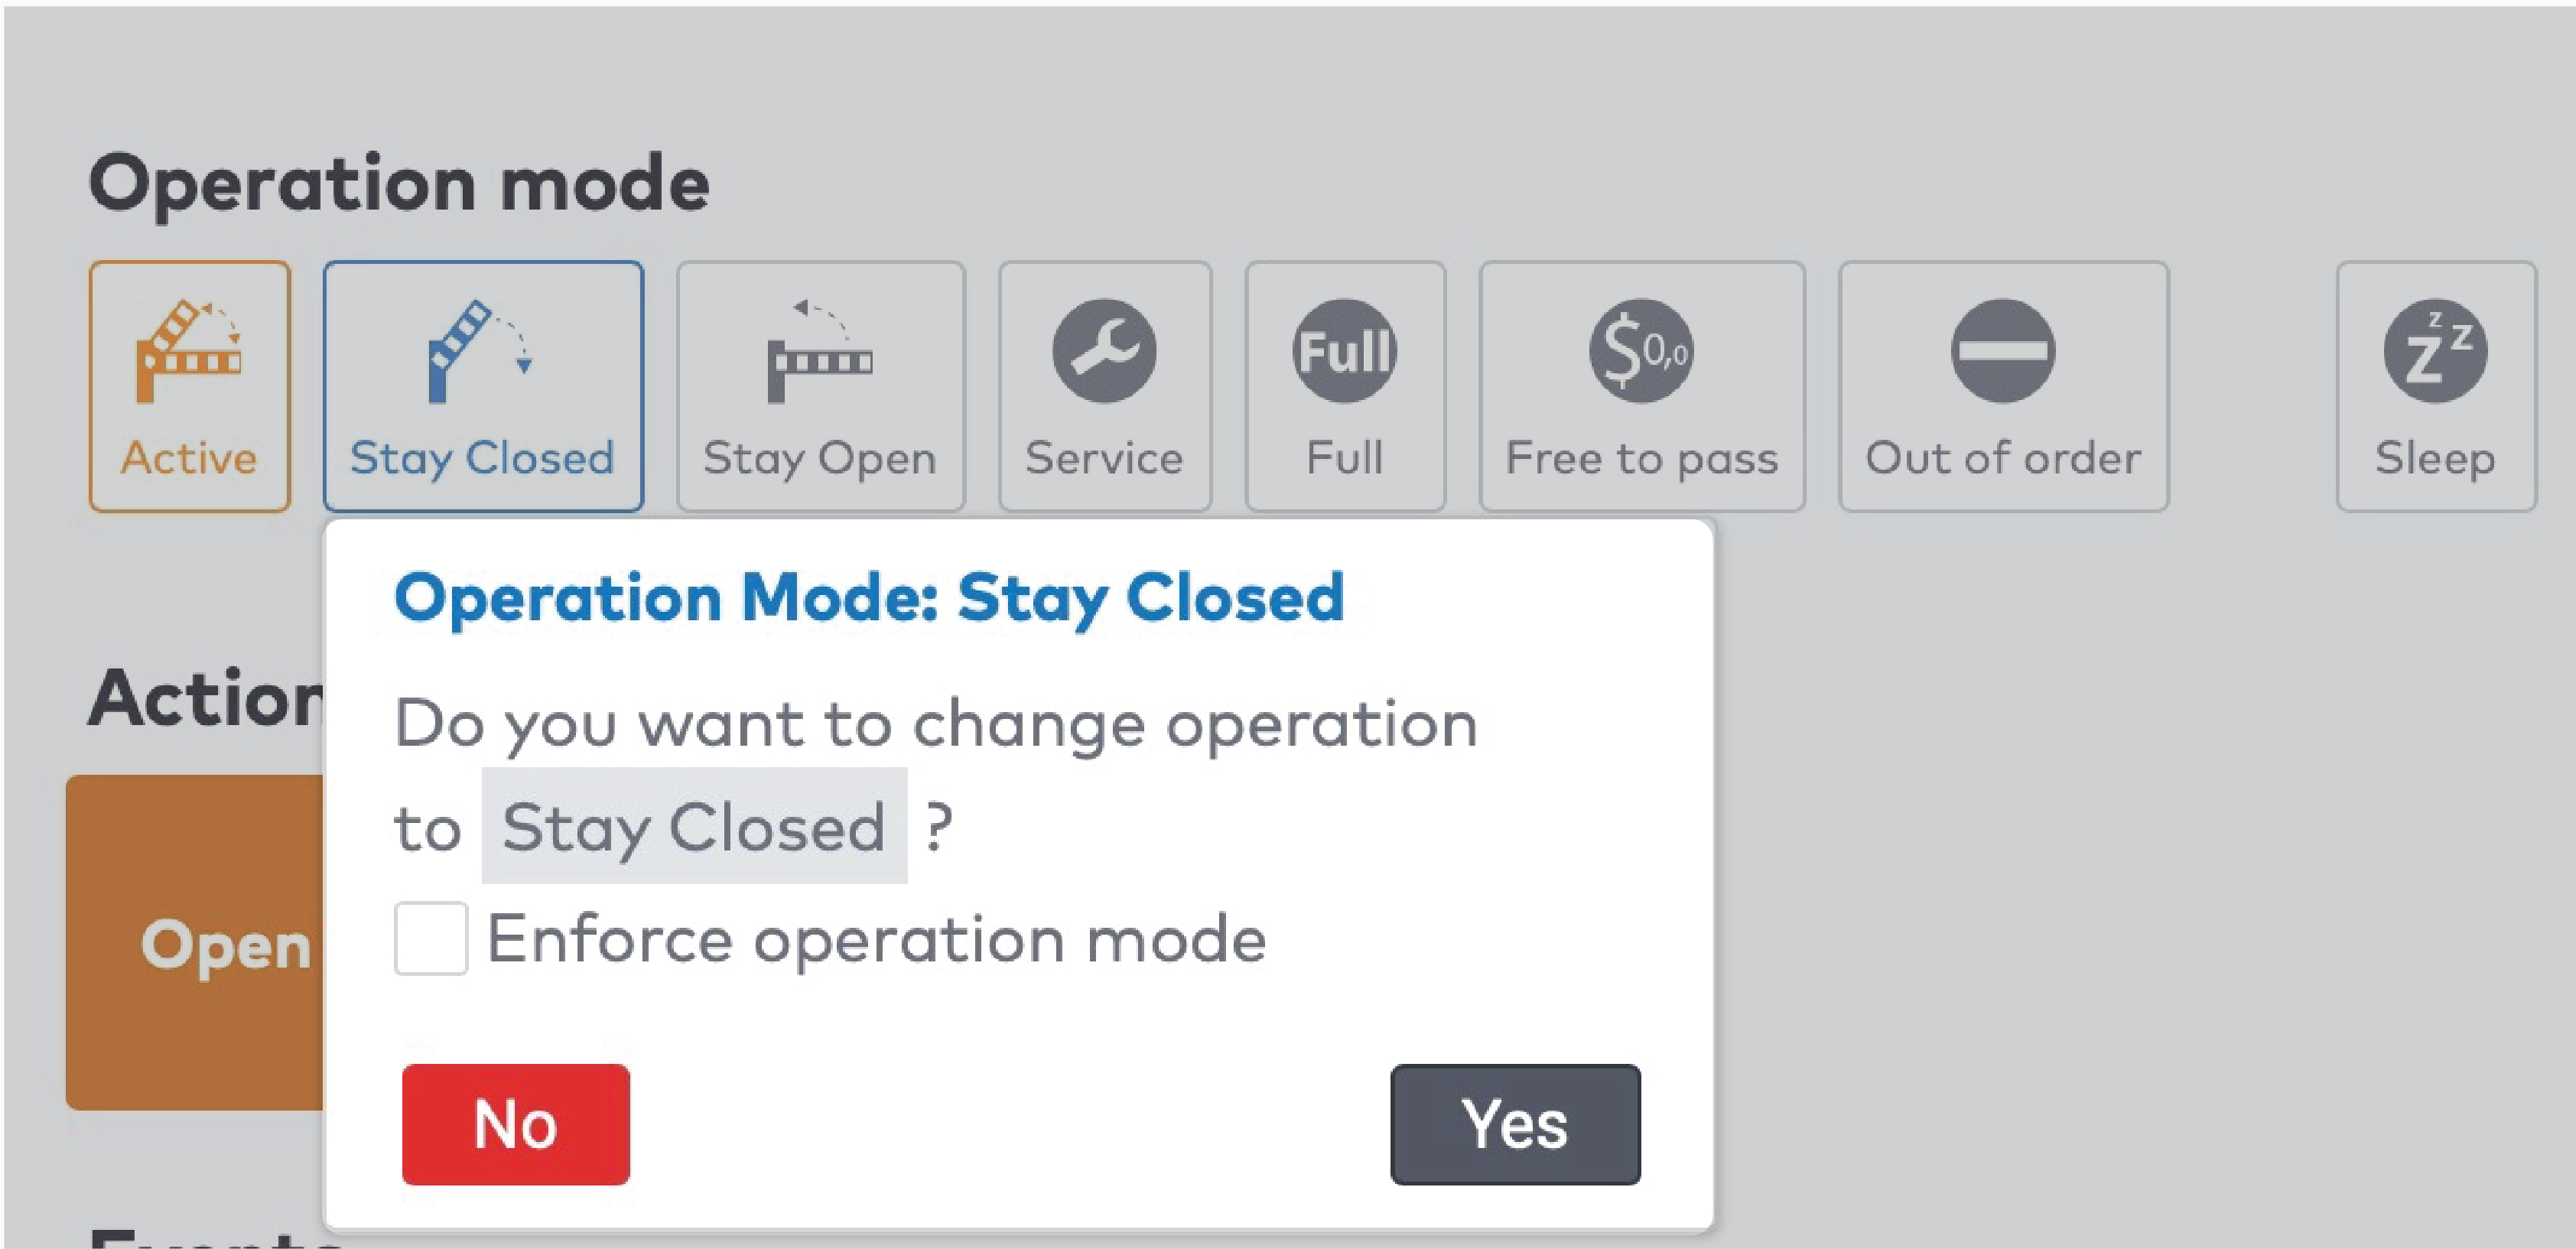
|
Click Yes to confirm your choice.
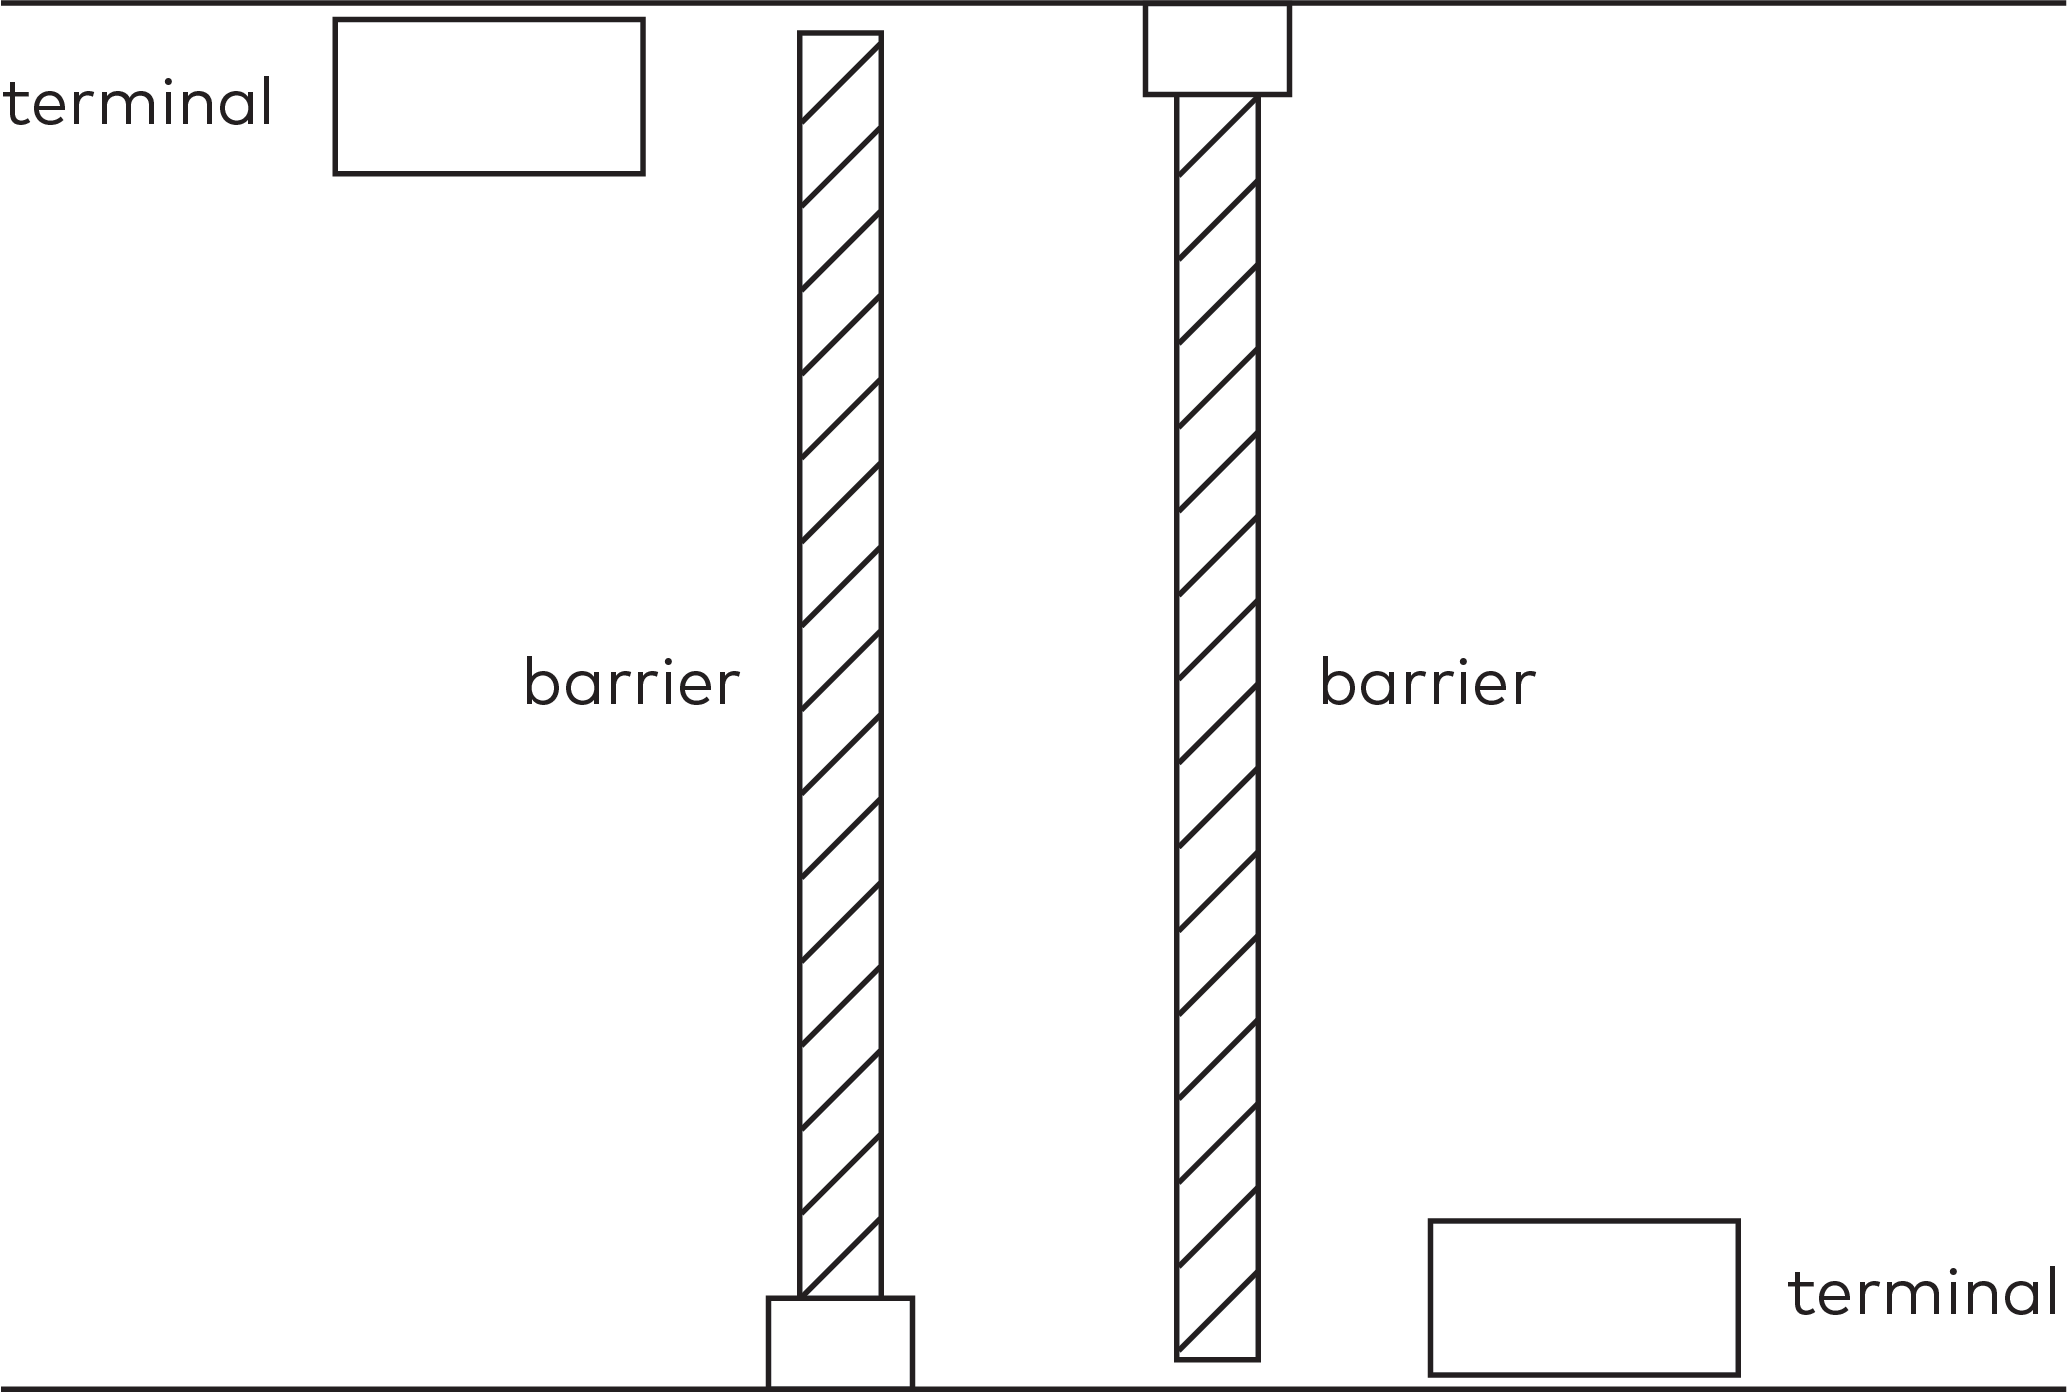
Configuring a bidirectional lane
A bidirectional lane is a lane with either:
One barrier with terminals on both sides, or
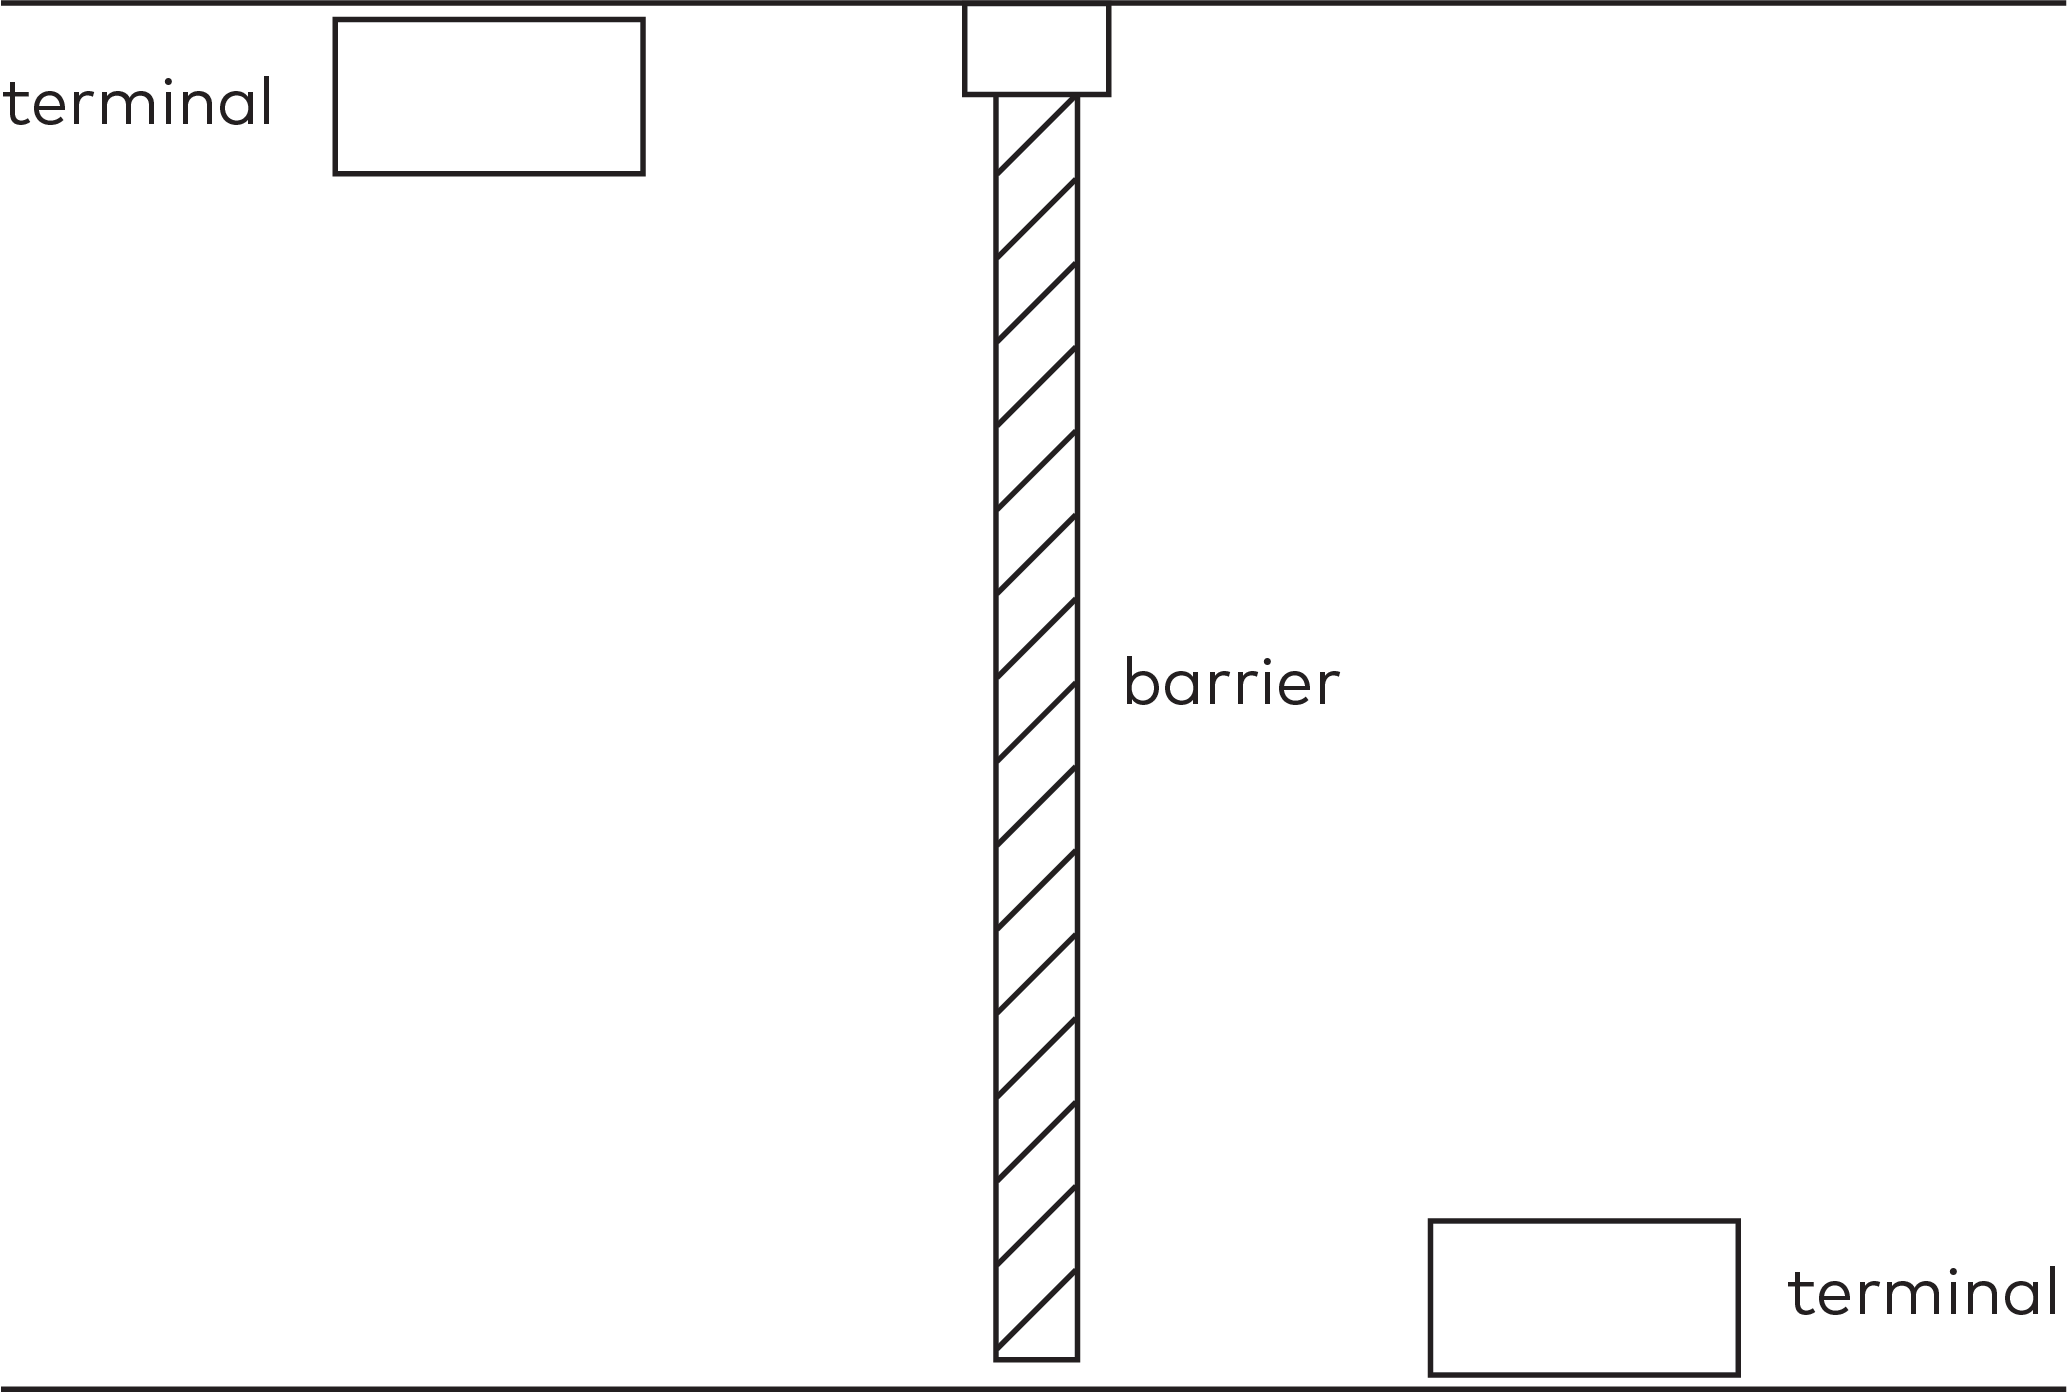
|
Two barriers with a terminal of their own.
|
A bidirectional lane can be configured to act like an entry or an exit station.
You can manually set the configuration of a bidirectional lane to either entry or exit station.
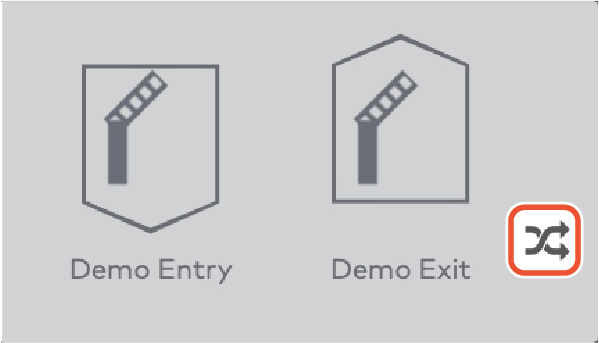
To do so:
Click  in the bidirectional lane area.
|
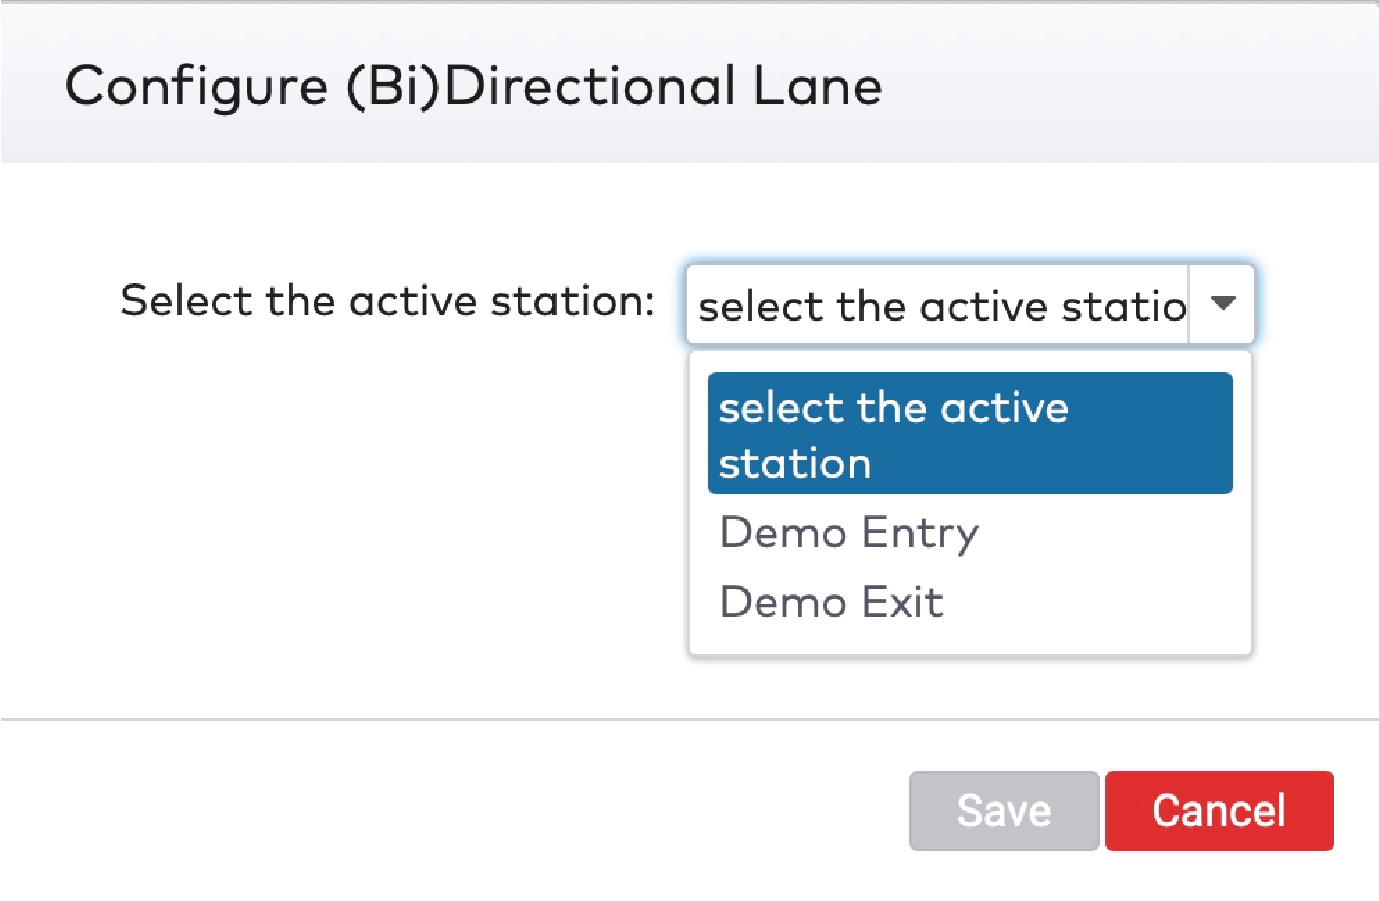
Select the entry or the exit station to be the active station from the dropdown menu.
|
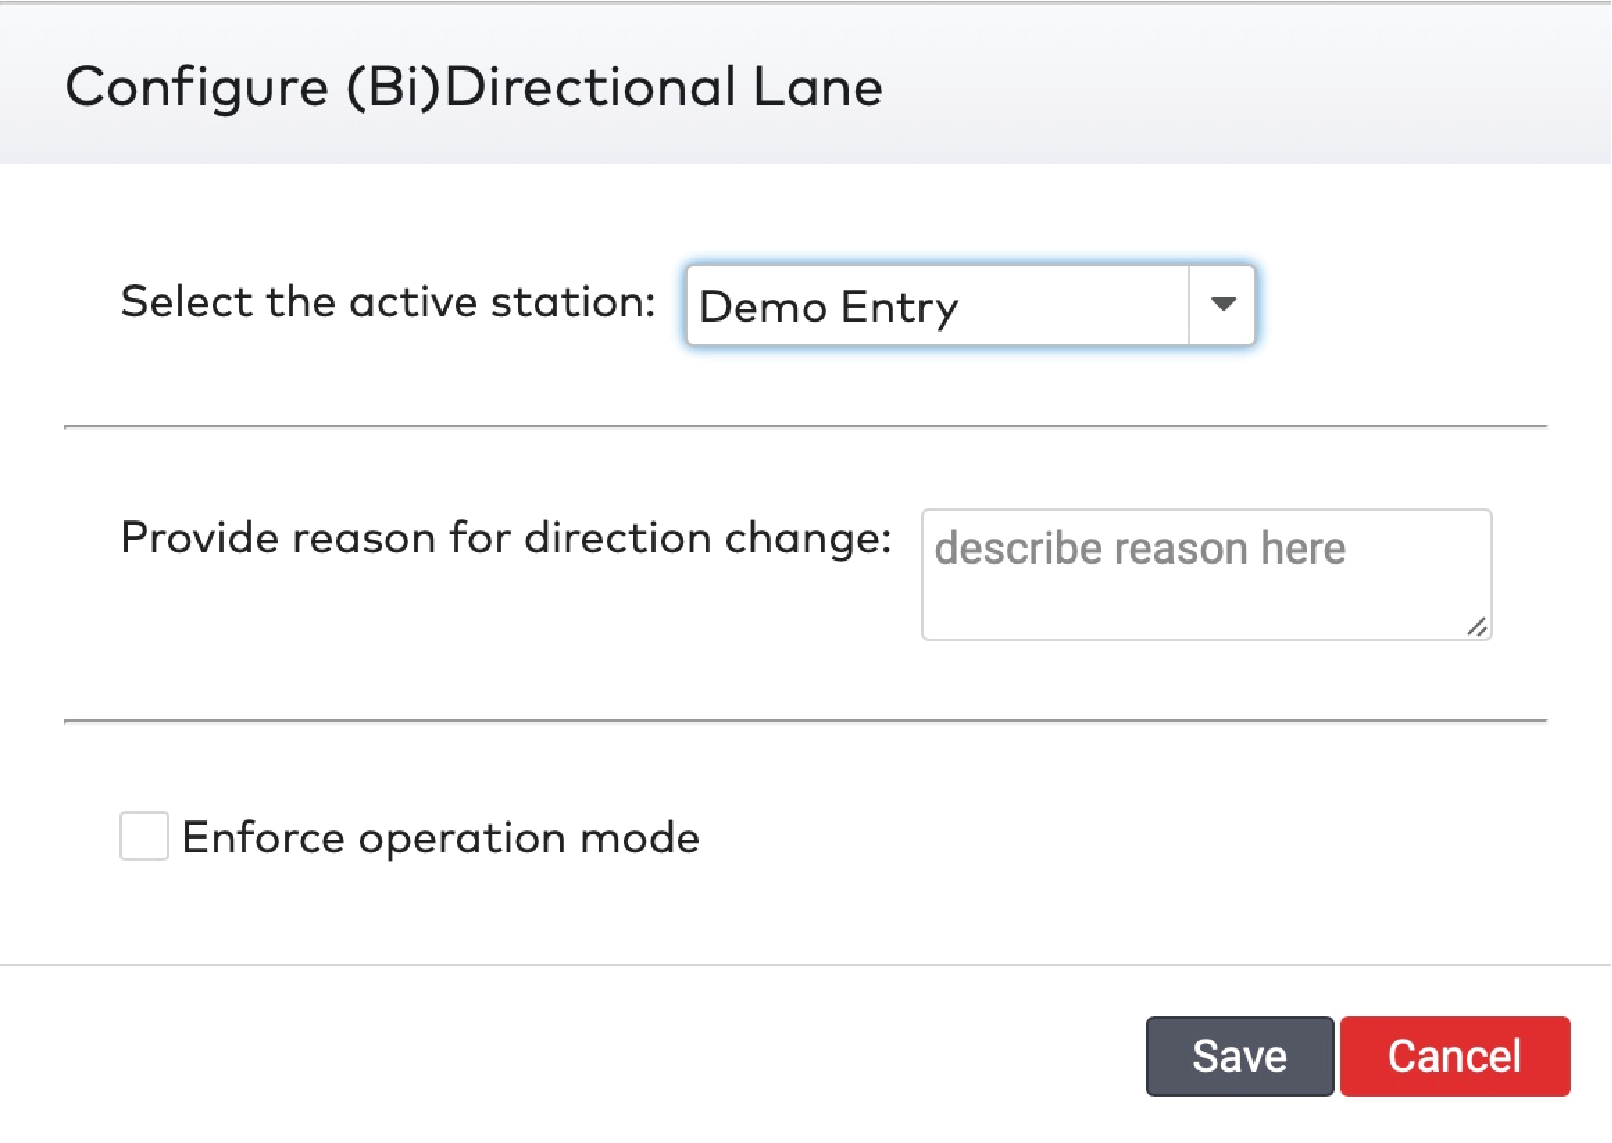
Click Save.
Enter a reason for the change.
|
Select Enforce operation mode only if you want to override a schedule.
Click Save.
The configuration is saved and the bidirectional lane now operates as desired.
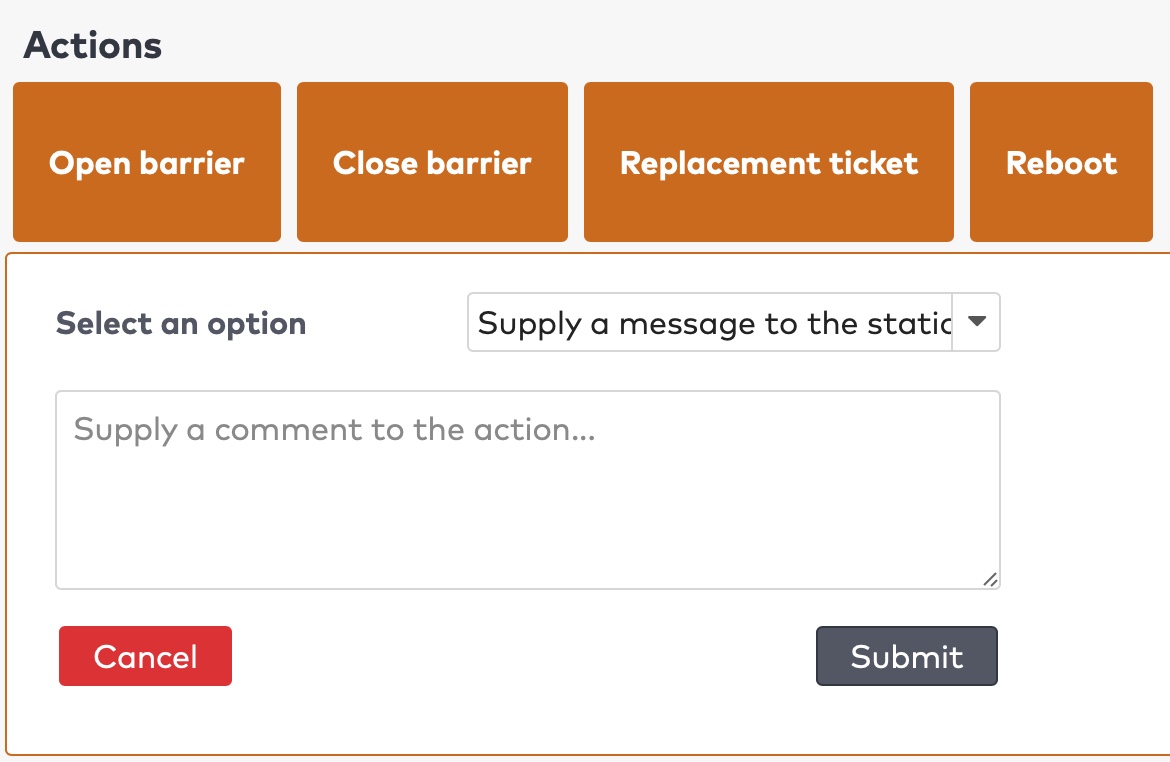
Opening or closing the barrier
Doors and entry and exit stations can be opened and closed.
To open or close the barrier:
Click the Open barrier or Close barrier button on the station’s page.
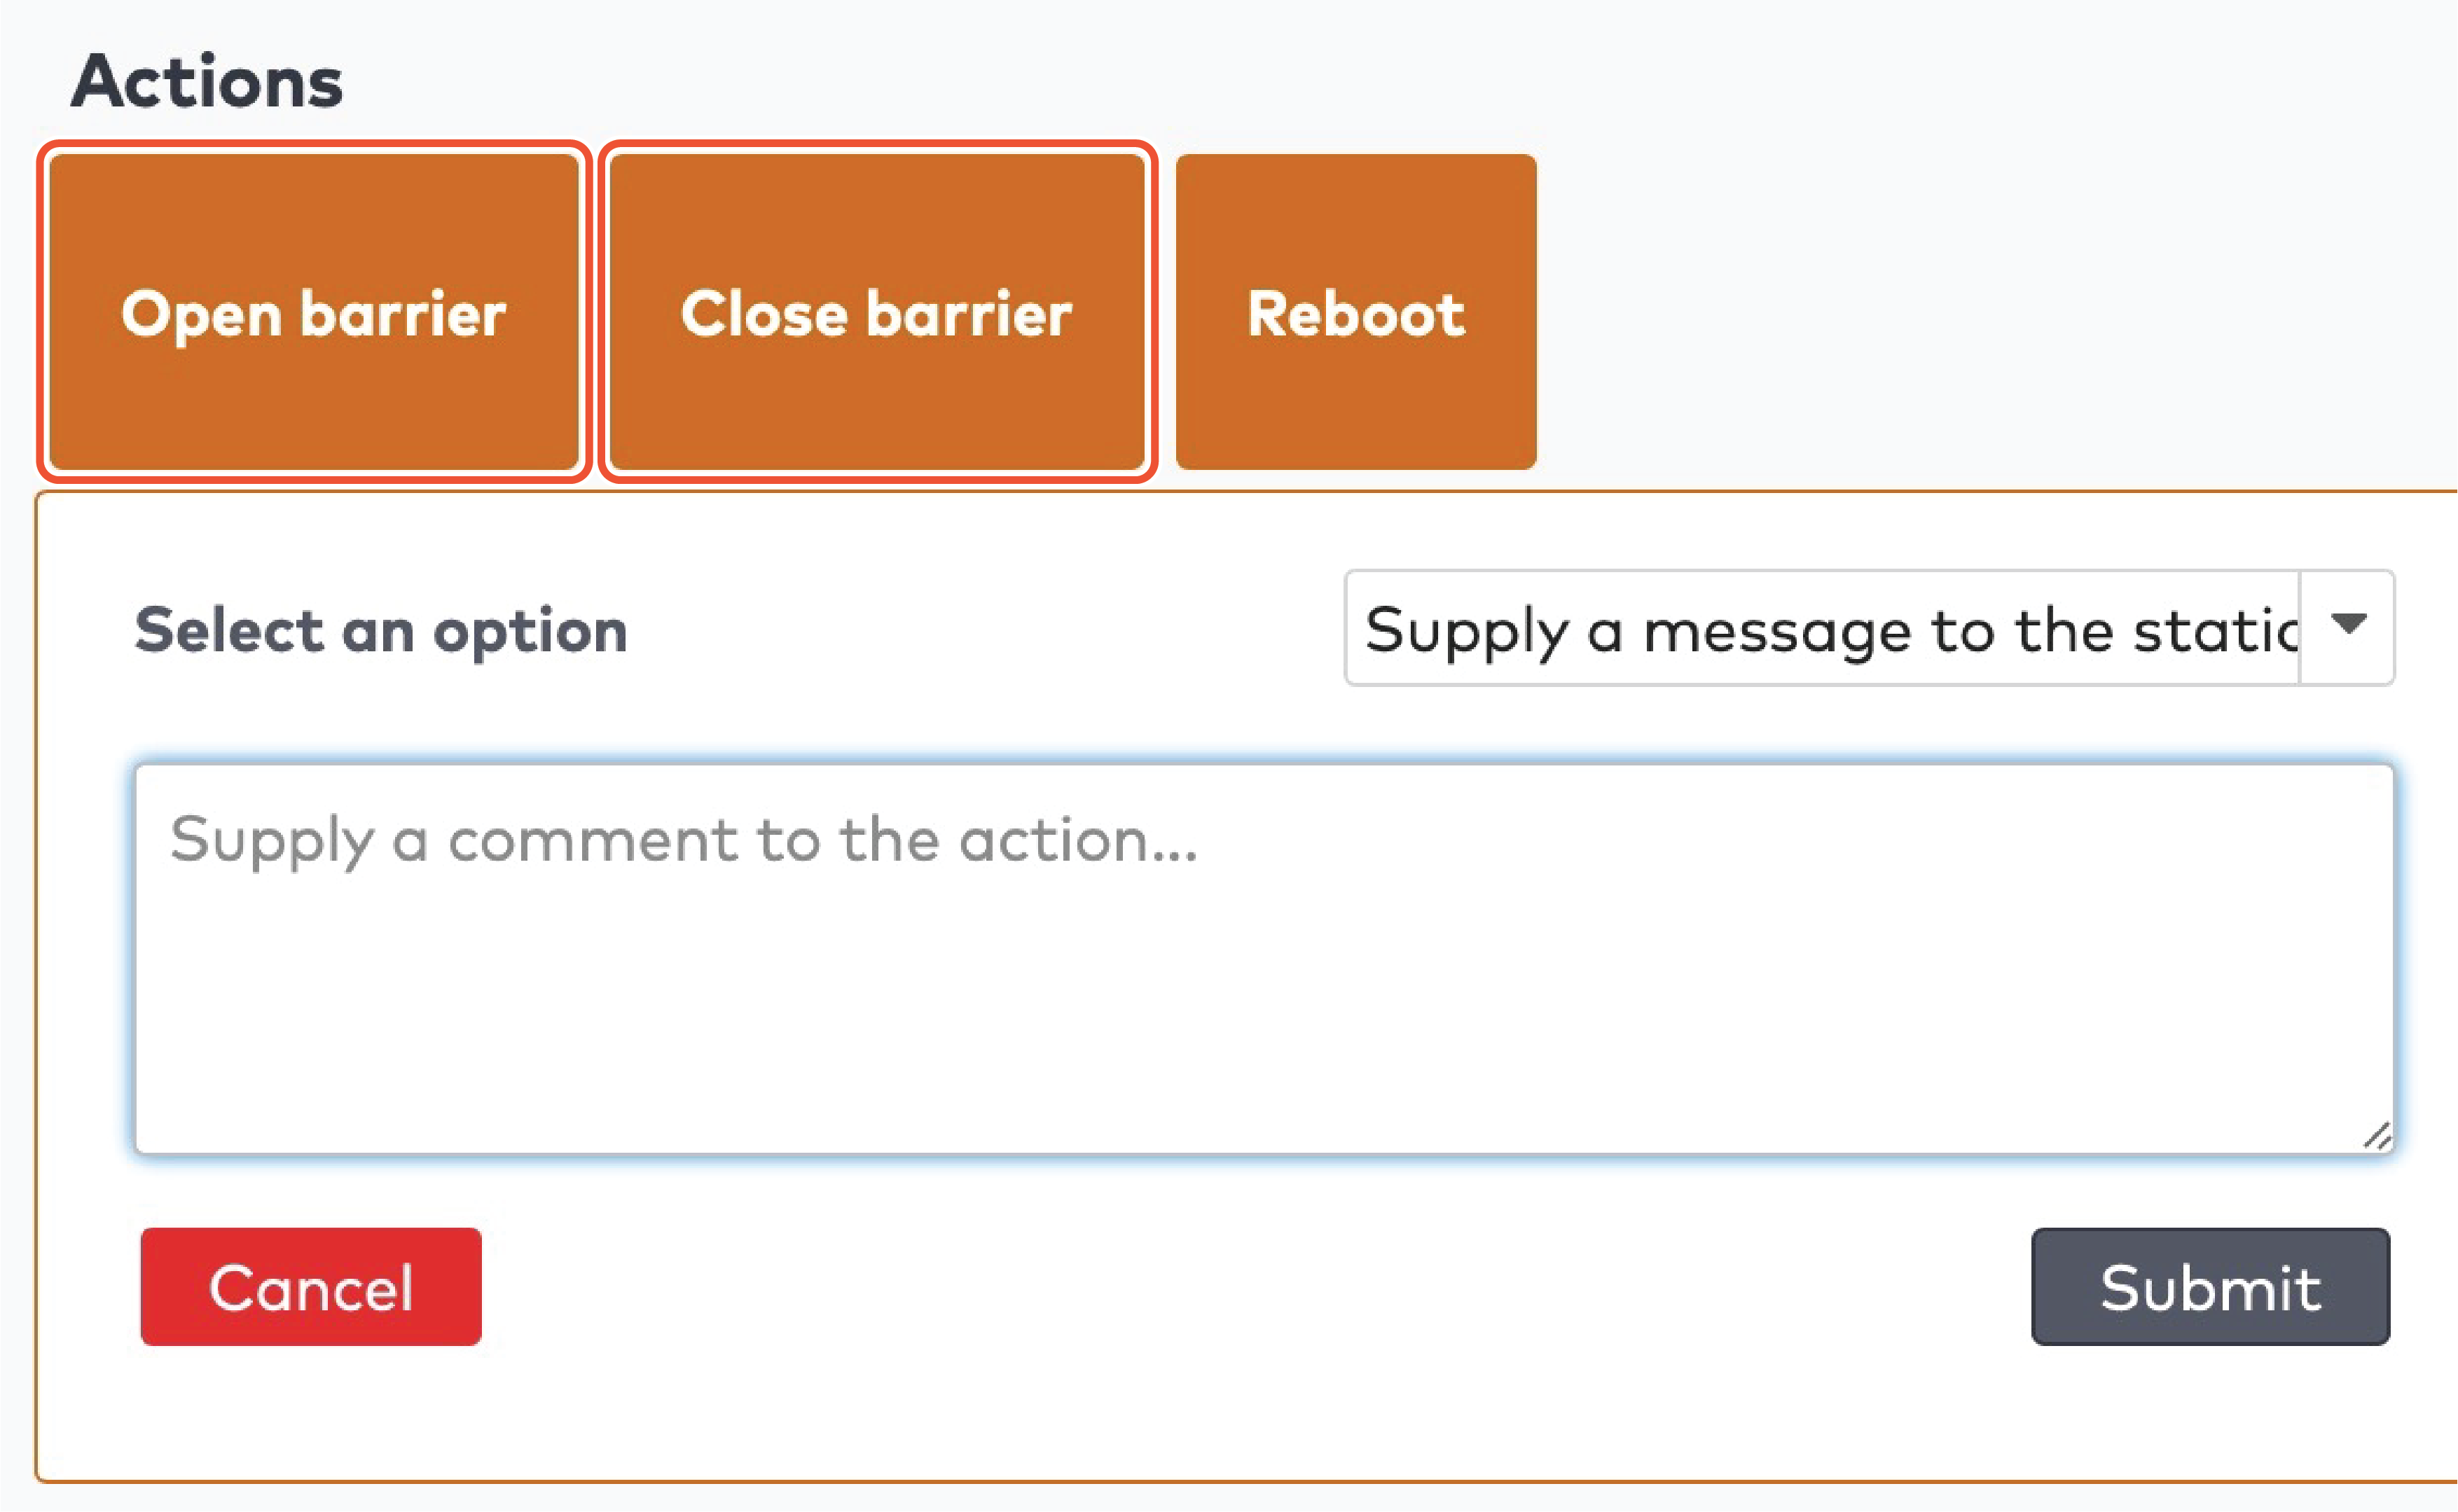
|
In the Select an option dropdown menu, select either a predefined reason or select Supply a message to the station and manually enter a short description of the reason for this action.
Click Submit.
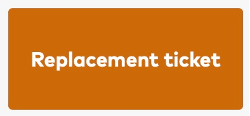
Generating a replacement ticket
You can generate a replacement ticket from payment stations and exit stations with a payment characteristic.
To generate a replacement ticket:
Click the Replacement ticket button.
|
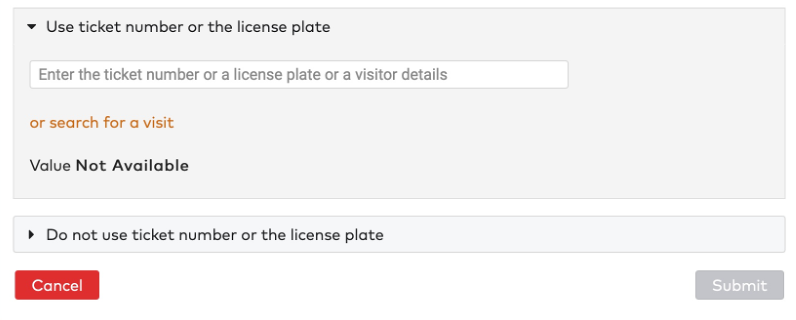
If the visitor’s ticket number is known, or the license plate registered at the time of entry, you can generate a replacement ticket based on this information. To do so:
Click Use ticket number or the license plate.
|
Enter the ticket number, the license plate or another registered detail and click Submit or click or search for a visit.
Filter the list of visitors by Visitor identifier or details, date of Entrance, and/or station. Find the visitor, select it and click Create ticket for this visitor.

|
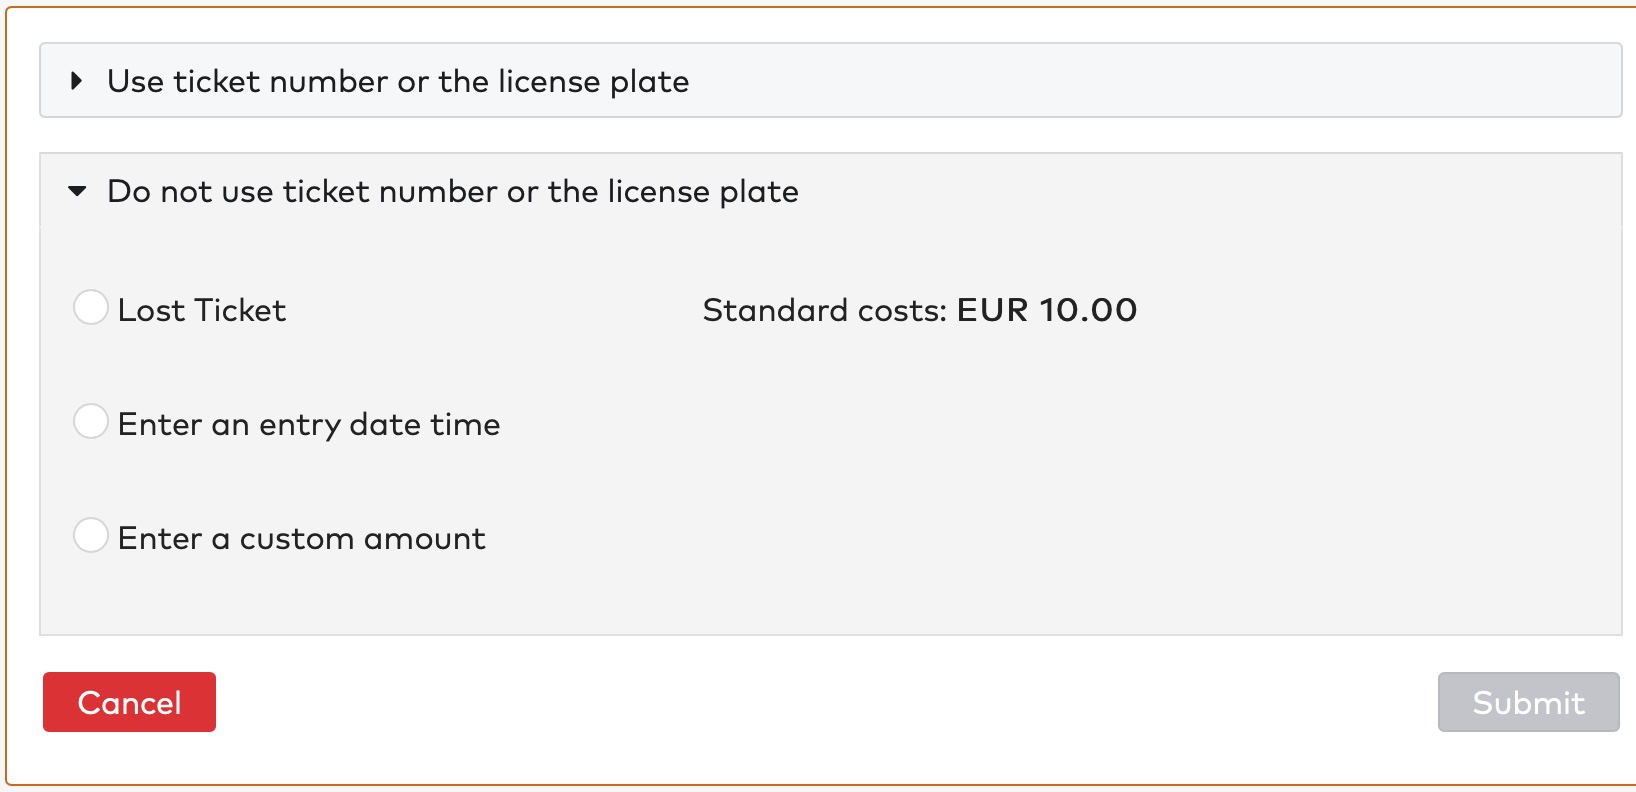
Alternatively, you can generate a replacement ticket without entering visitor details. You can:
Generate a ticket for a predetermined price: Lost ticket.
Enter an entry date and time to generate a ticket based on the parking time. Optionally, you can add a penalty fee.
Generate a ticket with a custom amount.
To do so:
Click Do not use ticket number or the license plate.
|
To generate a replacement ticket with a predetermined price, select Lost Ticket and click Submit.
To generate a ticket based on parking time, select Enter an entry date time.
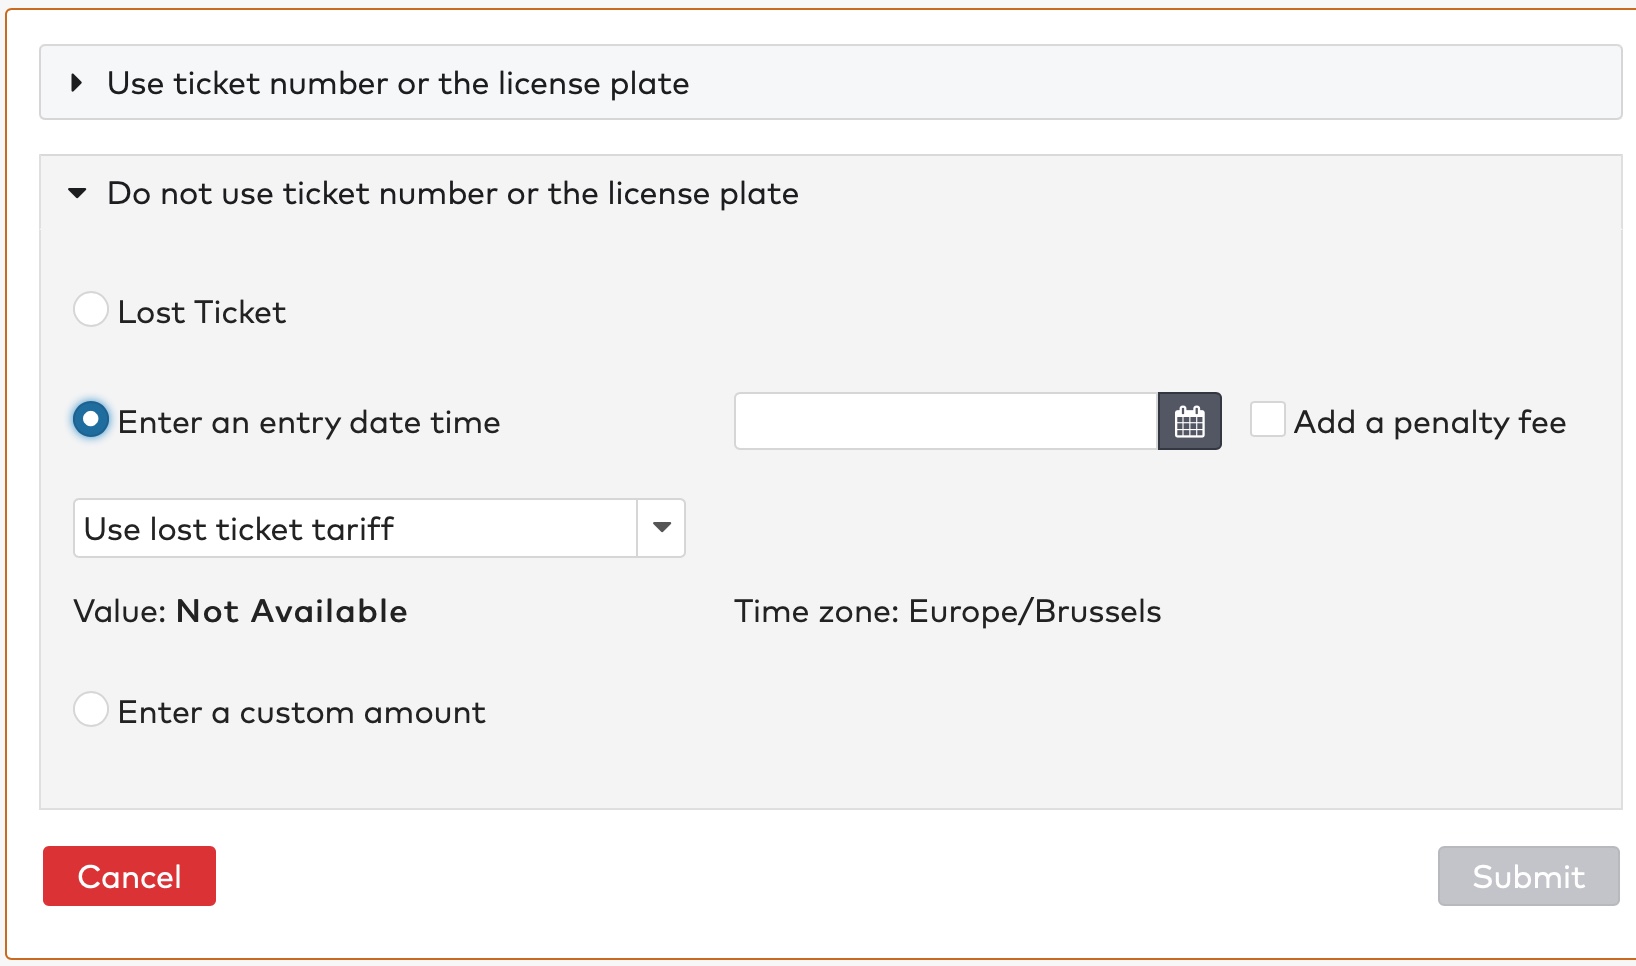
|
Click  to enter the entry date and time.
to enter the entry date and time.
Click Submit.
Optionally, select Add a penalty fee.
Select a tariff type from the dropdown menu. Select Use lost ticket tariff to calculate the ticket price from the lost ticket tariff. Select Use customer type tariff to choose from a list of short-term contract types to calculate the ticket price.
Click Submit.
To generate a replacement ticket and sell it for a custom amount, select Enter a custom amount.
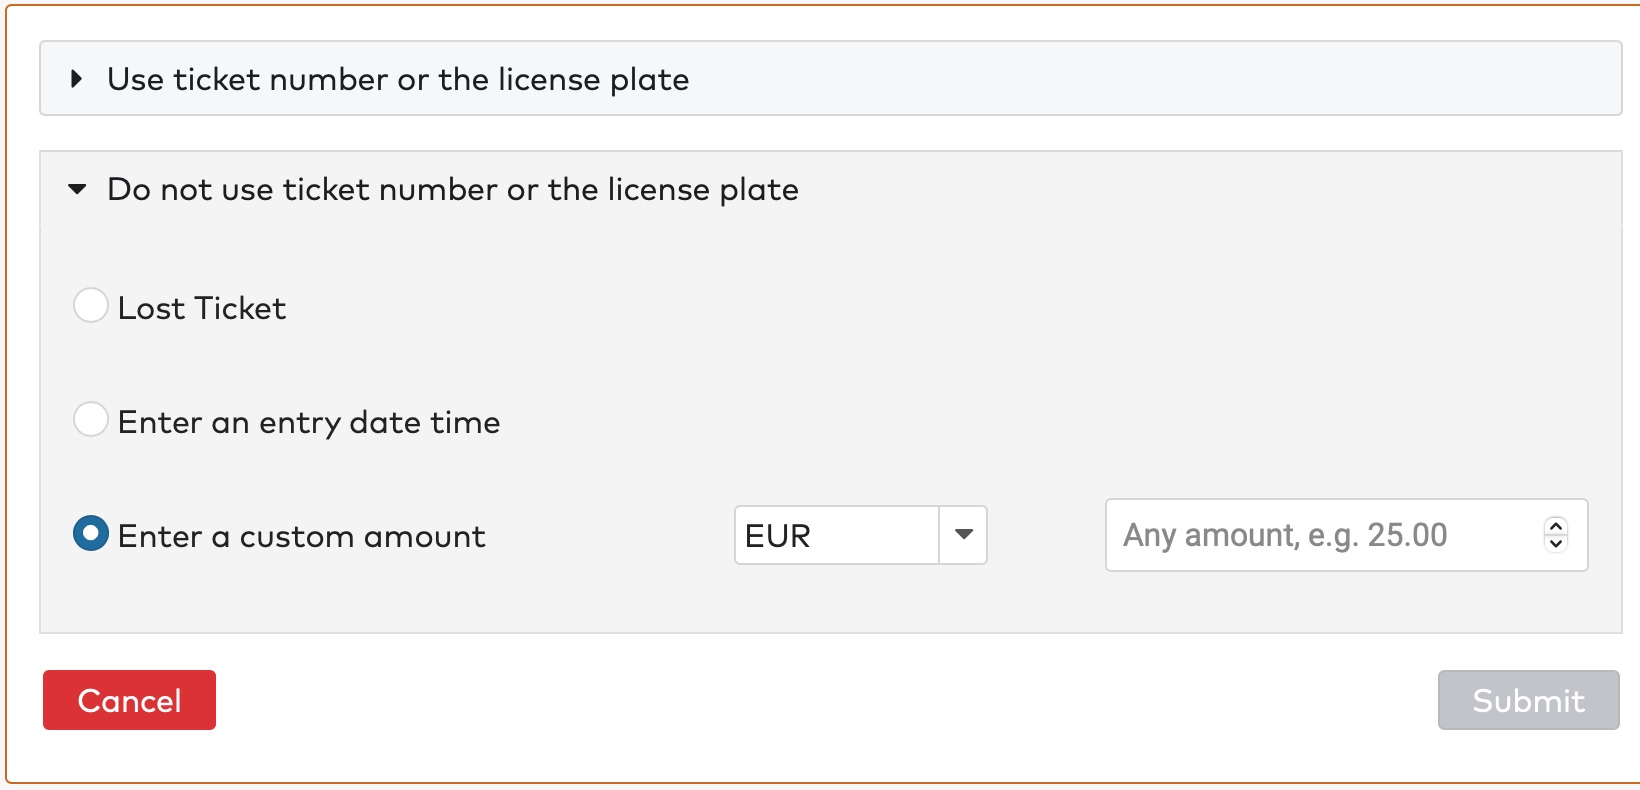
|
Select a currency from the dropdown menu and enter an amount.
Click Submit.
The visitor enters the payment flow on the station.
Rebooting a station
To reboot a station:
Click the Reboot button on the station’s page.
|
In the Select an option dropdown menu, select either a predefined reason or select Supply a message to the station and manually enter a short description of the reason for this action.
Click Submit.
Counters
Counters can be used to display:
The number of visitors in the car park
The number of visitors in a section of the car park
The number of visitors with a subscription
And many other variables.
Counters are displayed in the car park overview, either in a specific section, or in the dedicated field below the sections.
|
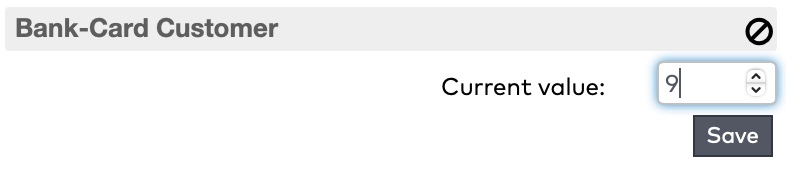
If a counter displays an incorrect number, you can manually adjust it. Some counters are system managed and can’t be adjusted. To make an adjustment in a non-system managed counter:
Click  next to the counter you want to adjust.
next to the counter you want to adjust.
Adjust the value and click Save. Click  to discard any changes.
to discard any changes.
|
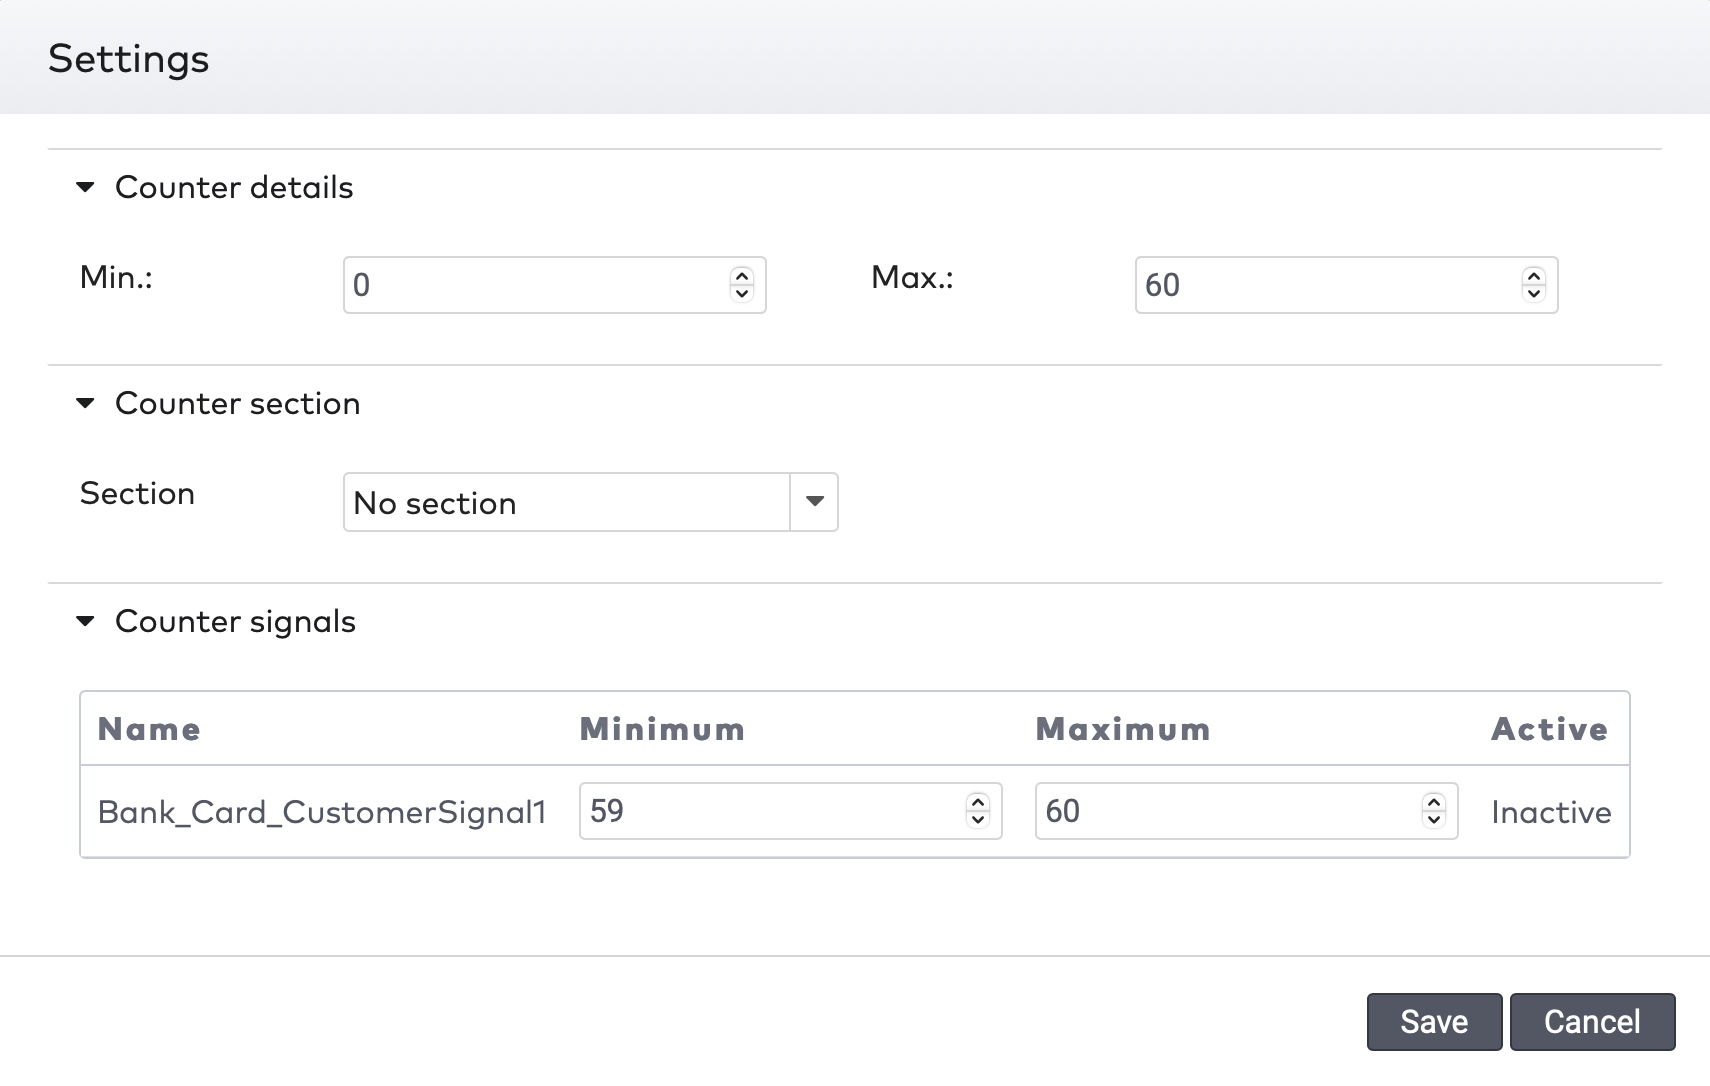
You can change the minimum and maximum values of the counter, as well as the section it belongs to. To do so:
Click  next to the counter you want to adjust.
next to the counter you want to adjust.
Change any details and click Save.
|
Events
The following types of events are logged:
Visitors entering and exiting
Problems regarding entry or exit
Problems regarding stations
Actions performed by an operator in the system
System messages
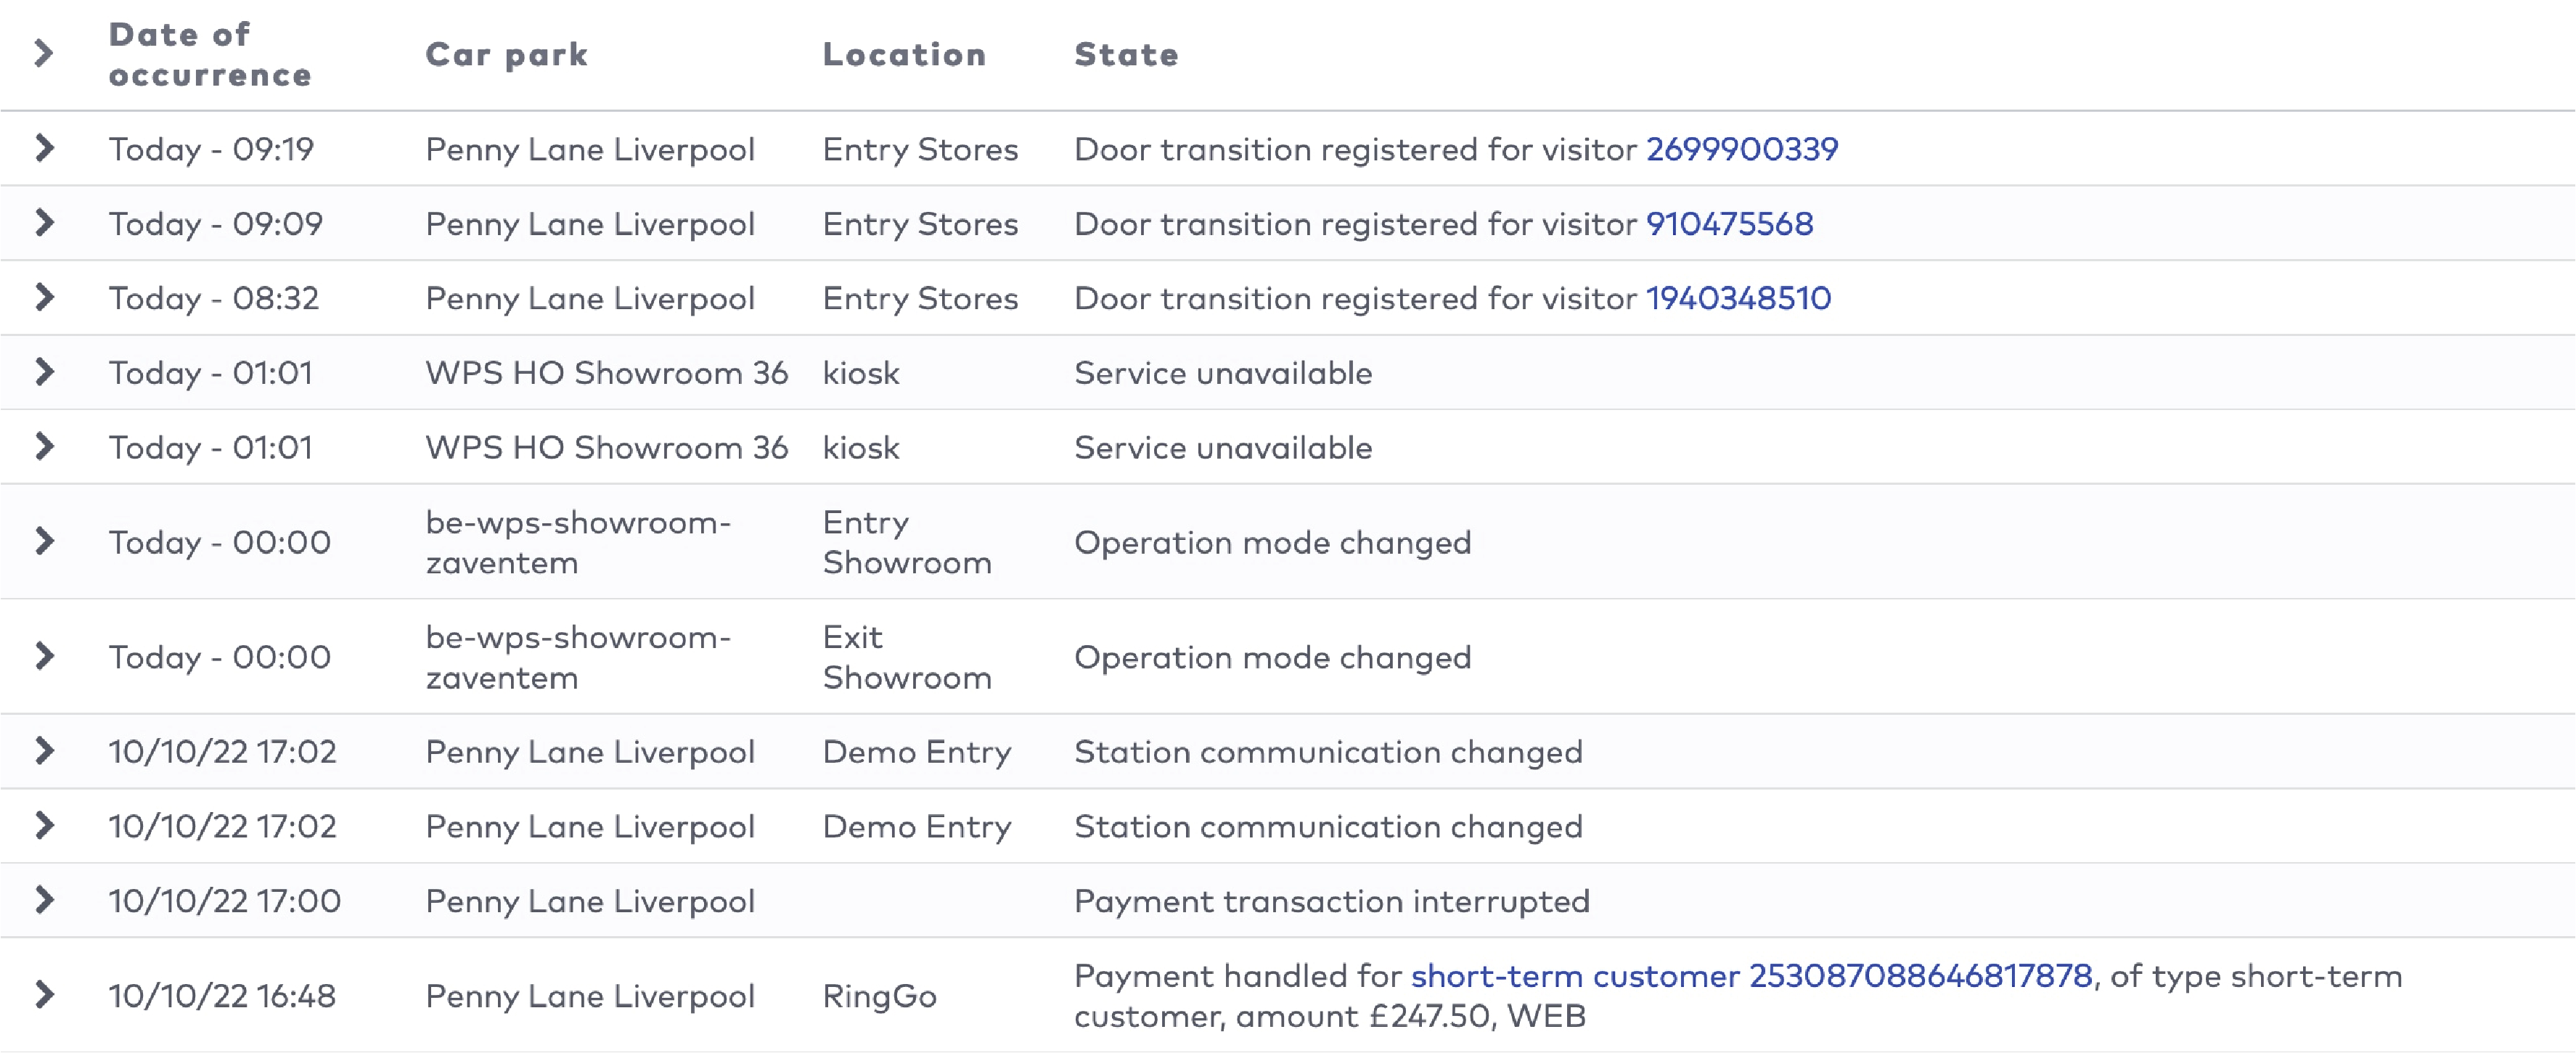
To see a list of events, click Events in the menu bar.
|
|
The five most recent system warnings (2)
|
Car park status messages
You’ll see status and warning messages from the system in a yellow bar. When a car park is offline, it can’t be operated. When a car park is out of sync, it can be operated, but feedback from the car park might not be accurate. For example, the status of barriers might be incorrect, and entries and exits might not be properly displayed.

|
Checking and clearing system warnings
System warnings require action. For example, when paper is running out at a station, it needs to be checked and solved.
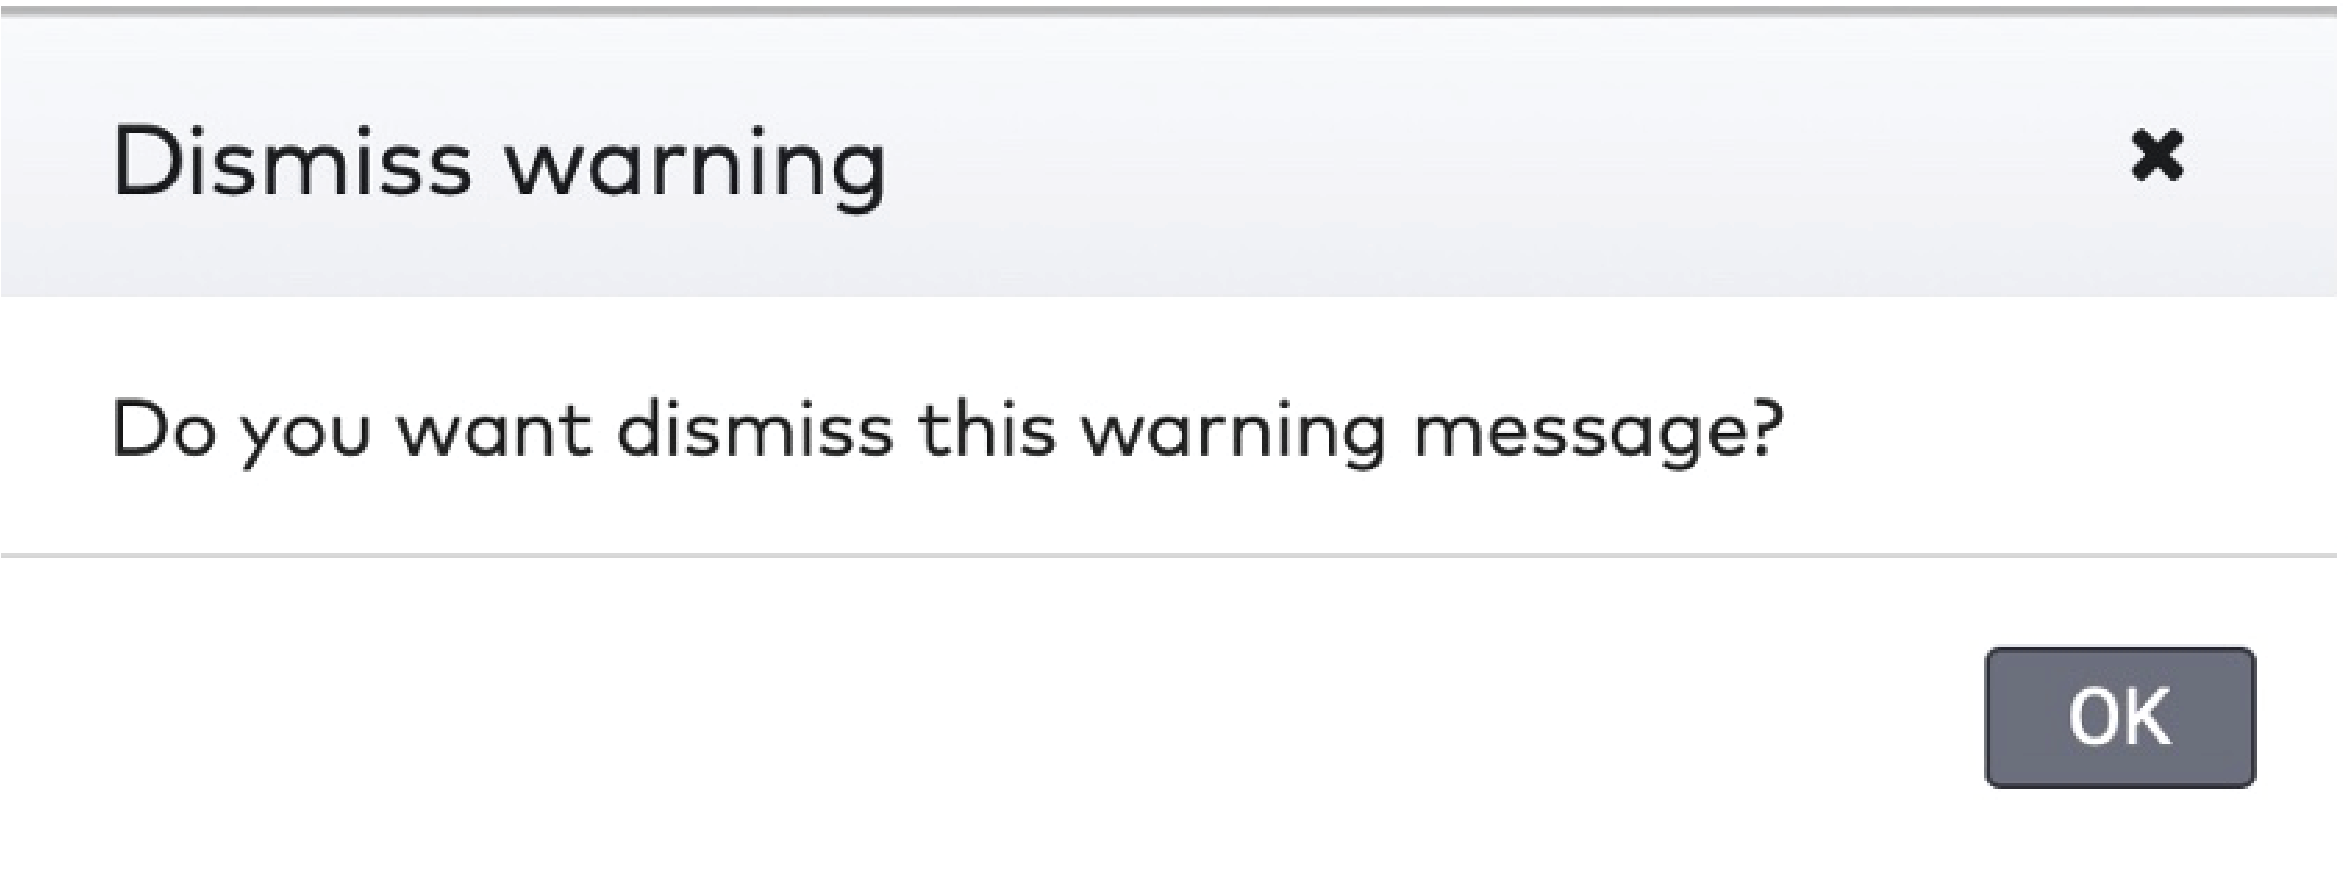
When the system warning is checked and the cause is solved:
Click Clear.

|
Click OK to dismiss the warning message.
|
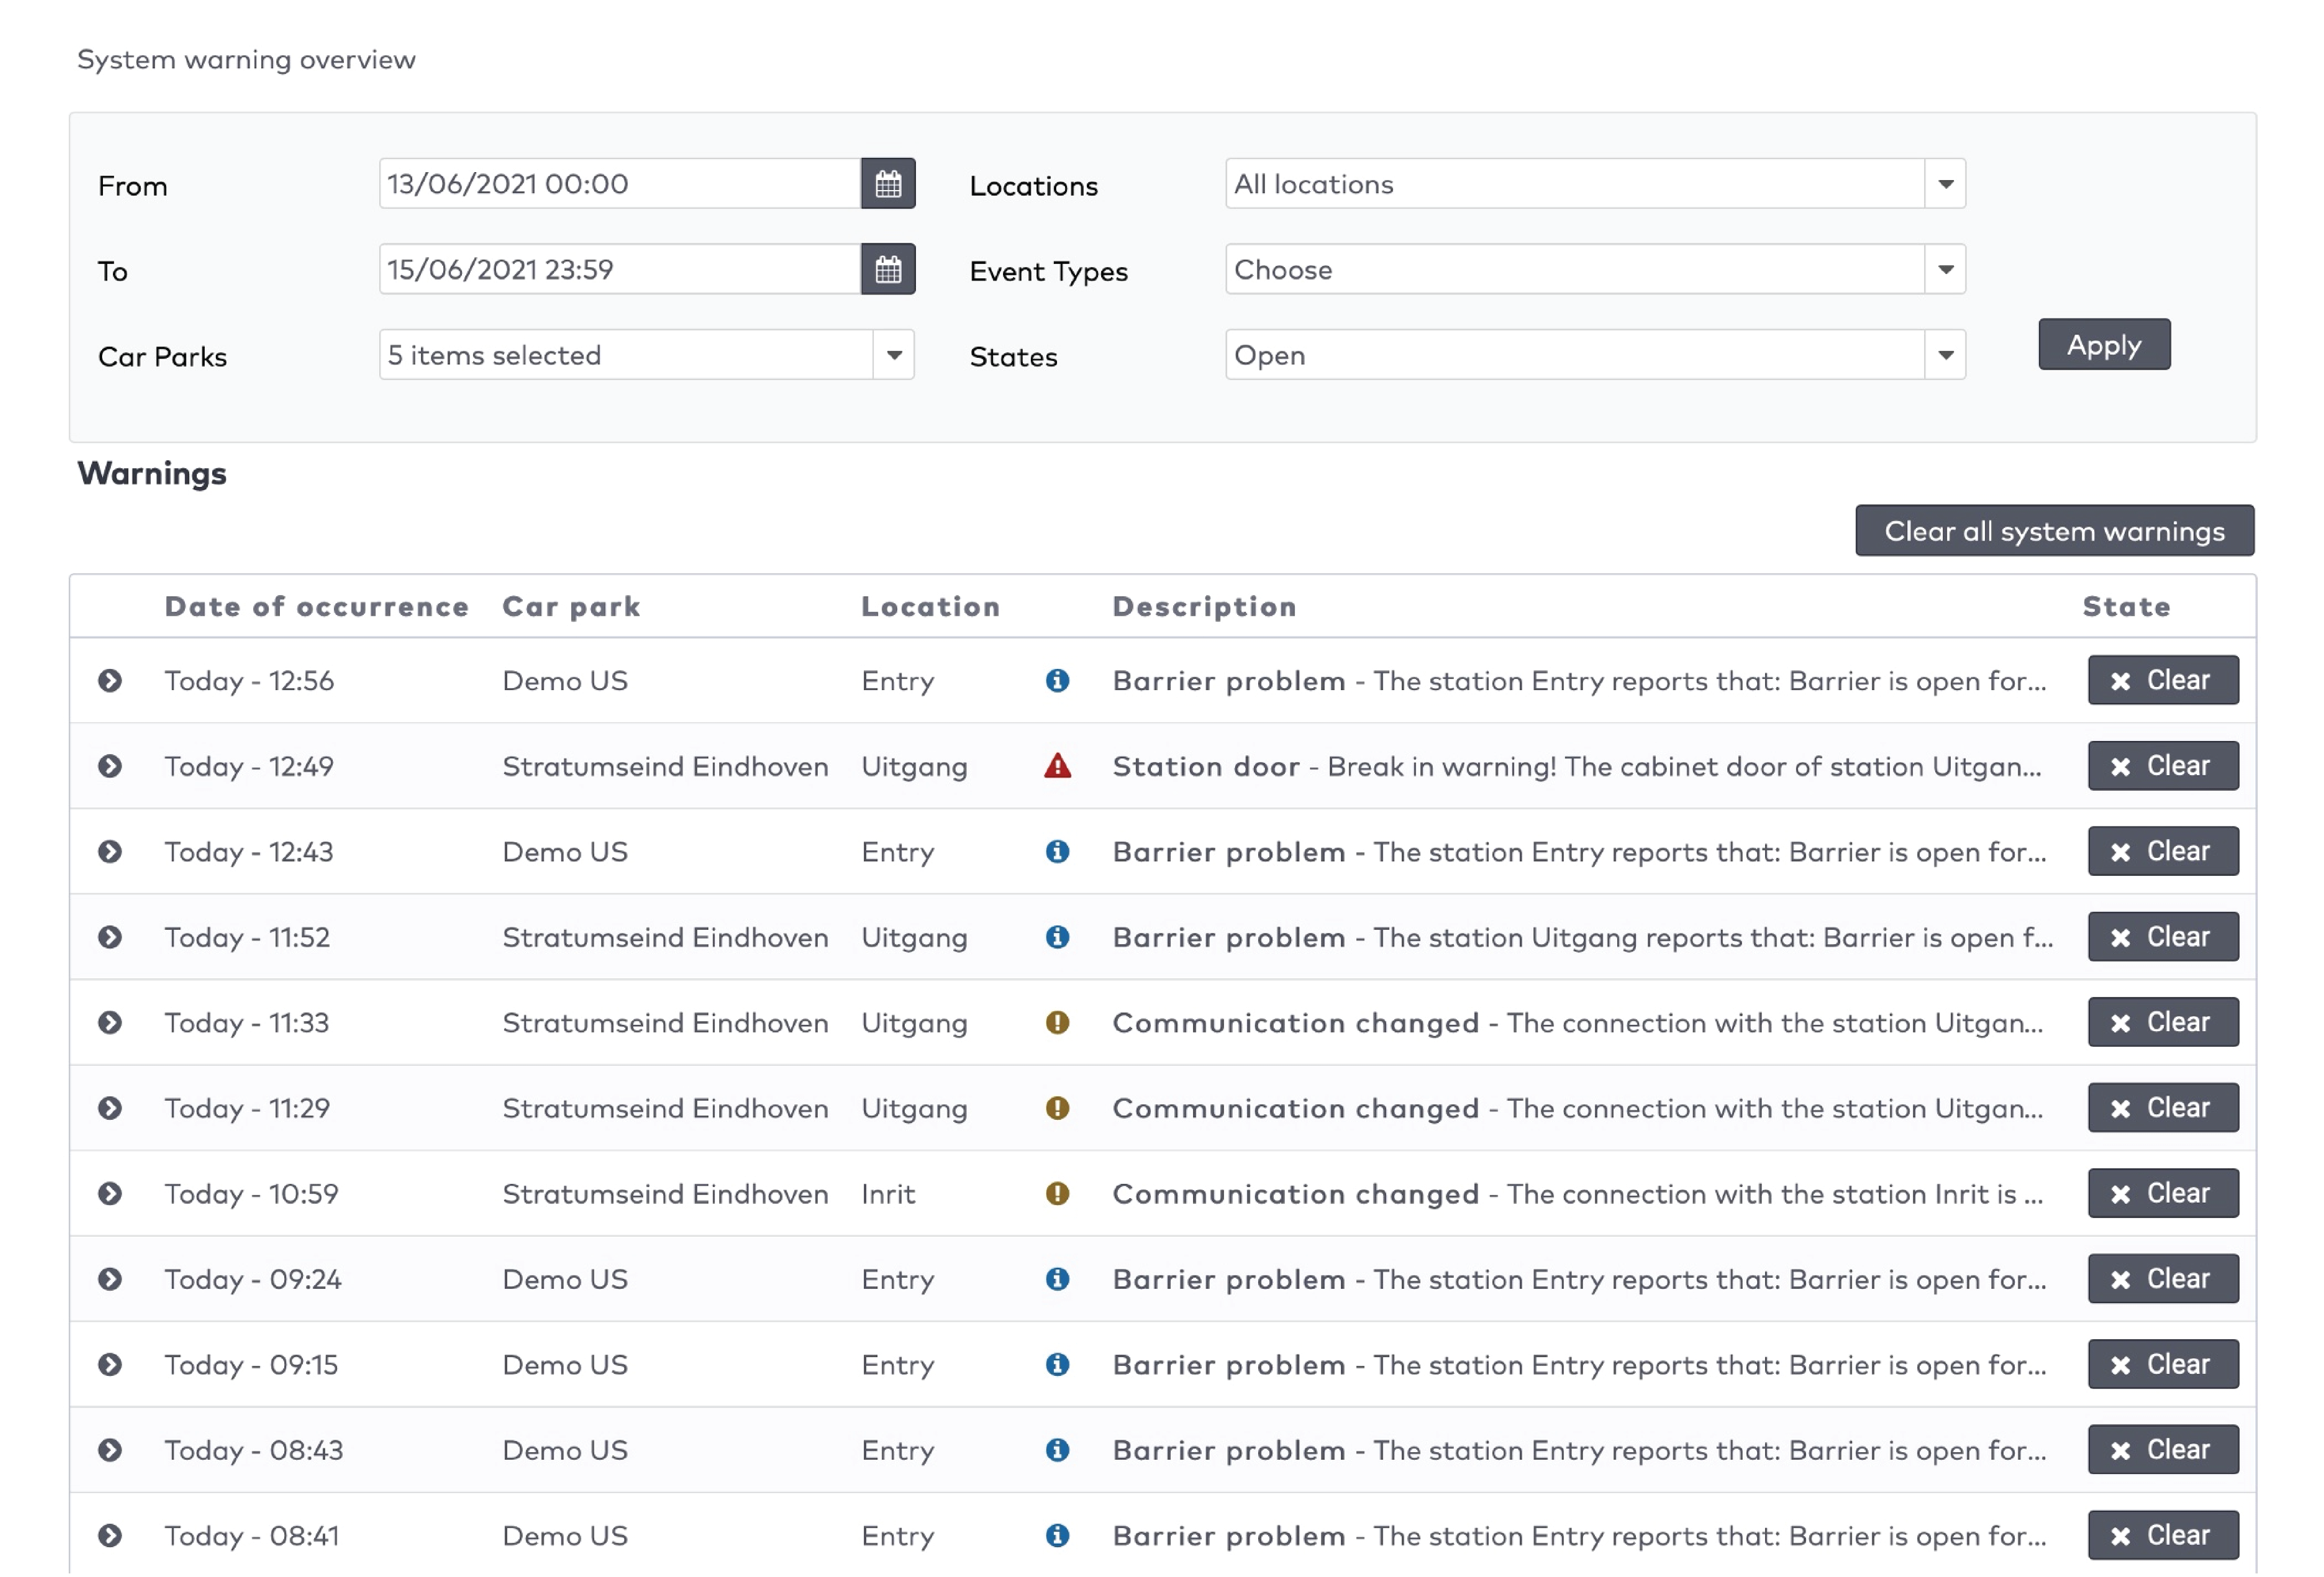
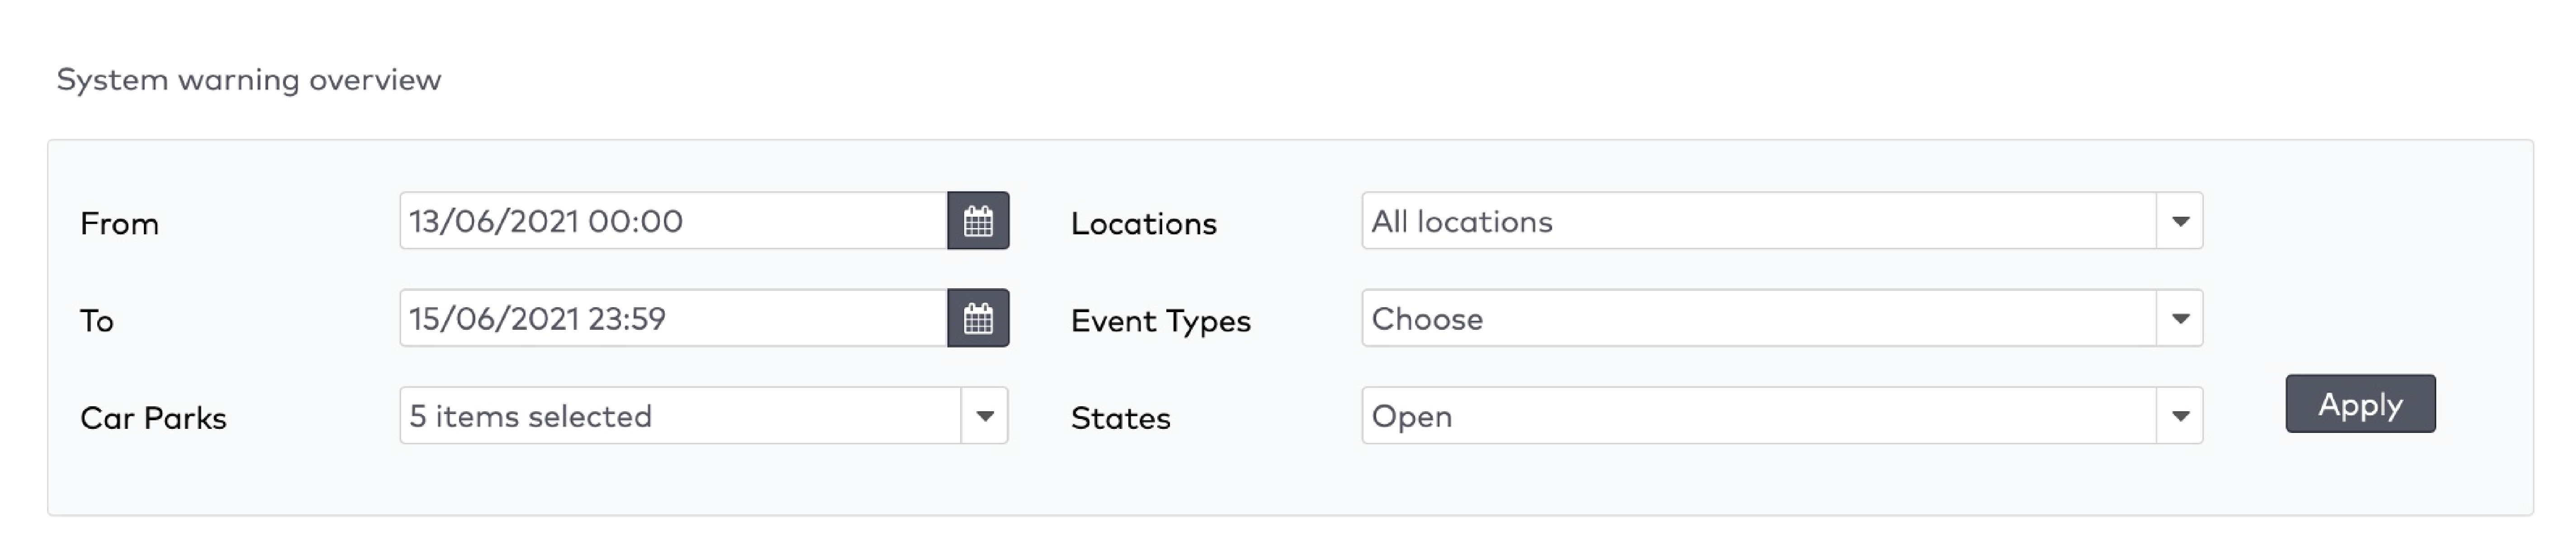
To see a complete list of system warnings:
Click Go to system warnings overview or
Click  in the menu bar.
in the menu bar.

|
|
You can filter warnings by:
Date and time (From and To)
Car park
Location: where the event happened.
Event type
States: whether the warning is open or cleared.
Click Apply to apply the filters to the list of warnings.
Three types of warnings are displayed:

|
Critical warning
A very important message to the user about an unexpected system behavior or state which can have major effects on the system performance, user experience or visitor experience.
|

|
Warning
An important message to the user about an unexpected system behavior or state
|

|
User action requests
A message to trigger the user to take action
|
You can clear all warnings in one go. Please make sure all issues are solved before you do so. The list of open warnings is empty after clearing. Select Cleared in the States dropdown menu to see all cleared warnings.
Click Clear all system warnings.
Click OK.
All warnings are cleared.
|
Filtering events
In the Events tab, you can filter events by:
Date and time (From and To)
Car park
Event type
Stations
Details (any detail linked to the event, such as visitor’s name, card number, amount, the last four digits of a credit card, etc.)
Click Apply to apply the filters.

|
A filtered list of events is displayed.
List of events
In the Events tab, to see a detailed description of an event, click  next to it:
next to it:

|
Links to visitors
Visitor’s events contain deep links to the visitor’s record:
|
To view a visitor:
Click the blue visitor name or identifier in the list of events.
|
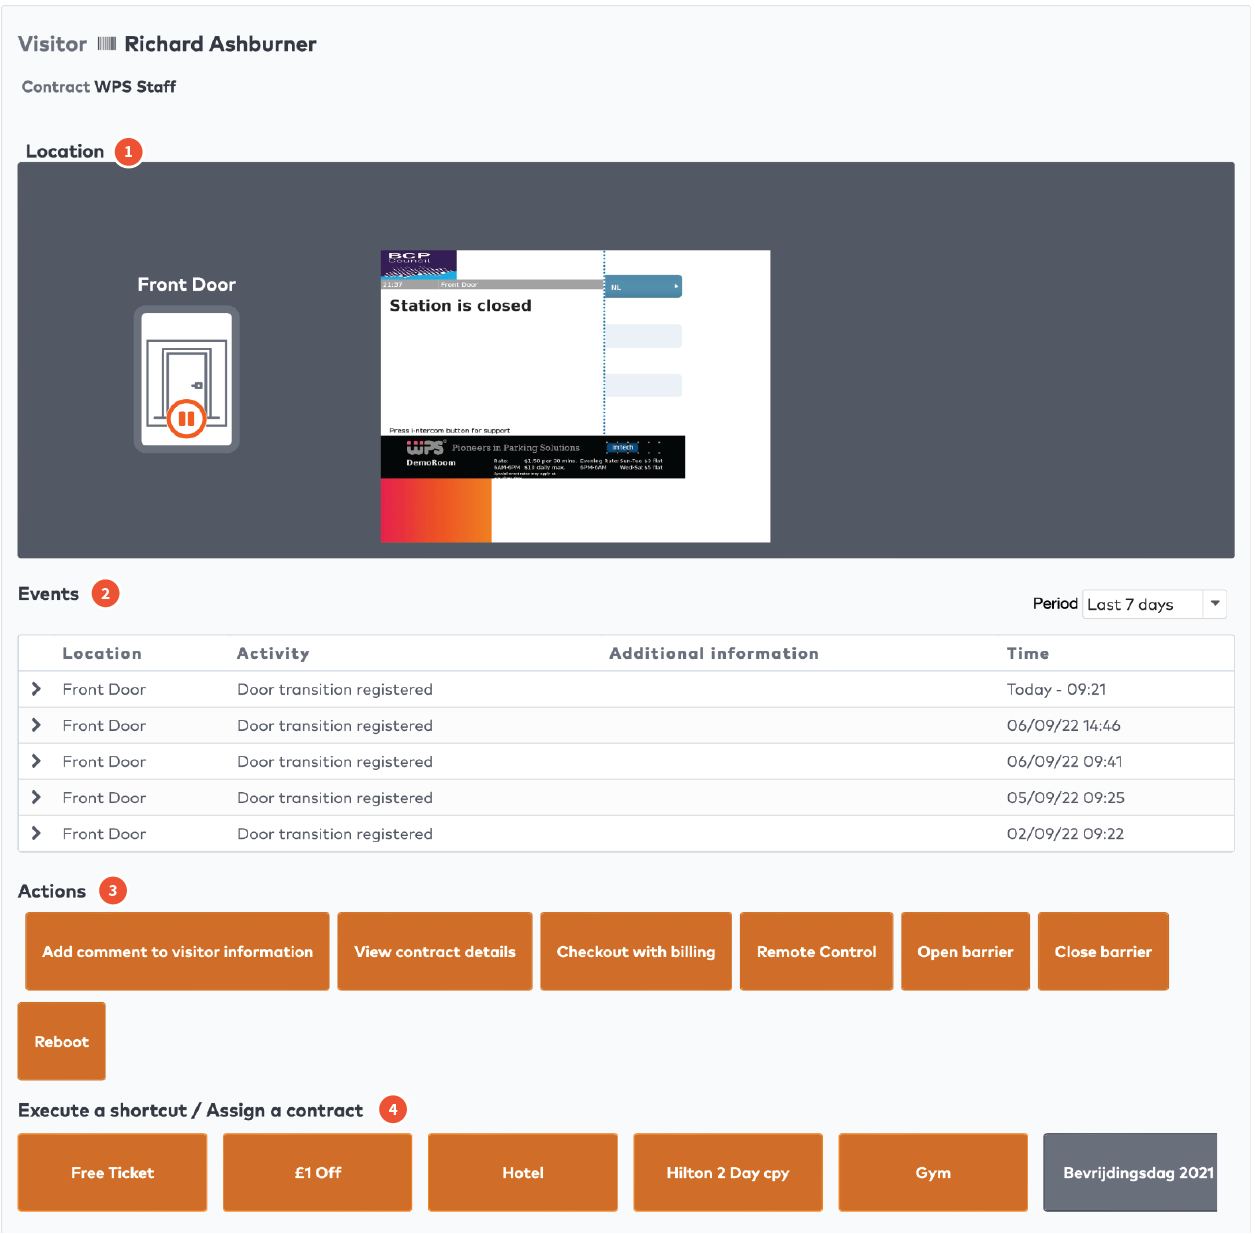
In this screen you can:
See the station and its camera feed (1)
See a list of events of this visitor (2)
Perform actions on the visitor and the station (3)
Execute a shortcut or assign a different contract (4)
Performing actions on the visitor and the station
You can:
Perform an anti-passback reset
Add comments to visitor information
View and edit contract details
Perform a manual checkout with billing
Control the station remotely
Open or close the barrier
Reboot the station
Performing an anti-pass back reset
ParkID detects misuse of access identifiers. This is called anti-pass back. For example: when the same access identifier is used by two or more visitors at the same time.
Anti-pass back detection information can be incorrect in the following cases:
After an emergency, when exits have not been properly registered.
After a station malfunction or maintenance update.
To perform an anti-pass back for a visitor:
Click Anti-pass back reset
Click …
Adding a comment to visitor information
Comments are displayed in the list of Events. To add a comment:
Click Add comment to visitor information.
Type your comment in the bar.
Click Save.
The comment is saved and visible in Events.
Viewing and editing contract details
To view and edit contract details, click View contract details. The contract screen is displayed.
To learn more about editing a visitor’s details, see Editing details.
To learn more about editing contracts, see Editing a contract.
Performing a manual checkout with billing
To perform a manual checkout with billing:
Click Checkout with billing.
Select an Outside section you want to move this visitor to.
Either enter an Amount and select a Currency, or
Enter an Exit date and time. The system will calculate the costs based on the rules of the visitor’s contract.
Click Submit.
The visitor’s exit is registered and they will be billed.
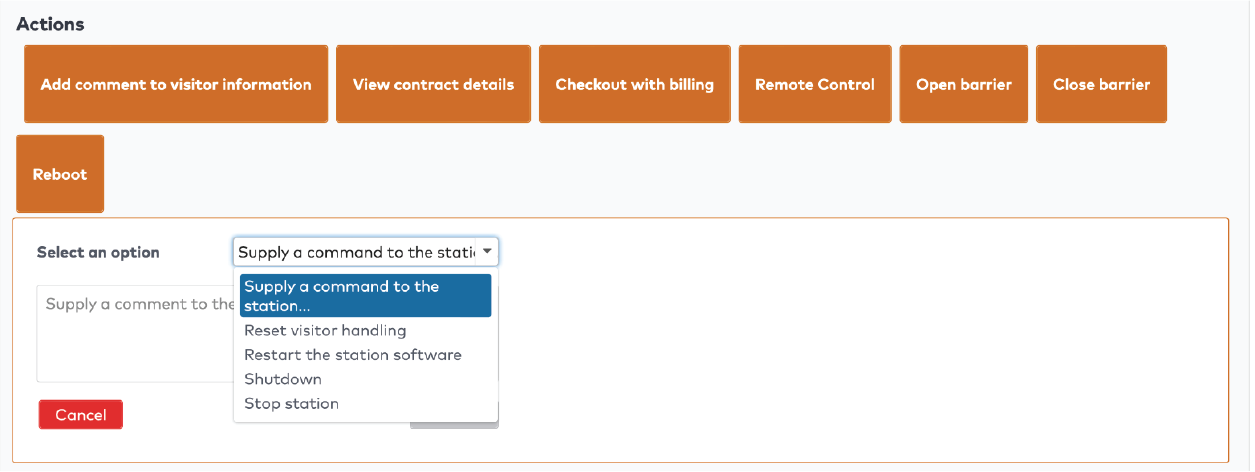
Controlling the station remotely
Use remote control to:
Reset visitor handling
Restart the station software
Shutdown the station
Stop the station
To use remote control:
Click Remote Control.
Select an option from the dropdown menu.
Enter a comment to the action.
Click Submit.
The action is executed.
|
Opening or closing the barrier
Doors and entry and exit stations can be opened and closed.
To open or close the barrier:
Click the Open barrier or Close barrier button.
In the Select an option dropdown menu, select either a predefined reason or select Supply a message to the station and manually enter a short description of the reason for this action.
Click Submit.
Rebooting a station
To reboot a station:
Click the Reboot button.
In the Select an option dropdown menu, select either a predefined reason or select Supply a message to the station and manually enter a short description of the reason for this action.
Click Submit.
Reduction cards
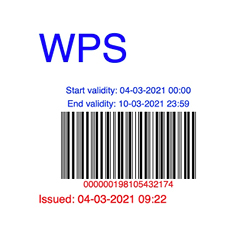
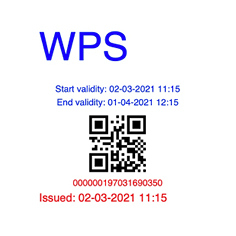
Reduction cards are used by groups to offer free or reduced rate parking to their visitors. A reduction card usually is a paper card with a unique bar code and sequence number. Reduction cards have to be used in combination with a parking ticket or another identifier.
|
|
|
Example reduction card with bar code.
|
Example reduction card with QR code.
|
If you want to know how to generate one time exit cards, click here.
Generating reduction cards
You can generate a new set of reduction cards based on a reduction template or choose to generate a custom set of reduction cards.
Generating custom reduction cards
To generate one or more custom reduction cards for a group:
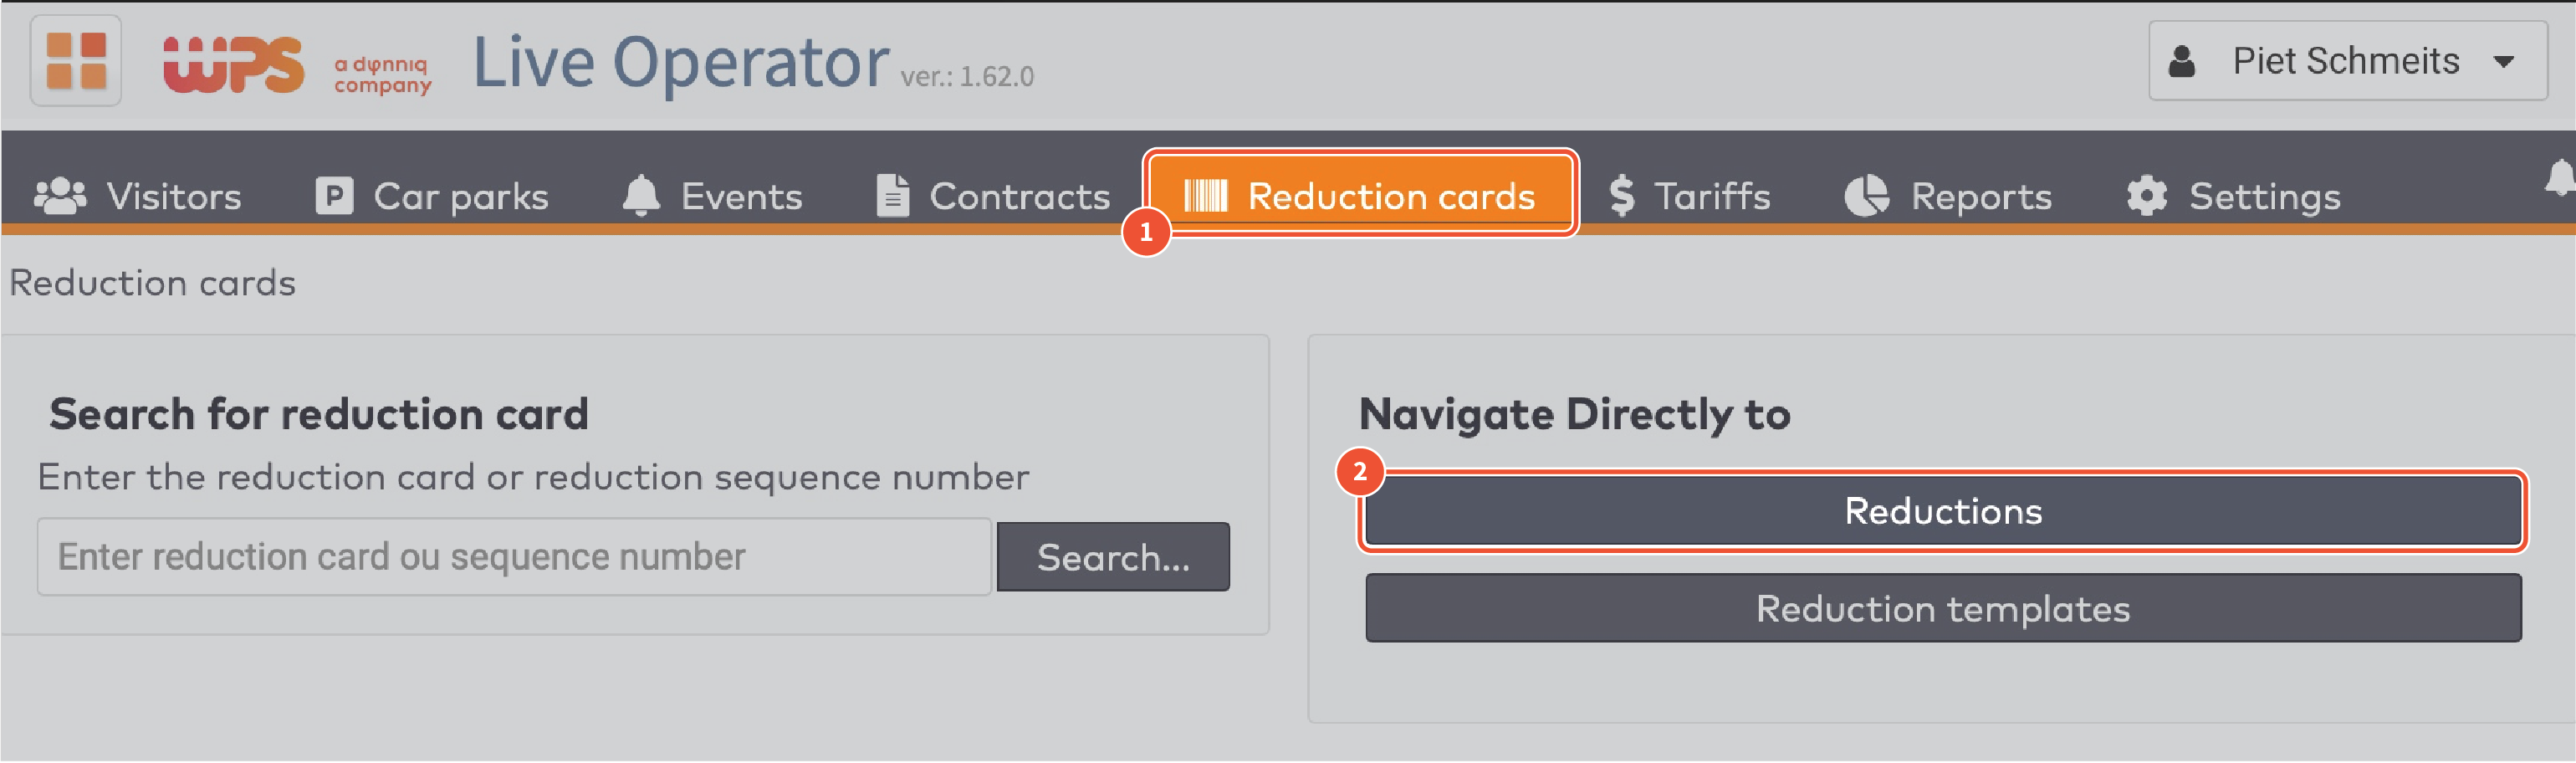
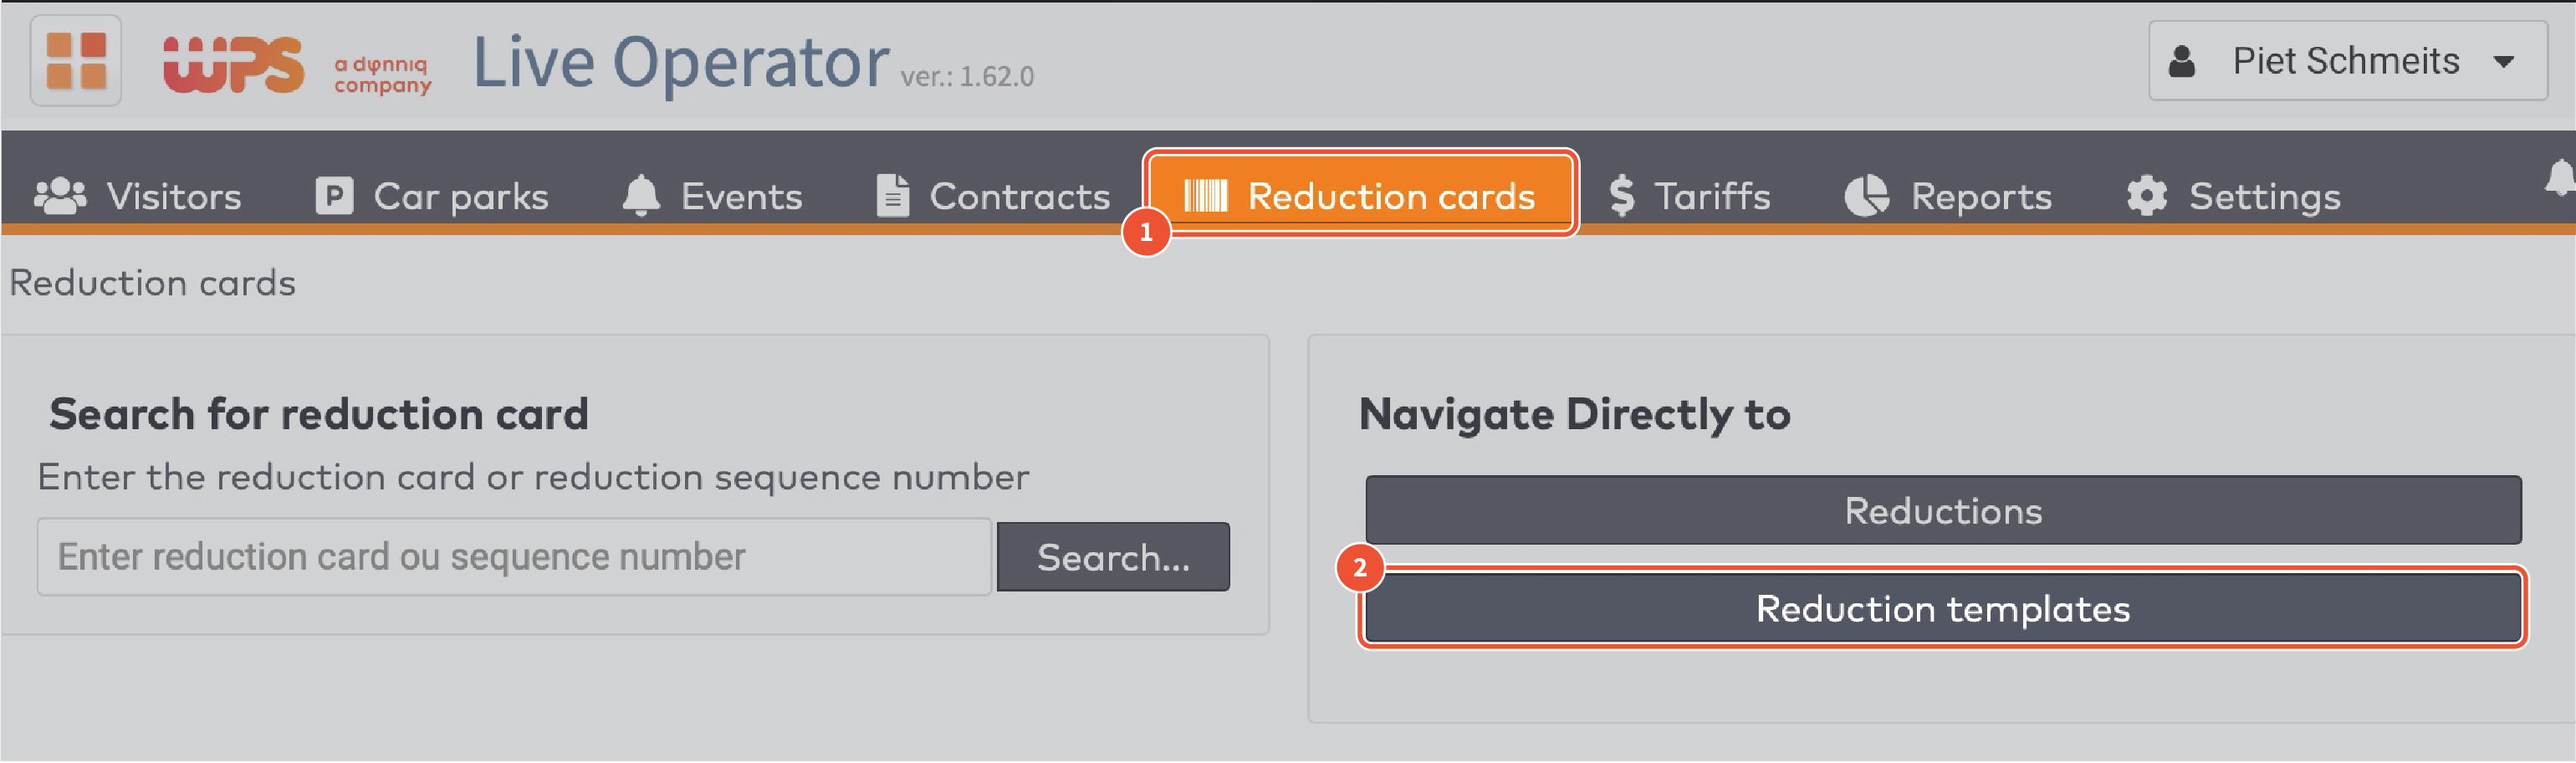
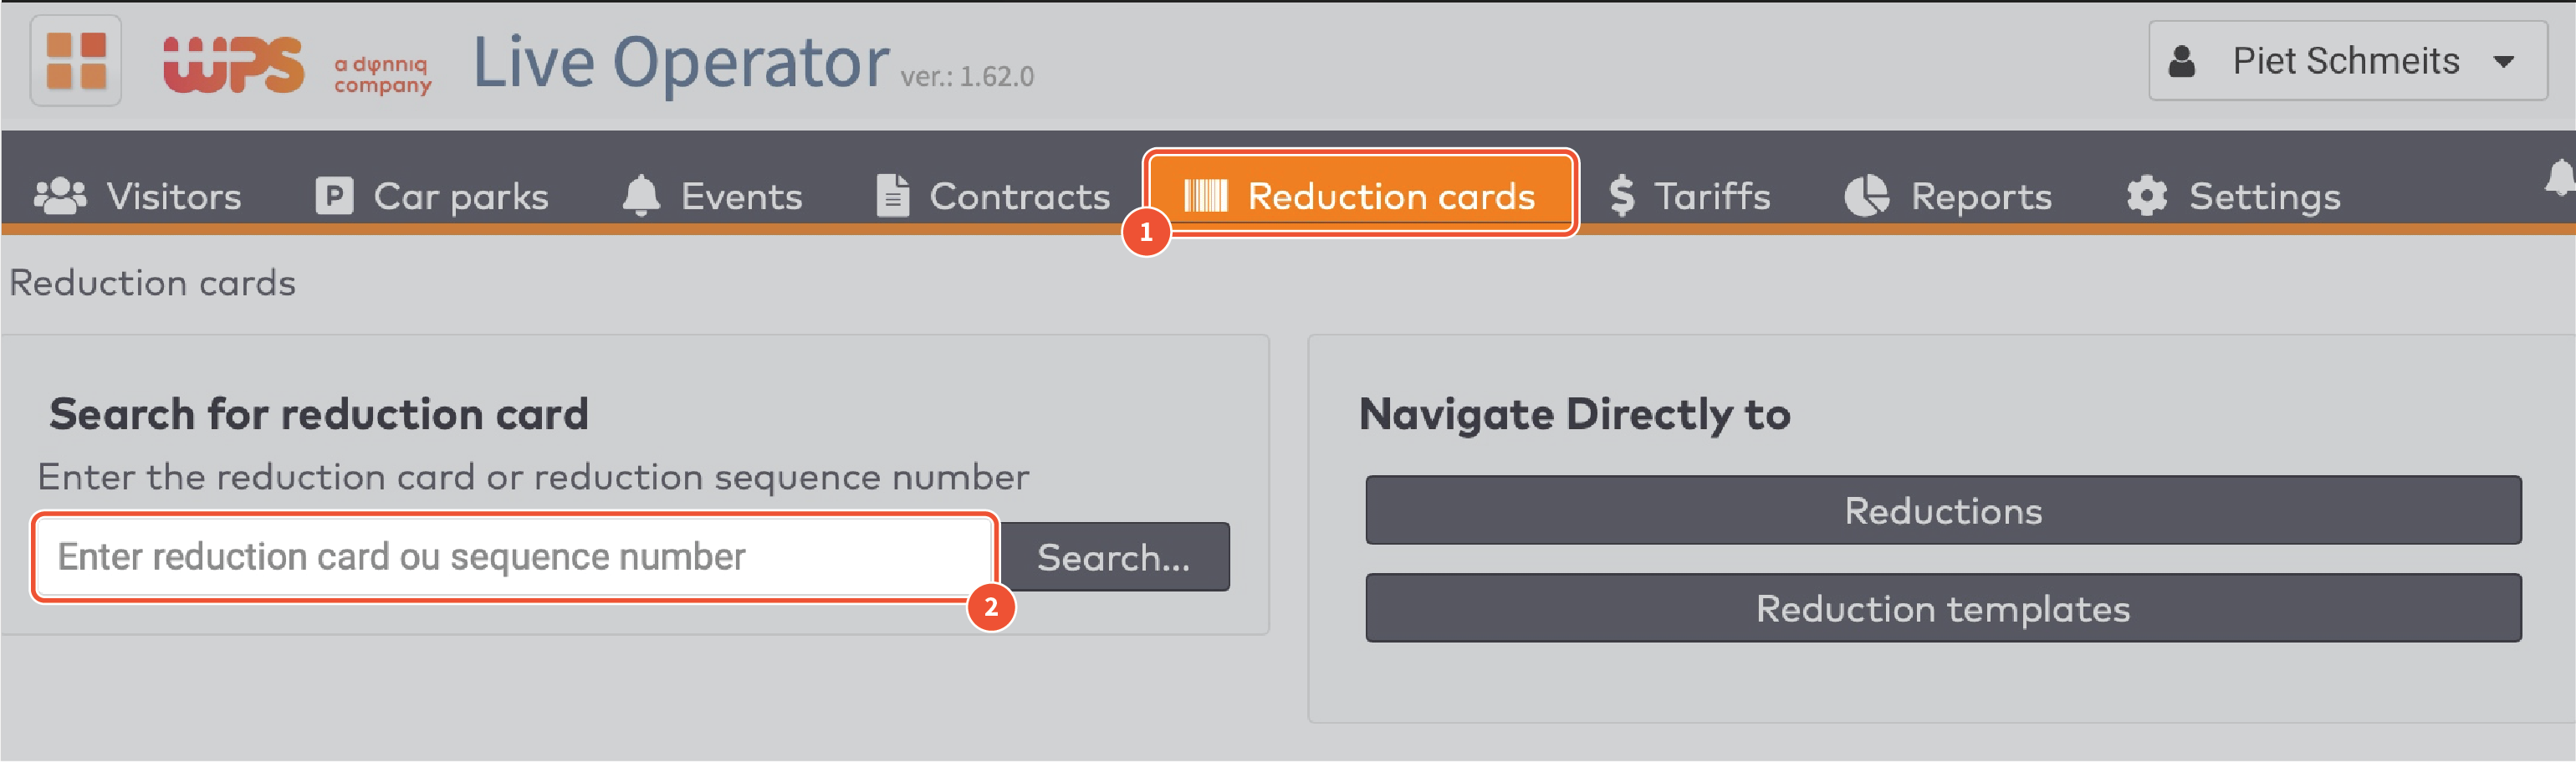
Click Reduction cards in the menu bar.
Then click Reductions.
|
Select the car park for which the reduction cards have to be generated from the Car Parks dropdown menu.
Then click Add reduction.
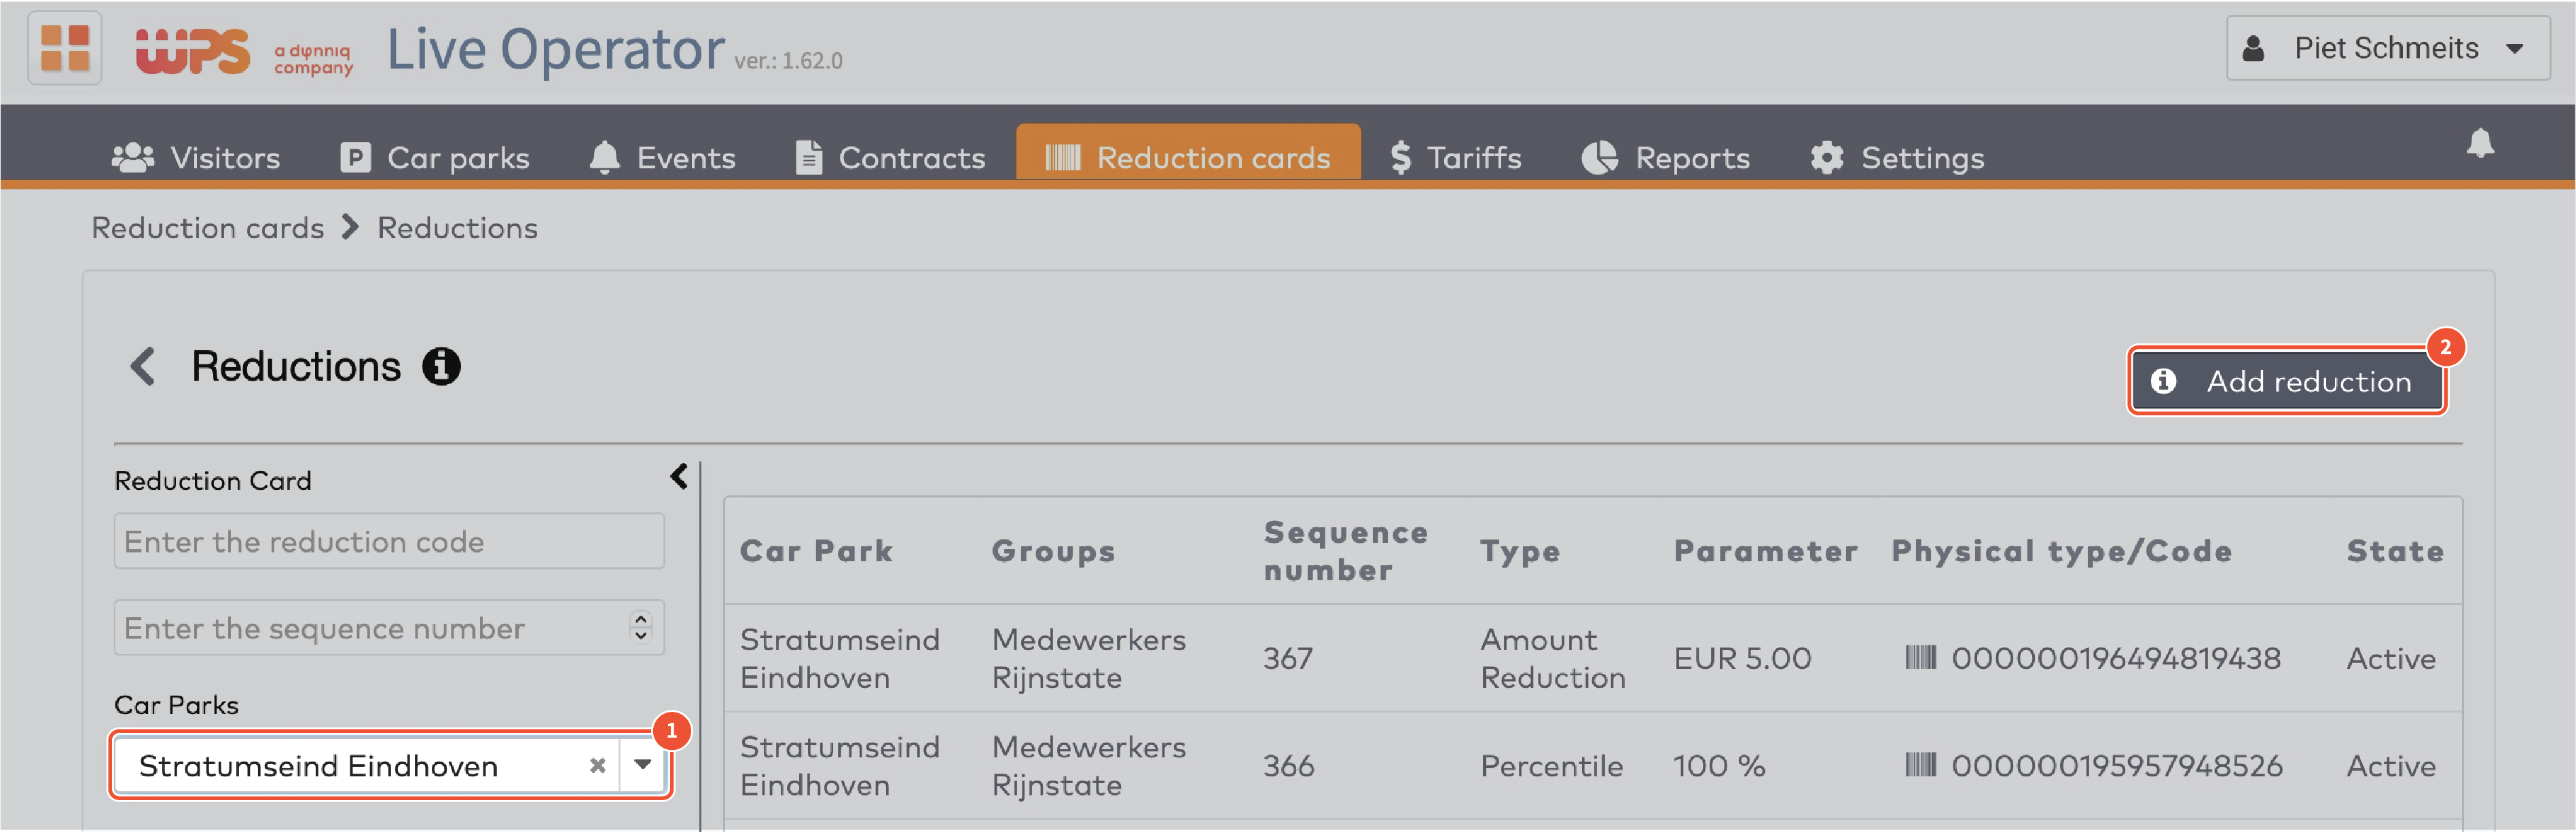
|
Click Generate custom reductions.

|
Reduction specifications
Select the Issuing Group from the dropdown menu.
Select the Reduction Type from the dropdown menu.
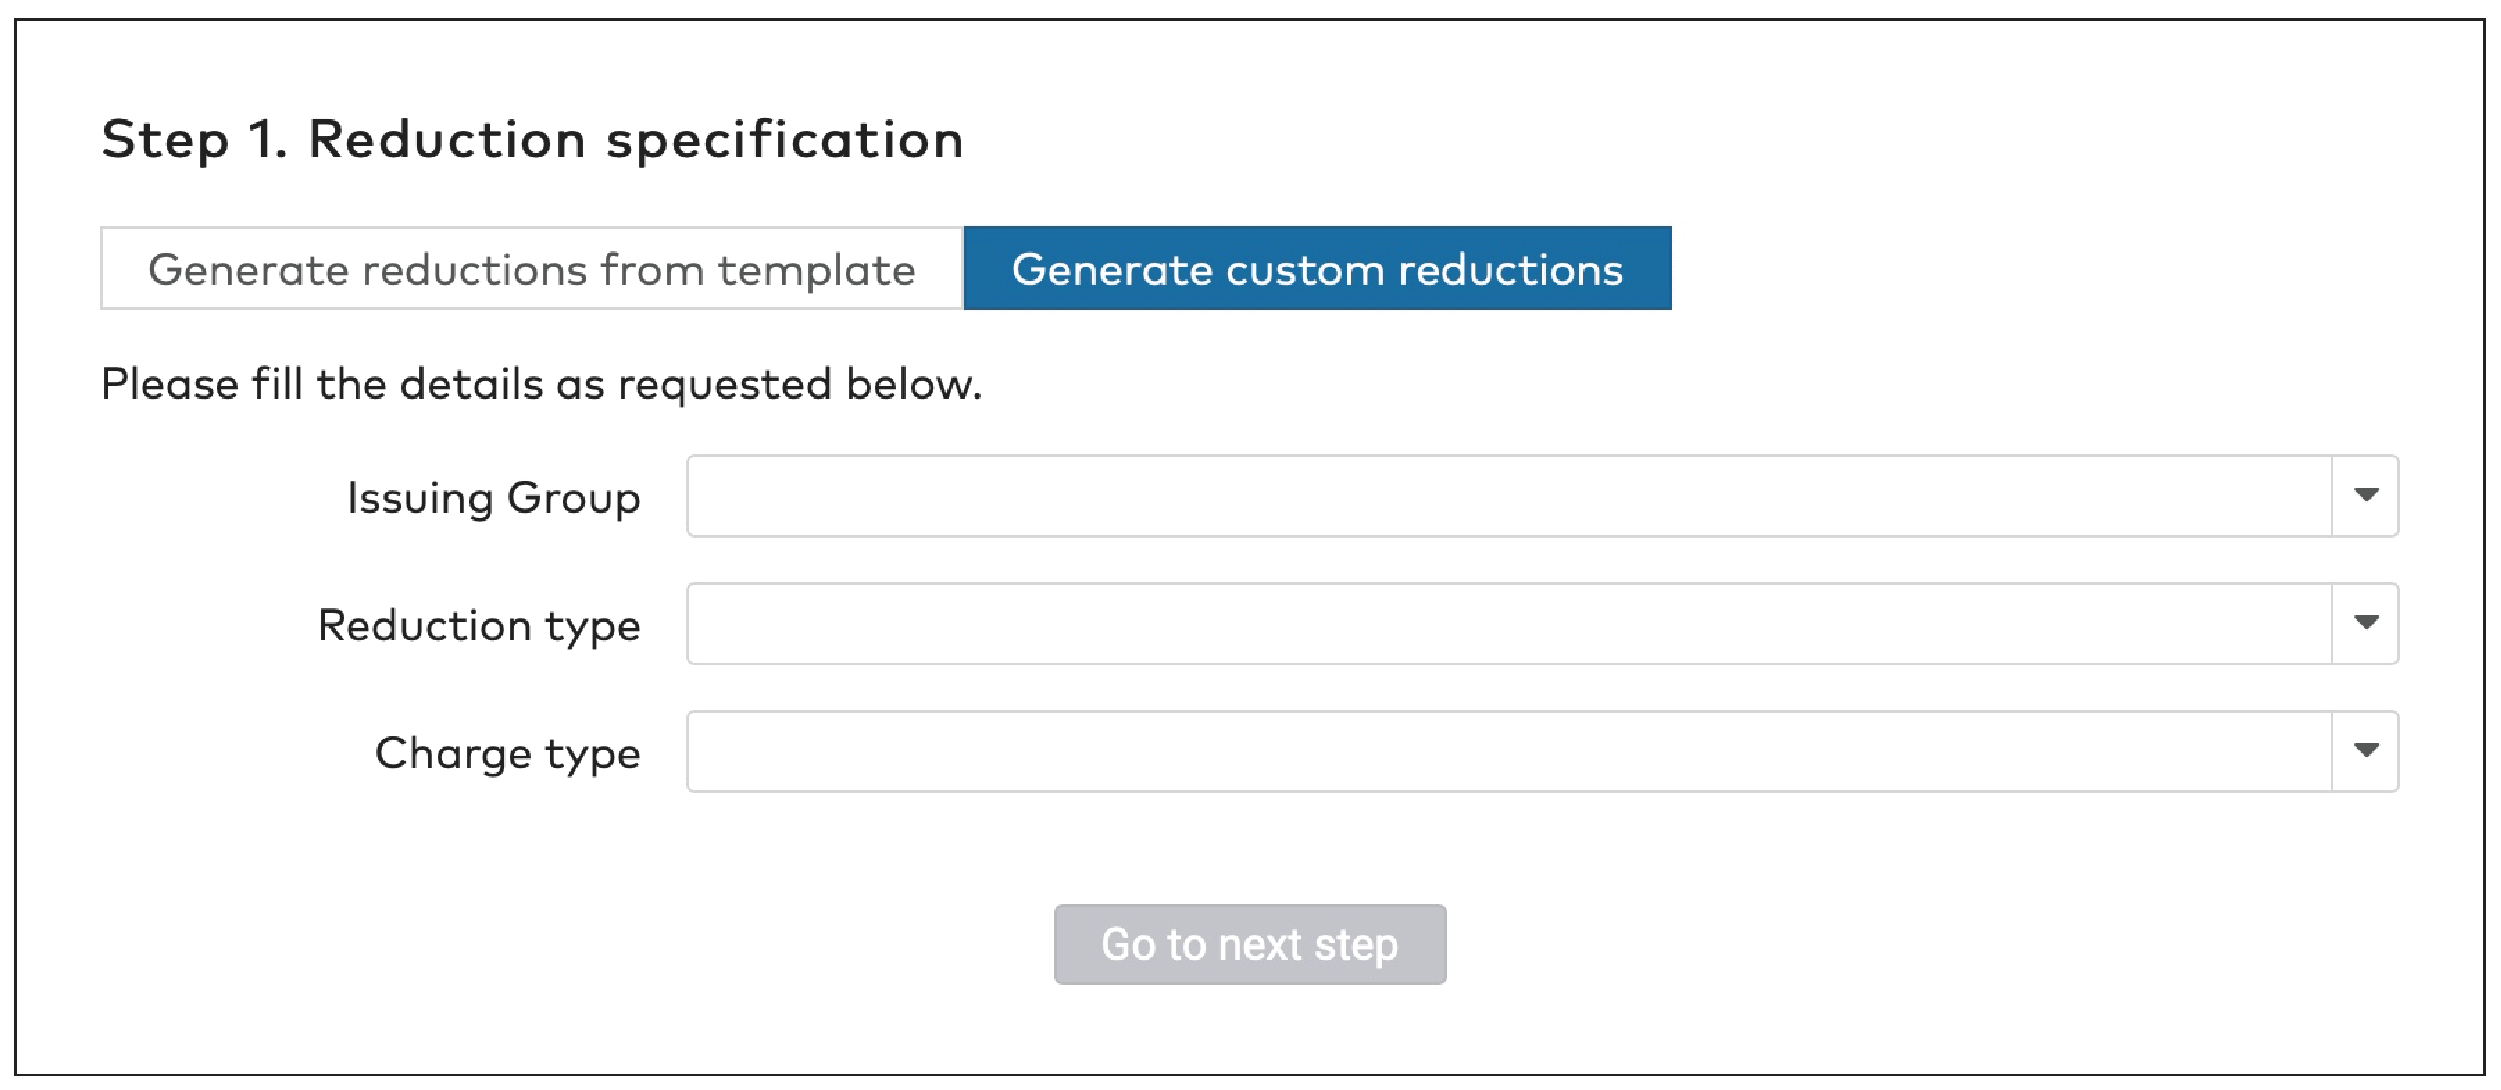
|
There are five reduction types:
Amount reduction
Fixed time
Percentile
Sales amount
Tariff switch
Amount reduction
A fixed amount is subtracted from the amount due.
For example: a visitor who has to pay €10 and has a reduction card with a fixed amount of €6 pays €4.
Fill in the Amount reduction.
Select the applicable currency from the dropdown menu.

|
Fixed time
A fixed amount of time is subtracted from the total parking time.
For example, a visitor who has parked for 1,5 hours and has a reduction card with a fixed time of two hours gets a free exit.
Fill in the number of Days, Hours and Minutes in the respective fields.

|
Percentile
The amount due is reduced by a set percentage of the original sum.
For example: a visitor who has to pay €10 and has a reduction card of 50% pays €5.
Fill in the Percentile in whole numbers, without decimals.
Fill in a maximum reduction amount, if applicable.
For example, if the maximum reduction amount is €10, a visitor who has to pay €50 and has a reduction card of 50% gets the maximum reduction of €10 and pays €40.

|
Sales Amount
The amount due is replaced by a set amount.
For example: a visitor who has to pay €10 and has a reduction card with a sales amount of €3 pays €3.
Fill in the Sales Amount in whole numbers, without decimals.

|
Tariff switch
The tariff applied to the parking time is changed.
For example: a visitor who has parked 4 hours during the day for €2,50/hour and has a tariff switch reduction card set to the more favorable night rate of €2/hour pays €8.
Select a Tariff from the dropdown menu.

|
Reduction cards are paid for by the issuing group. You can charge the group
When the cards are created (charge on issue). All cards are paid for, regardless whether they are used or not.
When the cards are actually used (charge on transaction). Unused cards will not be charged.
If you charge the group when the cards are actually used, you can either
Set a fixed amount per card (fixed charge on transaction) regardless of the actual value of the reduction. For example, you could create a set of reduction cards with a percentile reduction of 50% and sell them for €2,50 each.
Charge the exact reduction amount (exact charge on transaction).
When you have made your choice:
Select the Charge type from the dropdown menu.

|
Fill in the Charge amount, if applicable.

|
Select a currency from the dropdown menu.
Click Go to next step.
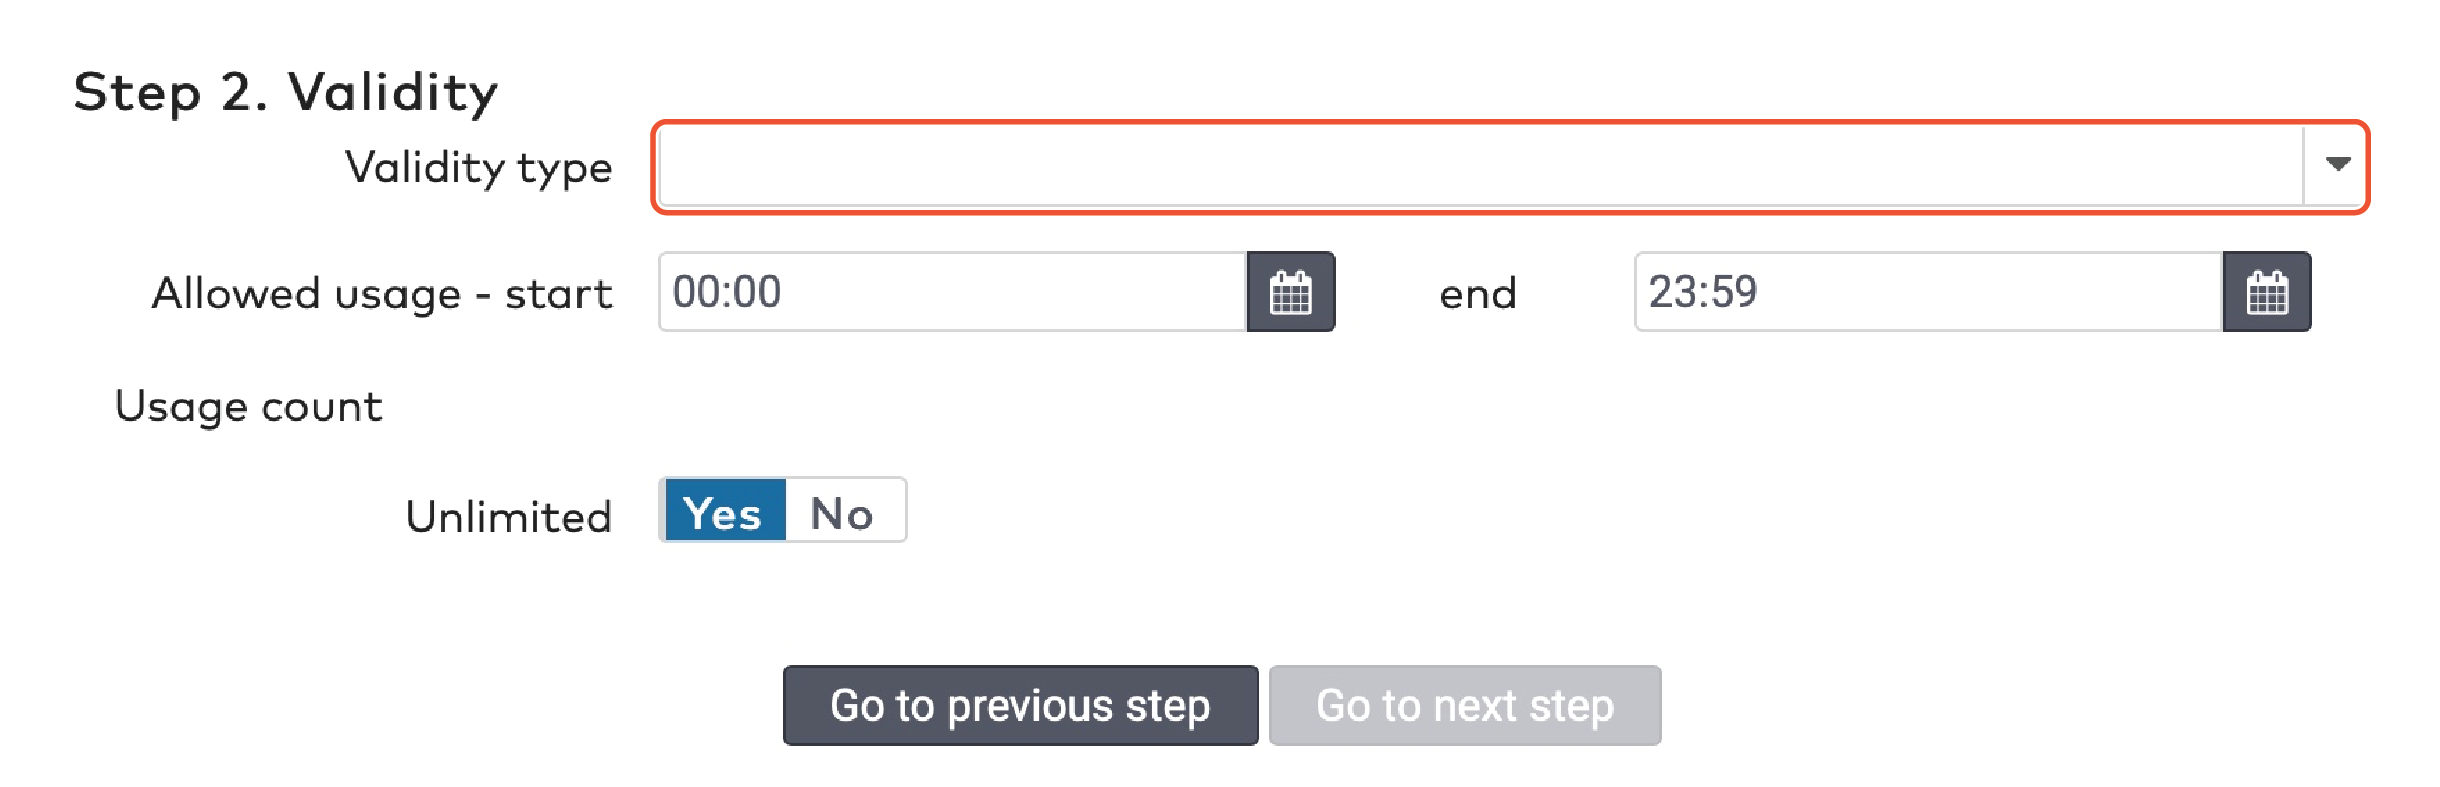
Validity
Reduction cards have a limited validity. You have to specify a date range in which the reduction card can be used. Additionally, you can set a time window in which it can be used. Between 9.00 AM and 6.00 PM, for example.
|
Select a Validity type from the dropdown menu. This can be a duration in days from the creation date, or a specific date range.
If you selected Duration, fill in the Duration in days.

|
If you selected Specific, pick a start date and an end date.

|
To set the time window in which the reduction can be applied:
Fill in a start and end time in the Allowed usage field.

|
You can set reduction cards to be used once, multiple times or unlimited times. Under Usage count
Set Unlimited to Yes if you want the cards to have no limit of usage.
Set Unlimited to No if you do want to limit the usage of the cards. Fill in the maximum Number of uses.

|
Click Go to next step.
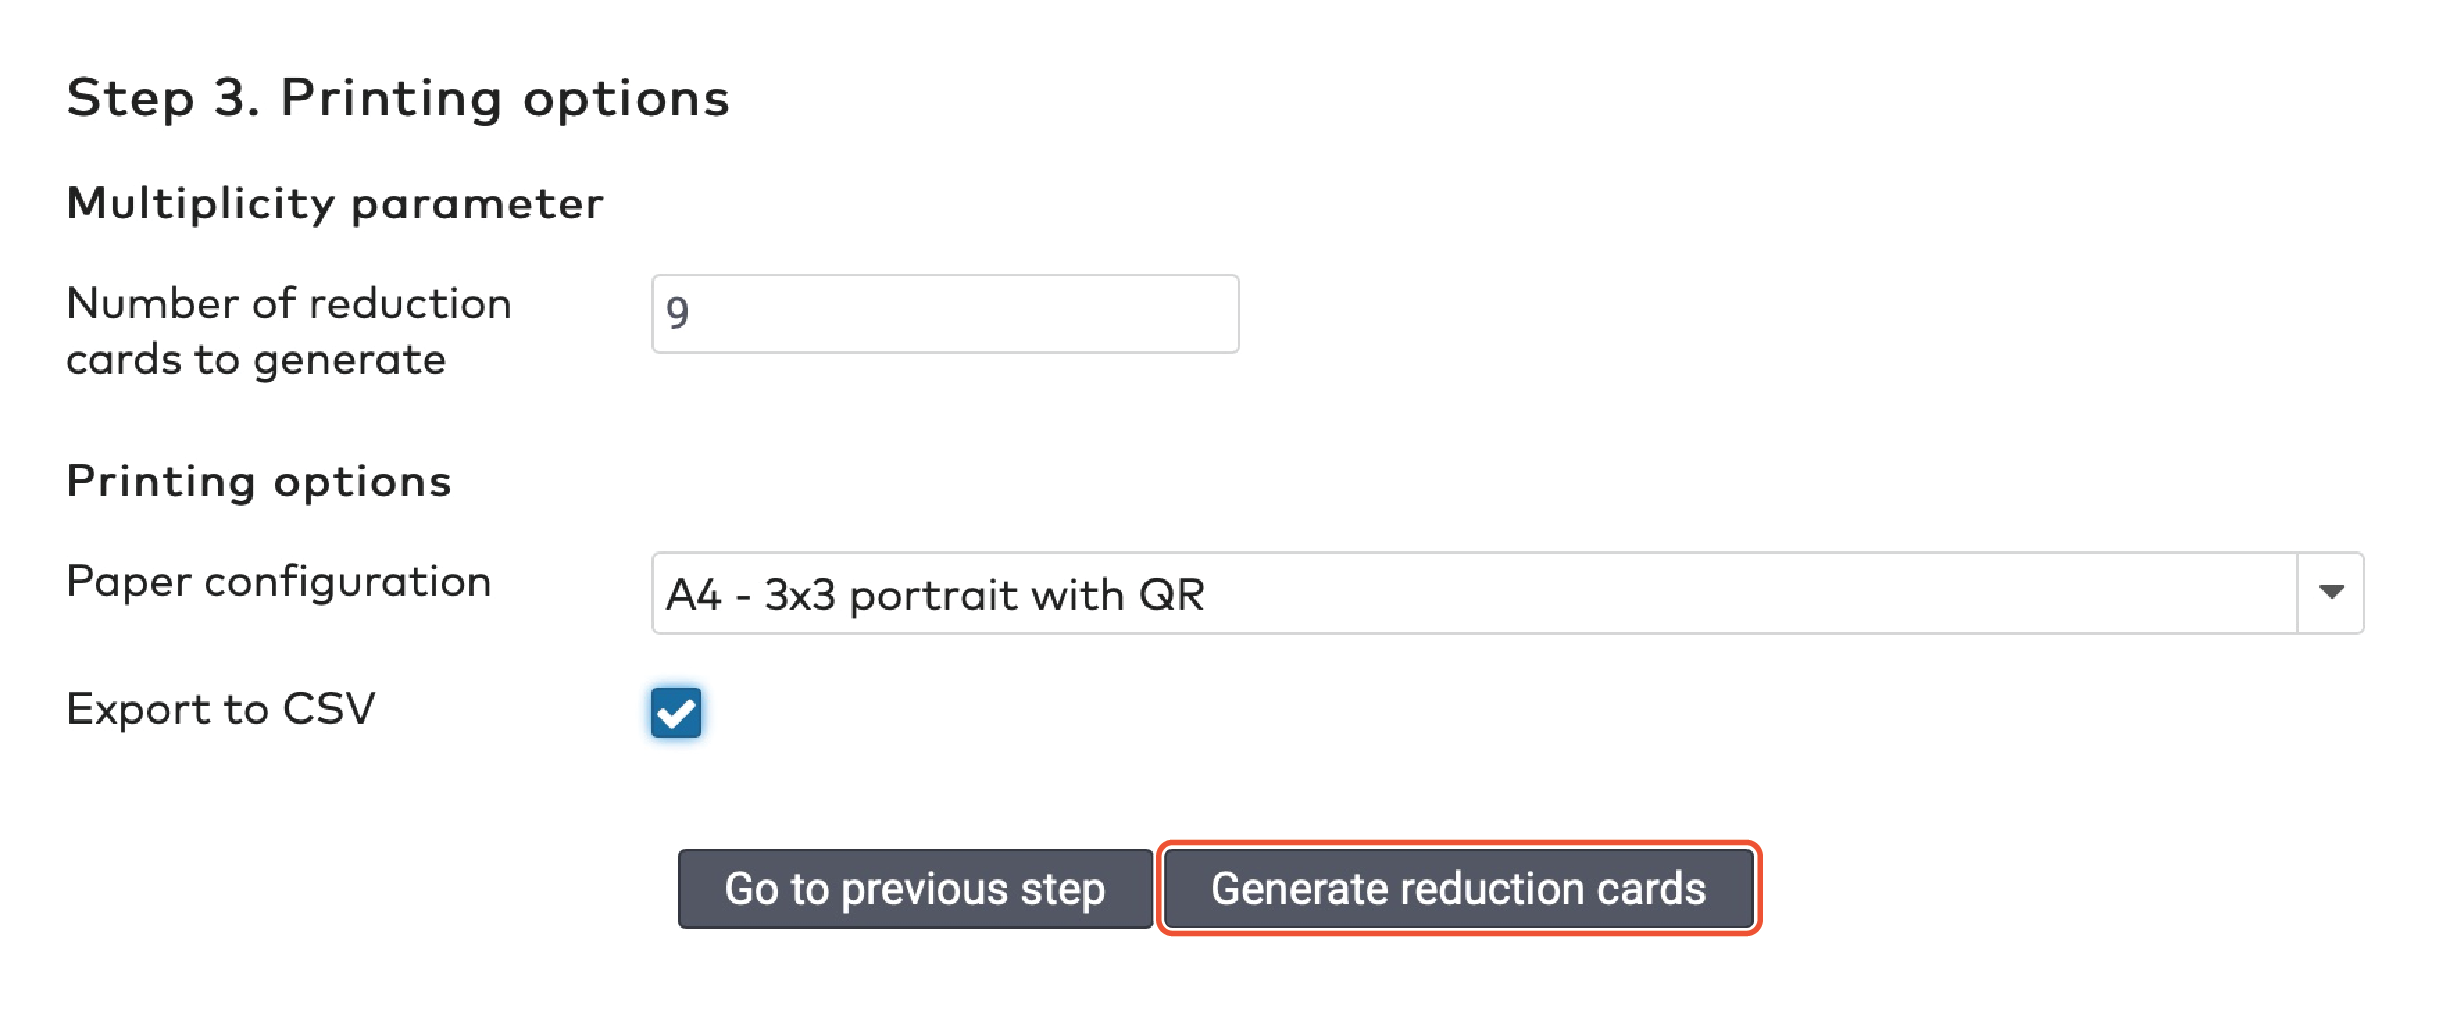
Printing options
Set the Number of reduction cards to generate. The maximum number of cards is 9.999.
Select the appropriate Paper configuration.
Tick Export to CSV if you want to save the sequence numbers and bar code numbers to a separate file.
Click Generate reduction cards.
|
A PDF file with reduction cards is generated for printing. A CSV file is generated for download, if enabled.
Important! This file is not saved anywhere else in the system. It is only accessible at the time of generation, from this window.
Save or print the PDF file with the reduction cards directly from this window.
Creating templates for reduction cards
Use templates if you want to generate the same set of reduction cards multiple times. Each set of reduction cards generated by a template:
is for the same car park,
for the same issuing group,
has the same reduction type,
and the same validity.
To create a template:
Click Reduction cards in the menu bar.
Then click Reduction templates.
|
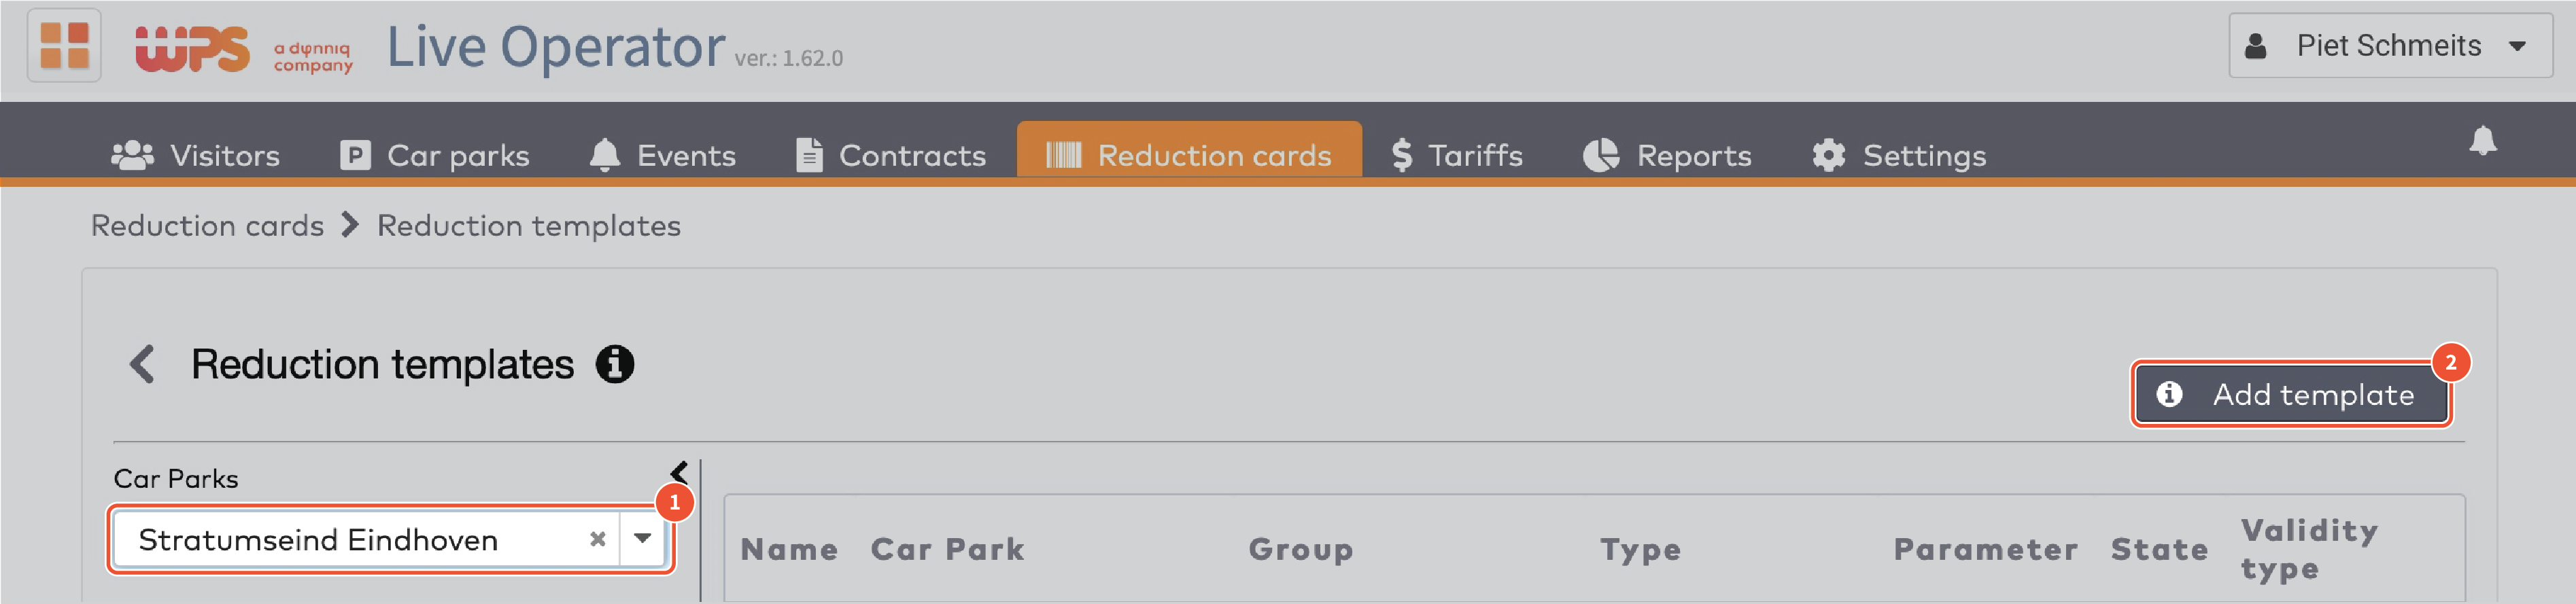
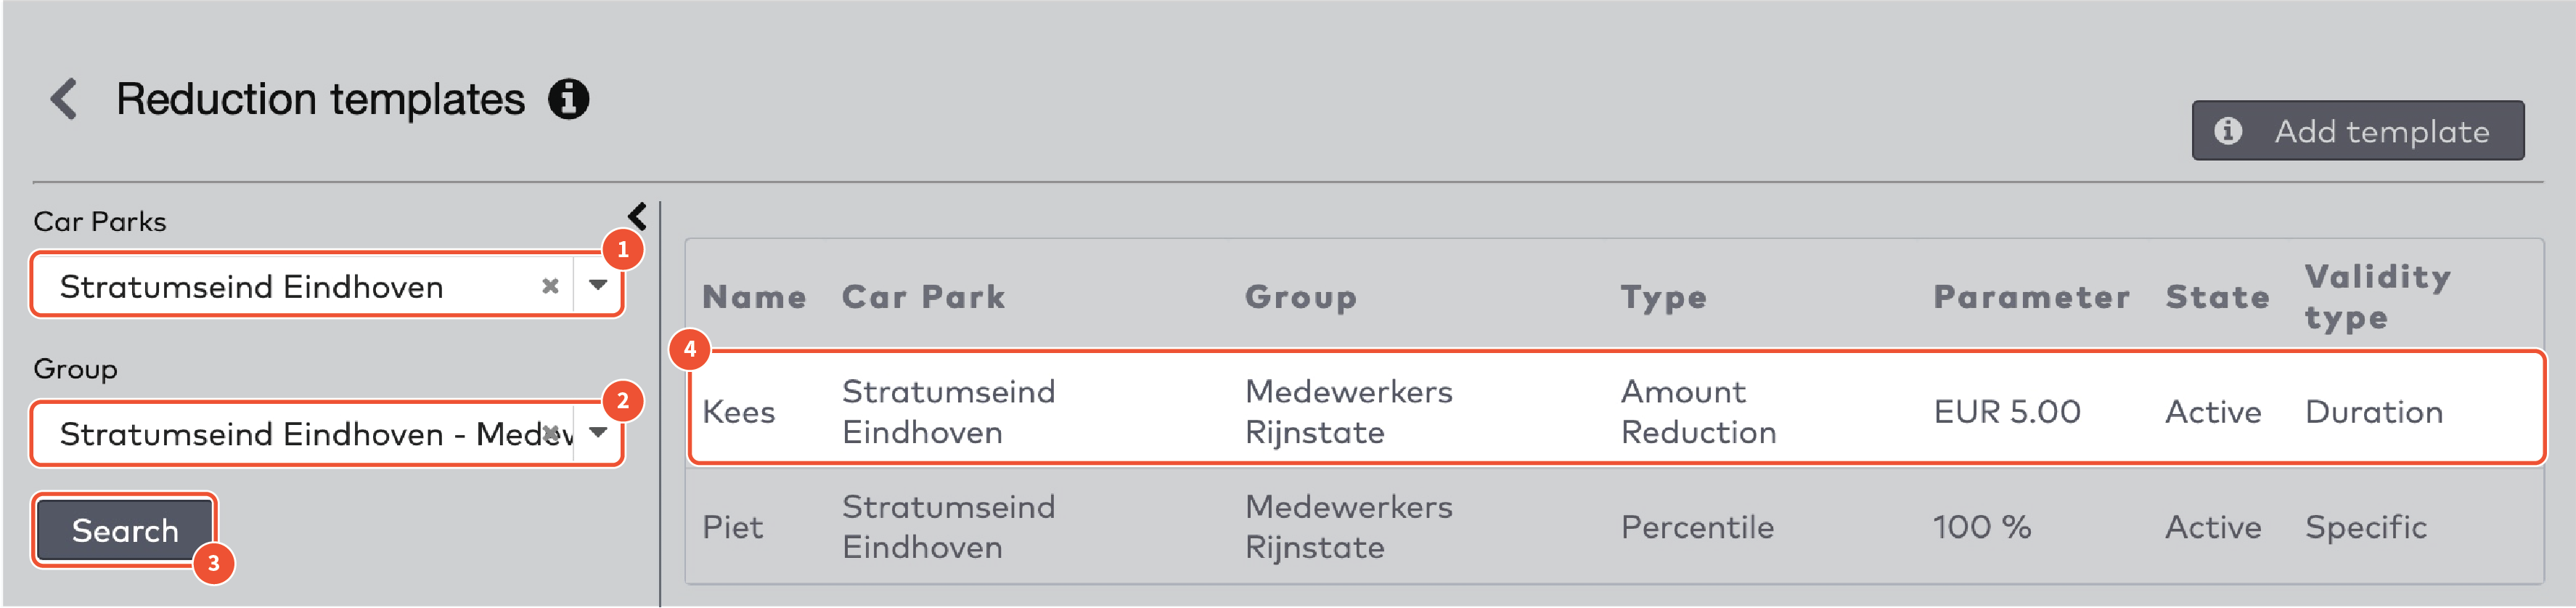
Select the car park for which the reduction template has to be generated from the Car Parks dropdown menu.
Then click Add template.
|
Fill in a Name for this template.
Select the Issuing Group from the dropdown menu.
Select the Reduction type from the dropdown menu.
|
Reduction type
|
|
There are five reduction types:
Amount reduction
Fixed time
Percentile
Sales amount
Tariff switch
Amount reduction
A fixed amount is subtracted from the amount due.
For example: a visitor who has to pay €10 and has a reduction card with a fixed amount of €6 pays €4.
Fill in the Amount reduction.
Select the applicable currency from the dropdown menu.
Fixed time
A fixed amount of time is subtracted from the total parking time.
For example, a visitor who has parked for 1,5 hours and has a reduction card with a fixed time of two hours gets a free exit.
Fill in the number of Days, Hours and Minutes in the respective fields.
Percentile
The amount due is reduced by a set percentage of the original sum.
For example: a visitor who has to pay €10 and has a reduction card of 50% pays €5.
Fill in the Percentile in whole numbers, without decimals.
Fill in a maximum reduction amount, if applicable.
For example, if the maximum reduction amount is €10, a visitor who has to pay €50 and has a reduction card of 50% gets the maximum reduction of €10 and pays €40.
Sales Amount
The amount due is replaced by a set amount.
For example: a visitor who has to pay €10 and has a reduction card with a sales amount of €3 pays €3.
Fill in the Sales Amount in whole numbers, without decimals.
Tariff switch
The tariff applied to the parking time is changed.
For example: a visitor who has parked 4 hours during the day for €2,50/hour and has a tariff switch reduction card set to the more favorable night rate of €2/hour pays €8.
Select a Tariff from the dropdown menu.
|
Select the Charge type from the dropdown menu.
|
Charge type
|
|
Reduction cards are paid for by the issuing group. You can charge the group
When the cards are created (charge on issue). All cards are paid for, regardless whether they are used or not.
When the cards are actually used (charge on transaction). Unused cards will not be charged.
If you charge the group when the cards are actually used, you can either
Set a fixed amount per card (fixed charge on transaction) regardless of the actual value of the reduction. For example, you could create a set of reduction cards with a percentile reduction of 50% and sell them for €2,50 each.
Charge the exact reduction amount (exact charge on transaction).
When you have made your choice:
Select the Charge type from the dropdown menu.
Fill in the Charge amount, if applicable.
Select a currency from the dropdown menu.
Click Go to next step.
|
Fill in the Charge amount, if applicable.
Select a currency from the dropdown menu.
Click Go to next step.
Specify the validity
|
Validity
|
|
Reduction cards have a limited validity. You have to specify a date range in which the reduction card can be used. Additionally, you can set a time window in which it can be used. Between 9.00 AM and 6.00 PM, for example.
Select a Validity type from the dropdown menu. This can be a duration in days from the creation date, or a specific date range.
If you selected Duration, fill in the Duration in days.
If you selected Specific, pick a start date and an end date.
To set the time window in which the reduction can be applied:
Fill in a start and end time in the Allowed usage field.
You can set reduction cards to be used once, multiple times or unlimited times. Under Usage count
Set Unlimited to Yes if you want the cards to have no limit of usage.
Set Unlimited to No if you do want to limit the usage of the cards. Fill in the maximum Number of uses.
Click Go to next step.
|
Click Add template.
Generating reduction cards based on a template
To generate a set of reduction cards using a template:
Click Reduction cards in the menu bar.
Then click Reductions.
|
|
Select the car park for which the reduction cards have to be issued from the Car Parks dropdown menu.
Then click Add reduction.
|
|
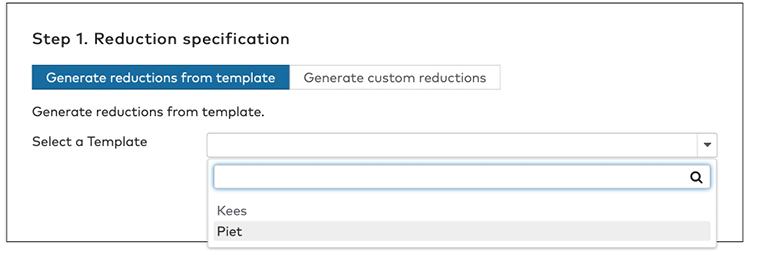
Select a template from the dropdown menu
|
Click Go to next step.
Set the printing options
|
Printing options
|
|
Set the Number of reduction cards to generate. The maximum number of cards is 9.999.
Select the appropriate Paper configuration.
Tick Export to CSV if you want to save the sequence numbers and bar code numbers to a separate file.
|
Click Generate reduction cards.
A PDF file with reduction cards is generated for printing.
Important! This file is not saved anywhere else in the system. It is only accessible at the time of generation, from this window.
Alternatively:
Click Reduction cards in the menu bar.
Then click Reduction templates.
|
|
To find a template, select a Car park or a Group and click Search.
Click the template you want to edit.
|
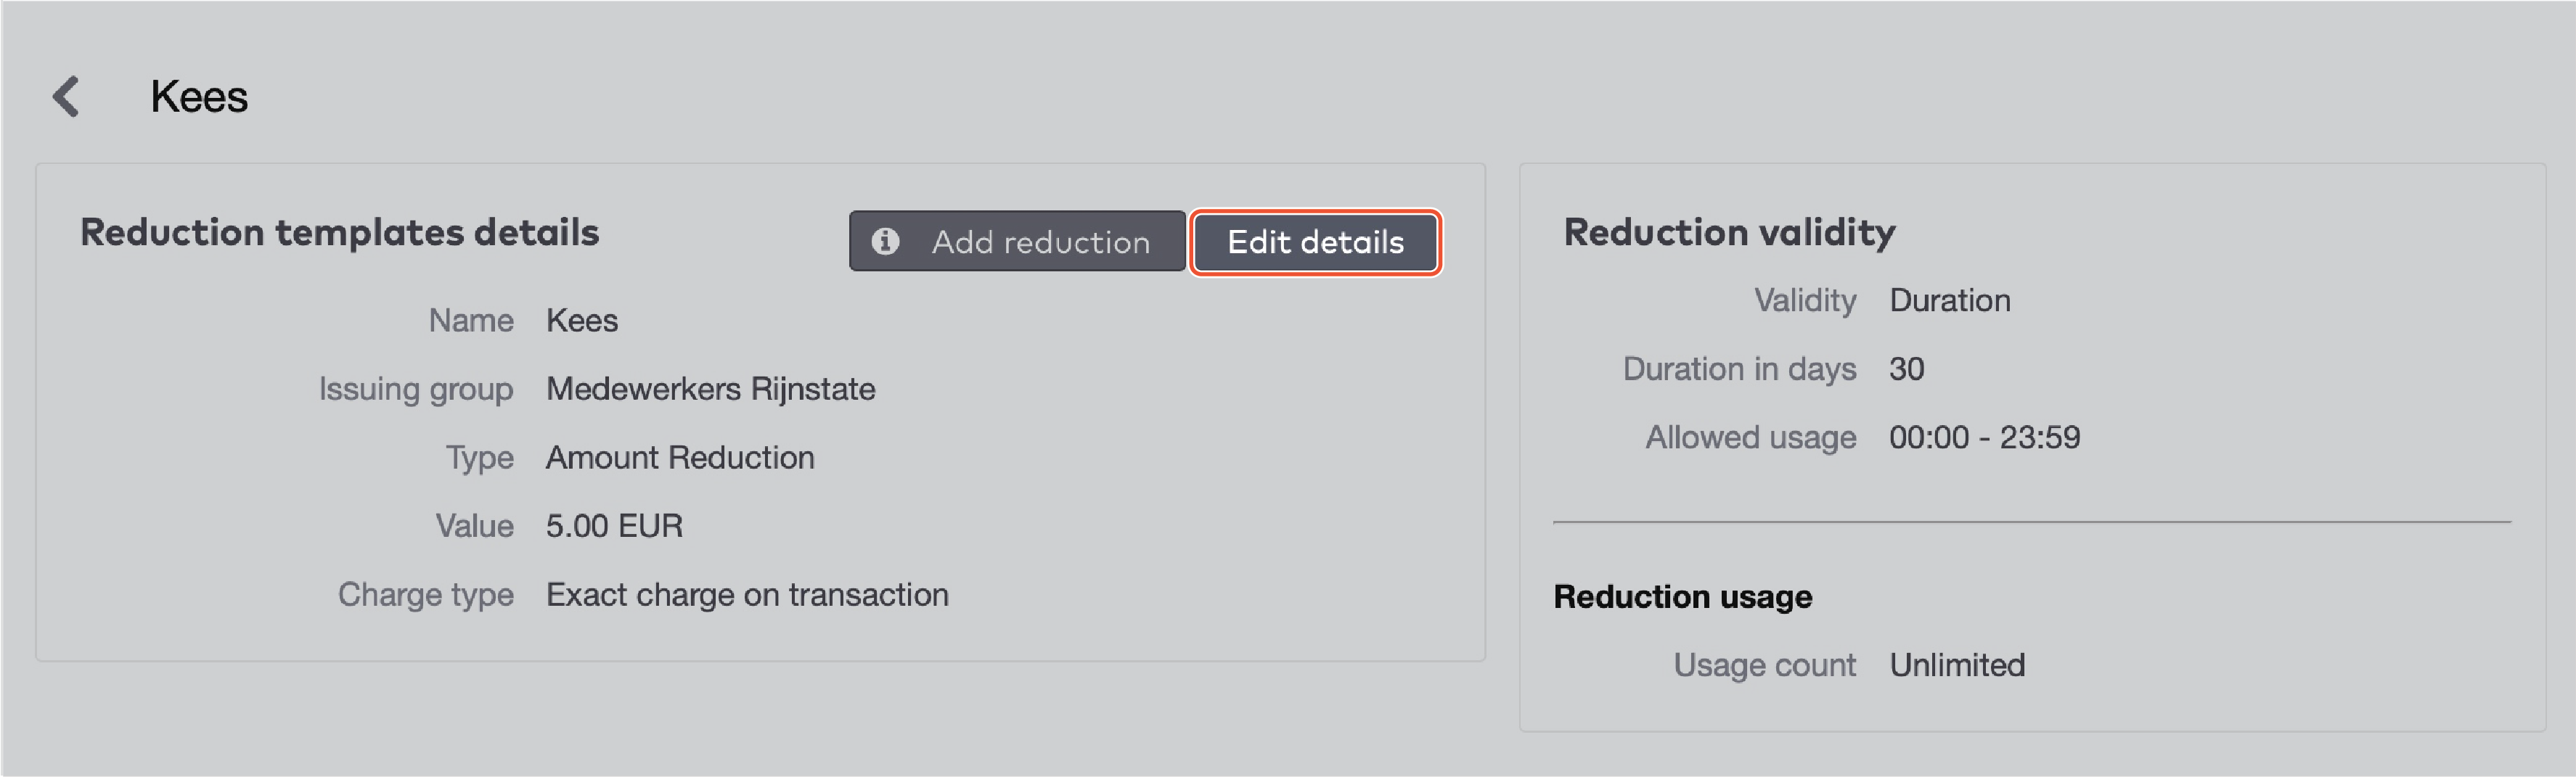
Click Add reduction.
|
Click Go to next step.
Set the printing options
|
Printing options
|
|
Set the Number of reduction cards to generate. The maximum number of cards is 9.999.
Select the appropriate Paper configuration.
Tick Export to CSV if you want to save the sequence numbers and bar code numbers to a separate file.
|
Click Generate reduction cards.
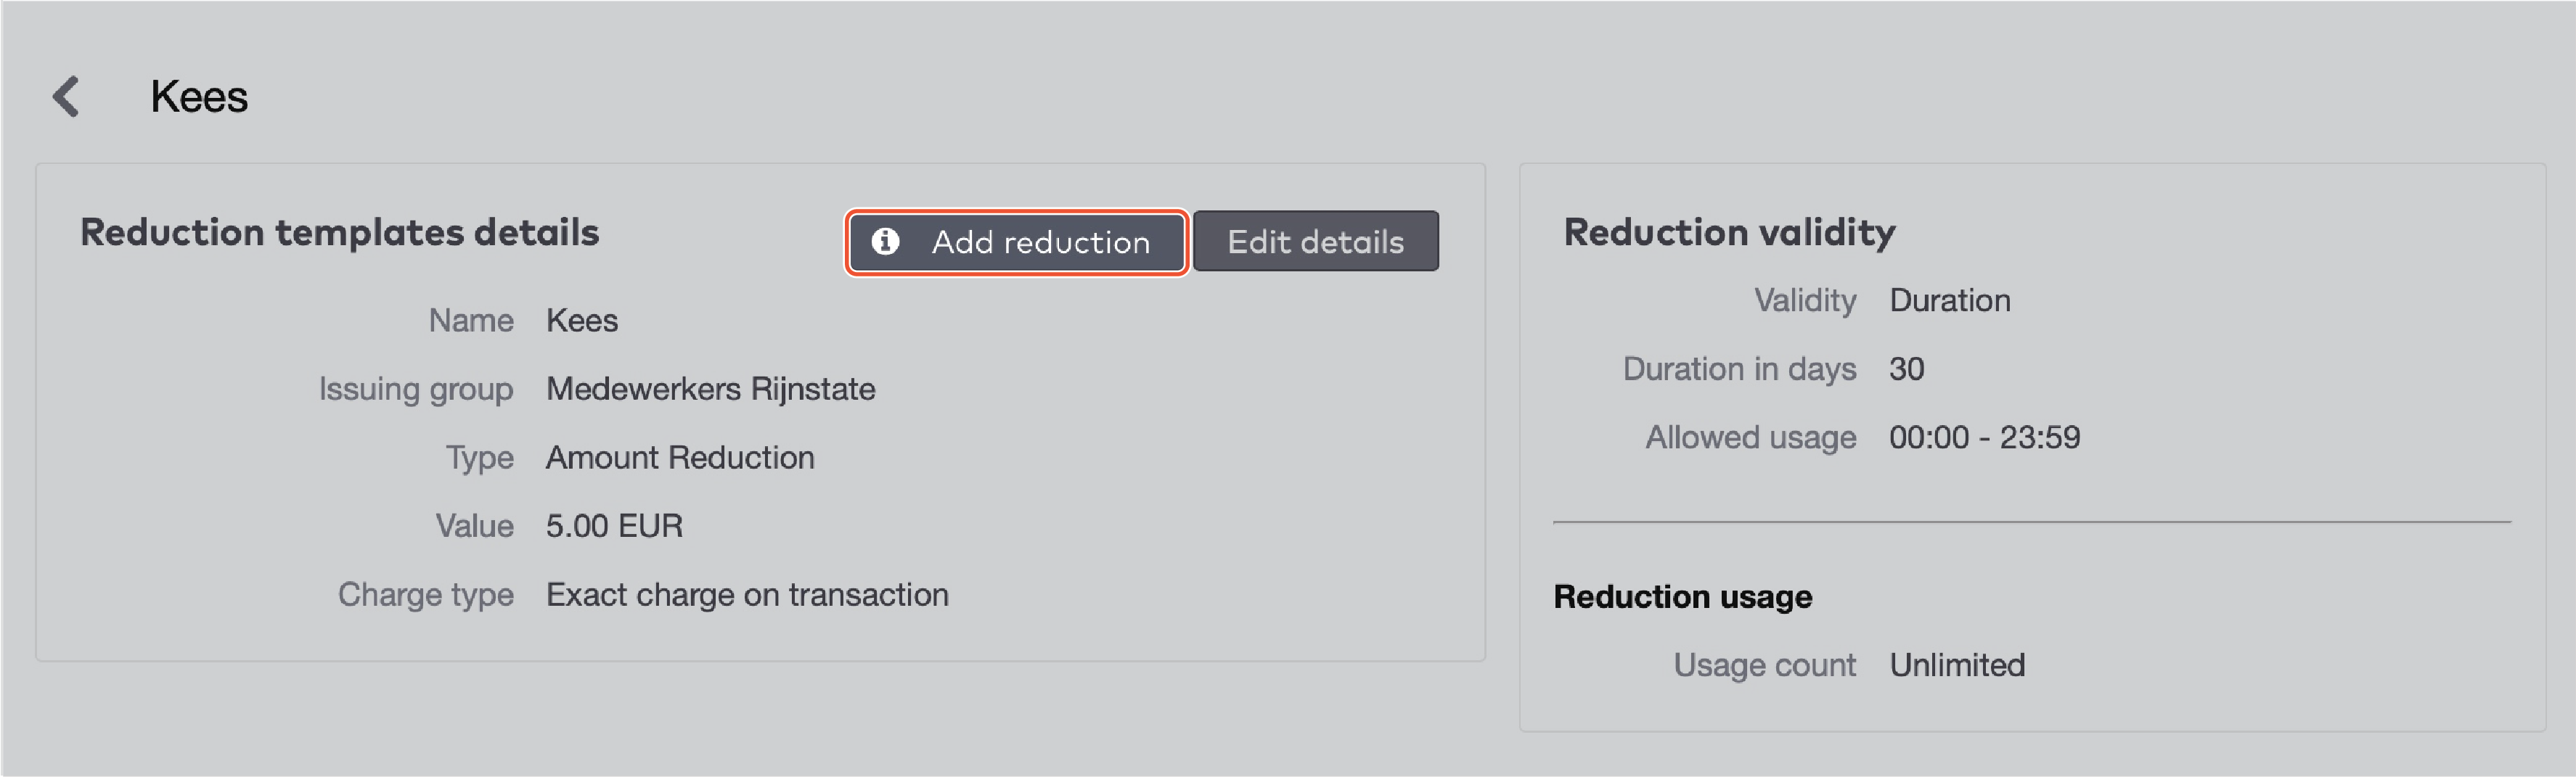
Editing a template
To change the details in a template:
Click Reduction cards in the menu bar.
Then click Reduction templates.
|
|
To find a template, select a Car park or a Group and click Search.
Click the template you want to edit.
|
|
Click Edit details.
|
Change any details and click Save.
Using reduction cards
A reduction card can be used when
The time of use is within its validity.
One or more uses remain on the card.
It is in active state.
The issuing group exists in the system.
Note that:
A reduction card can only be used once per parking transaction.
Per parking transaction more than one reduction card can be used.
When a visitor is in the process of paying a parking transaction, has used the reduction card, but decides to abort the transaction and come back later, the reduction is saved. The reduction is applied when the visitor returns.
Reduction cards cannot be used to buy subscriptions or to top up value cards.
Reduction cards can be applied when paying with a value card.
Reduction cards cannot be applied to replacement tickets, short cut products or pre-pard cards
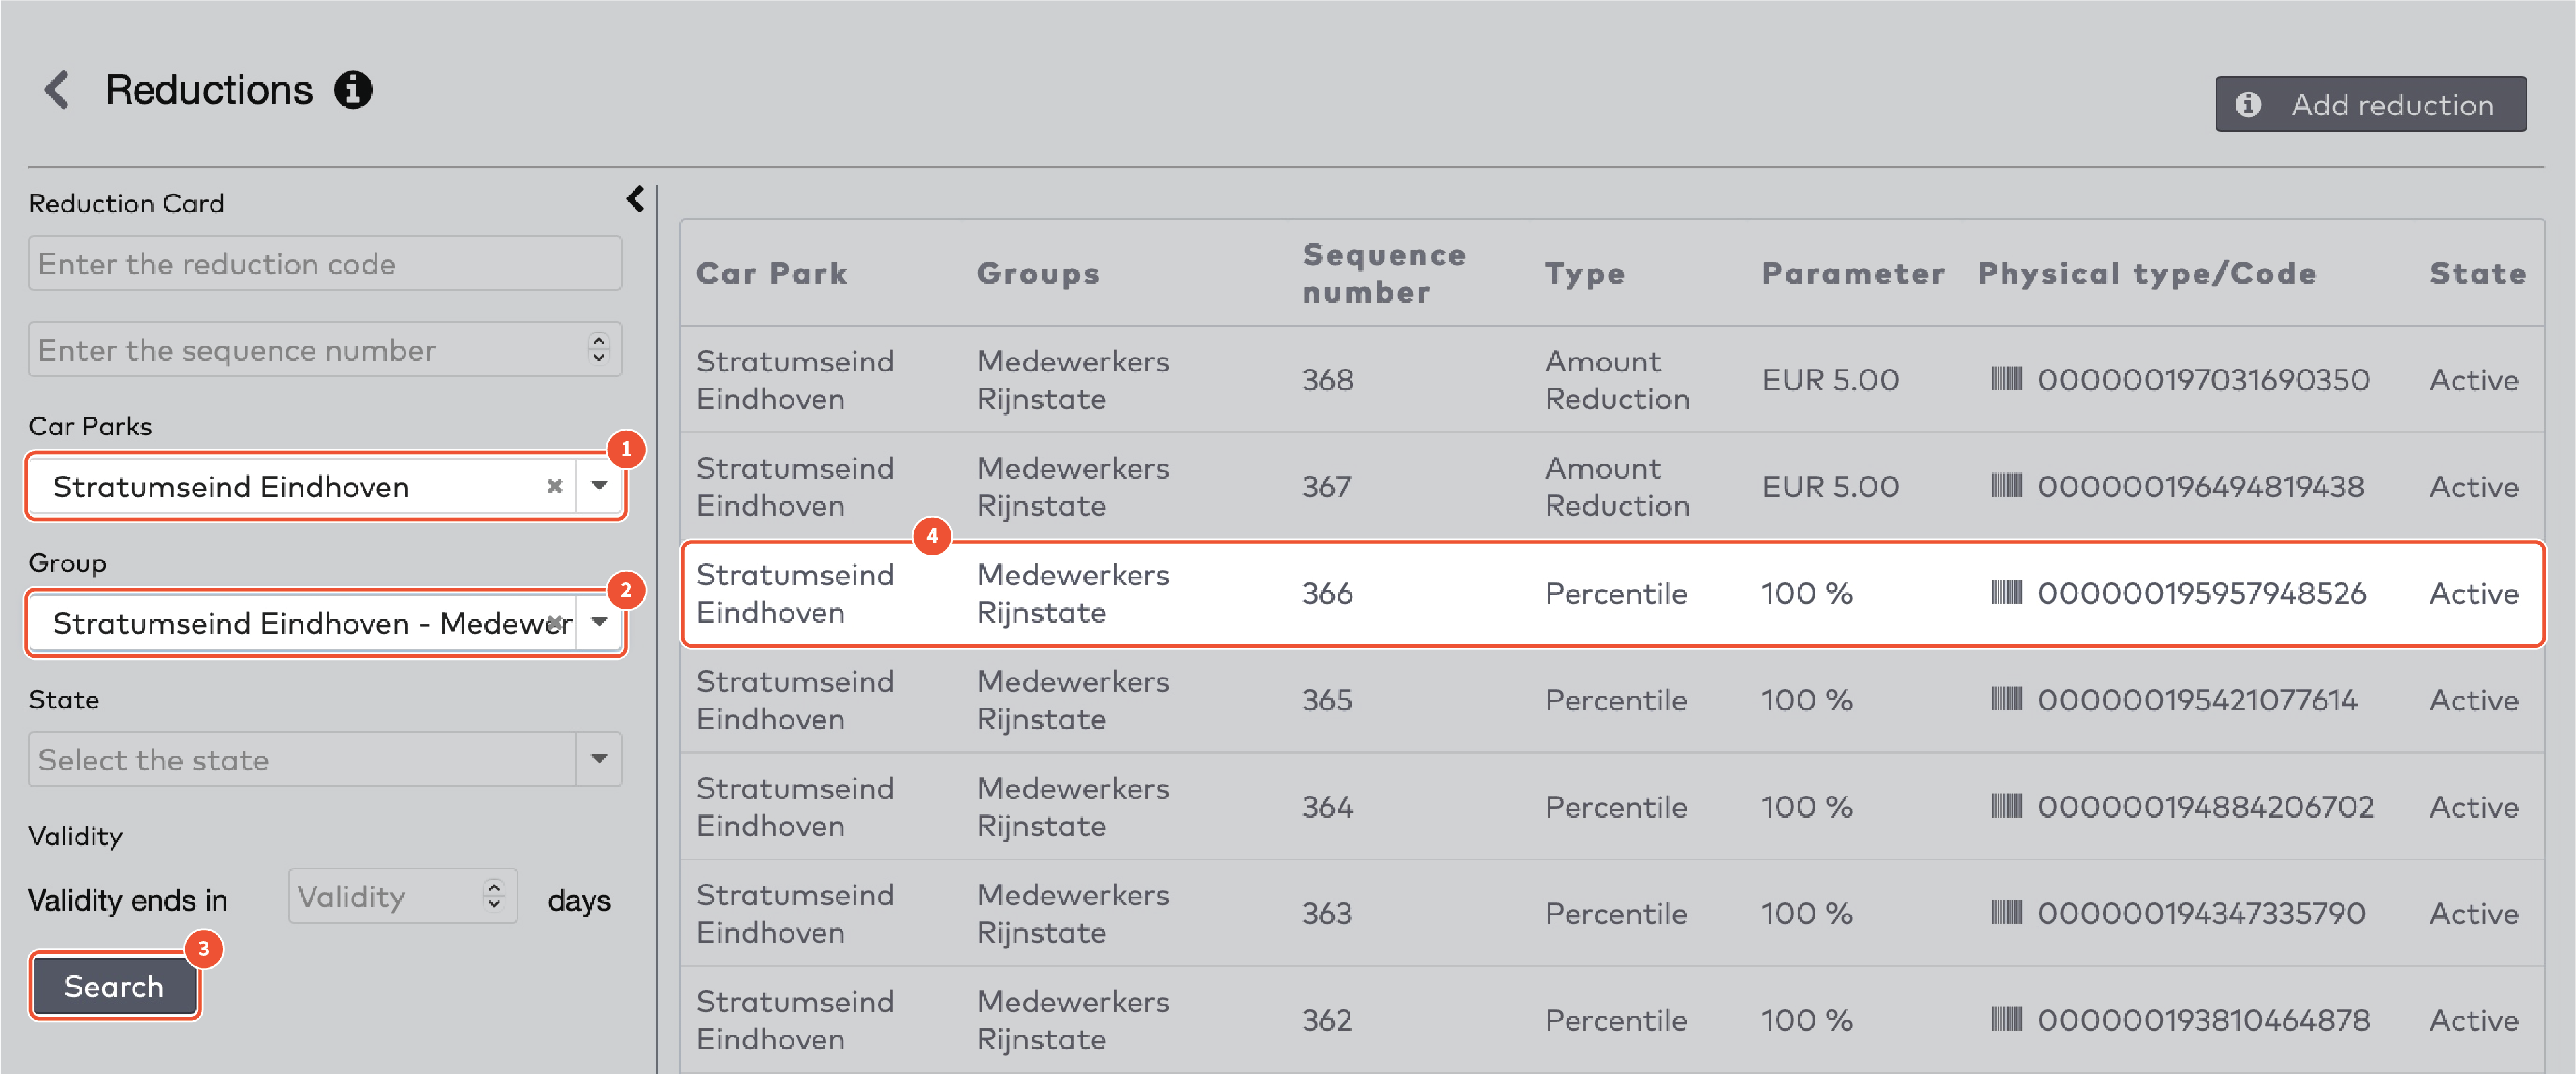
Finding reduction cards
You can find reduction cards by:
Searching by sequence number
Searching by bar code
Searching by car park
Searching by issuing group
To search for the sequence number or bar code:
Click Reduction cards in the menu bar.
Enter the sequence number or bar code in the search field.
Click the reduction card from the dropdown menu.
|
To search by car park or issuing group:
Click Reduction cards in the menu bar.
Click Reductions.
Select the Car park from the dropdown menu.
Or select the issuing Group from the dropdown menu.
Click Search.
Click the right reduction card.
|
NOTE Some reductions in the list do not have a sequence number or bar code. Those are direct reductions or reductions with different identifiers such as:
AWID
HID
the license plate
MAGSTRIPE
MIFARE
NEDAP
RFID
Token
PROTON
Contracts
Contracts contain rules for payment, access rights and other parking related agreements.
Contracts are assigned to visitors. Every visitor has a contract.
A visitor is a person with access rights.
A group usually is a company arranging payment and access for multiple visitors.
A contract is assigned:
automatically, for example, when a new visitor gets a ticket from the entry station.
manually, for example, when creating a visitor with a group subscription or generating a one time exit card.
Contract types
Contract types are templates for contracts. Each car park has its own collection of contract types. If you want to use the same contract type in multiple car parks, you need to manually recreate it for each car park.
Finding a contract type
To find a contract type:
Click Contracts in the menu bar.
Then click Contract types.

|
Then do one of the following:
Type the name of the contract type in the search bar and click Search.
|
Click the contract type directly, choose a car park to filter by car park or type the name of the contract type in the search bar and click Search.
Creating a new contract type
To create a new contract type:
Click Contracts in the menu bar.
Then click Contract types.
|
|
Select the car park for which the contract type has to be created from the Car parks dropdown menu.
|
Then click Add contract.
|
Fill in a Name for the new contract type.
Set Details to Yes if you need address details. This is standard practice with visitors with a subscription.
Set Details to No if address details are not required. For example, if you’re creating a contract type for short term customers.
Ignore the Assignable contract type dropdown menu. This feature is not used at the moment.
Set the Validity type. Choose between Unlimited, Until date and time, Until duration after creation. This setting is applied to automatically added visitors only.
Check Default paid until if this contract type offers free parking time. For example, if the first hour is always free. Fill in the free Days, Hours and Minutes. This setting is applied to automatically added visitors only.
Click Go to next step.
|
Select a Subscription type from the dropdown menu.
There are five subscription types:
Short term customers
Group subscription
Pre-paid subscription
Reservation
Value subscription
Short term customers
Short term customers are visitors who stay for a short period of time and pay for their visit afterwards.

|
Group subscription
A group can arrange access and payment for multiple visitors with a group subscription. Arranging payment is optional, visitors can also be charged directly.
|
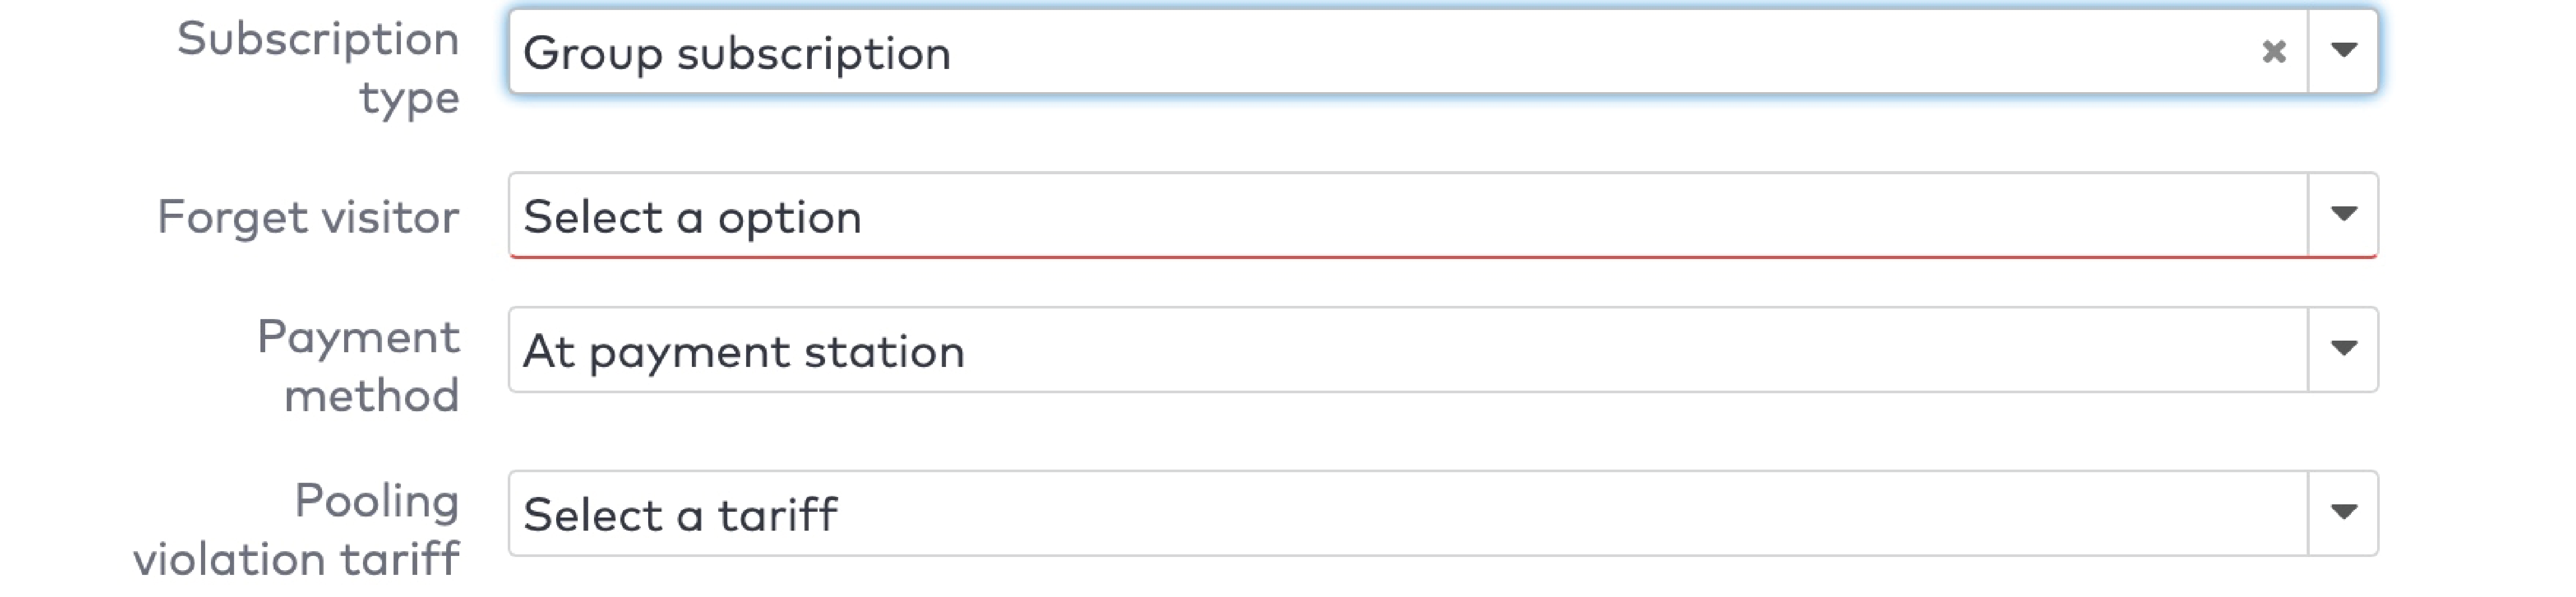
In the Forget visitor dropdown menu, select When validity ends to erase the link between the visitor and their identifiers when the contract is rendered invalid. The identifiers can then be re-used for another visitor. Select Never to always keep the link between the visitor and their identifiers. The identifiers can be re-used by the same visitor upon renewal.
In the payment method dropdown menu, select By group invoice to invoice the group. Select At payment station when the groups’ visitors pay by themselves.
Select a Pooling violation tariff from the dropdown menu. Learn more about pooling here.
Pre-paid subscription
With a pre-paid subscription, a visitor can pay for parking per year, month or week. When a tolerance period is specified, a visitor is allowed access even after their subscription has expired. The visitor can use this tolerance period to enter the car park to renew their subscription.
Reservation
This contract type is for reservations made through external systems.
Value subscription
With a value subscription, a visitor can pay for a set amount of parking time in advance. After each visit, the actual parking costs are subtracted from the pre-paid amount. Parking time can be charged according to any tariff profile.
|
When you have made your choice:
Select the appropriate Tax profile.
Select a custom counter, if applicable. Learn more about custom counters here .
Next, specify access rights per section.
Set Belongs in to Yes if the normal tariff applies for this section. Set to No if the violation tariff applies for this section.
Set Allowed in to Yes if visitors on this contract type may enter this section. If not, set to No. This option is available only if there are restricted sections in this car park.
Select the Tariff profile for this contract type in this section.
Choose one section to be the Default section. Only one section can be the default.
Click Go to next step.
In the advanced configuration screen:
You can configure Special access rights. Select Visitor is allowed to enter the car park when car park is full if this contract type is used for staff, service personnel or other people who need to be able to access the car park at all times. Select None for other visitors.
|
ParkID detects misuse of visitor identifiers. This is called anti-pass back. For example: when the same visitor identifier is used by two or more visitors at the same time.
|
Use the When location is unknown dropdown menu to determine what should be done when entry or exit is not properly registered. For example, in case of an emergency, or when a short term customer is converted to a subscription and gets a new ticket.

|
Use the Check current visitor location dropdown menu to determine anti pass-back behavior.

|
Use the Visitor identifiers dropdown menu to determine how visitors get access.
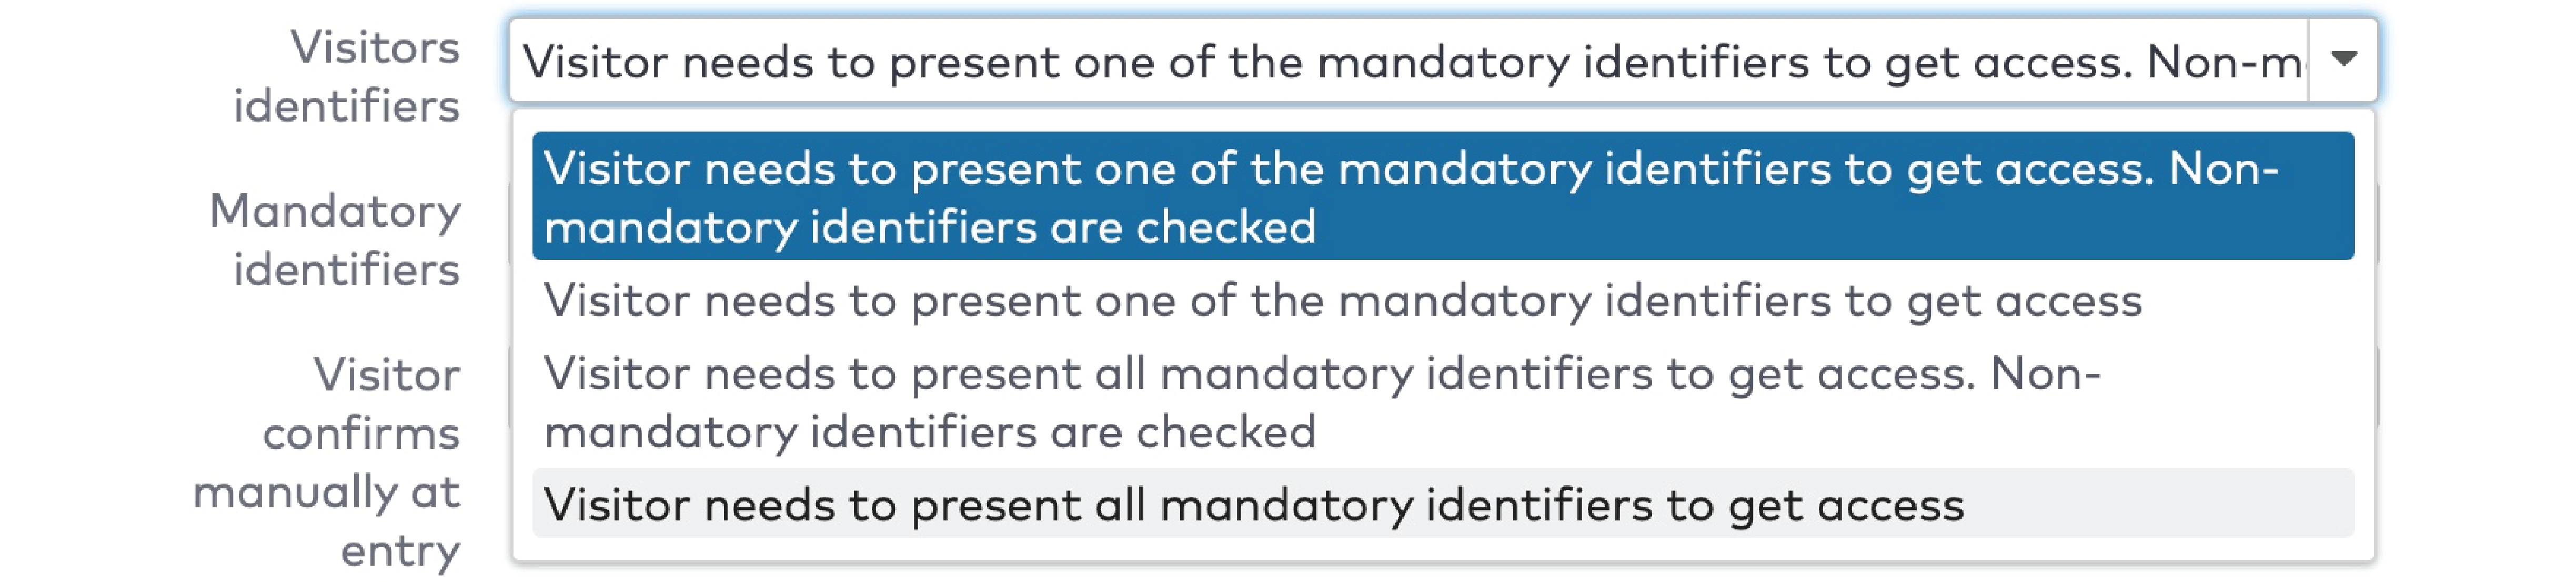
|
Select the Mandatory identifiers for this contract type. Select None if none of the identifiers are mandatory.

|
Set Visitor confirms manually at entry to Yes if this contract type requires visitors to confirm their entry. For example, when a visitor uses a third party identifier, for example ParkMobile. Set to No if entry is registered automatically.

|
Click Add contract.
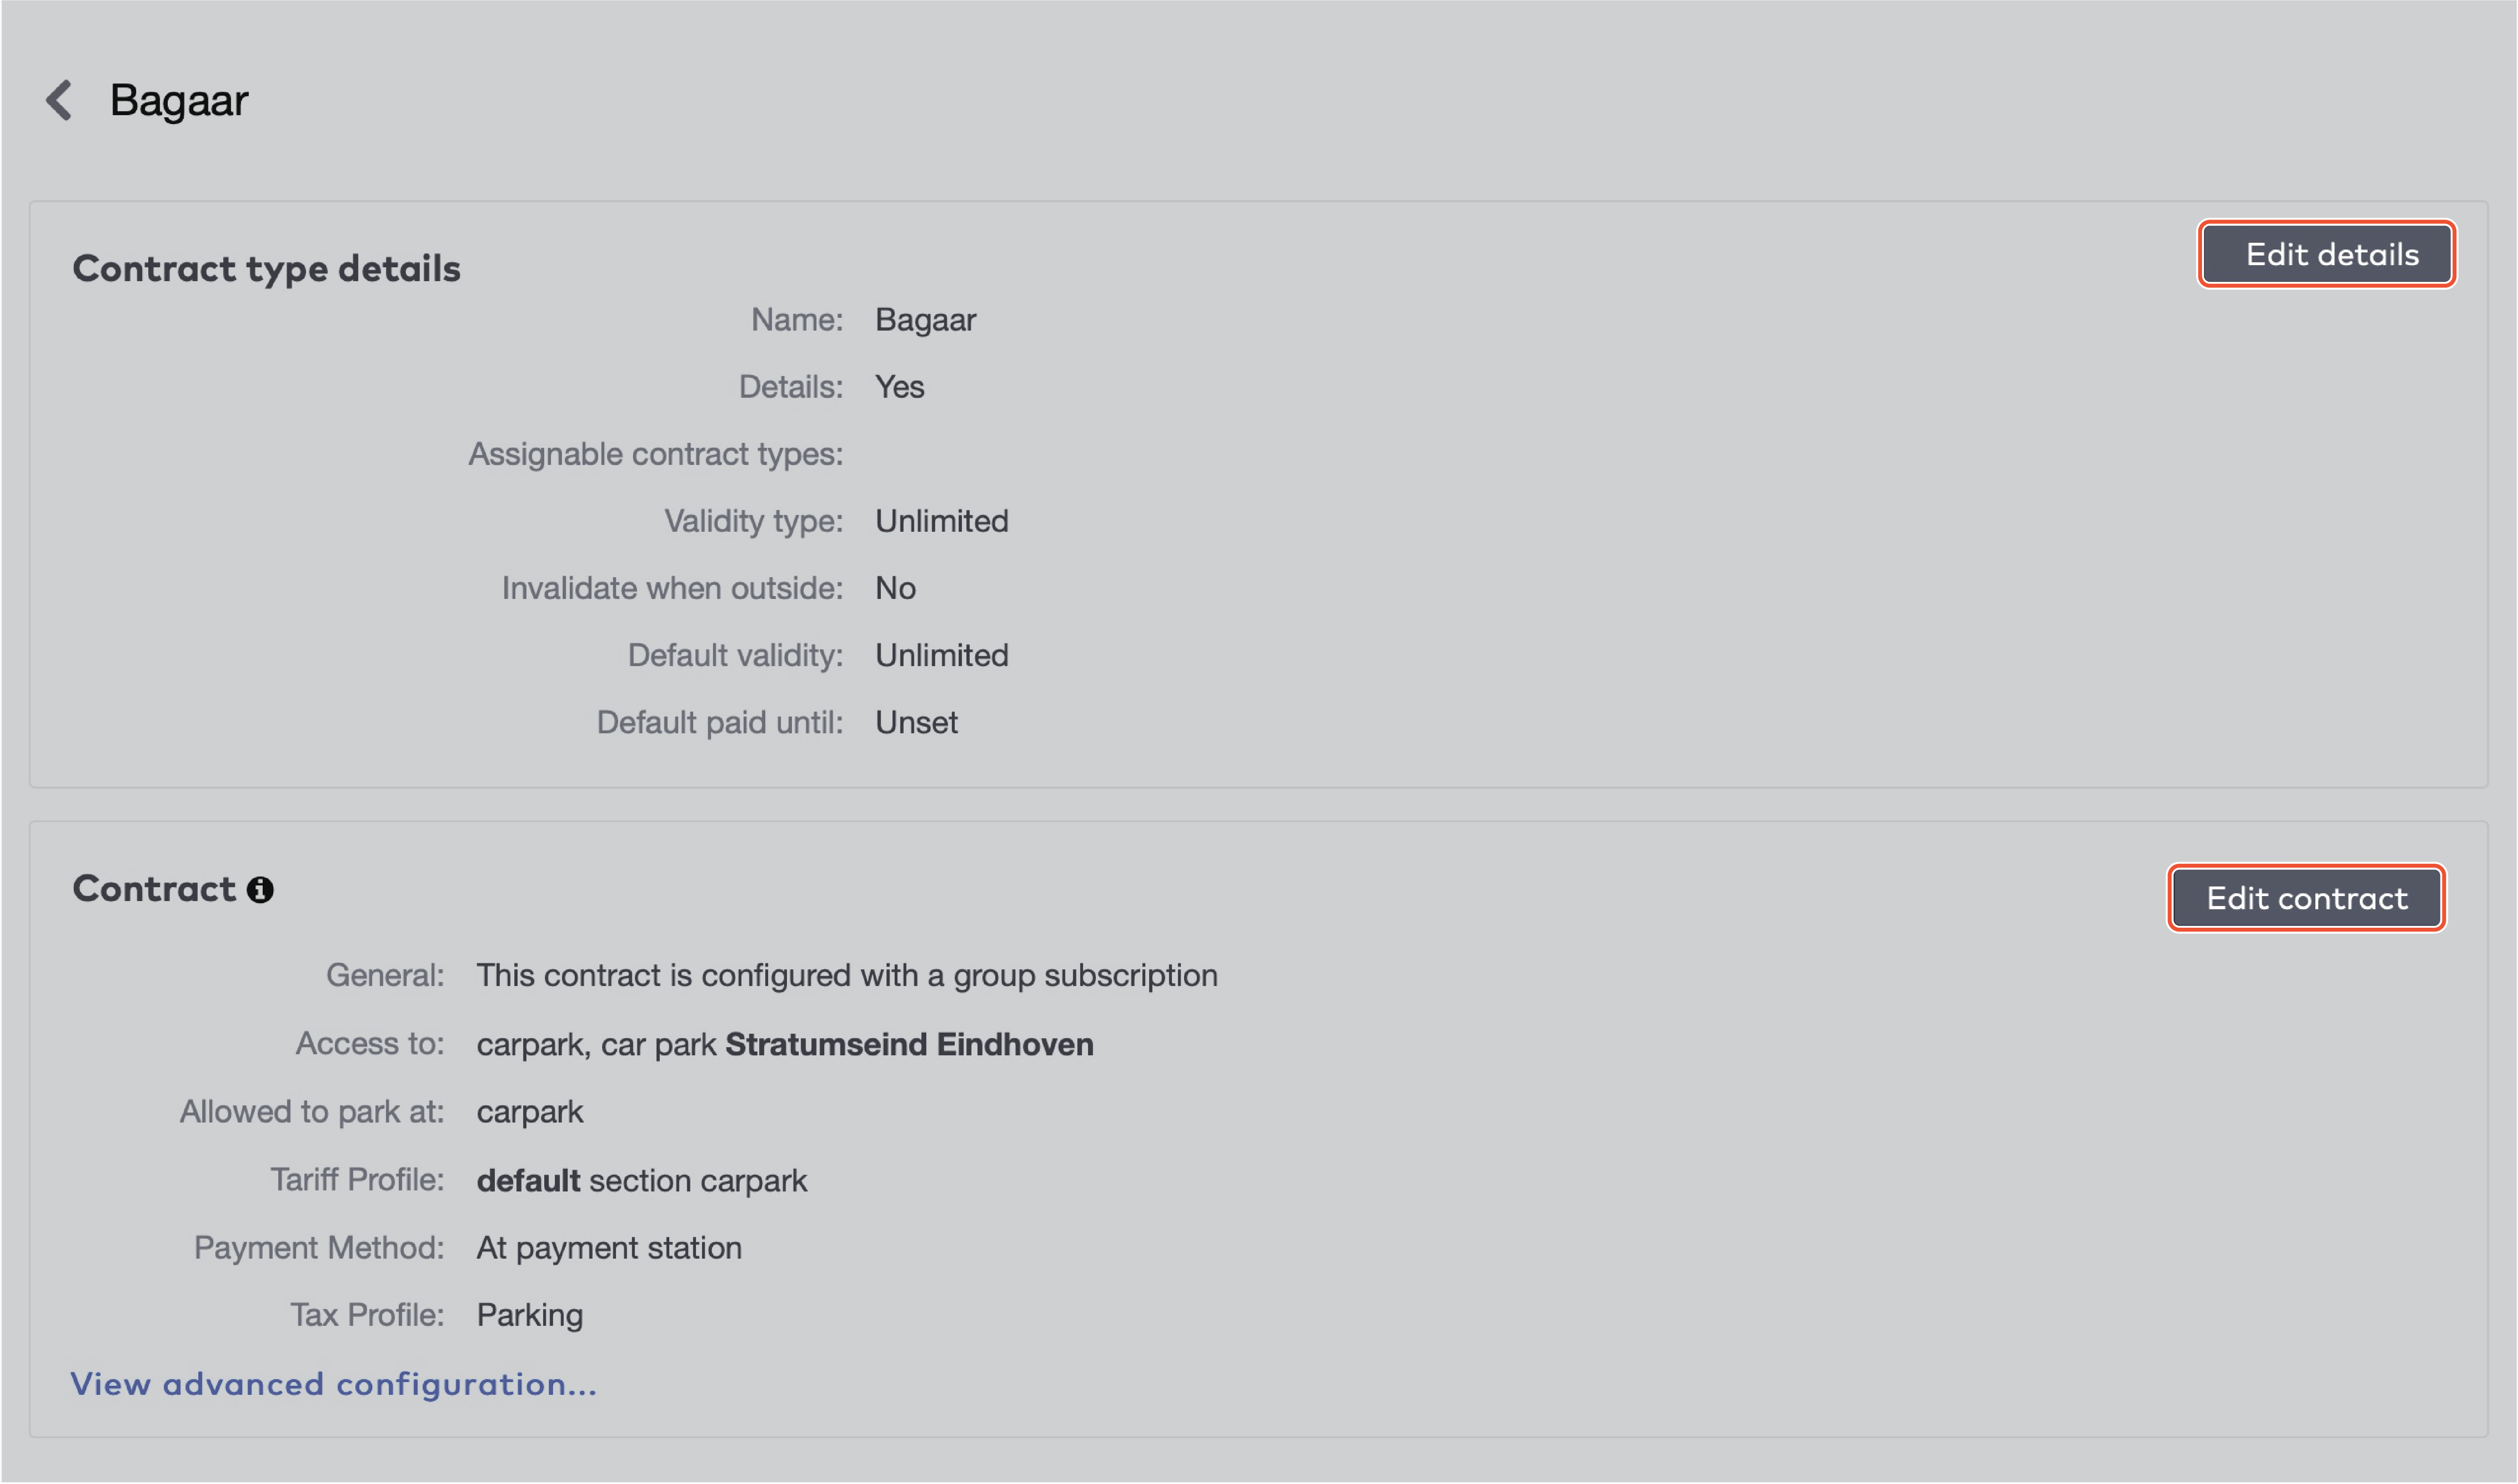
Editing a contract type
Contract types and contracts are linked. Changes you make to a certain contract type are applied to the contracts that use that contract type. When you make a change to one of the fields in a contract, the link between that field and the corresponding field in the contract type is erased. All other fields stay linked.
To edit a contract type:
Click Contracts in the menu bar.
Then click Contract types.
|
|
Browse the list and click the contract type you want to edit or use the Type search bar to find it, then click it.
|
|
Click Edit details or Edit contract to edit the contract type.
|
Make any changes and click Save. Click Cancel to discard changes.
Adding a schedule to a contract
You can use schedules with contracts to limit access to sections of the car park on certain days, and at certain times.
To add a schedule to a contract:
Click Contracts in the menu bar.
Then click Contract types.
|
|
Browse the list and click the contract type you want to edit or use the Type search bar to find it, then click it.
|
|
Click Edit contract.
Click Add section schedule.

|
Select the sections this schedule applies to.
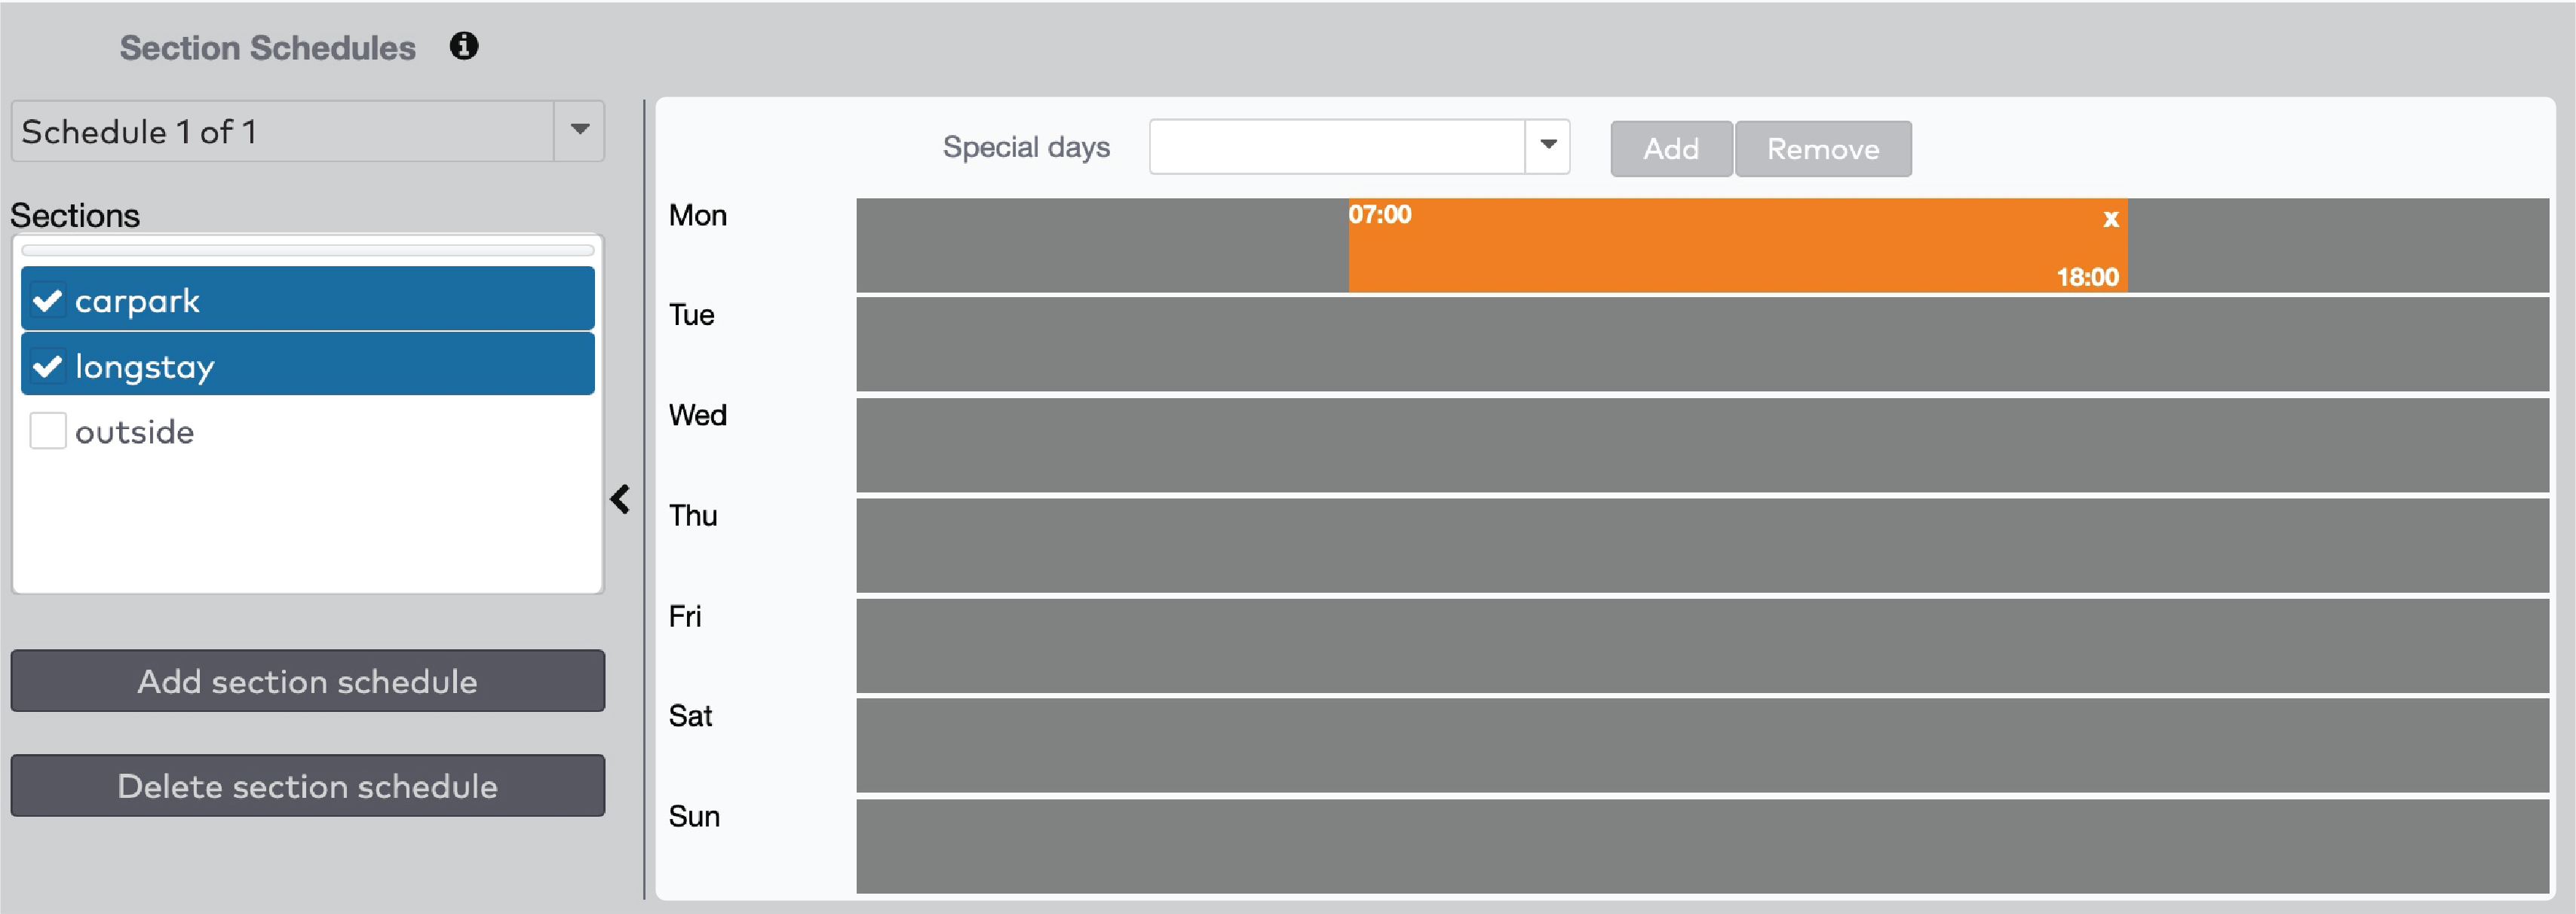
|
The schedule repeats weekly. The In schedule is displayed in orange. In the In schedule, the visitor is allowed in. The Out schedule is displayed in grey. In the Out schedule, the visitor is not allowed in.
Drag the orange bar to change the In schedule.

|
Click  to remove the orange bar.
to remove the orange bar.
Click anywhere in the grey bar to create a new orange bar and drag to resize it.

|
Groups
A group:
is a company arranging payment and access for multiple visitors and/or
is a company issuing reduction cards.
Every group belongs to one car park. A group can’t belong to multiple car parks. If a company is a client of multiple car parks, you need to create a new group in each car park.
Finding a group
To find a group:
Click Contracts in the menu bar.
Then click Groups.

|
Then do one of the following:
Type the name of the group in the search bar and click Search.

|
Click the group directly, choose a car park to filter by car park or type the name of the group in the search bar and click Search.
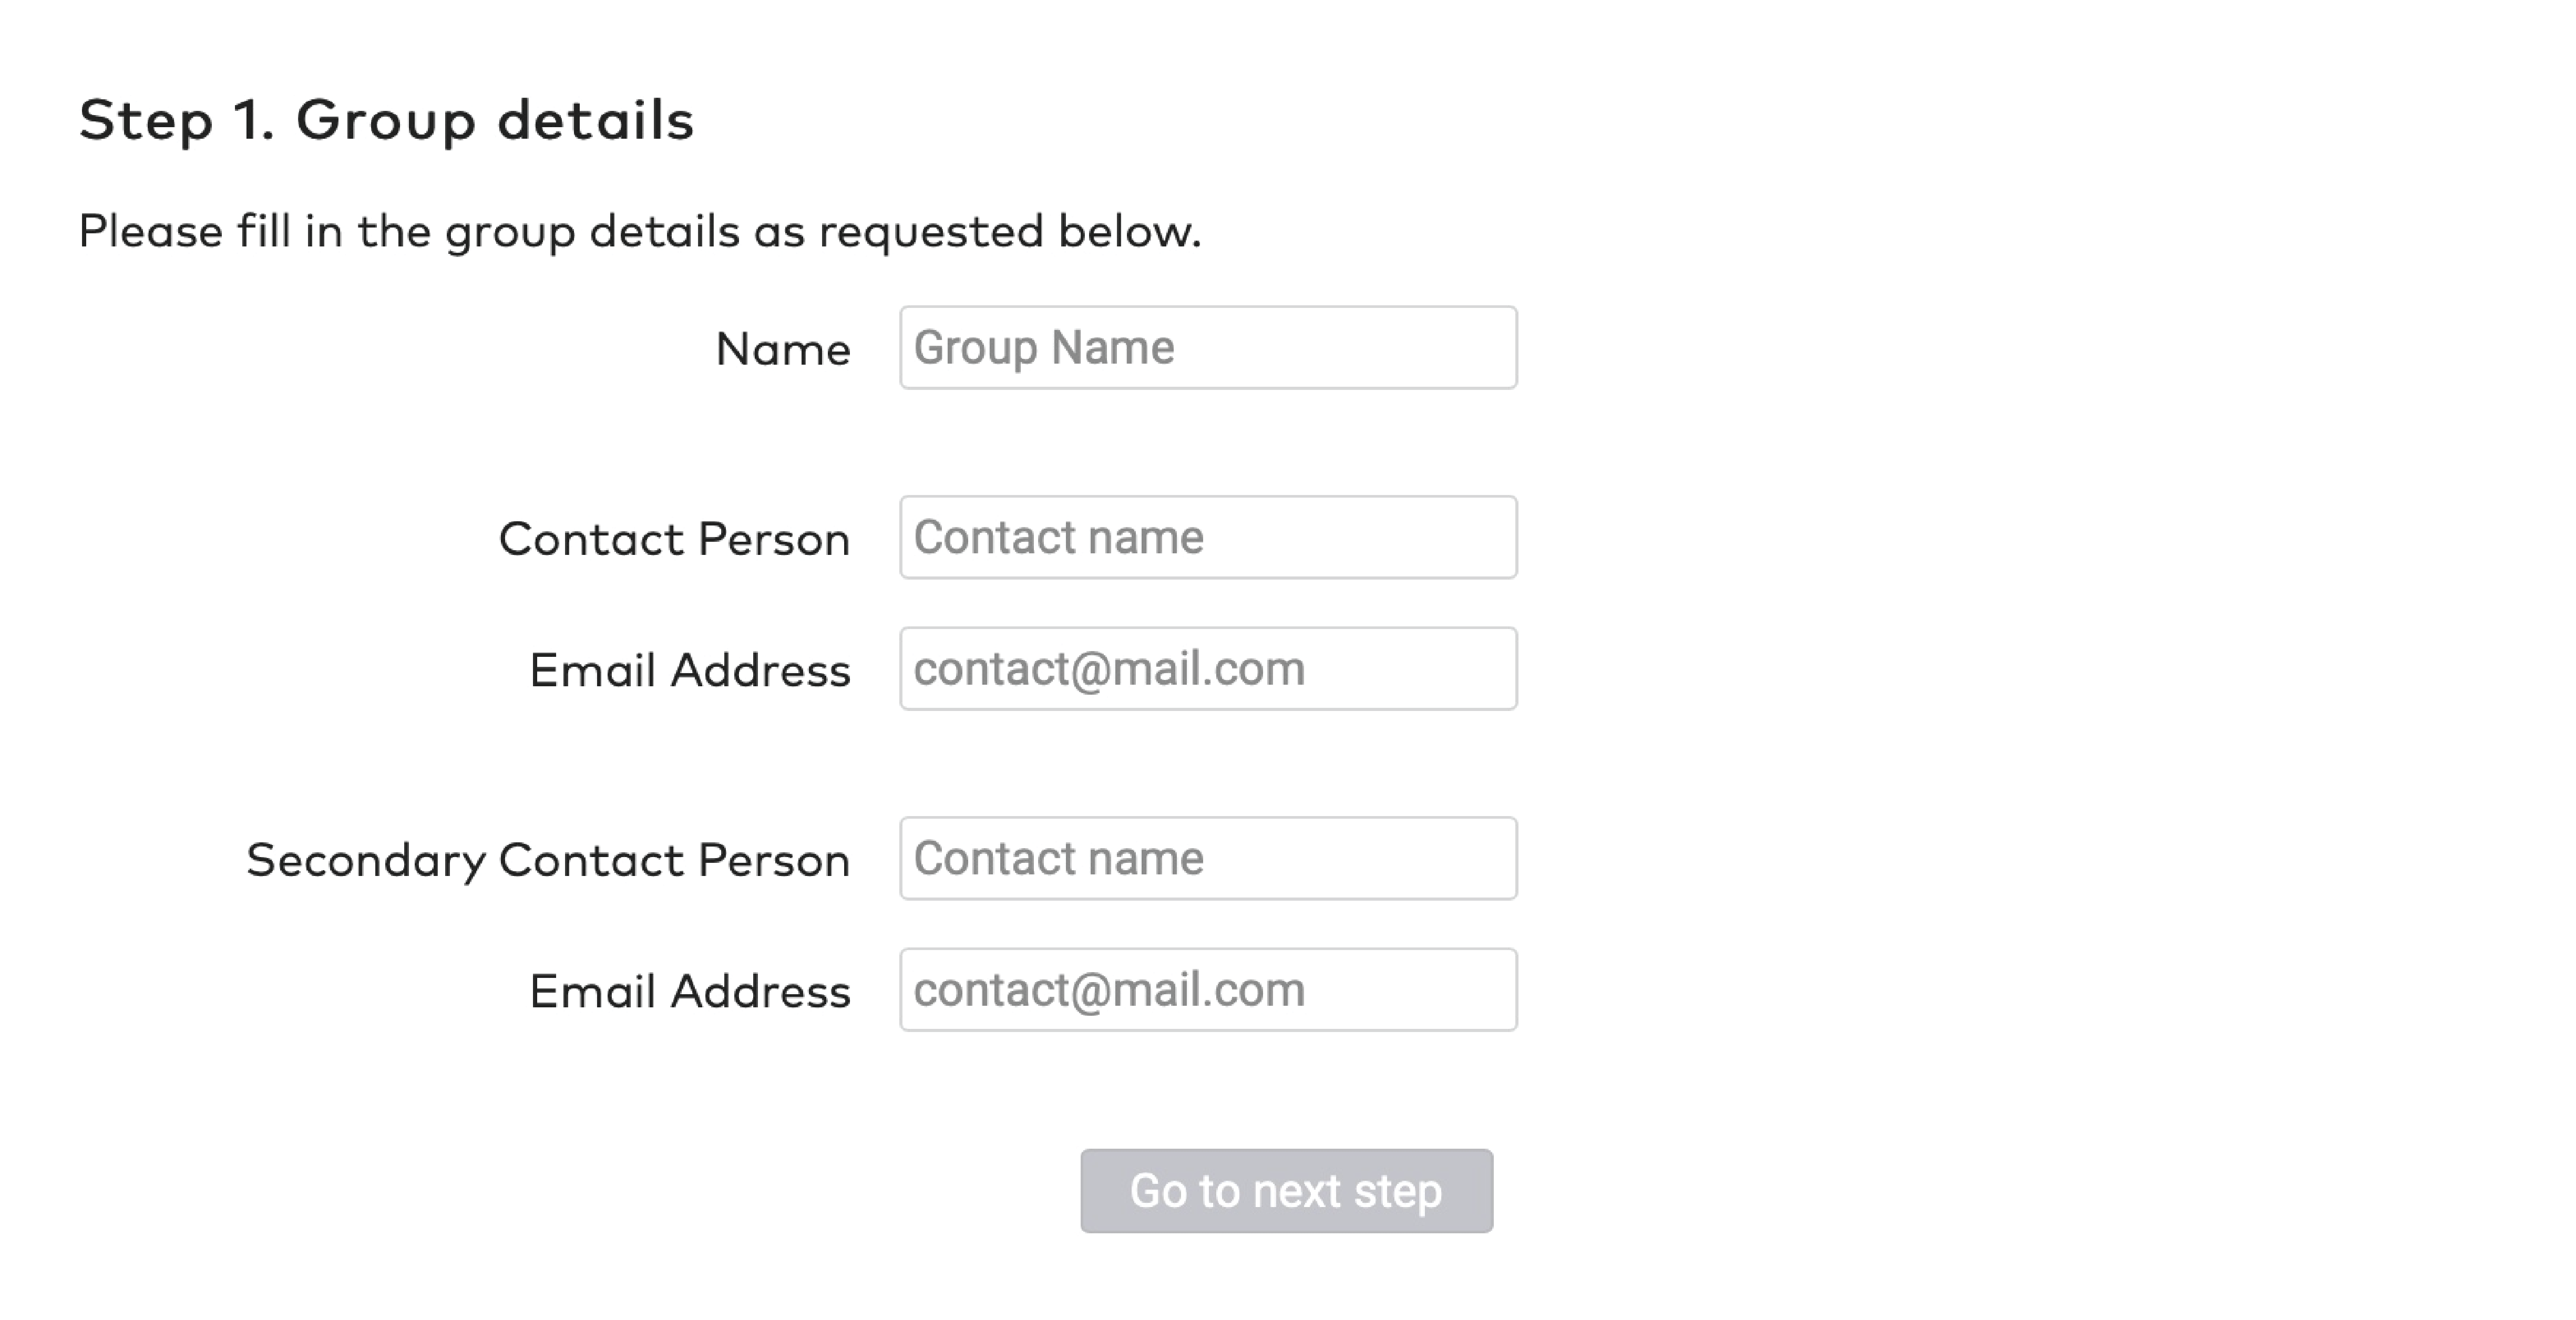
Creating a group
To create a new group:
Click Contracts in the menu bar.
Then click Groups.
|
|
Select the car park for which the contract type has to be created from the Car parks dropdown menu.

|
Click Add group.
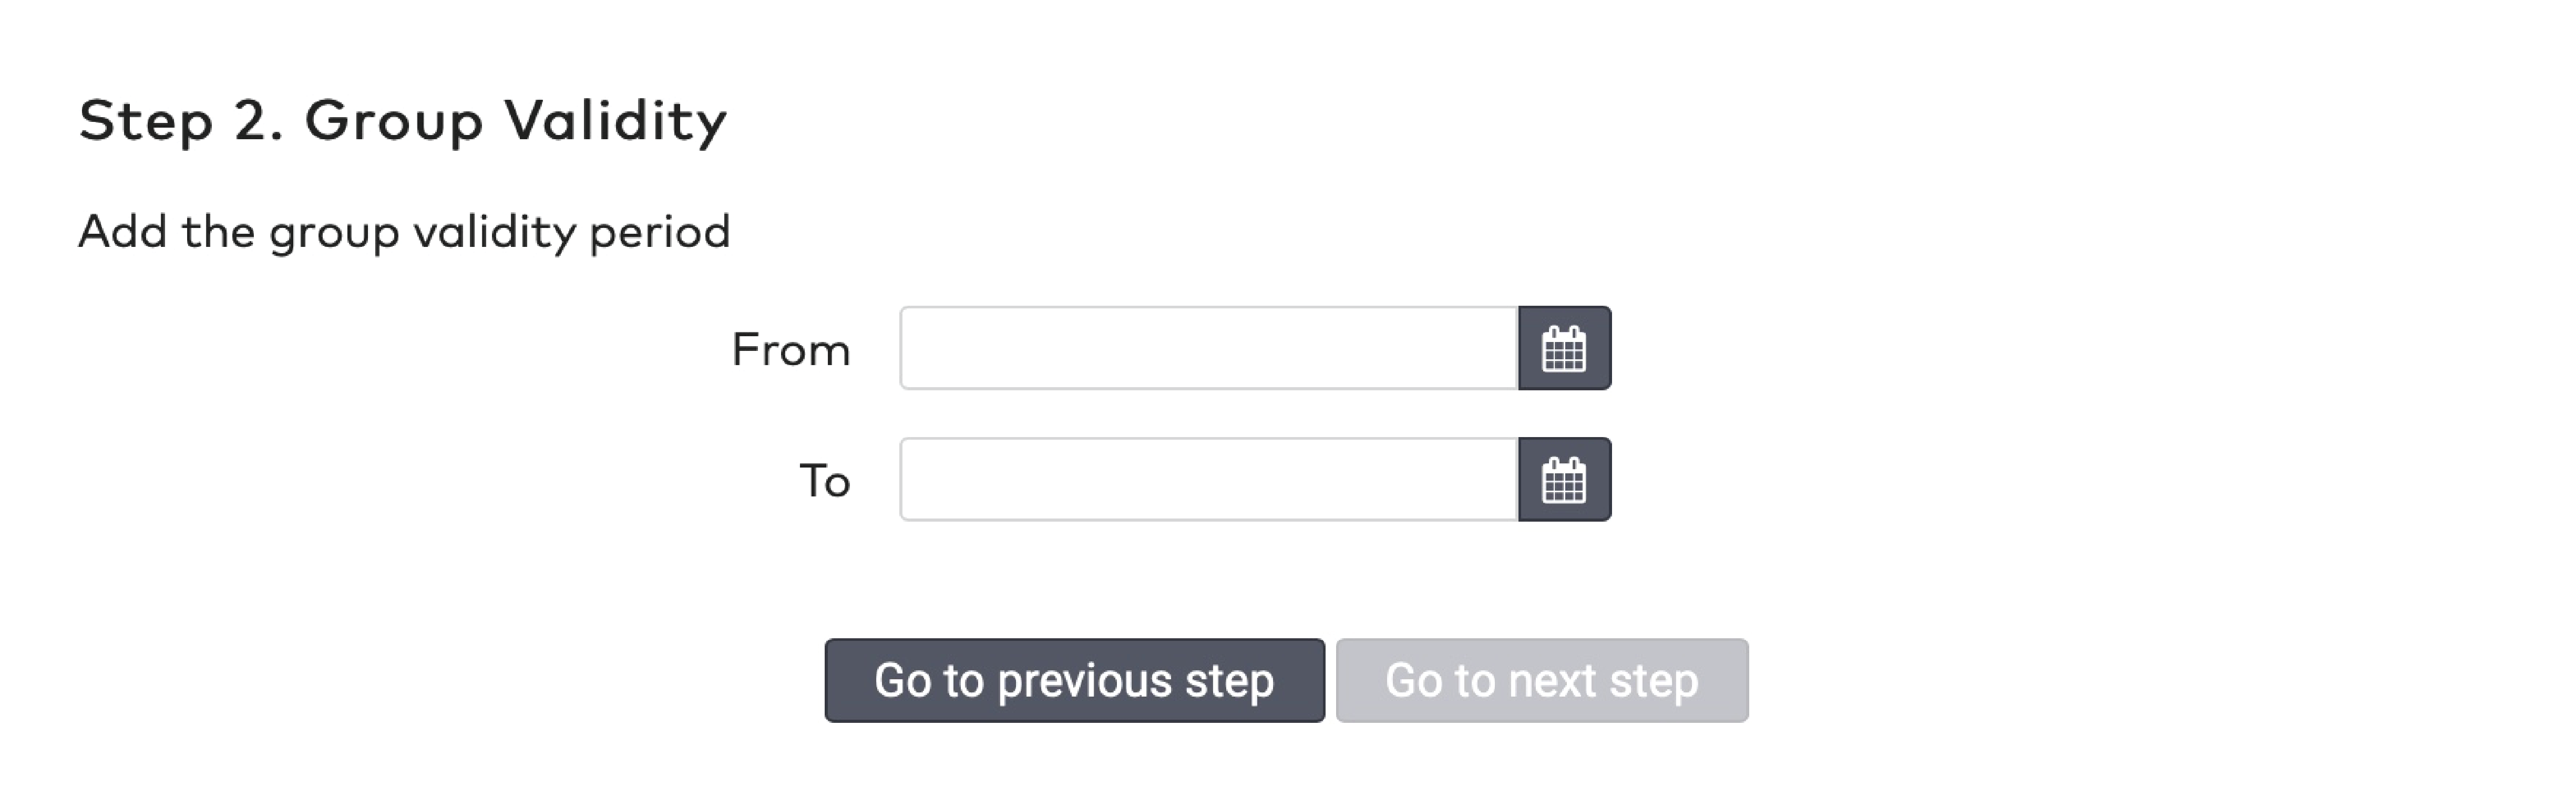
Enter the group details and click Go to next step.
|
Specify a Start date and an End date for the validity period of this group. Visitors belonging to this group can only enter the car park within the validity period.
|
|
With Pooling you can limit the number of visitors from a group. There are three types of pooling:
1.
Visitors are denied access when the maximum amount of visitors is reached.
2.
Visitors are charged the entire parking time as a pooling violation.
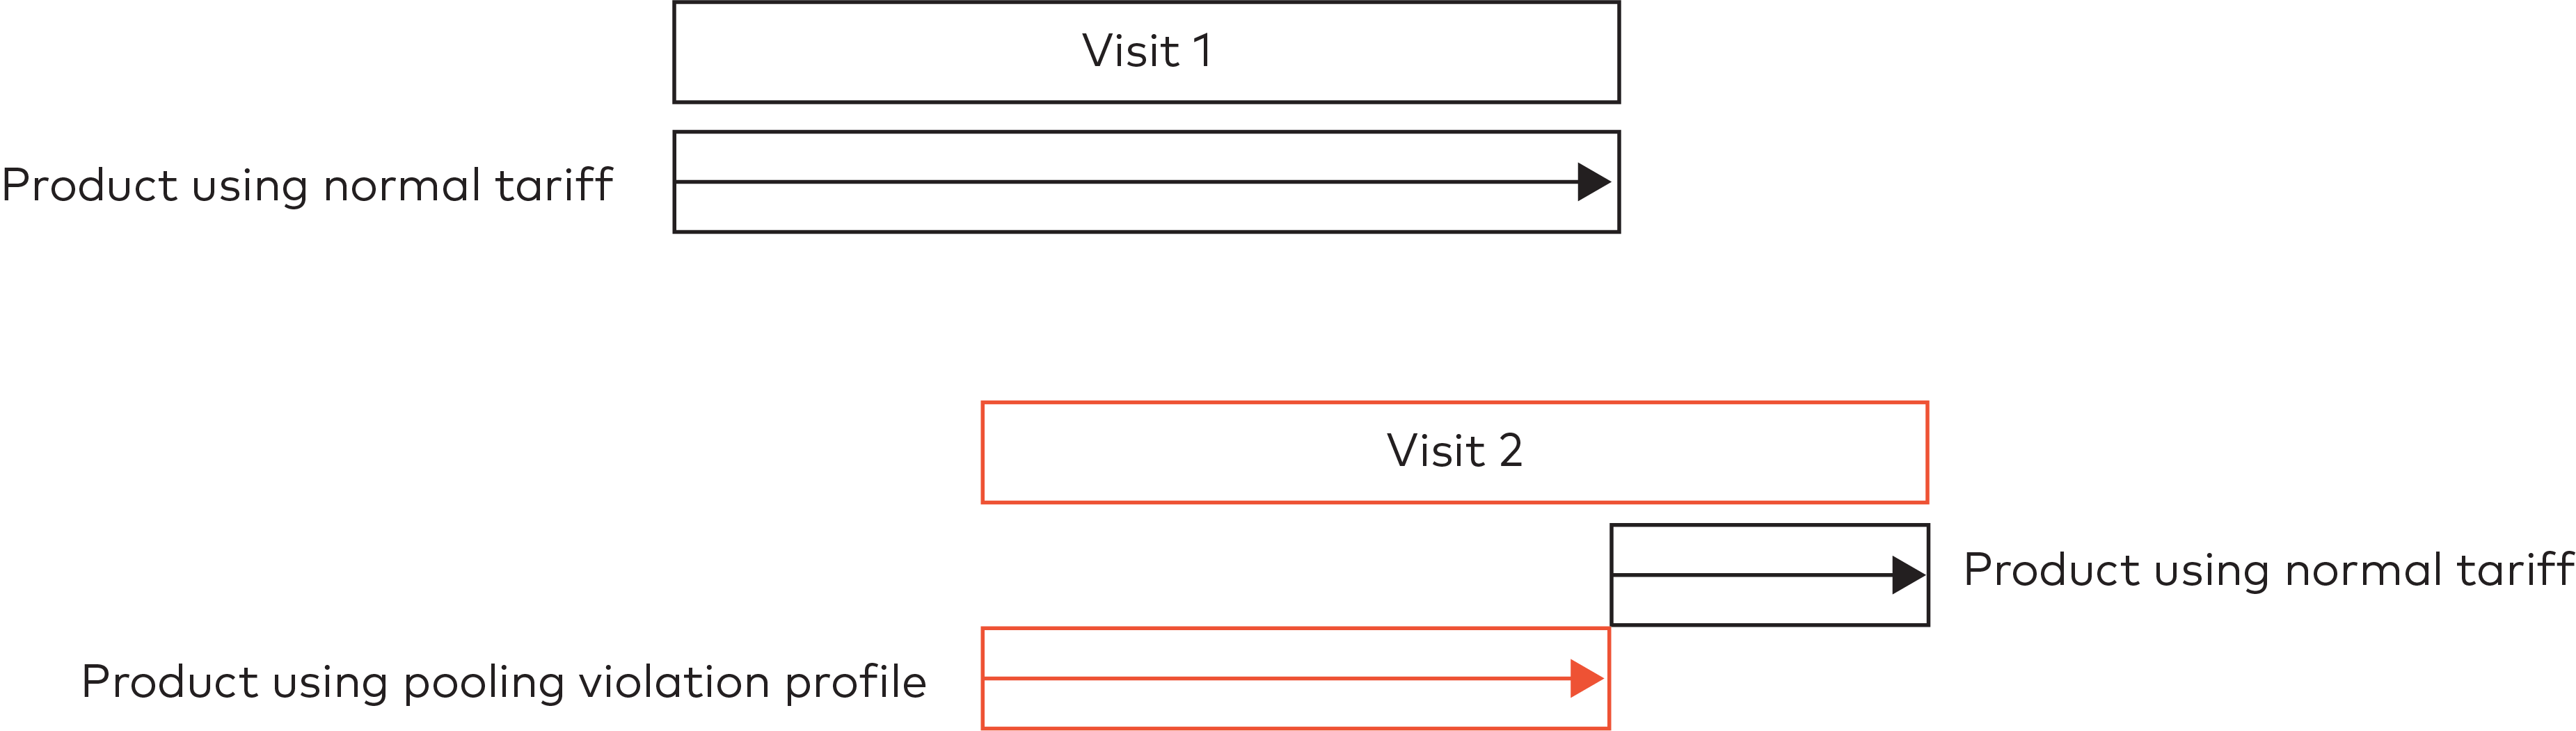
For example: a visitor (visit 1) enters the car park while making use of the pool. Visit 1 is charged with the normal tariff configured for the group. When visit 2 arrives, the pool is full. Visit 2 is charged a different tariff the entire time.
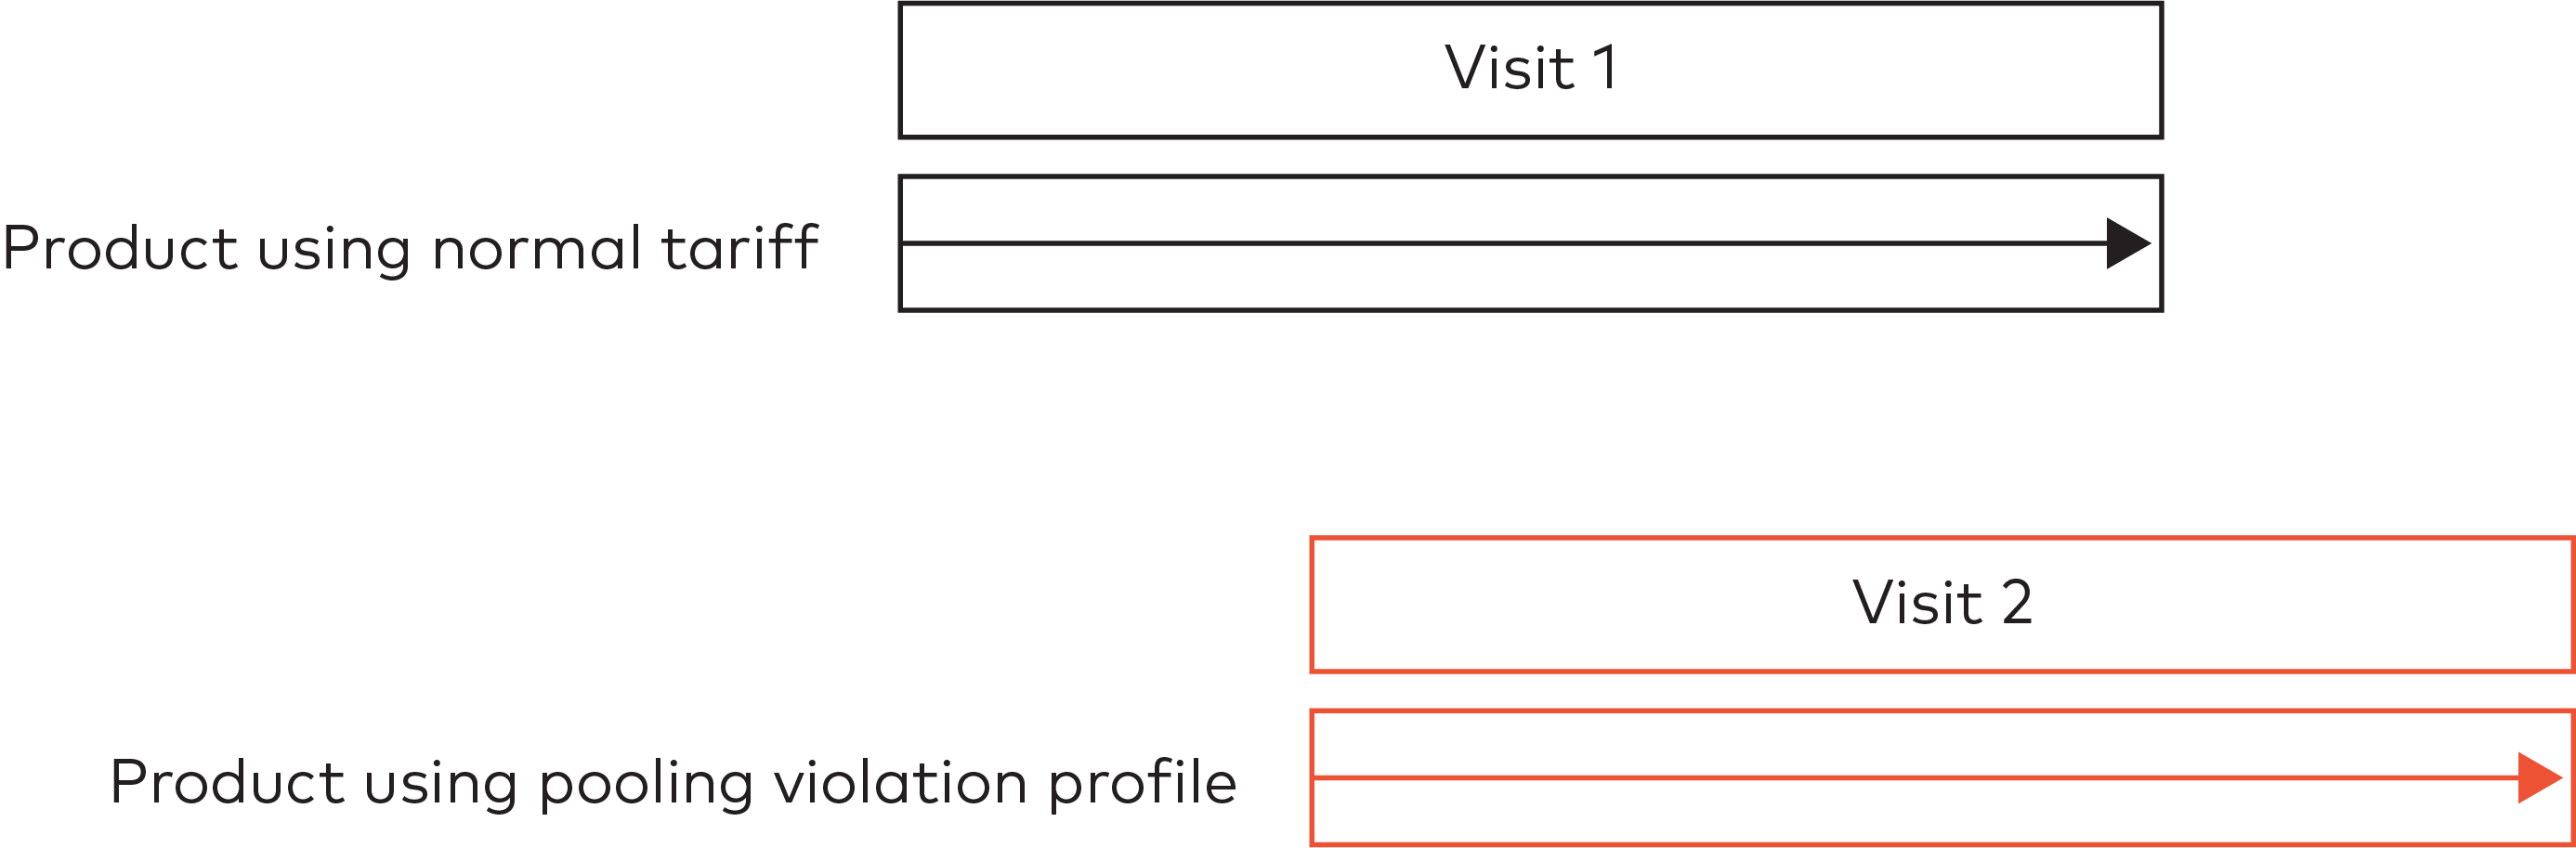
3.
Visitors are charged only the parking time under pooling violation.
For example: a visitor (visit 1) enters the car park while making use of the pool. Visit 1 is charged with the normal tariff configured for the group. When visit 2 arrives, the pool is full. Visit 2 is charged a different tariff. When visit 1 leaves, a spot becomes available in the pool. Visit 2 is charged the normal tariff from that moment onwards.
|
Click Yes in the Pooling configuration screen if you want this to be a pooling group. Click No if this is not a pooling group.

|

|
Specify the Maximum of visitors in pool.

|
Select what happens When maximum amount is reached.
|
|
Click Add group.
Editing a group
To edit a group:
Click Contracts in the menu bar.
Then click Groups.
|
|
Browse the list and click the group you want to edit or use the Group name search bar to find it, then click it.
Click Edit details to edit the group.
|
Edit any details and click Save. Click Cancel to discard changes.
Visitors
Every person with a car and access rights to the car park is a visitor.
Visitors are divided by the subscription type of their contract.
Short term customers are visitors who stay for a short period of time and pay for their visit afterwards.
Visitors with a group subscription are part of a group. Learn how to add a visitor to a group, and how to remove a visitor from a group.
Other subscription types are pre-paid subscription, reservation and value subscription.
Every visitor is granted access with at least one visitor identifier. Examples of identifiers include:
the barcode on the entry card
the license plate
a custom token based on a payment card
a custom RFID
magstripe cards
access management solutions from AWID, HID, MIFARE and NEDAP
The visitor’s contract determines which identifier is to be used.
Finding a visitor
To find a visitor, click Contracts in the menu bar. Then do one of the following:
Use the search bar and enter the name of the visitor, the identifier number or the group of the visitor. Wait for the results to appear on screen or click Search.

|
Click Visitors, specify the search parameters and click Search.
|
Click a visitor’s record to:
Adding a visitor
You’ll use Add Visitor when:
Generating a one time exit card
To generate a one time exit card:
Click Contracts in the menu bar.
Click Visitors.
|
|
Select the car park for which the one time exit card has to be generated from the Car parks dropdown menu.
|
Click Add visitor.
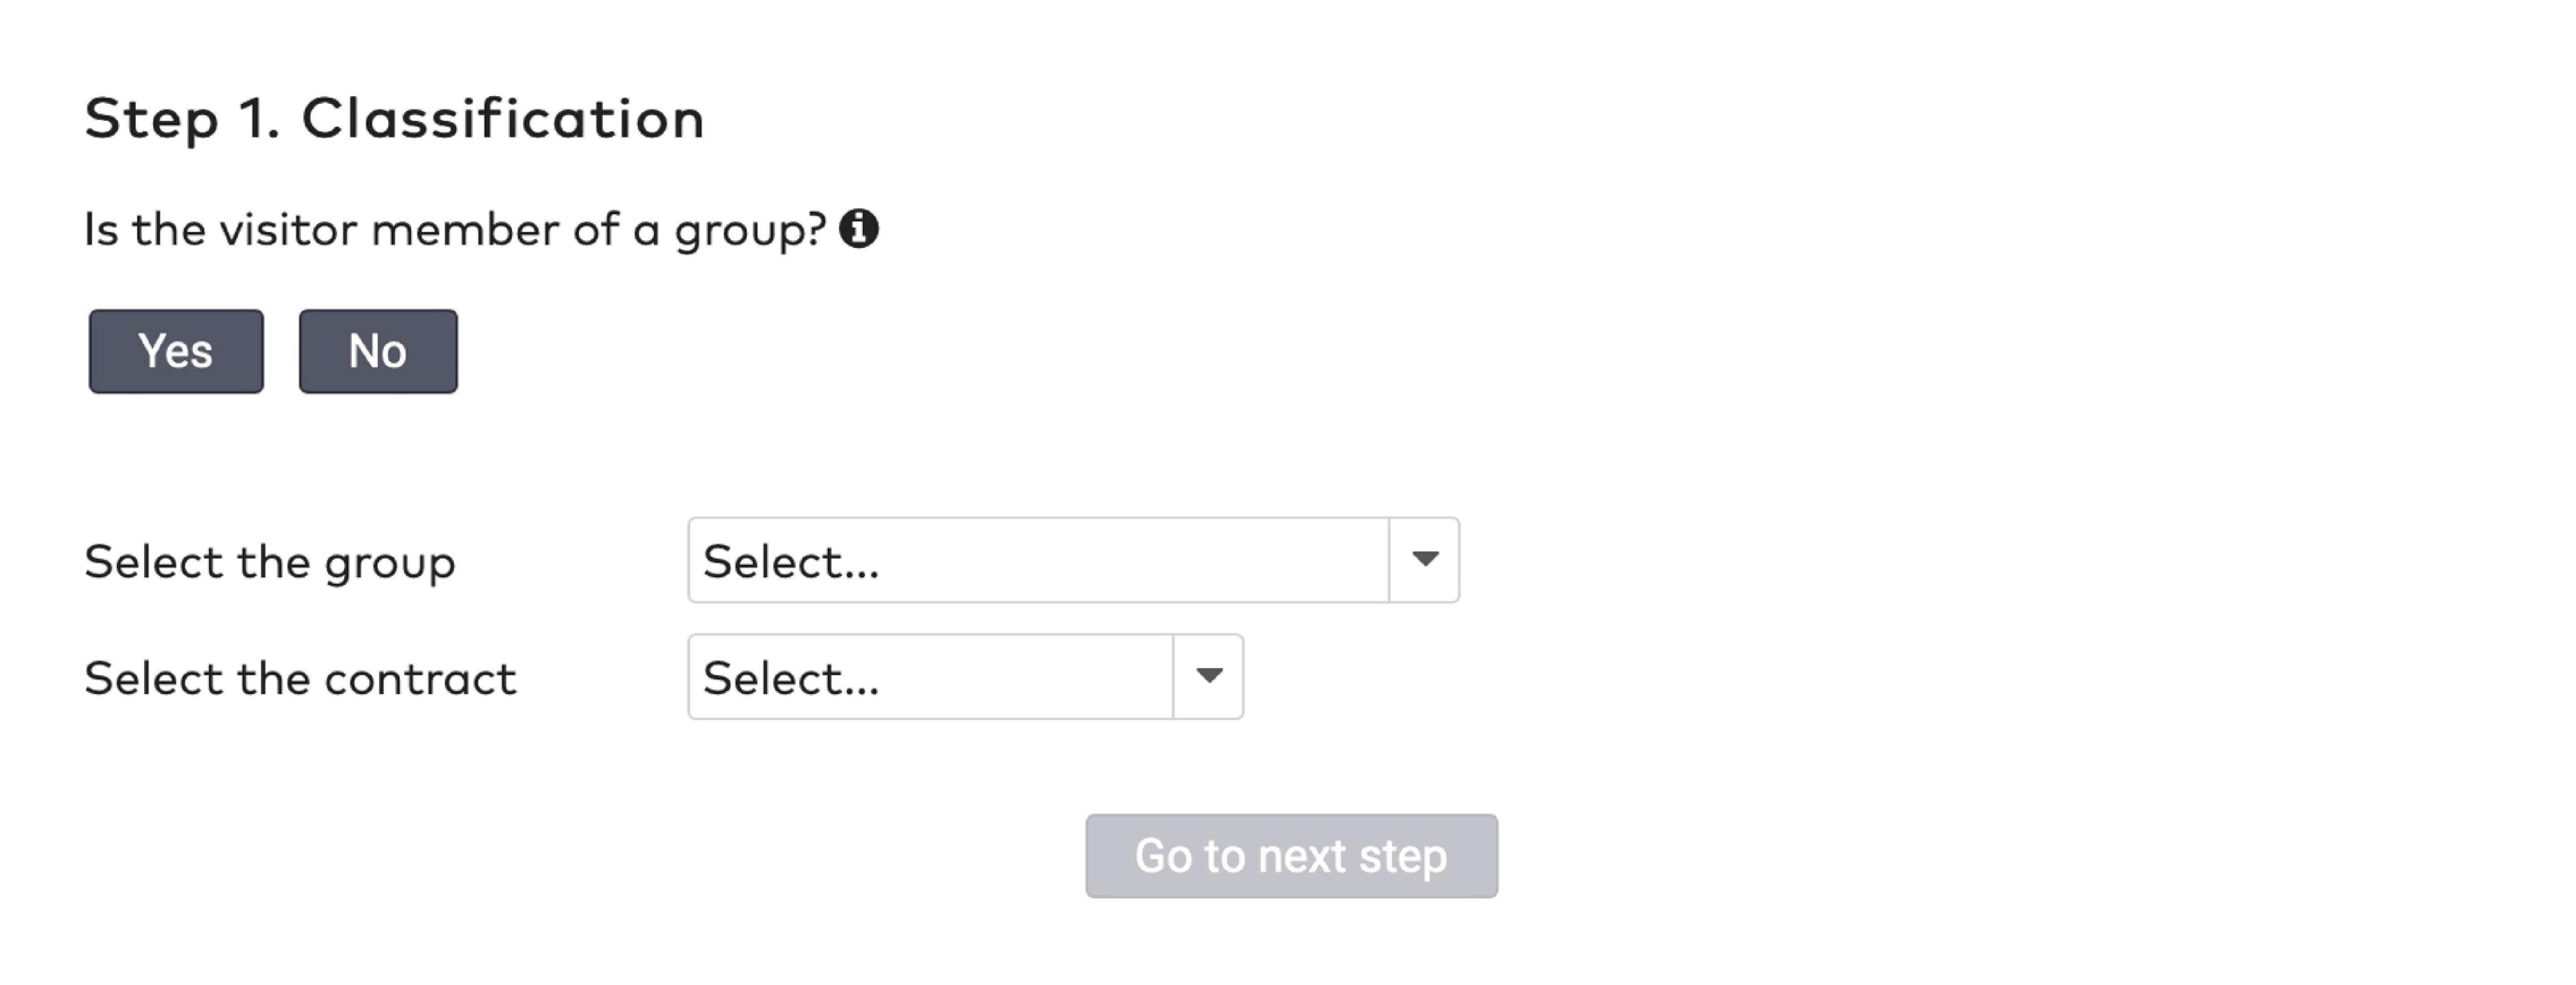
Click No below Is the visitor member of a group?
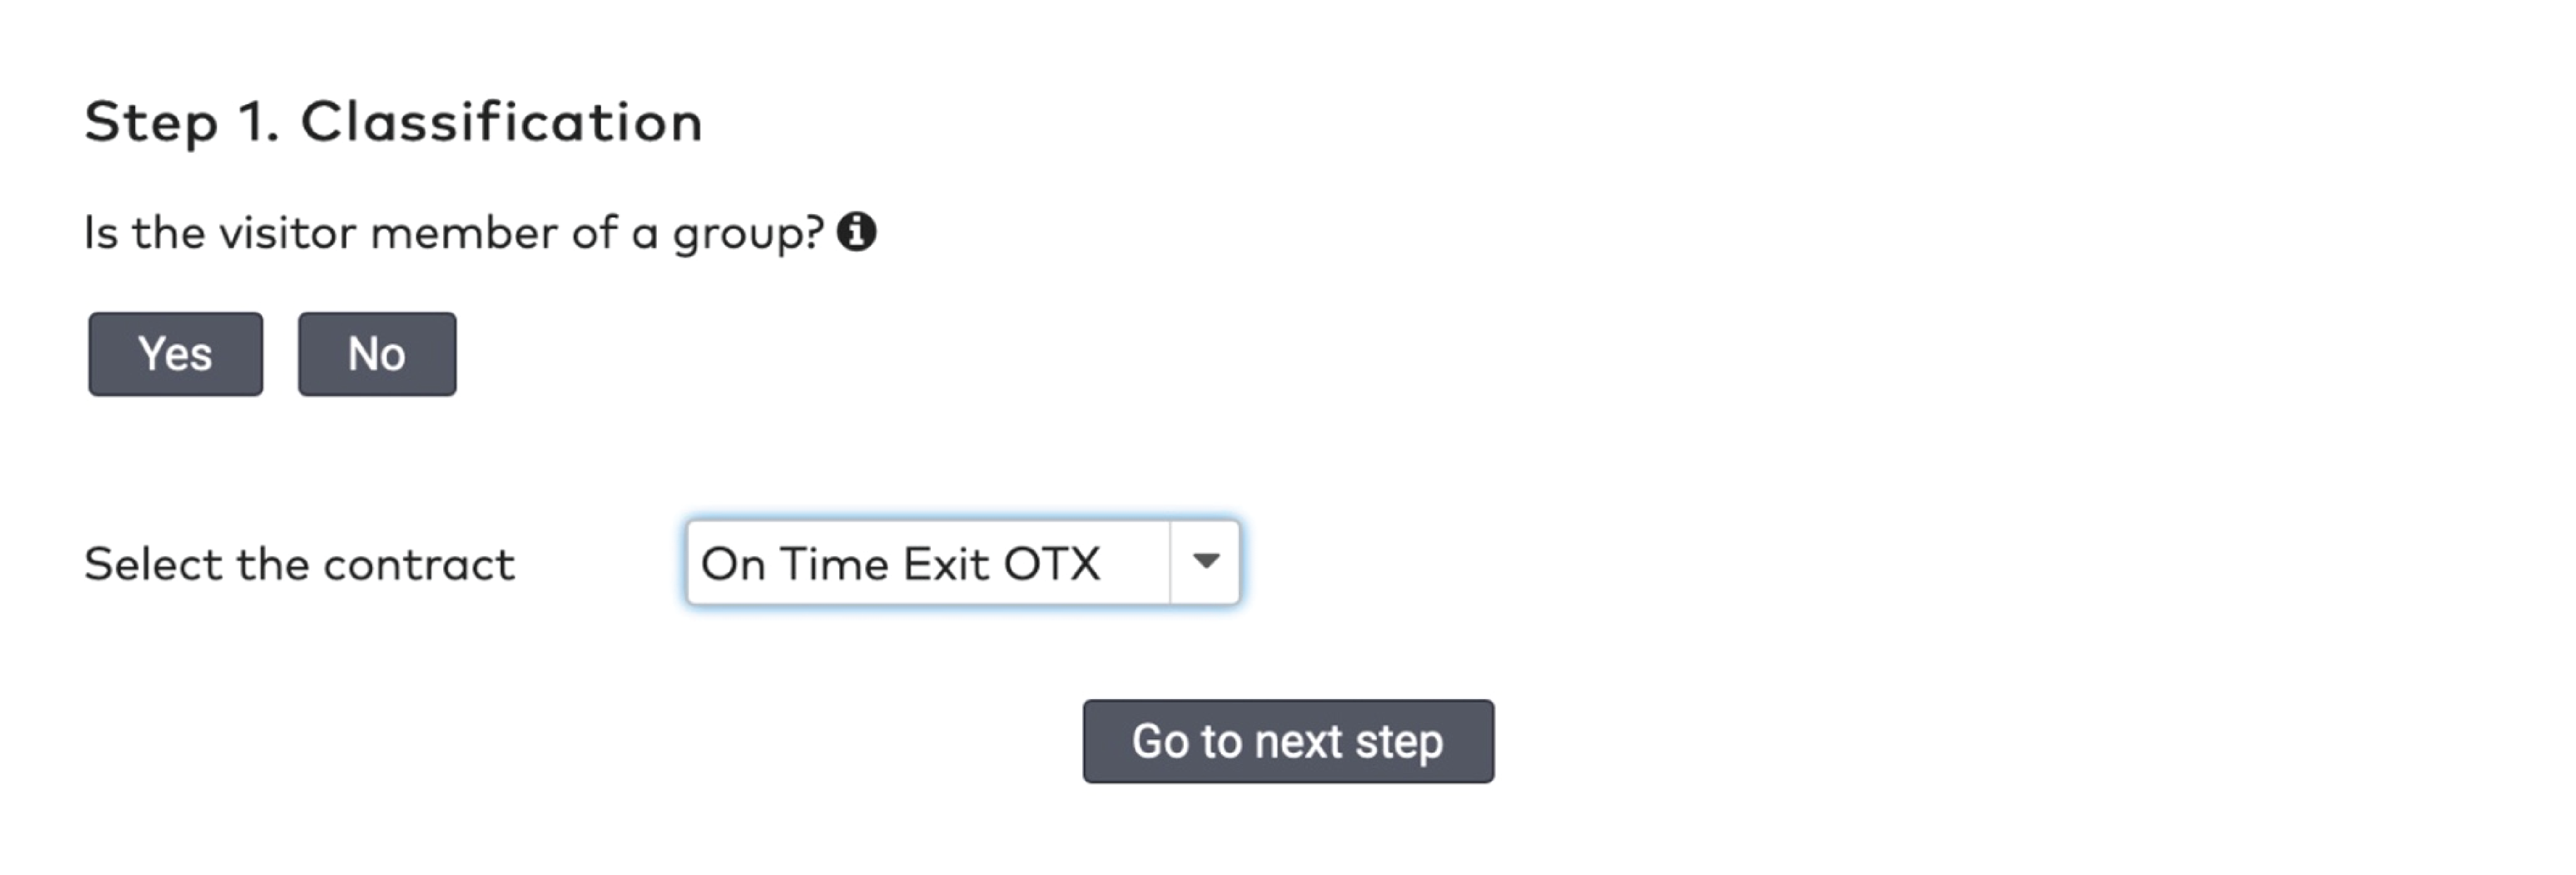
|
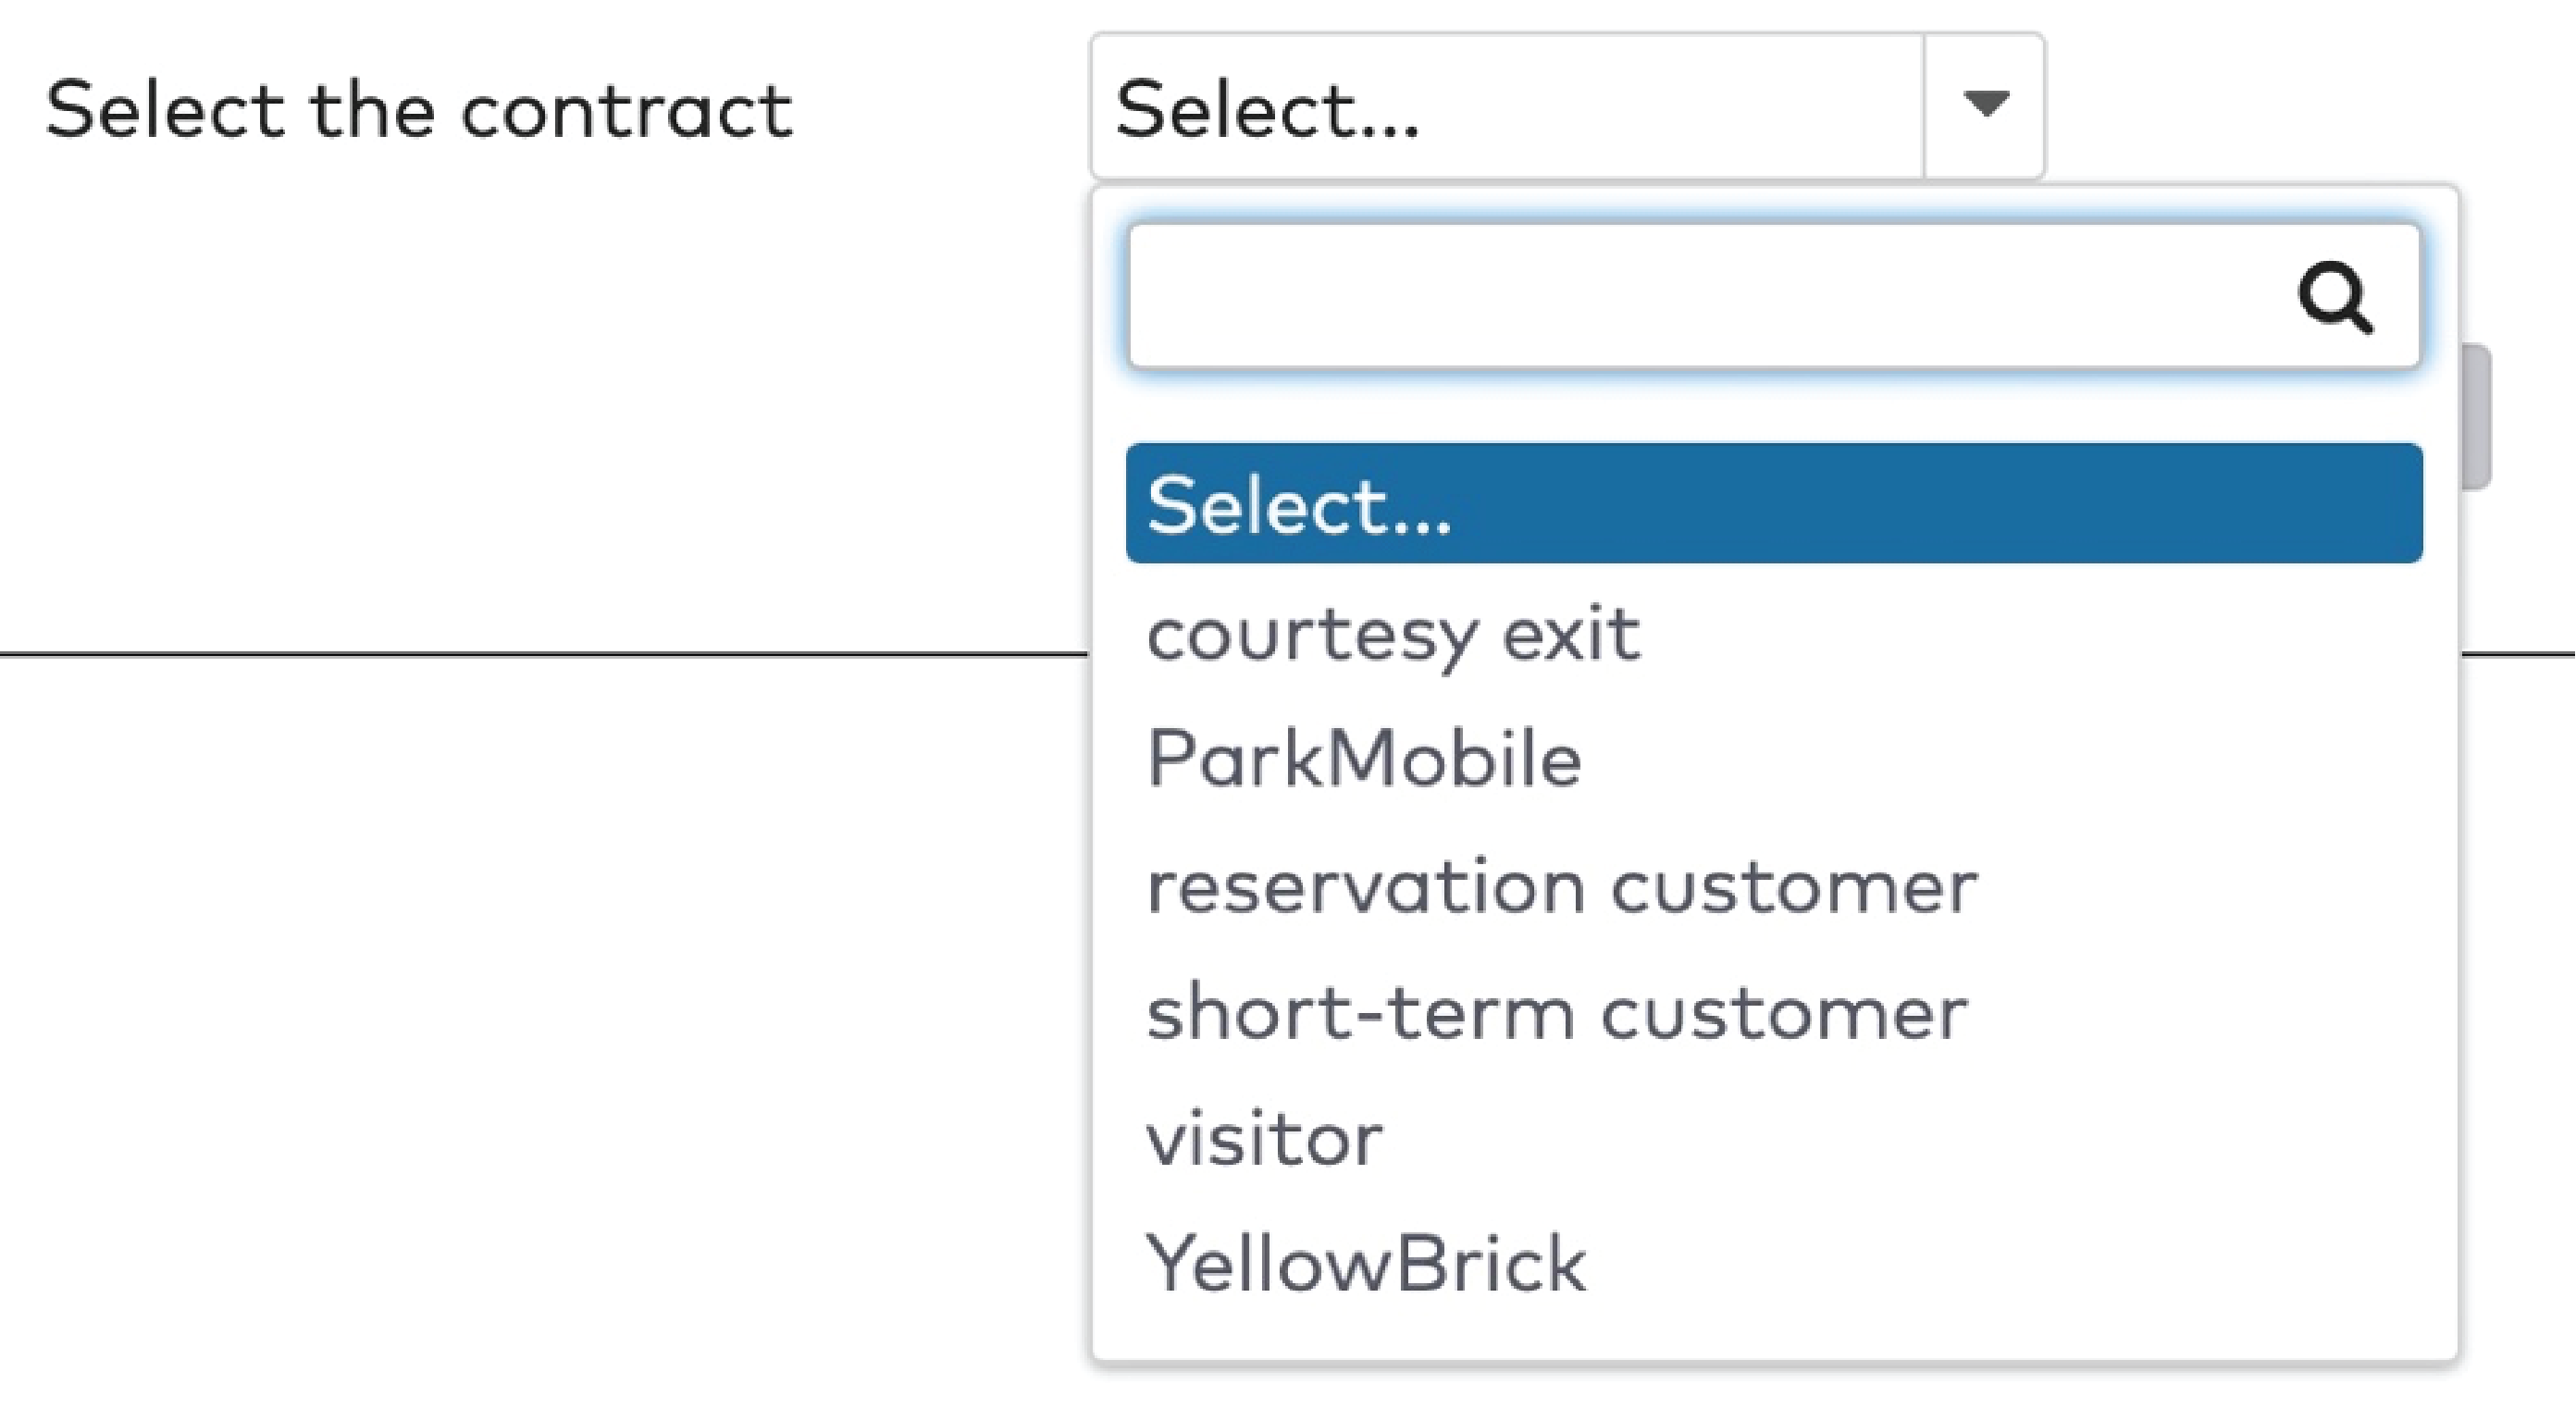
Choose the contract type for a one time exit card from the Select the contract dropdown menu.
Click Go to next step.
Click Go to next step again.
|
Specify the dates between which the one time exit card is valid.
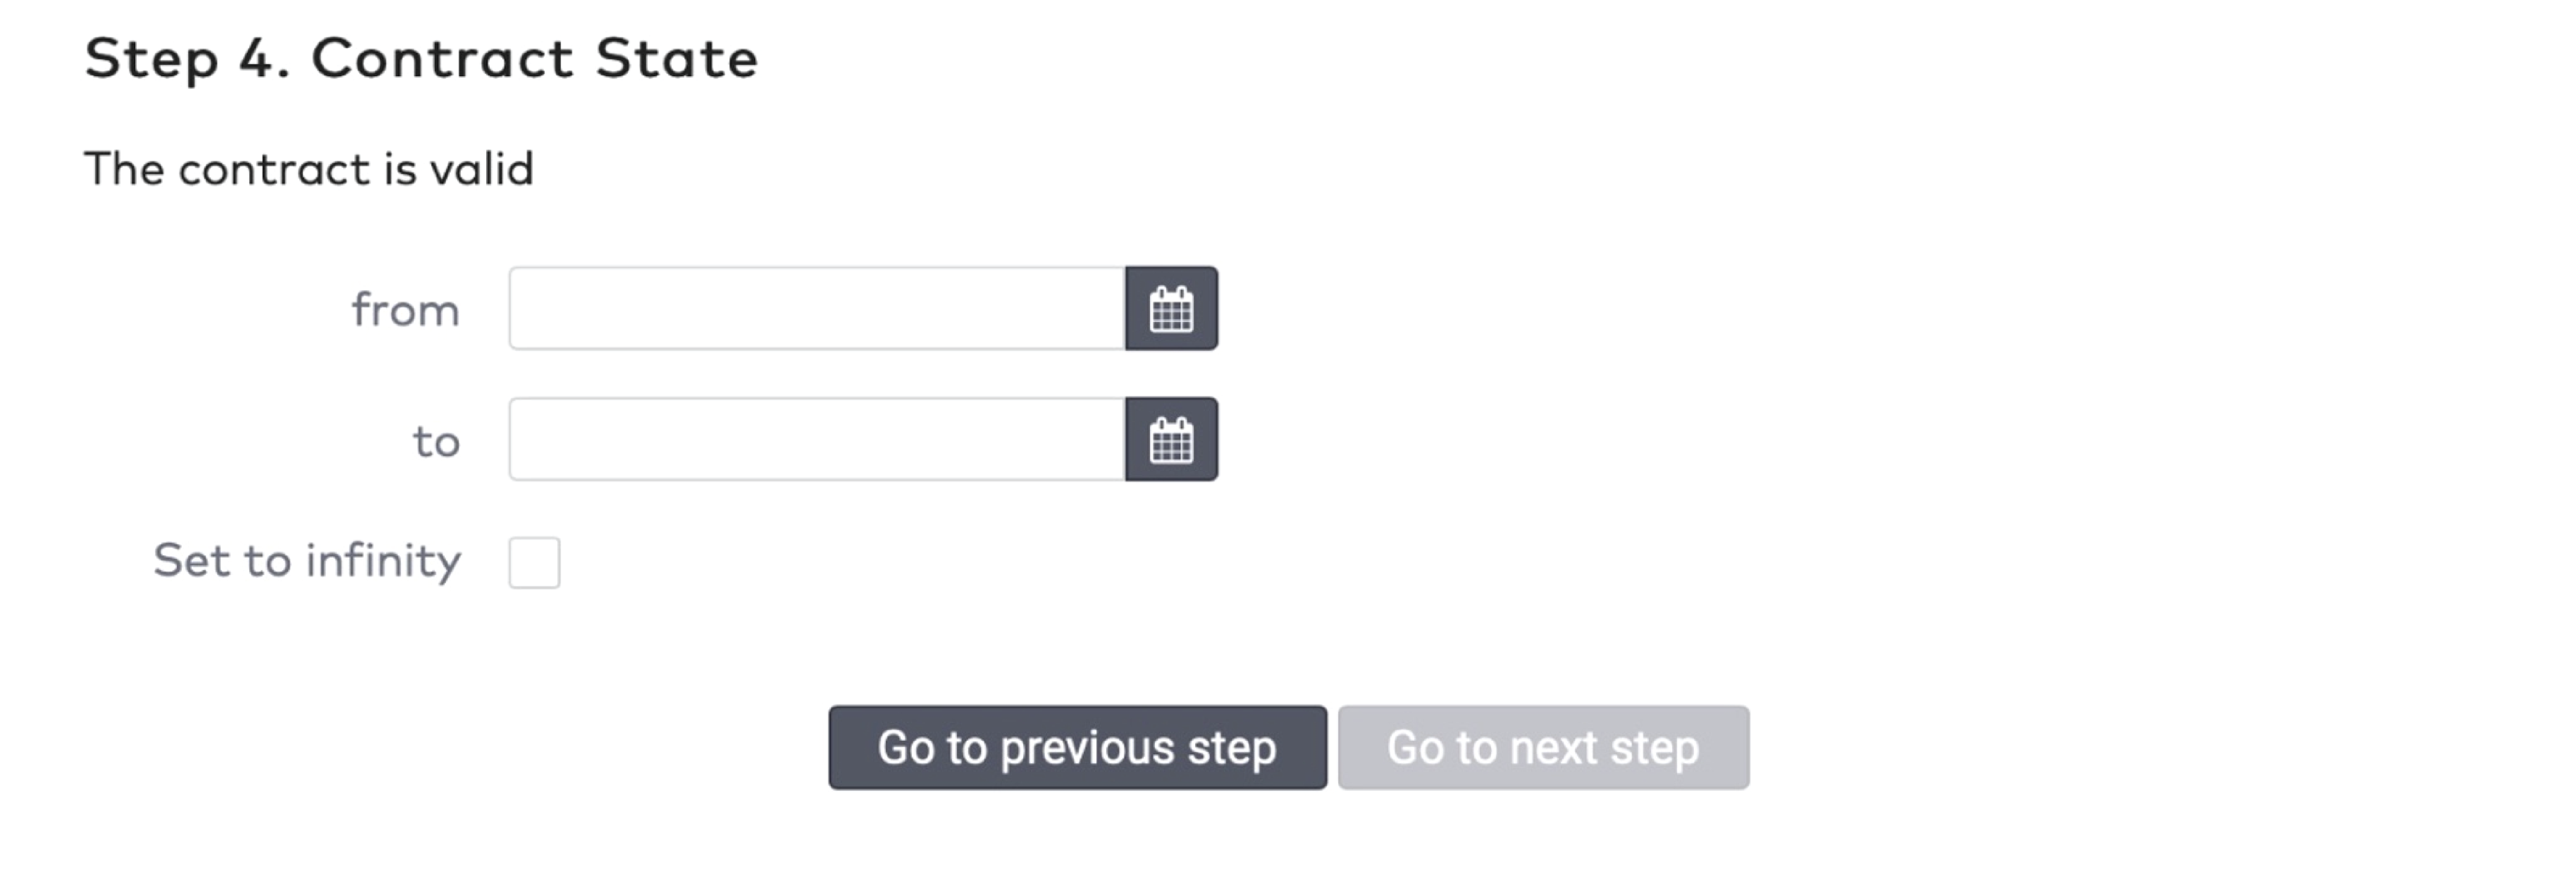
|
Click Go to next step.
Tick Generate Cards.
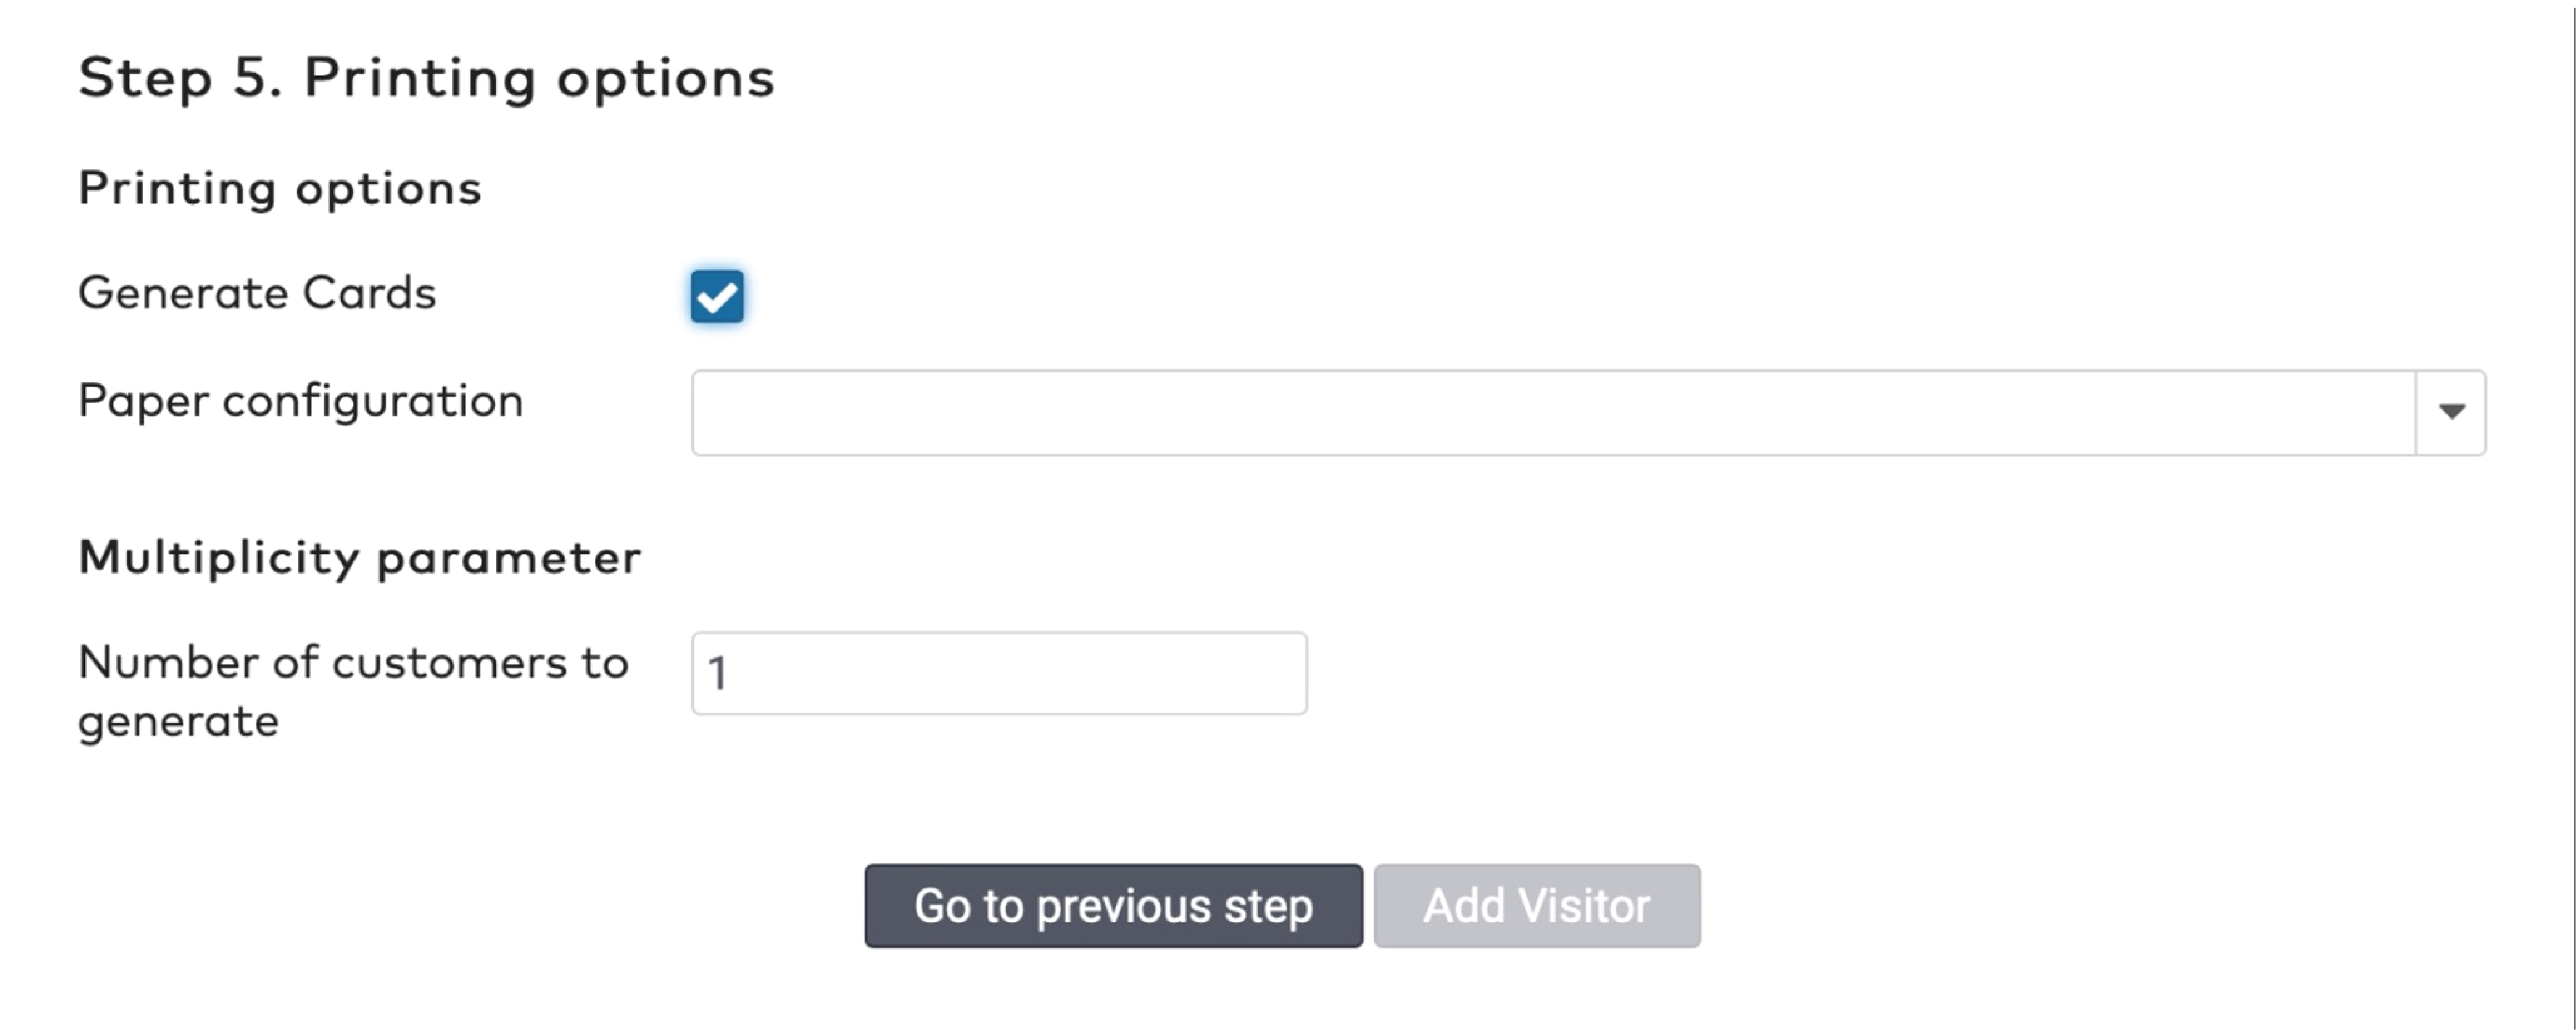
|
Select the appropriate Paper configuration.
Specify the Number of customers to generate.
Click Add visitor.
A one time exit card is generated.
|
|
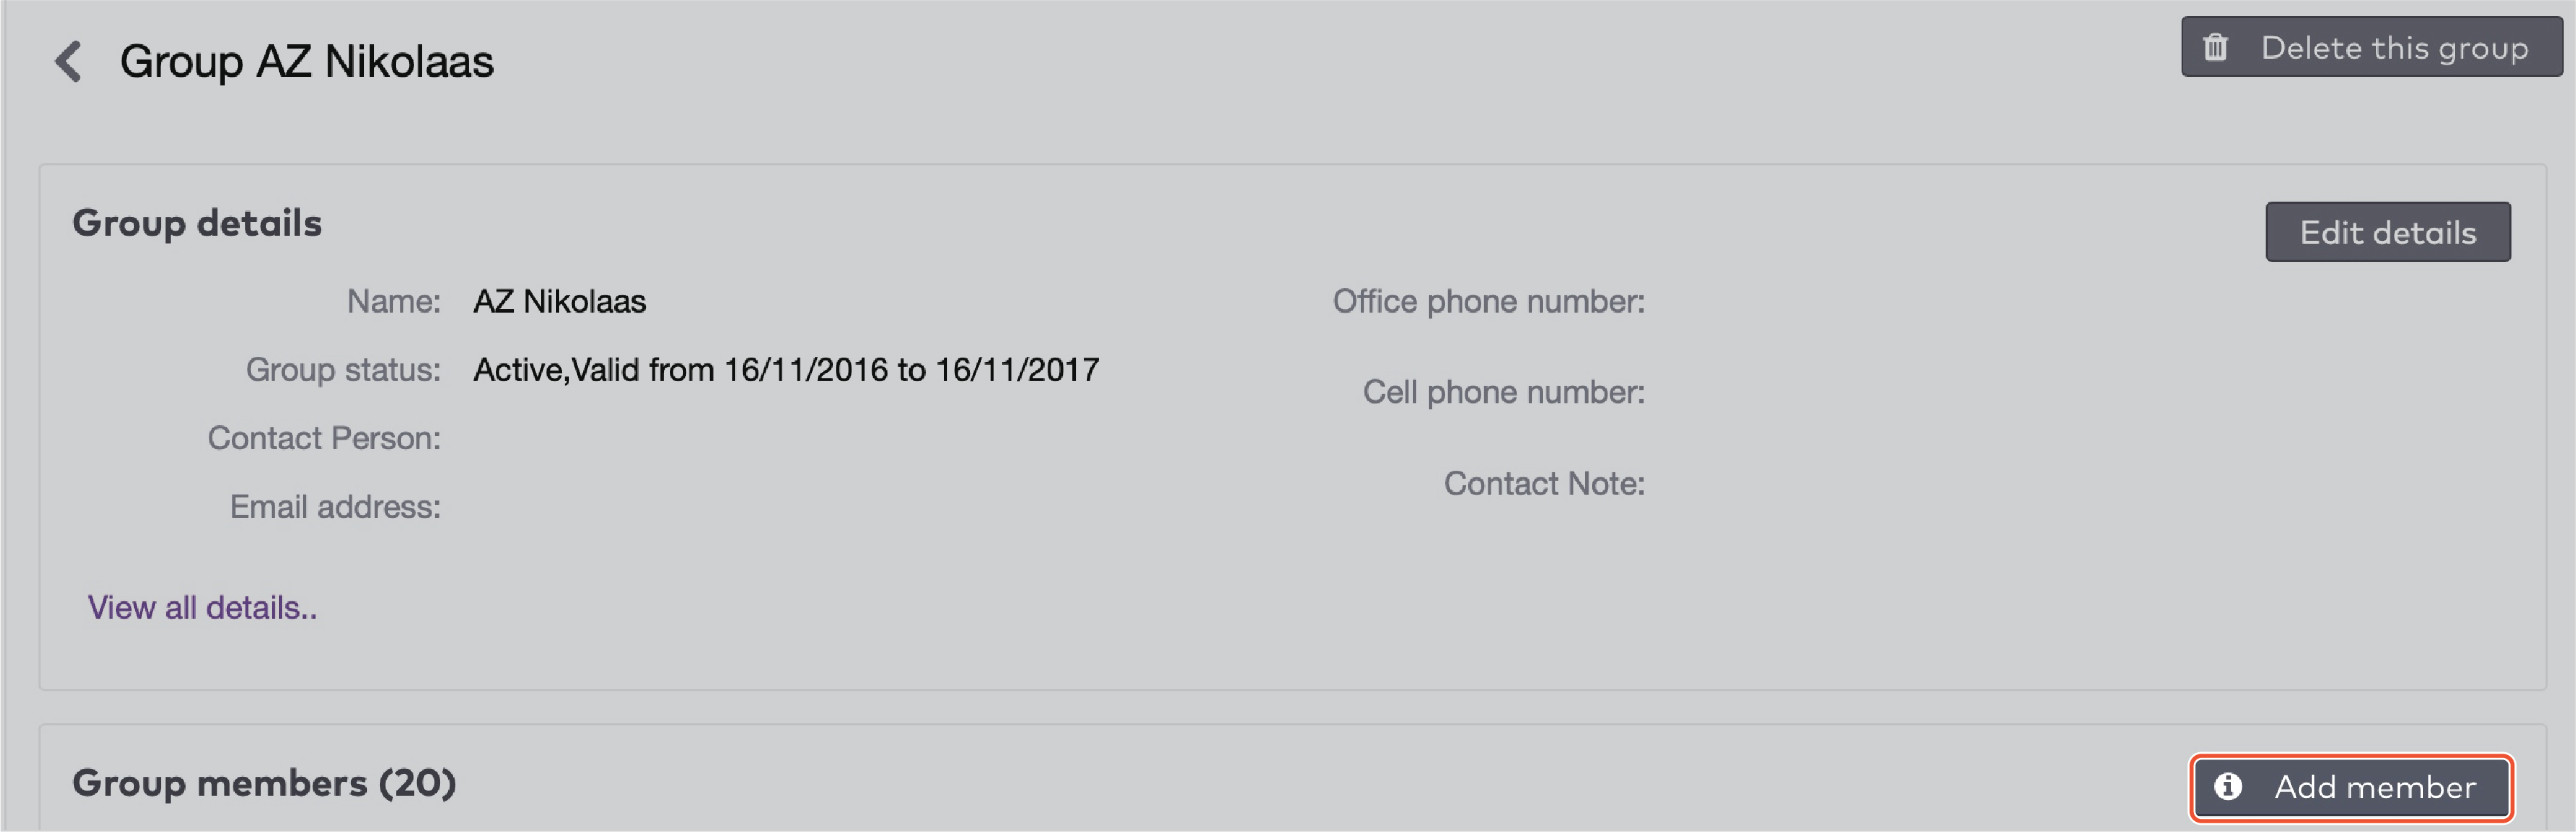
Adding a visitor to a group
To add a visitor to a group you can either use an existing visitor or create a new visitor.
To add a new visitor to a group:
Click Contracts in the menu bar.
Then click Groups.
|
|
Browse the list and click the group you want to edit or use the Group name search bar to find it, then click it.
Click Add member.
|
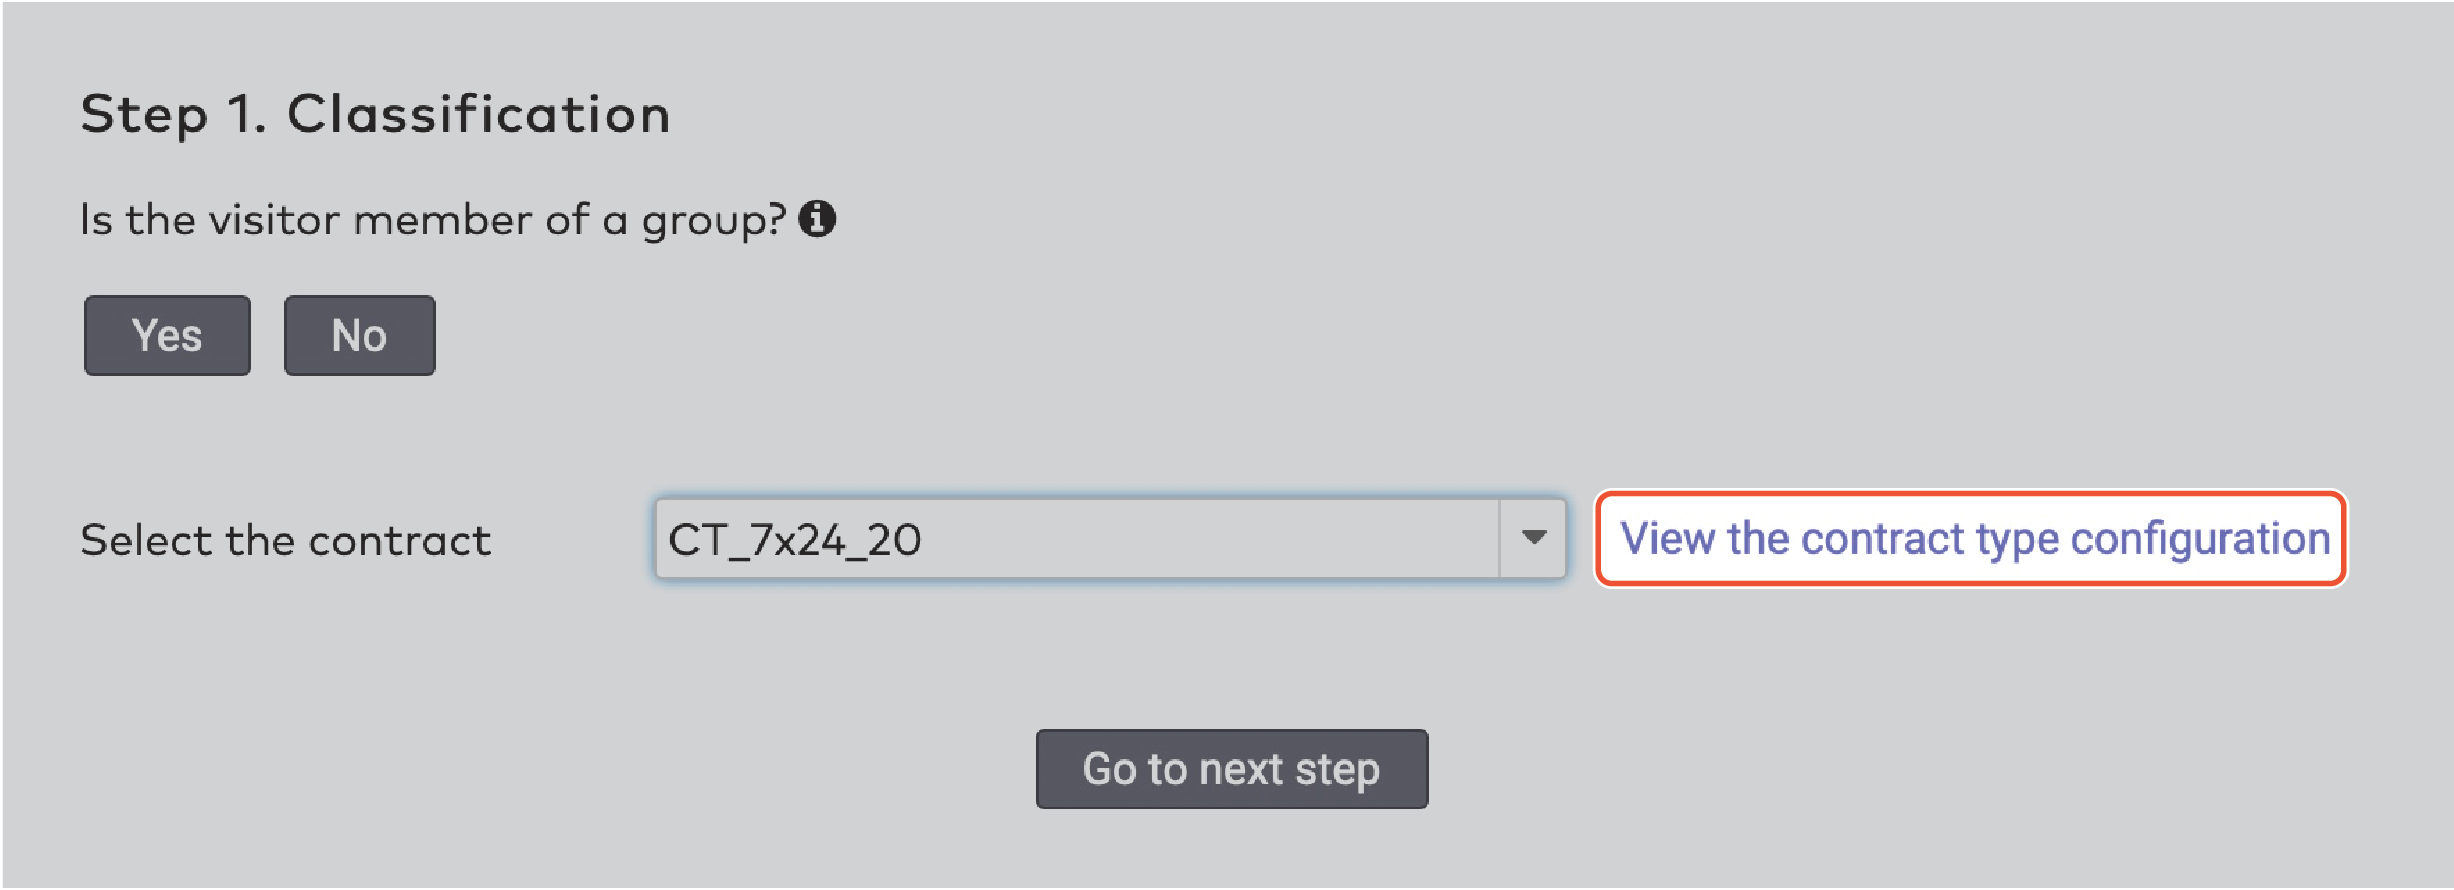
Select the contract for this visitor from the dropdown menu. Click View the contract type configuration to see the details of this contract.

|
Click Go to next step.
Fill in the visitor’s details and click Go to next step.
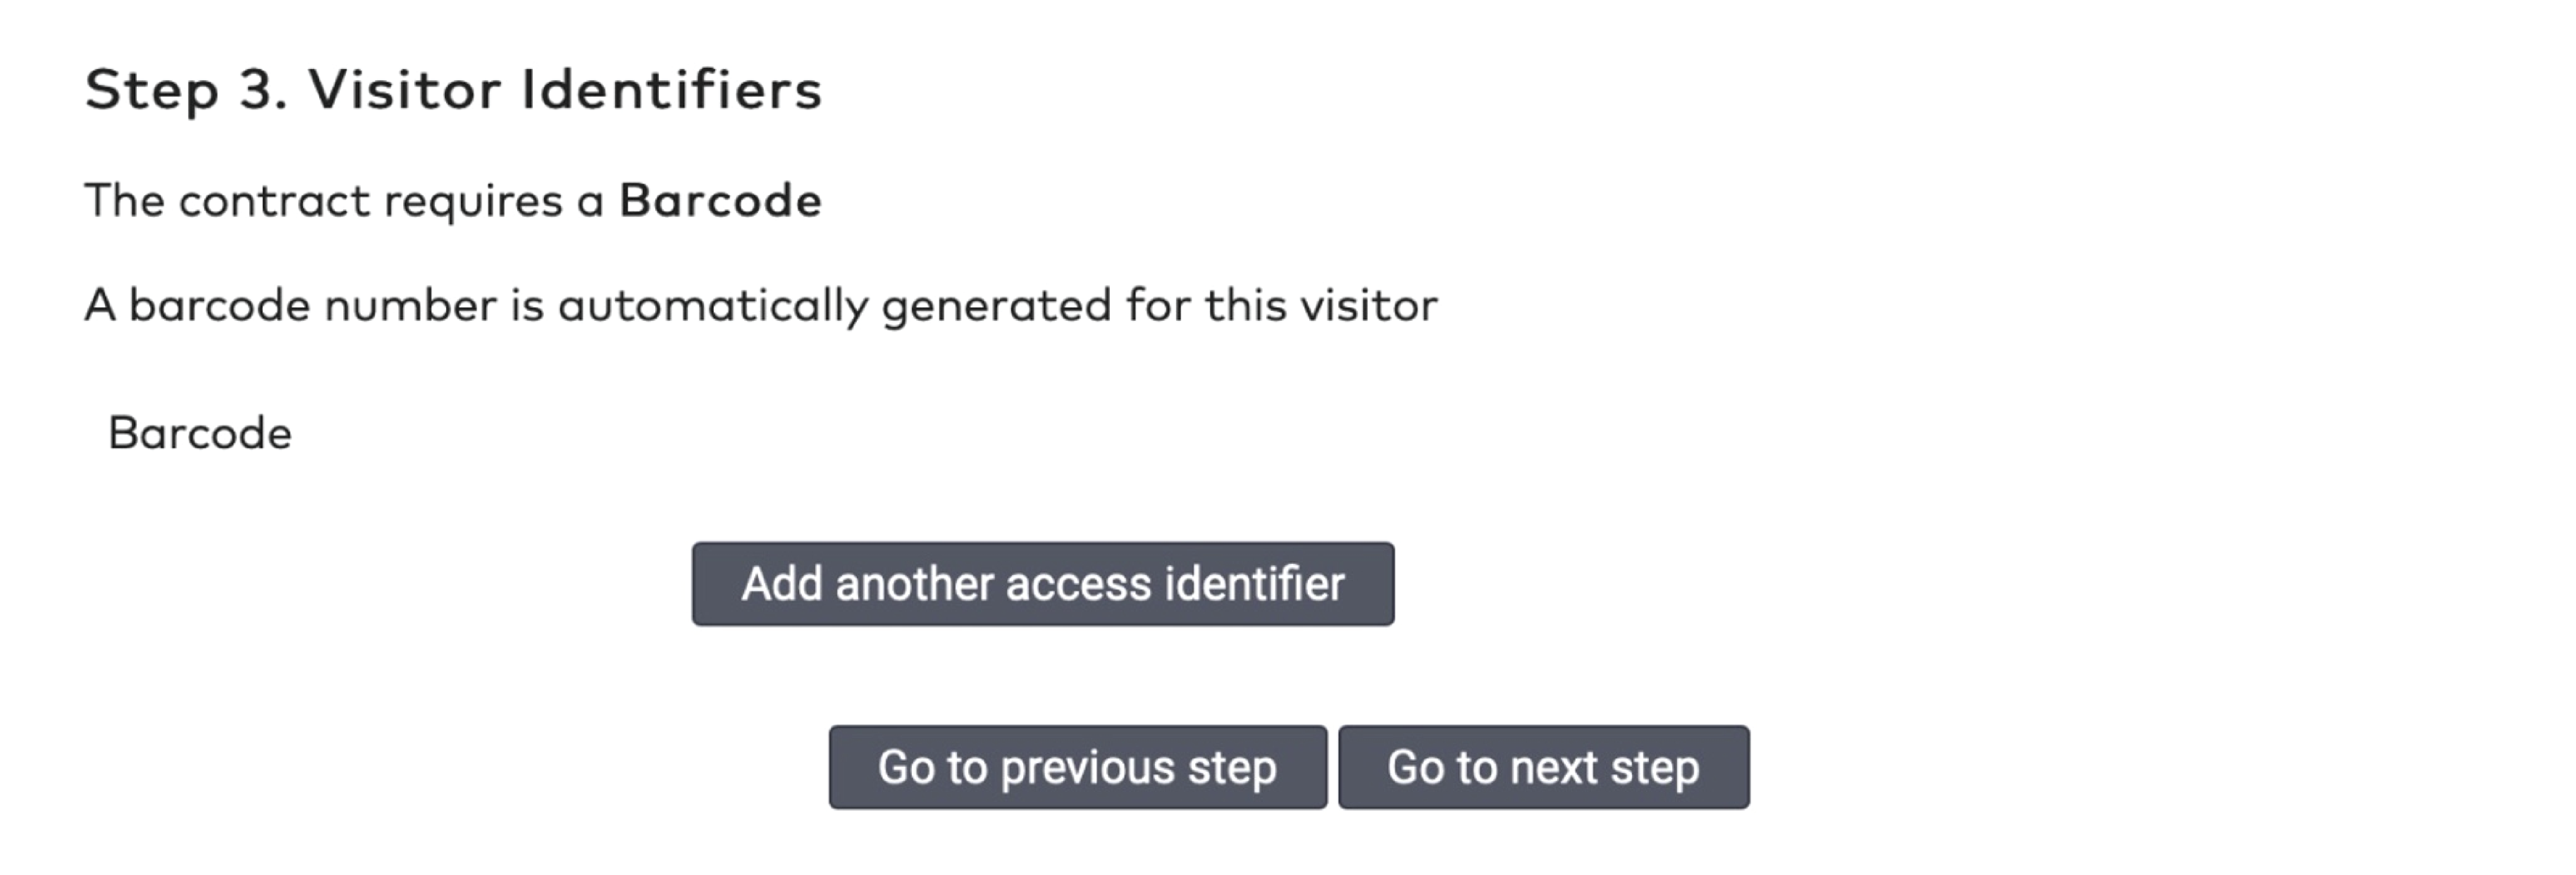
The next step is dependent on the chosen contract. Some contracts specify a mandatory access identifier. Other contracts let you choose which access identifier you use.
If there is no mandatory visitor identifier specified in the contract:
Click Add another visitor identifier to add an visitor identifier.

|
Select the identifier type from the dropdown.
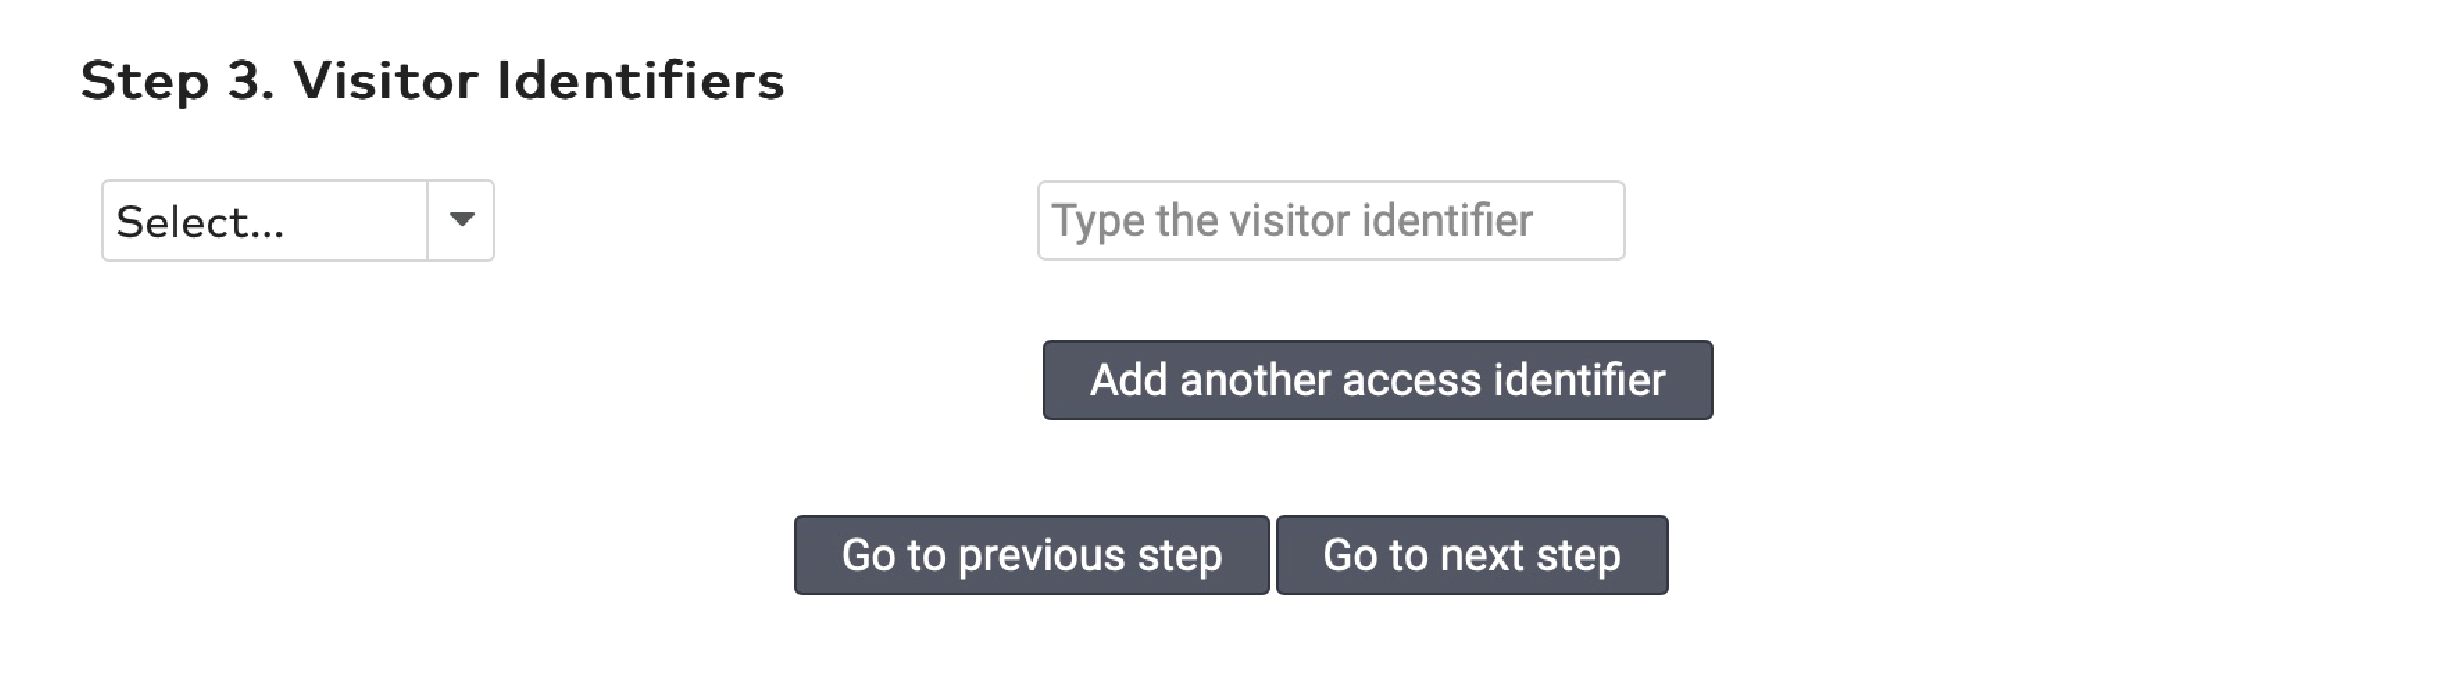
|
If you select Barcode, a barcode will be generated automatically. If you select another type, enter the visitor identifier in the text field.
Click Add another visitor identifier if applicable.
Click Go to next step.
Set a start date and an end date for this subscription to be valid. Or choose Set to infinity if no end date is required.
Click Go to next step if you have selected Barcode as visitor identifier, or click Add visitor if you chose to use a different visitor identifier.
If a barcode is the only identifier:
Tick Generate Cards.
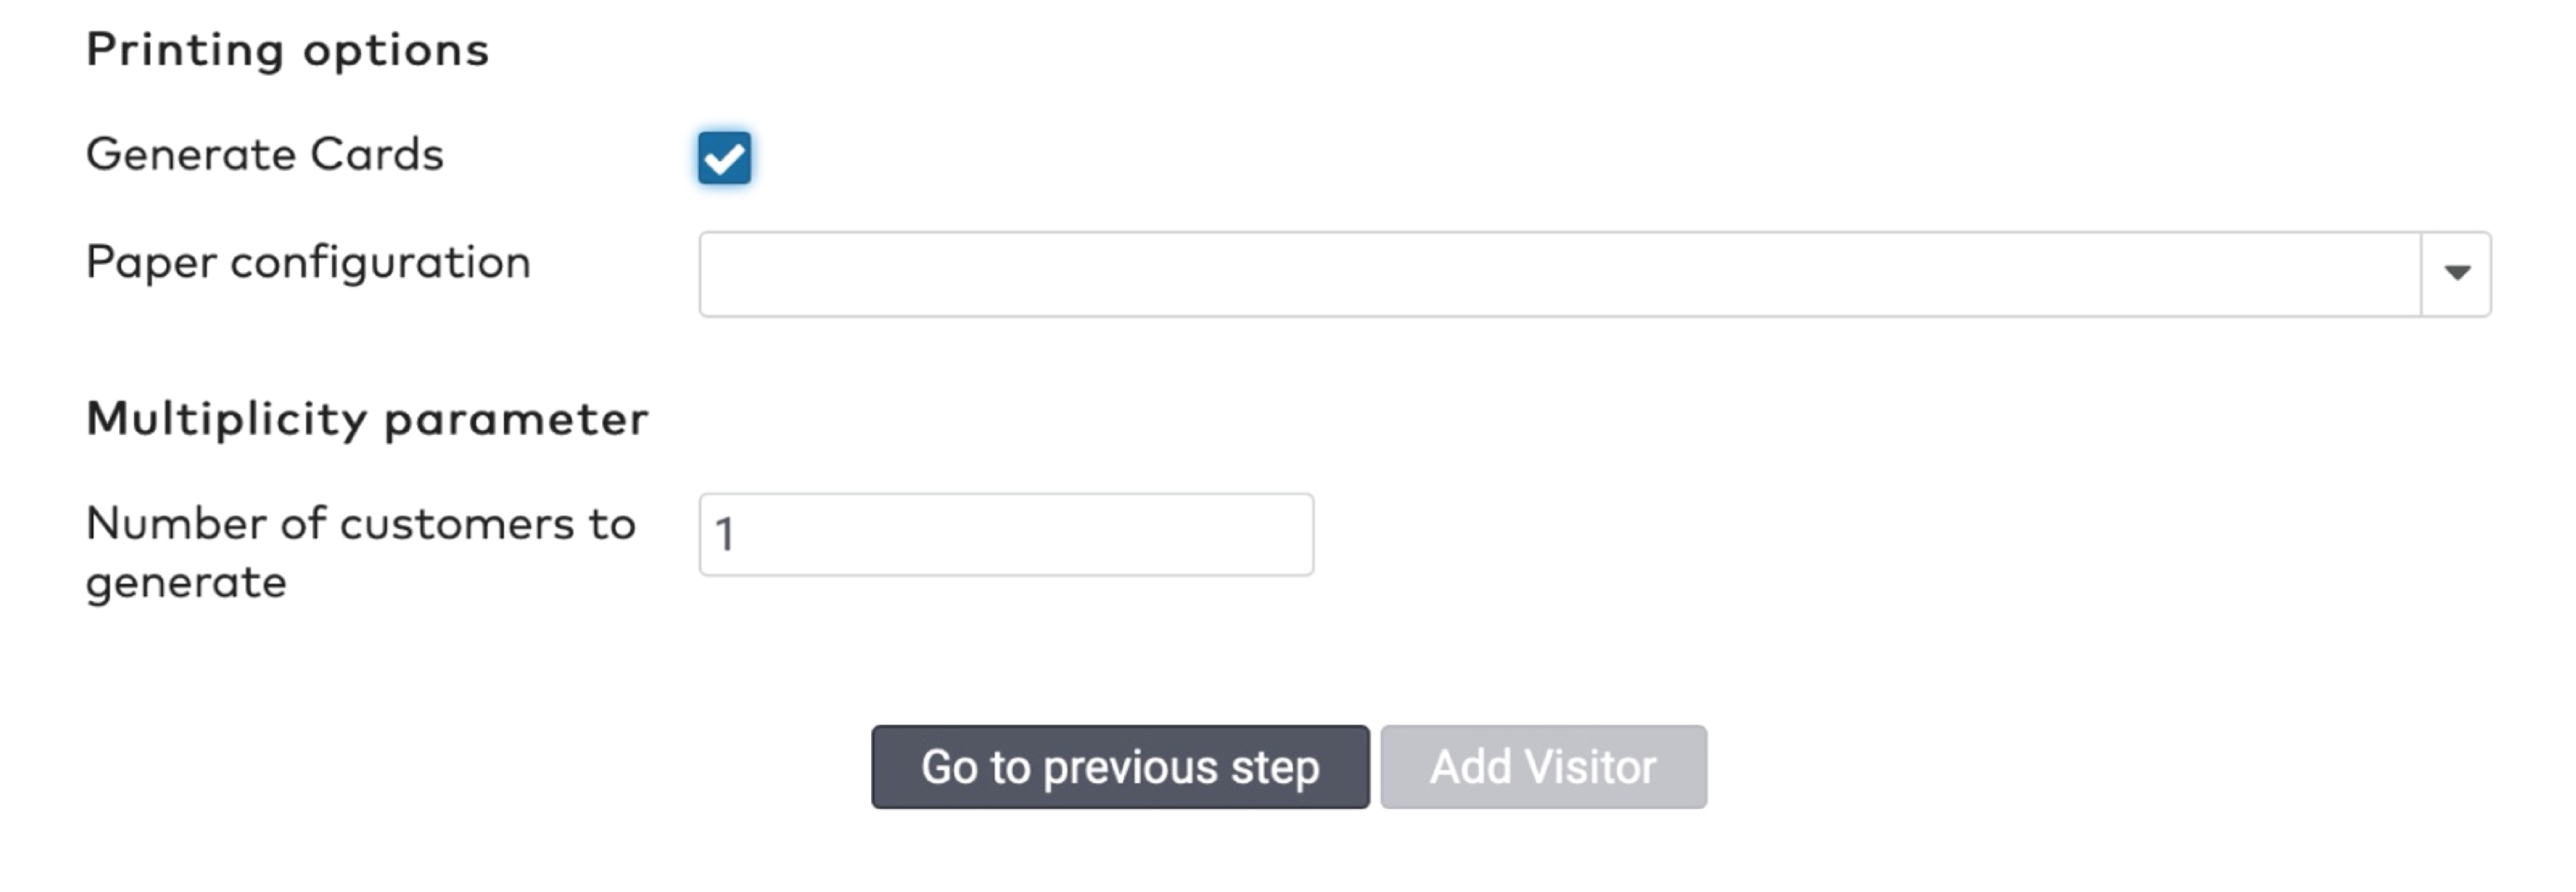
|
Select the appropriate Paper configuration.
Specify the Number of customers to generate.
Click Add visitor.
If the barcode is not the only identifier, you can print the barcode from the visitor’s record:
Click Add visitor.
Click  to print the barcode.
to print the barcode.
|
To add an existing visitor to a group:
Click Contracts in the menu bar.
|
|
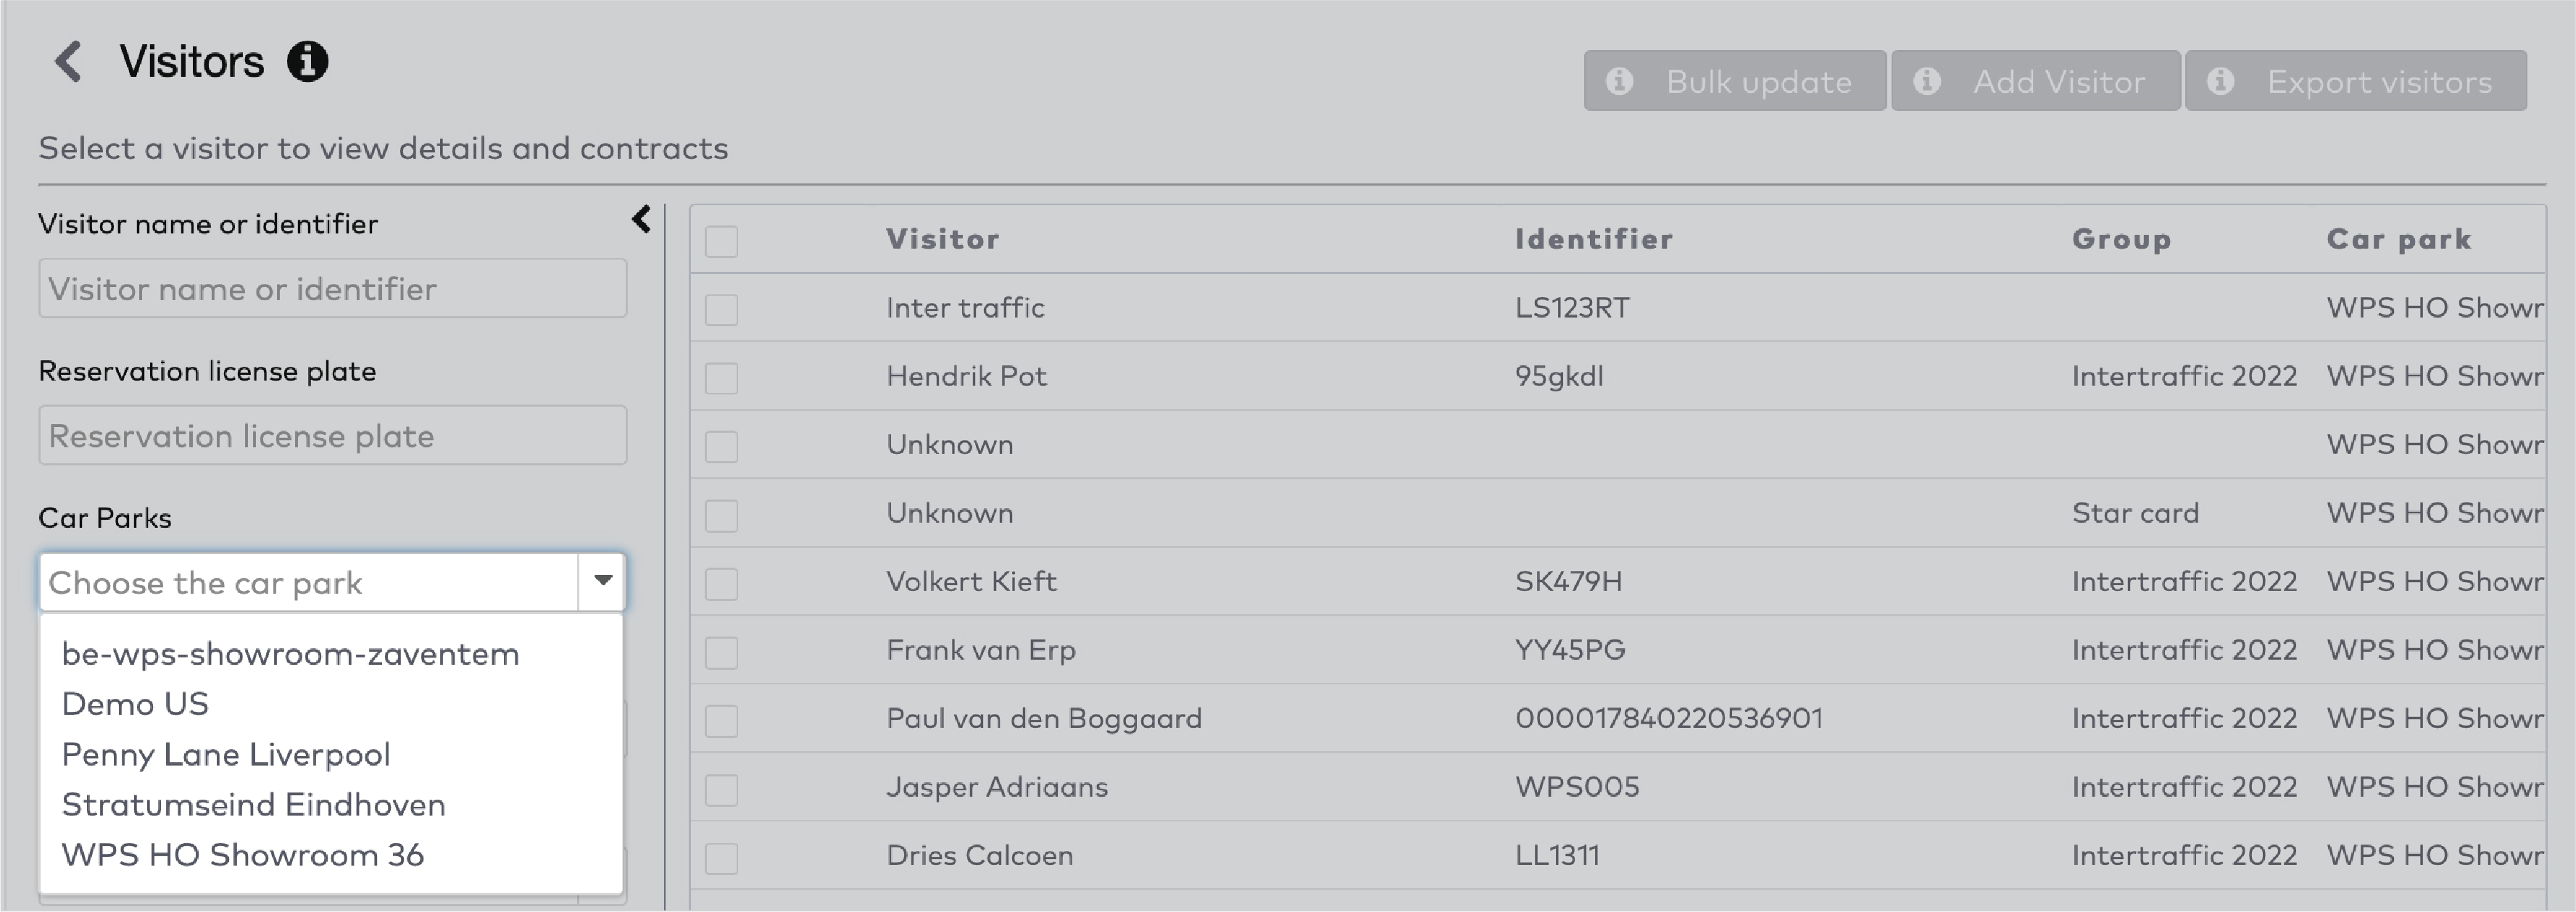
Click Visitors.
Select the Car park from the dropdown menu.
|
|
Click Add visitor.
Click Yes to answer the question Is the visitor member of a group?
|
Select the group from the dropdown.
Select a contract for this group from the dropdown. Click View the contract type configuration to see the details of this contract.
Click Go to next step.
Fill in the visitor’s details and click Go to next step.
The next step is dependent on the chosen contract. Some contracts specify a mandatory visitor identifier. Other contracts let you choose which visitor identifier you use.
If there is no mandatory visitor identifier specified in the contract:
Click Add another visitor identifier to add an visitor identifier.

|
Select the identifier type from the dropdown.

|
If you select Barcode, a barcode will be generated automatically. If you select another type, enter the visitor identifier in the text field.
Click Add another visitor identifier if applicable.
Click Go to next step.
Set a start date and an end date for this subscription to be valid. Or choose Set to infinity if no end date is required.
Click Go to next step if you have selected Barcode as visitor identifier, or click Add visitor if you chose to use a different visitor identifier.
If a barcode is the only identifier:
Tick Generate Cards.
|
|
Select the appropriate Paper configuration.
|
|
Select the appropriate Paper configuration.
Specify the Number of customers to generate.
Click Add visitor.
If the barcode is not the only identifier, you can print the barcode from the visitor’s record:
Click Add visitor.
Click to print the barcode.
to print the barcode.
|
|
Adding a visitor without a group
To add a visitor without a group:
Click Contracts in the menu bar.
Click Visitors.
|
|
Select the car park from the Car parks dropdown menu.
|
Click Add visitor.
Click No below Is the visitor member of a group?
|
|
Choose the contract type from the Select the contract dropdown menu.
|
Click View the contract type configuration to see the details of this contract.
|
Click Go to next step.
The next step is dependent on the chosen contract. Some contracts specify a mandatory visitor identifier. Other contracts let you choose which visitor identifier you use.
If there is no mandatory visitor identifier specified in the contract:
Click Add another visitor identifier to add an visitor identifier.
|
|
Select the identifier type from the dropdown.
|
|
If you select Barcode, a barcode will be generated automatically. If you select another type, enter the visitor identifier in the text field.
Click Add another visitor identifier if applicable.
Click Go to next step.
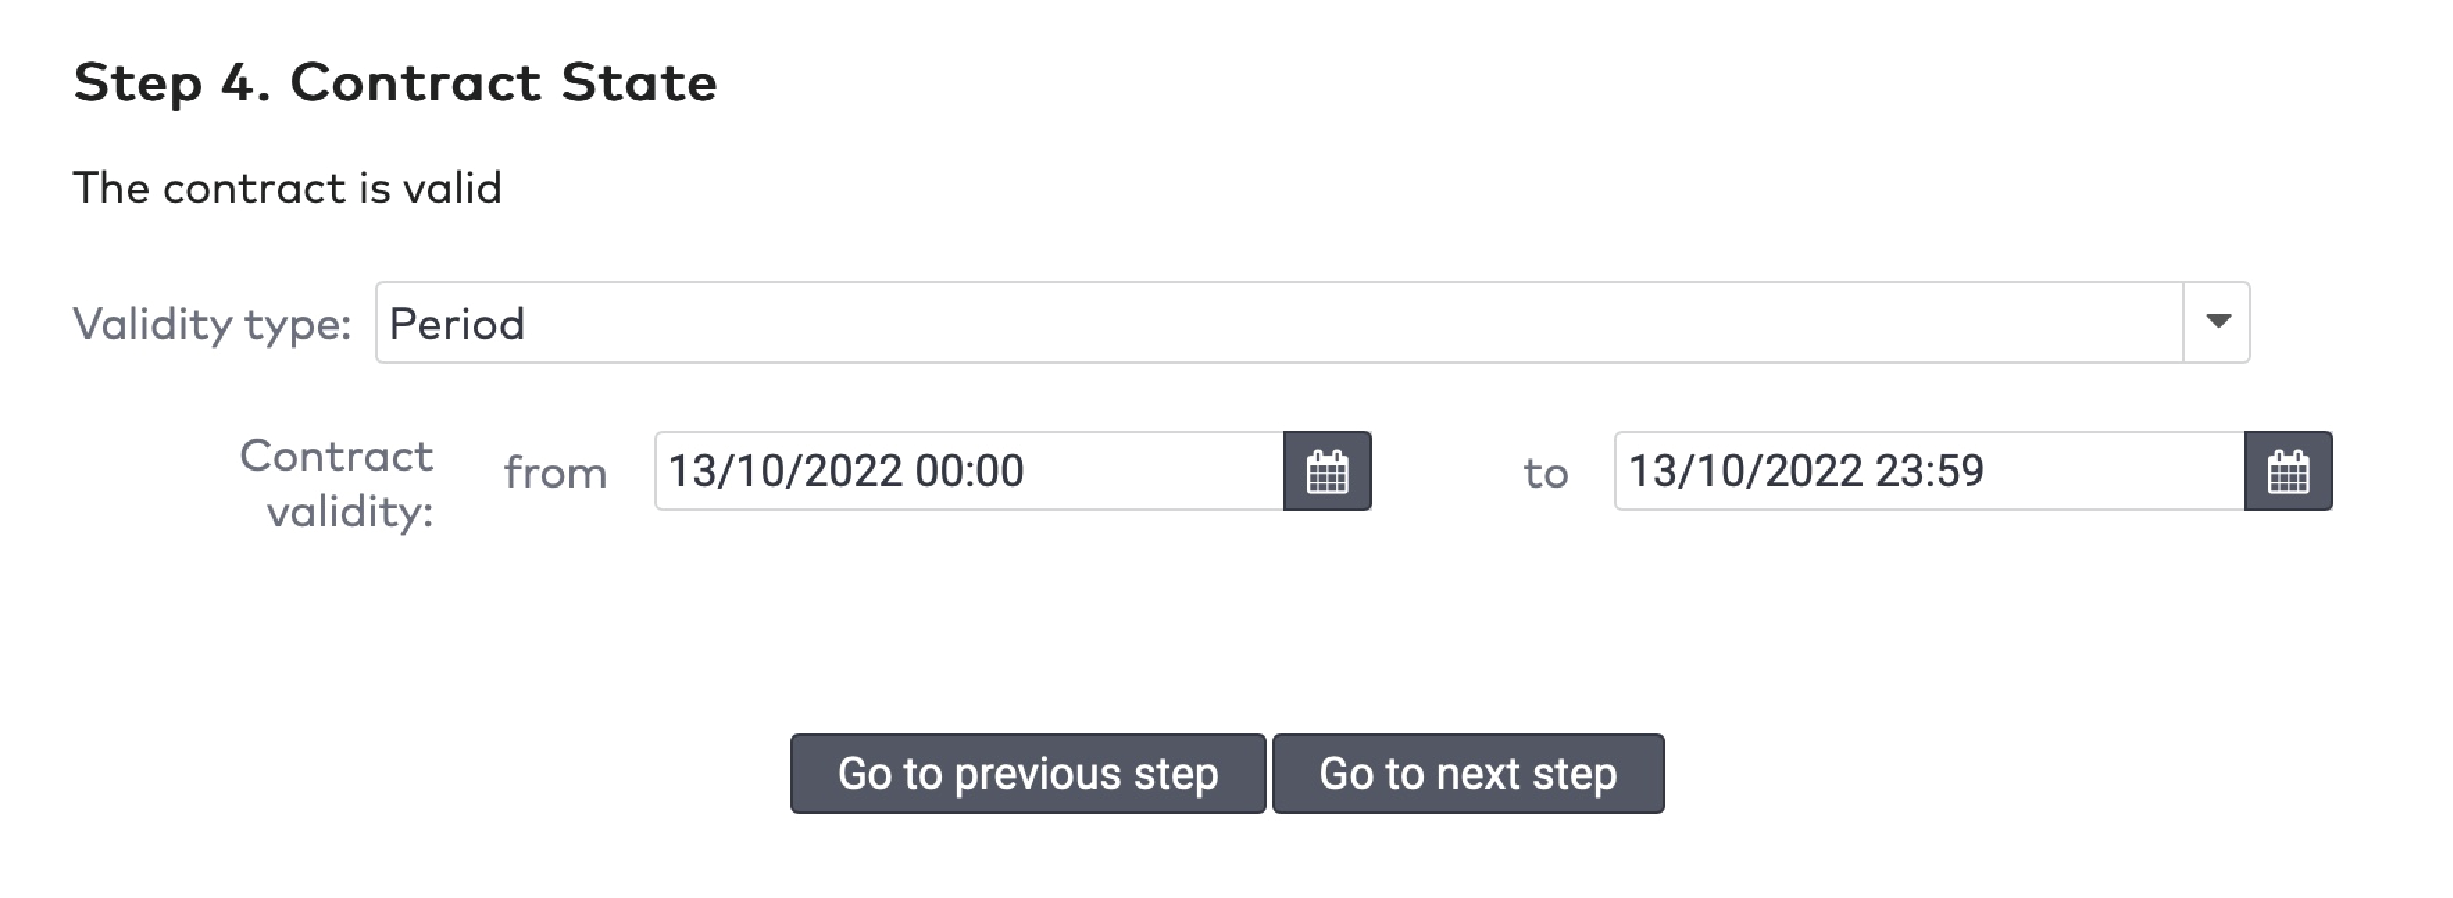
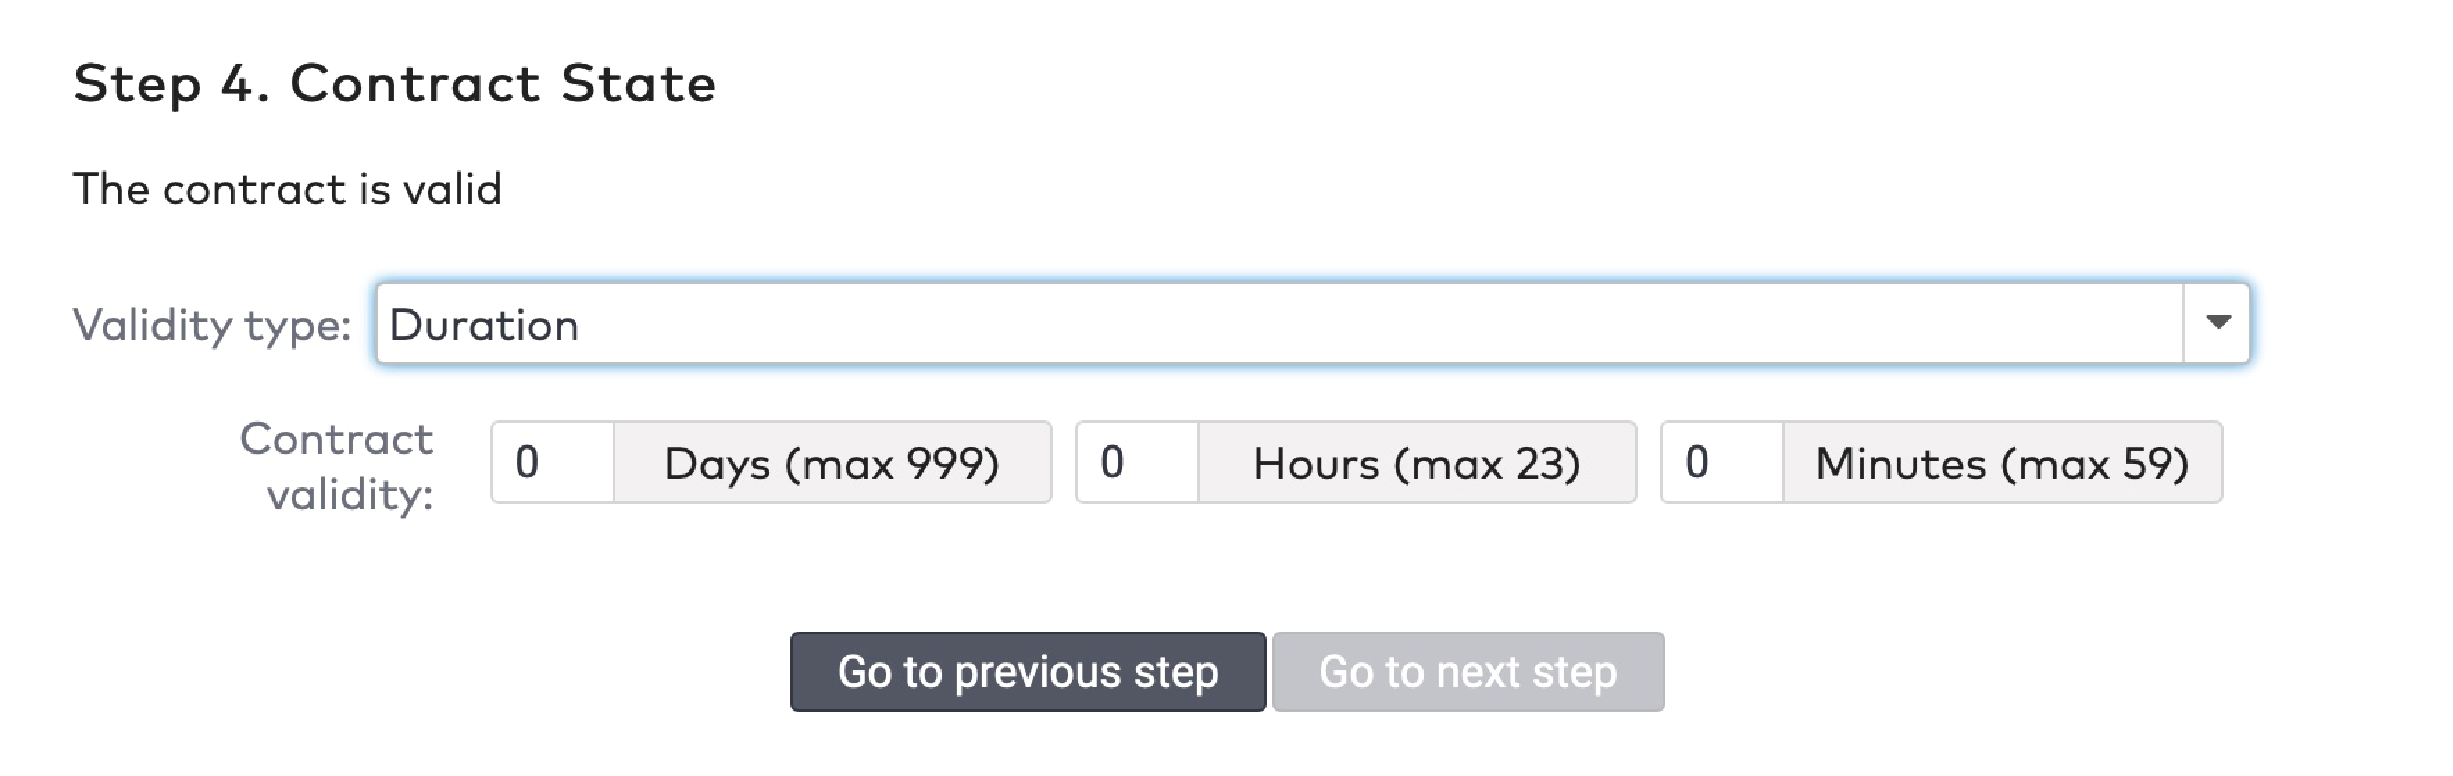
Choose the Validity type for this contract. This can be Period, Duration, or Unlimited.
|
If the validity type is set to Period, set a start date and an end date for this contract to be valid.
If the validity type is set to Duration, enter the validity in Days, Hours, and Minutes.
|
Click Go to next step if you have selected Barcode as visitor identifier, or click Add visitor if you chose to use a different visitor identifier.
If a barcode is the only identifier:
Tick Generate Cards.
|
|
Select the appropriate Paper configuration.
Specify the Number of customers to generate.
Click Add visitor.
If the barcode is not the only identifier, you can print the barcode from the visitor’s record:
Click Add visitor.
Click to print the barcode.
to print the barcode.
|
|
Removing a visitor from a group
To remove a visitor from a group: click Contracts in the menu bar. Then do one of the following:
Use the search bar and enter the name of the visitor, the identifier number or the group of the visitor. Click Search.
|
|
Click Visitors, specify the search parameters and click Search.
|
|
Click the visitor’s record.
Click Edit contract.
Click  in the Group dropdown menu.
in the Group dropdown menu.

|
Click Save.
The visitor is now removed from the group.
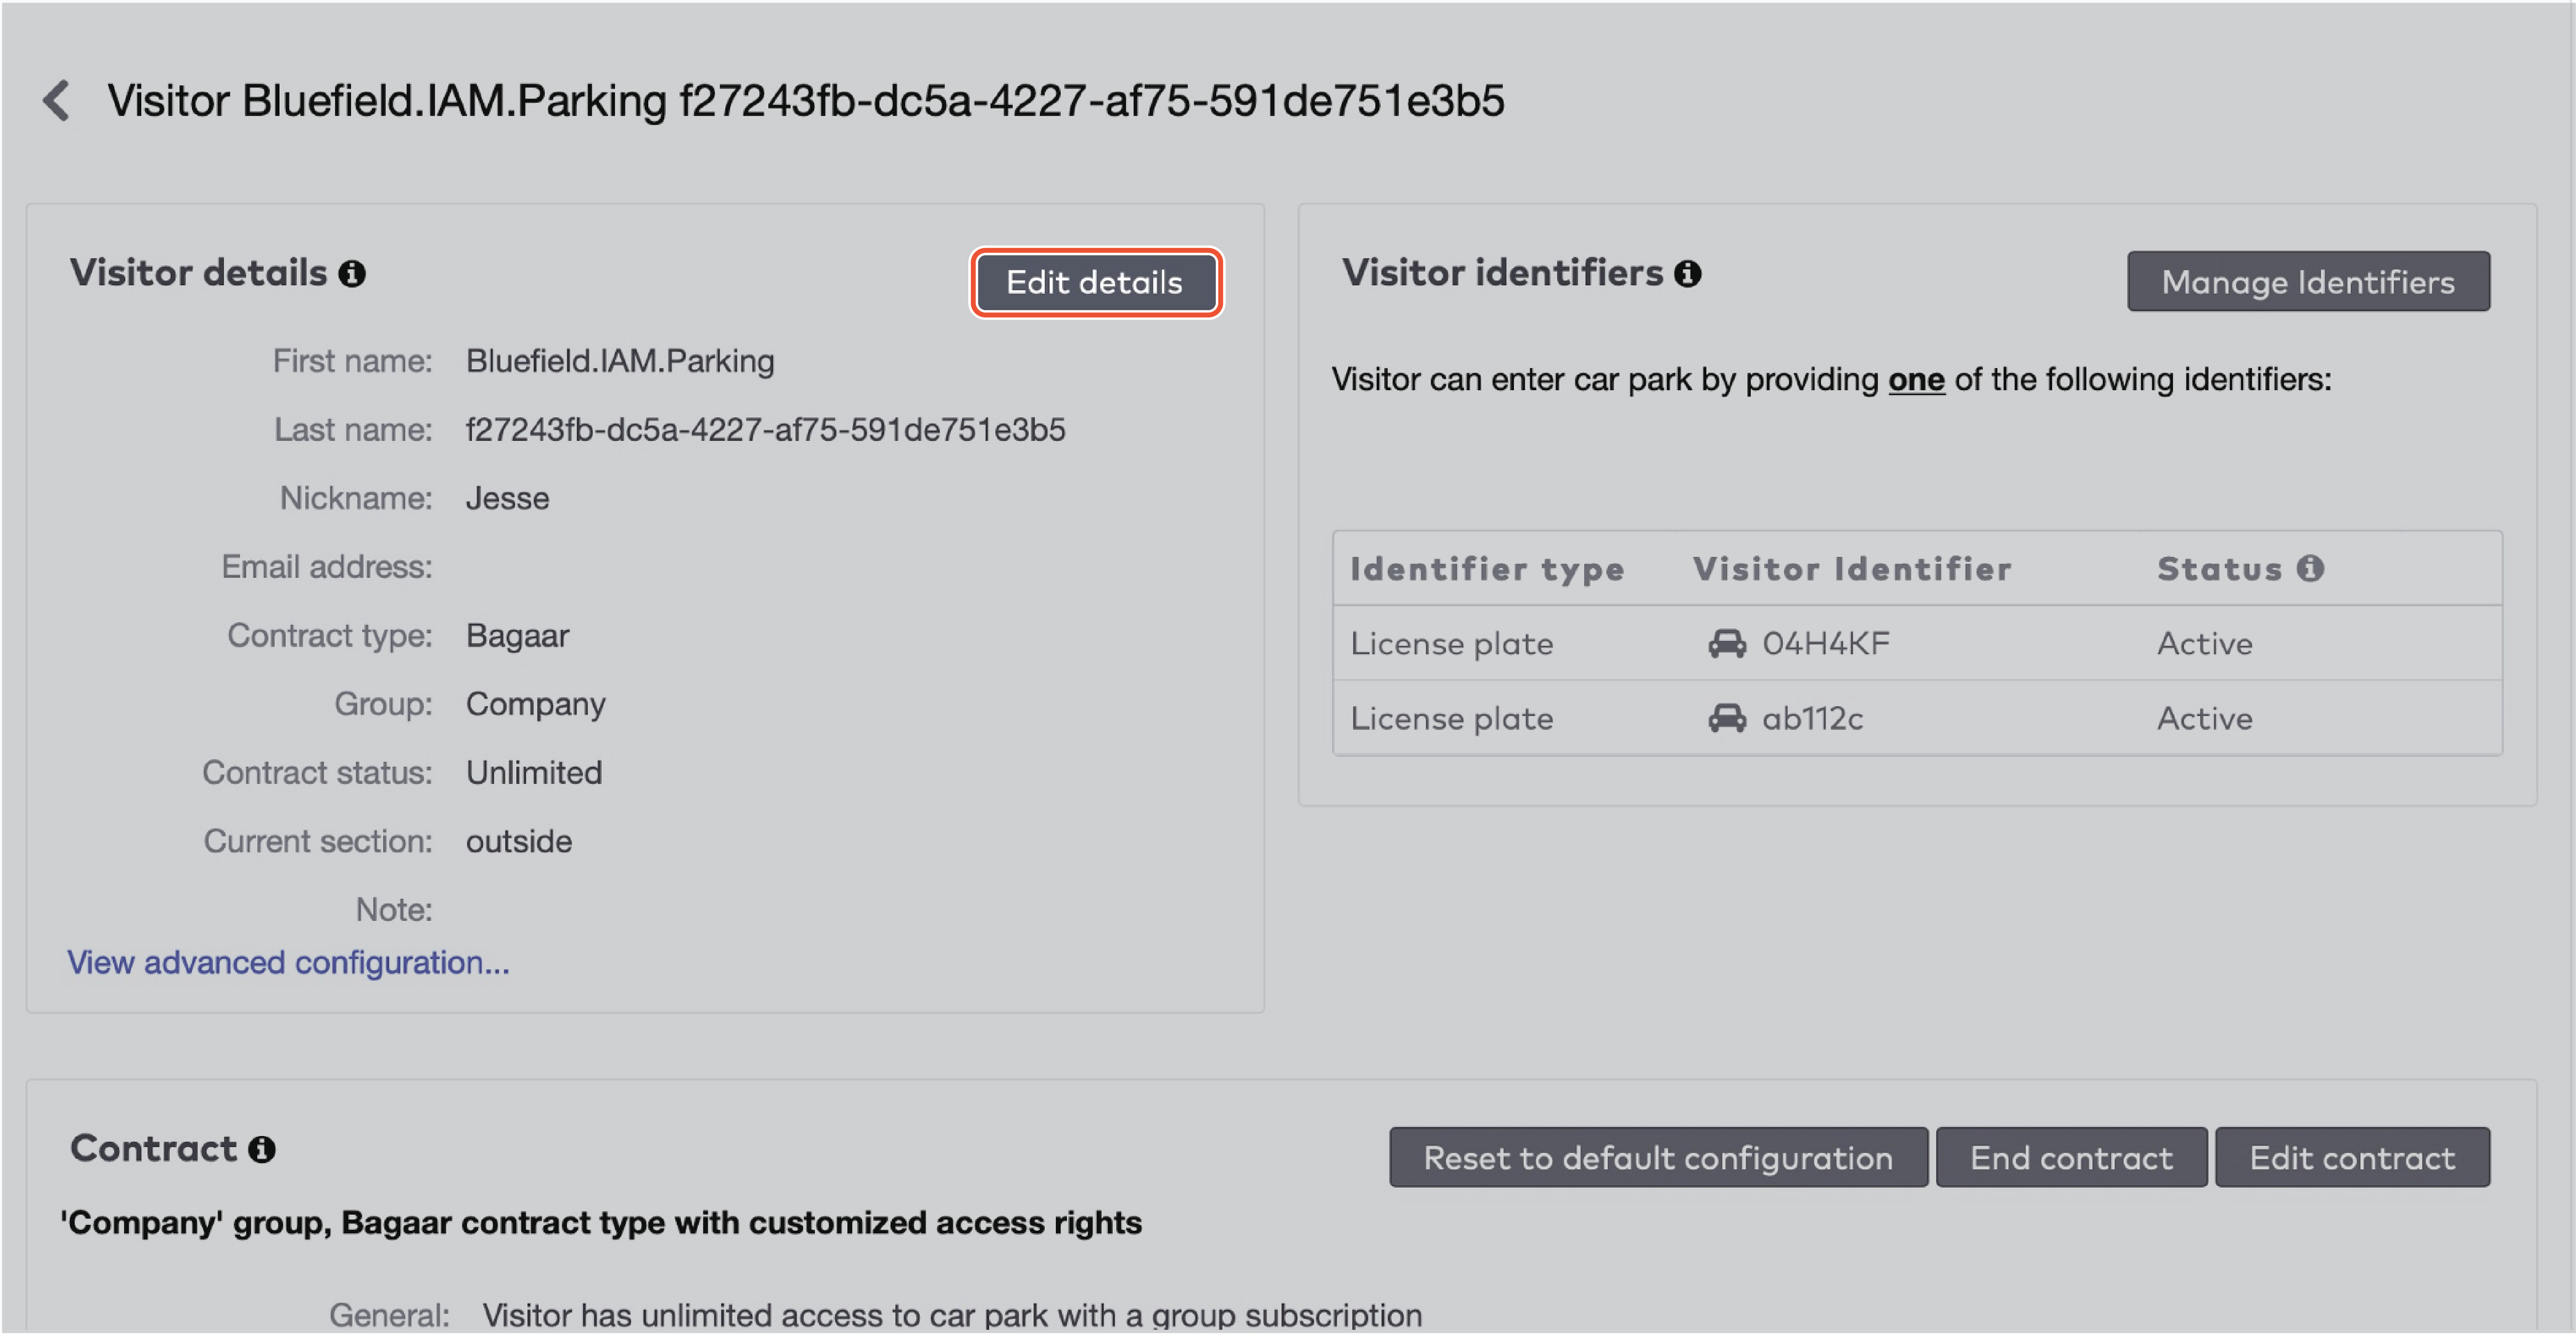
Editing details
In the visitor’s record, click Edit details.
|
Make any changes and click Save.
Click Cancel to discard changes.
Blacklisting a visitor
To blacklist a visitor, go to the visitor’s record.
Click Edit contract.
|
Scroll to Advanced configuration and set Visitor is blacklisted to Yes.

|
Specify a blacklist reason and click Save.
Click Cancel to discard any changes.
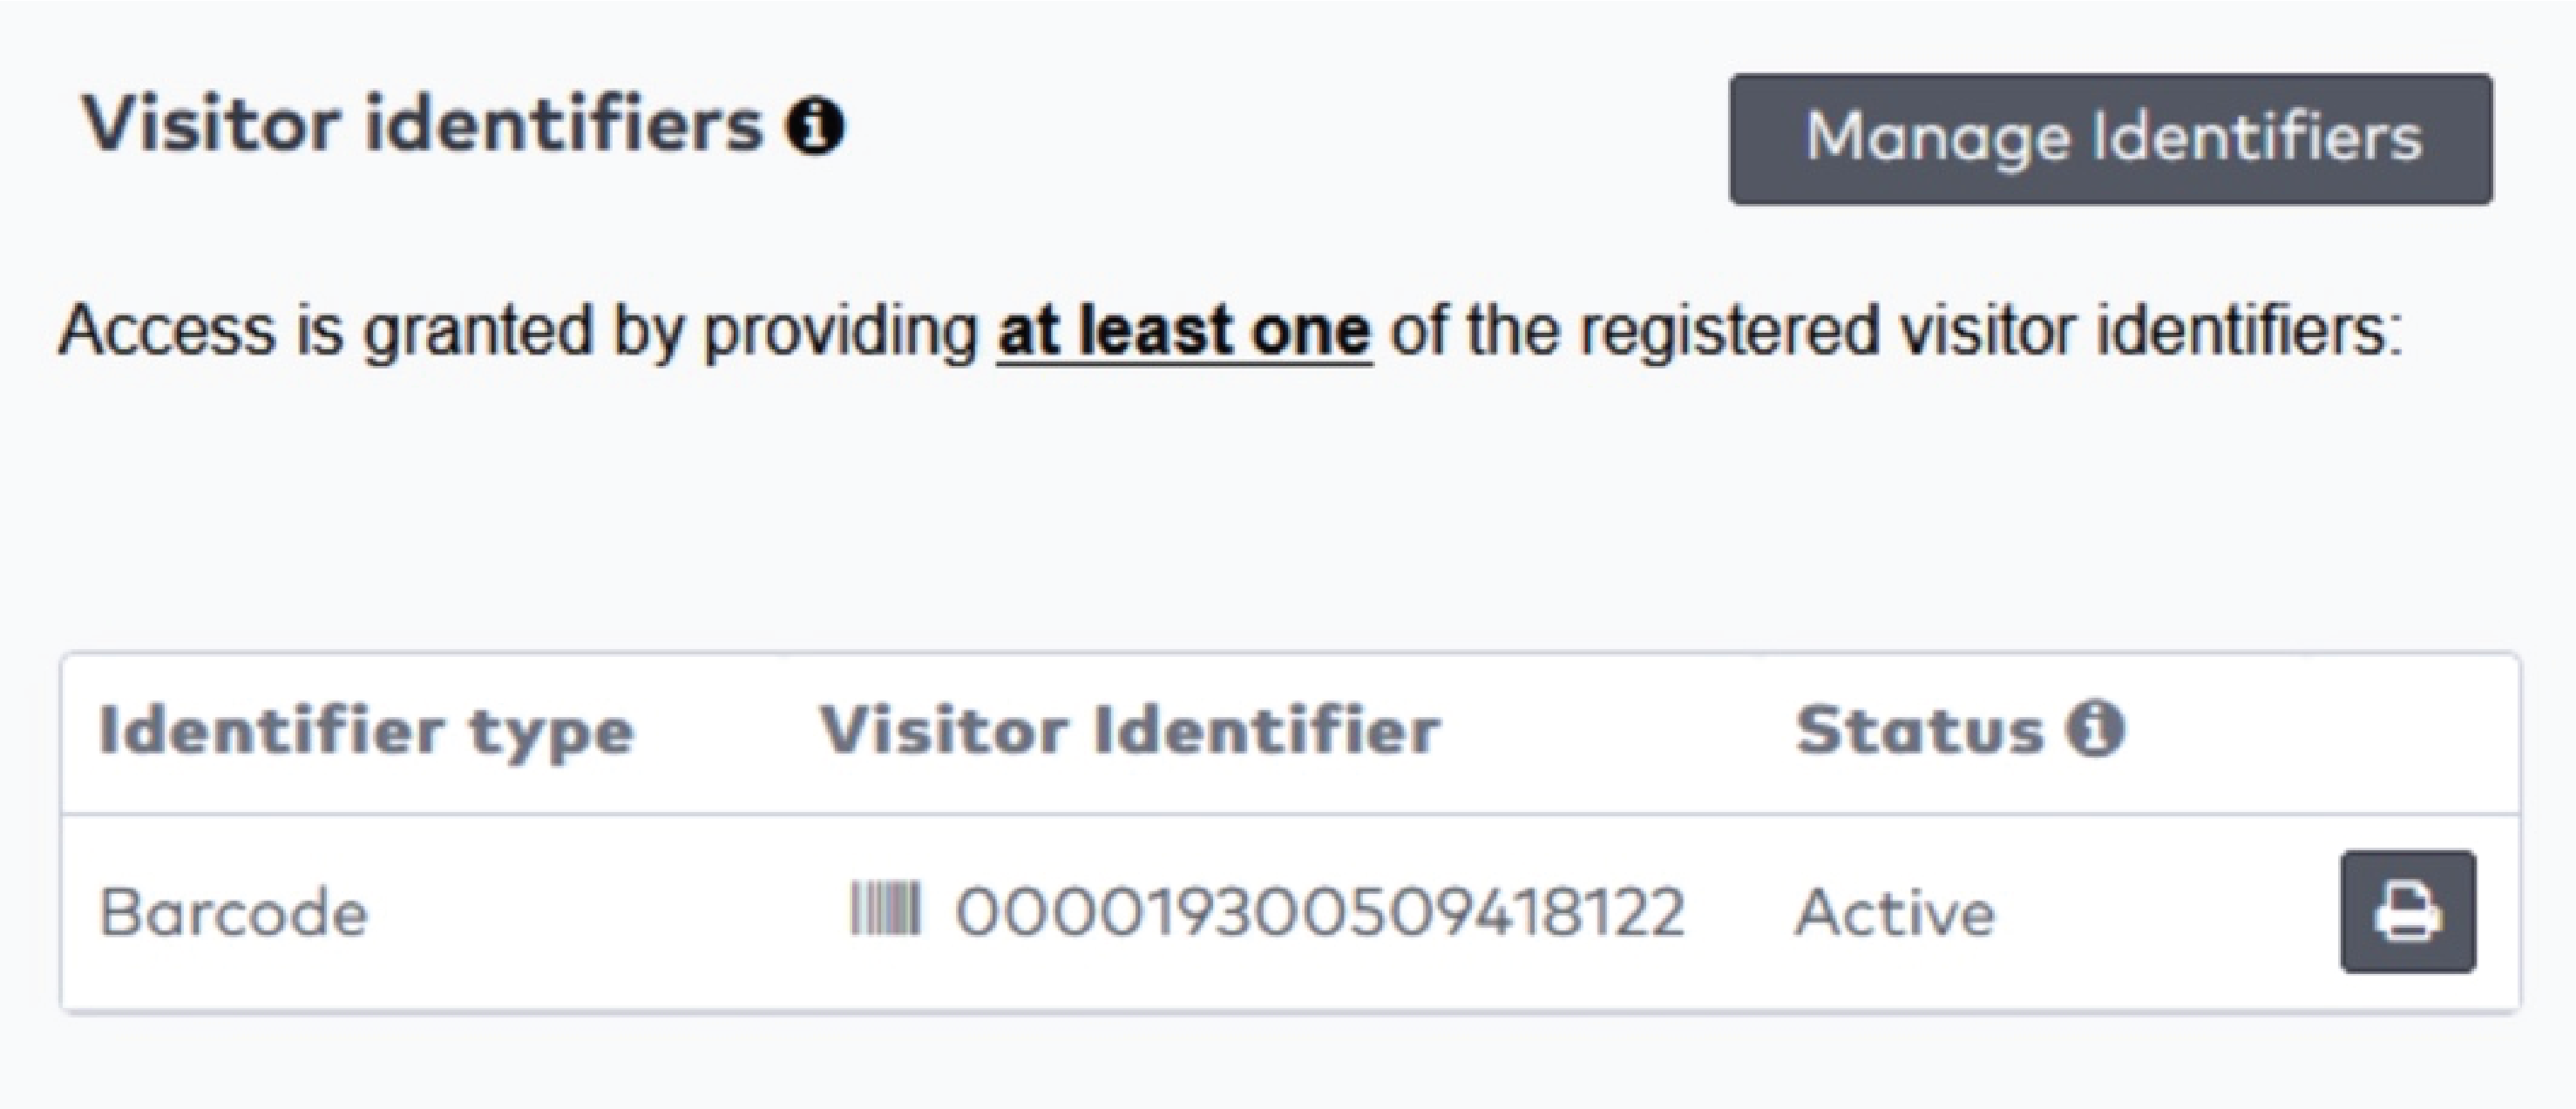
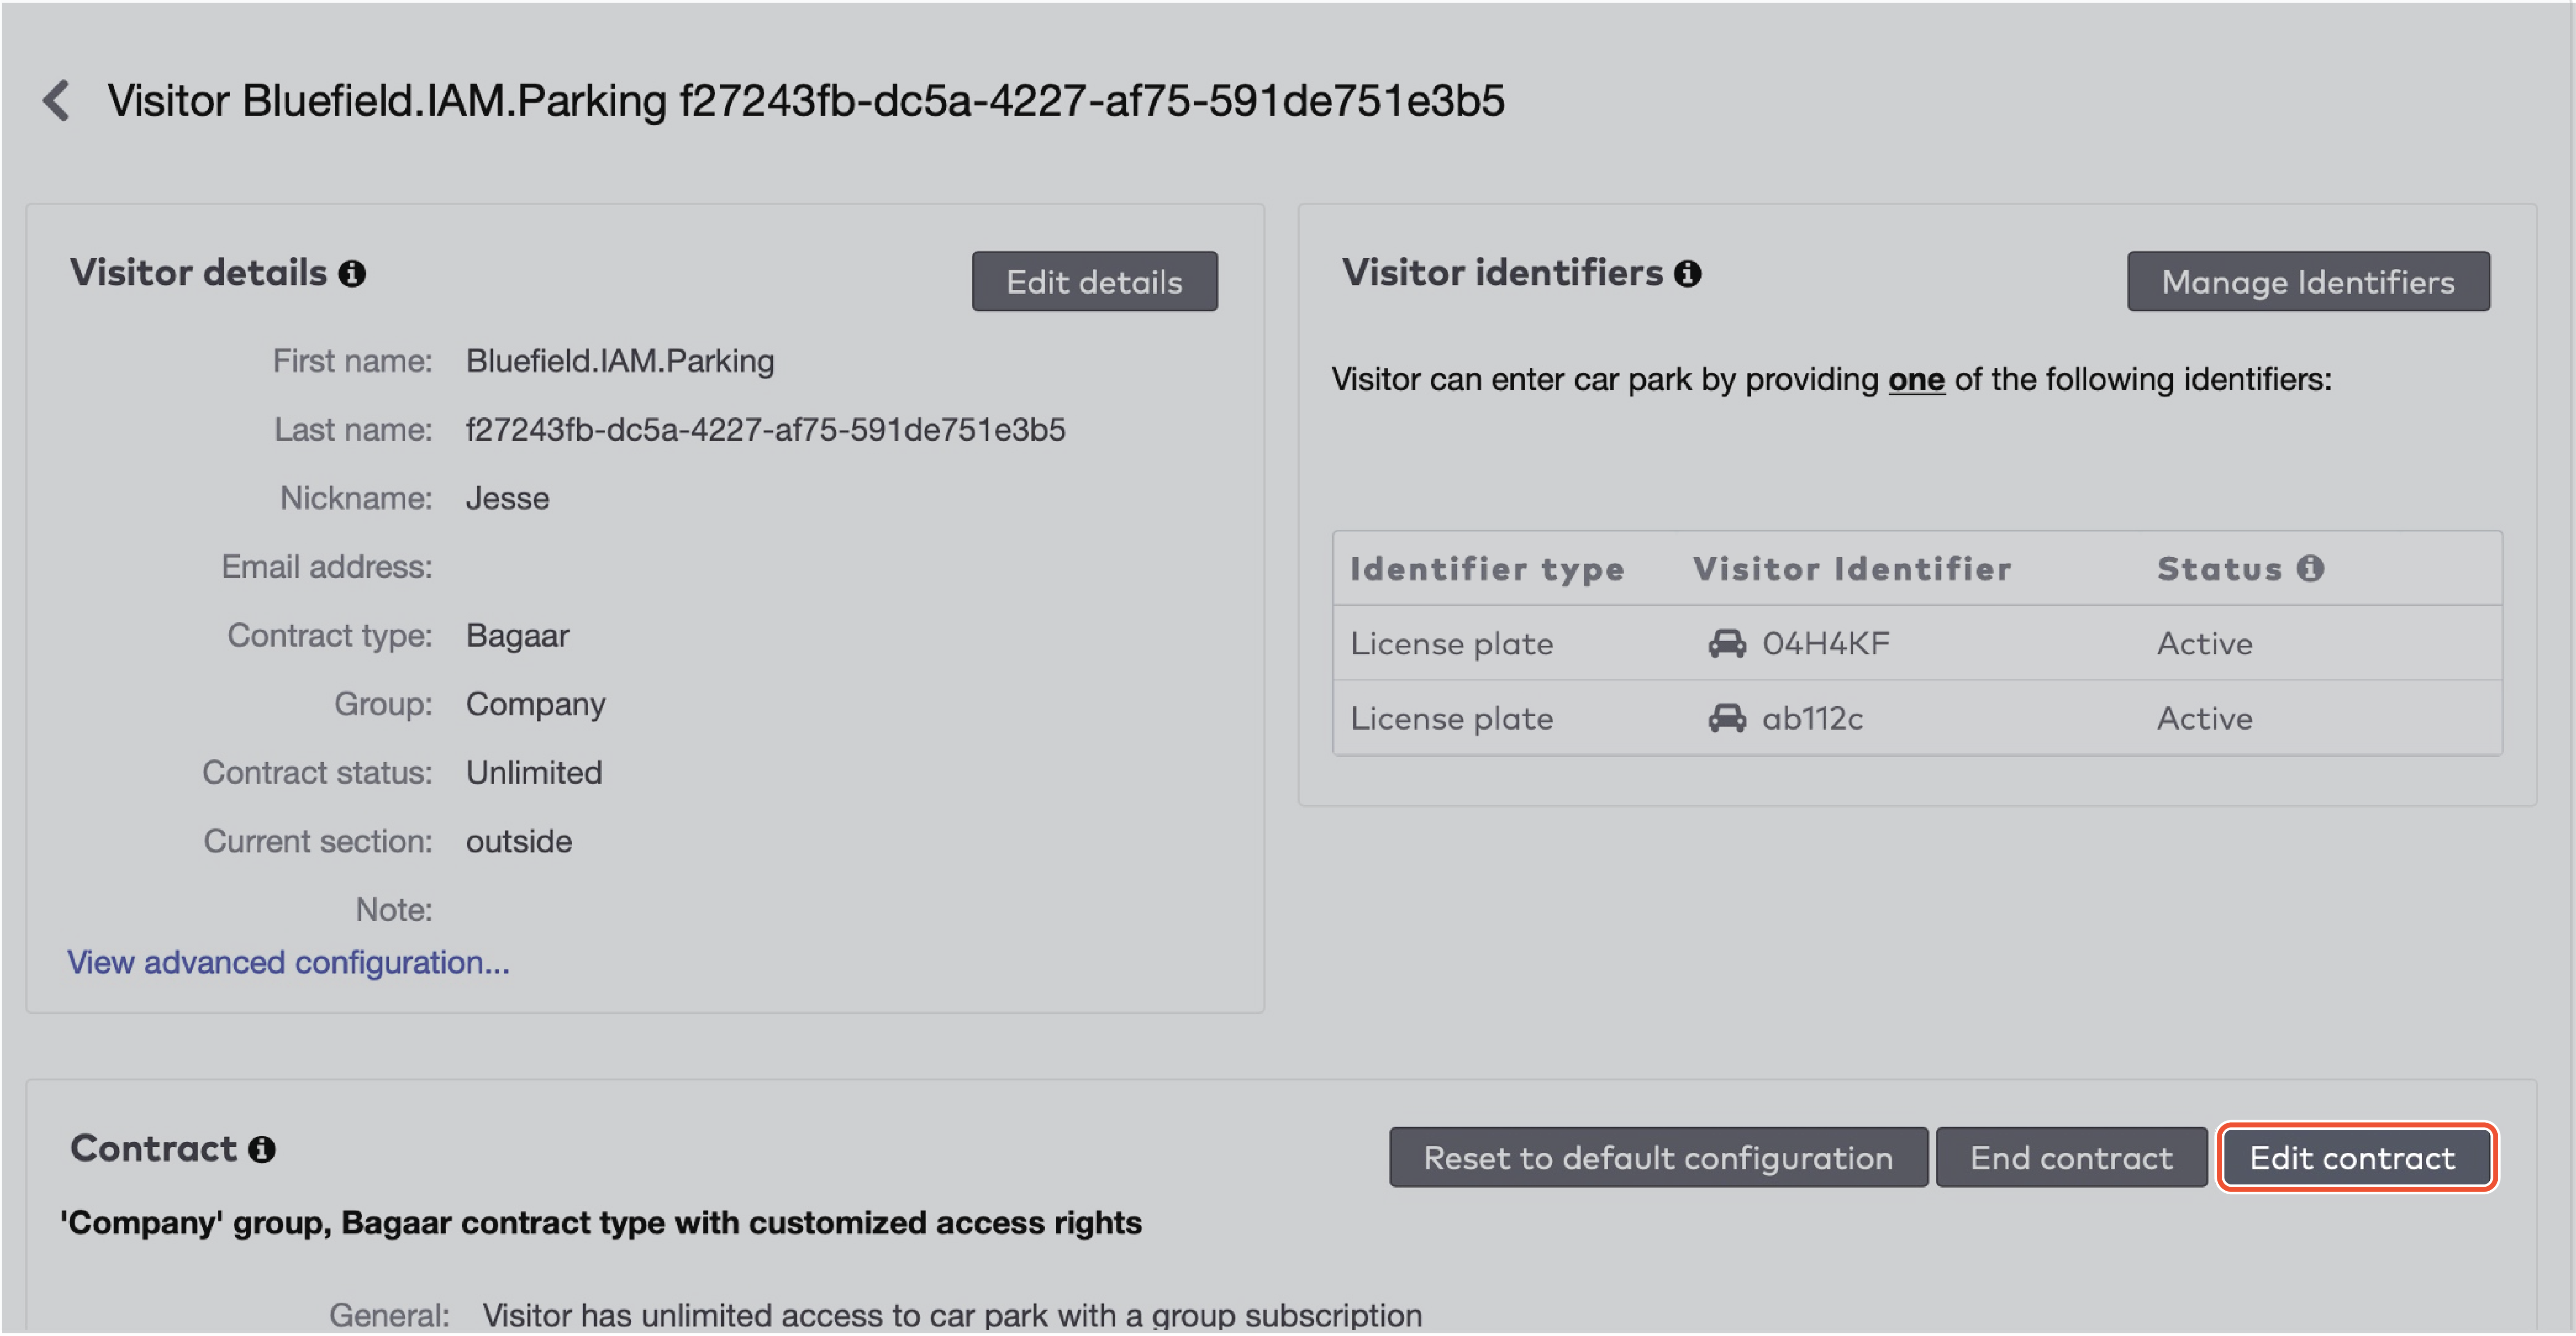
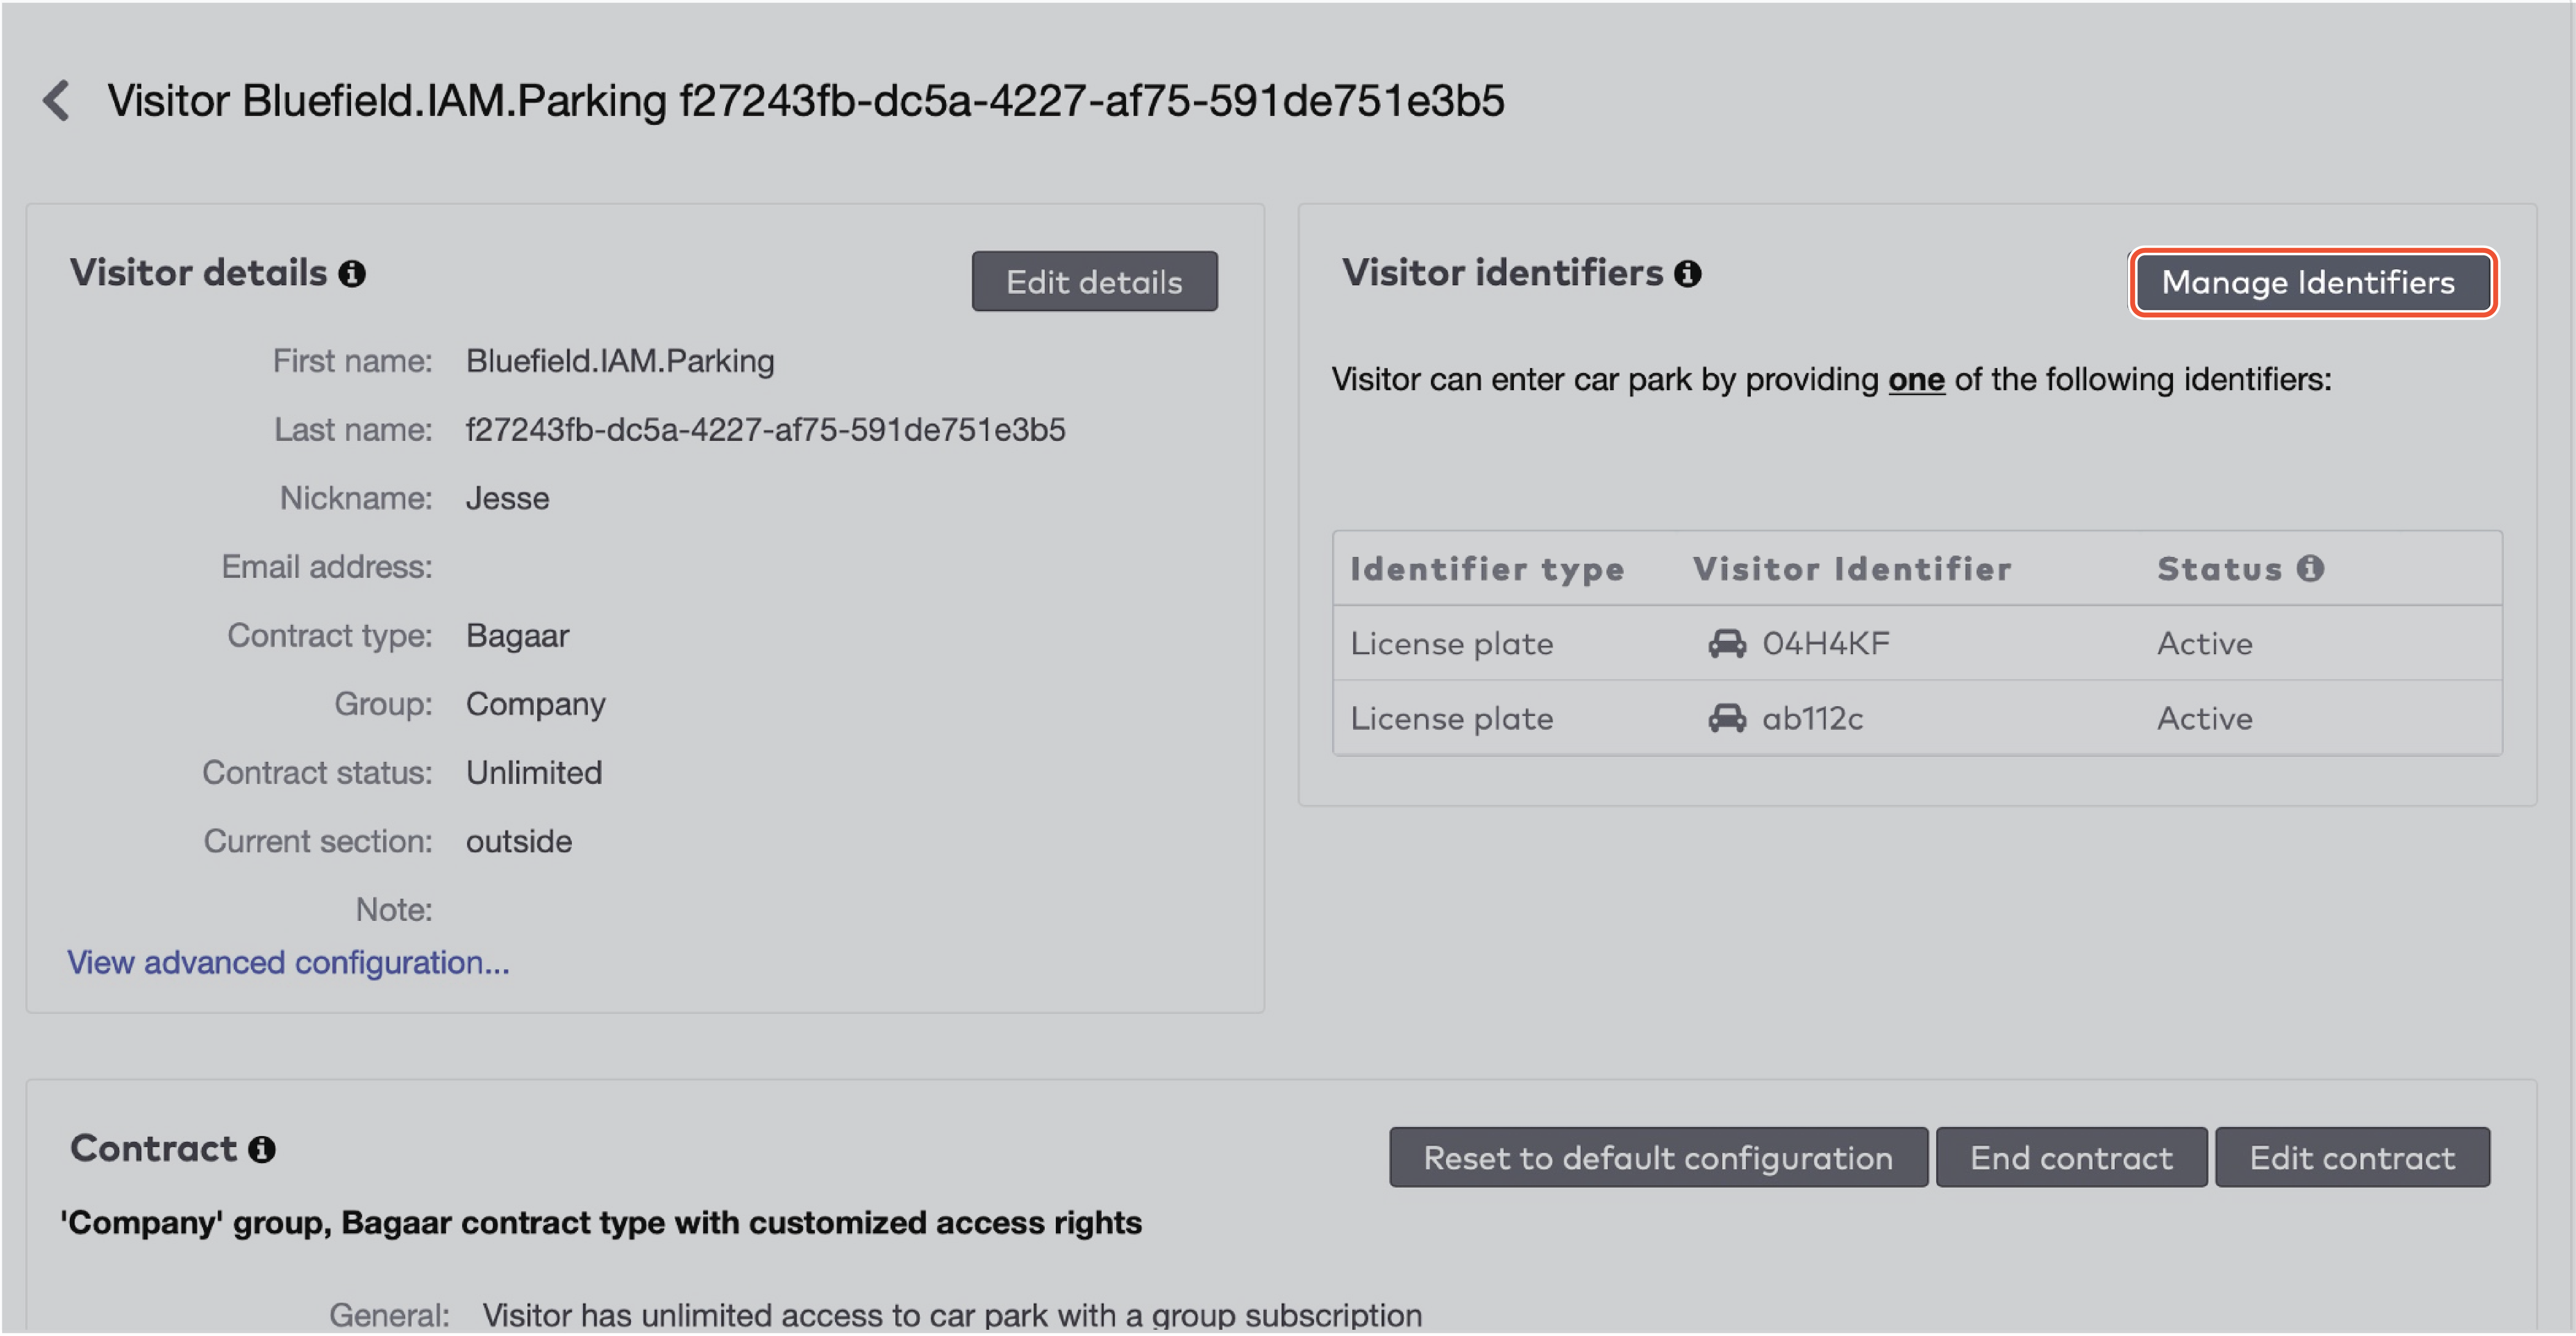
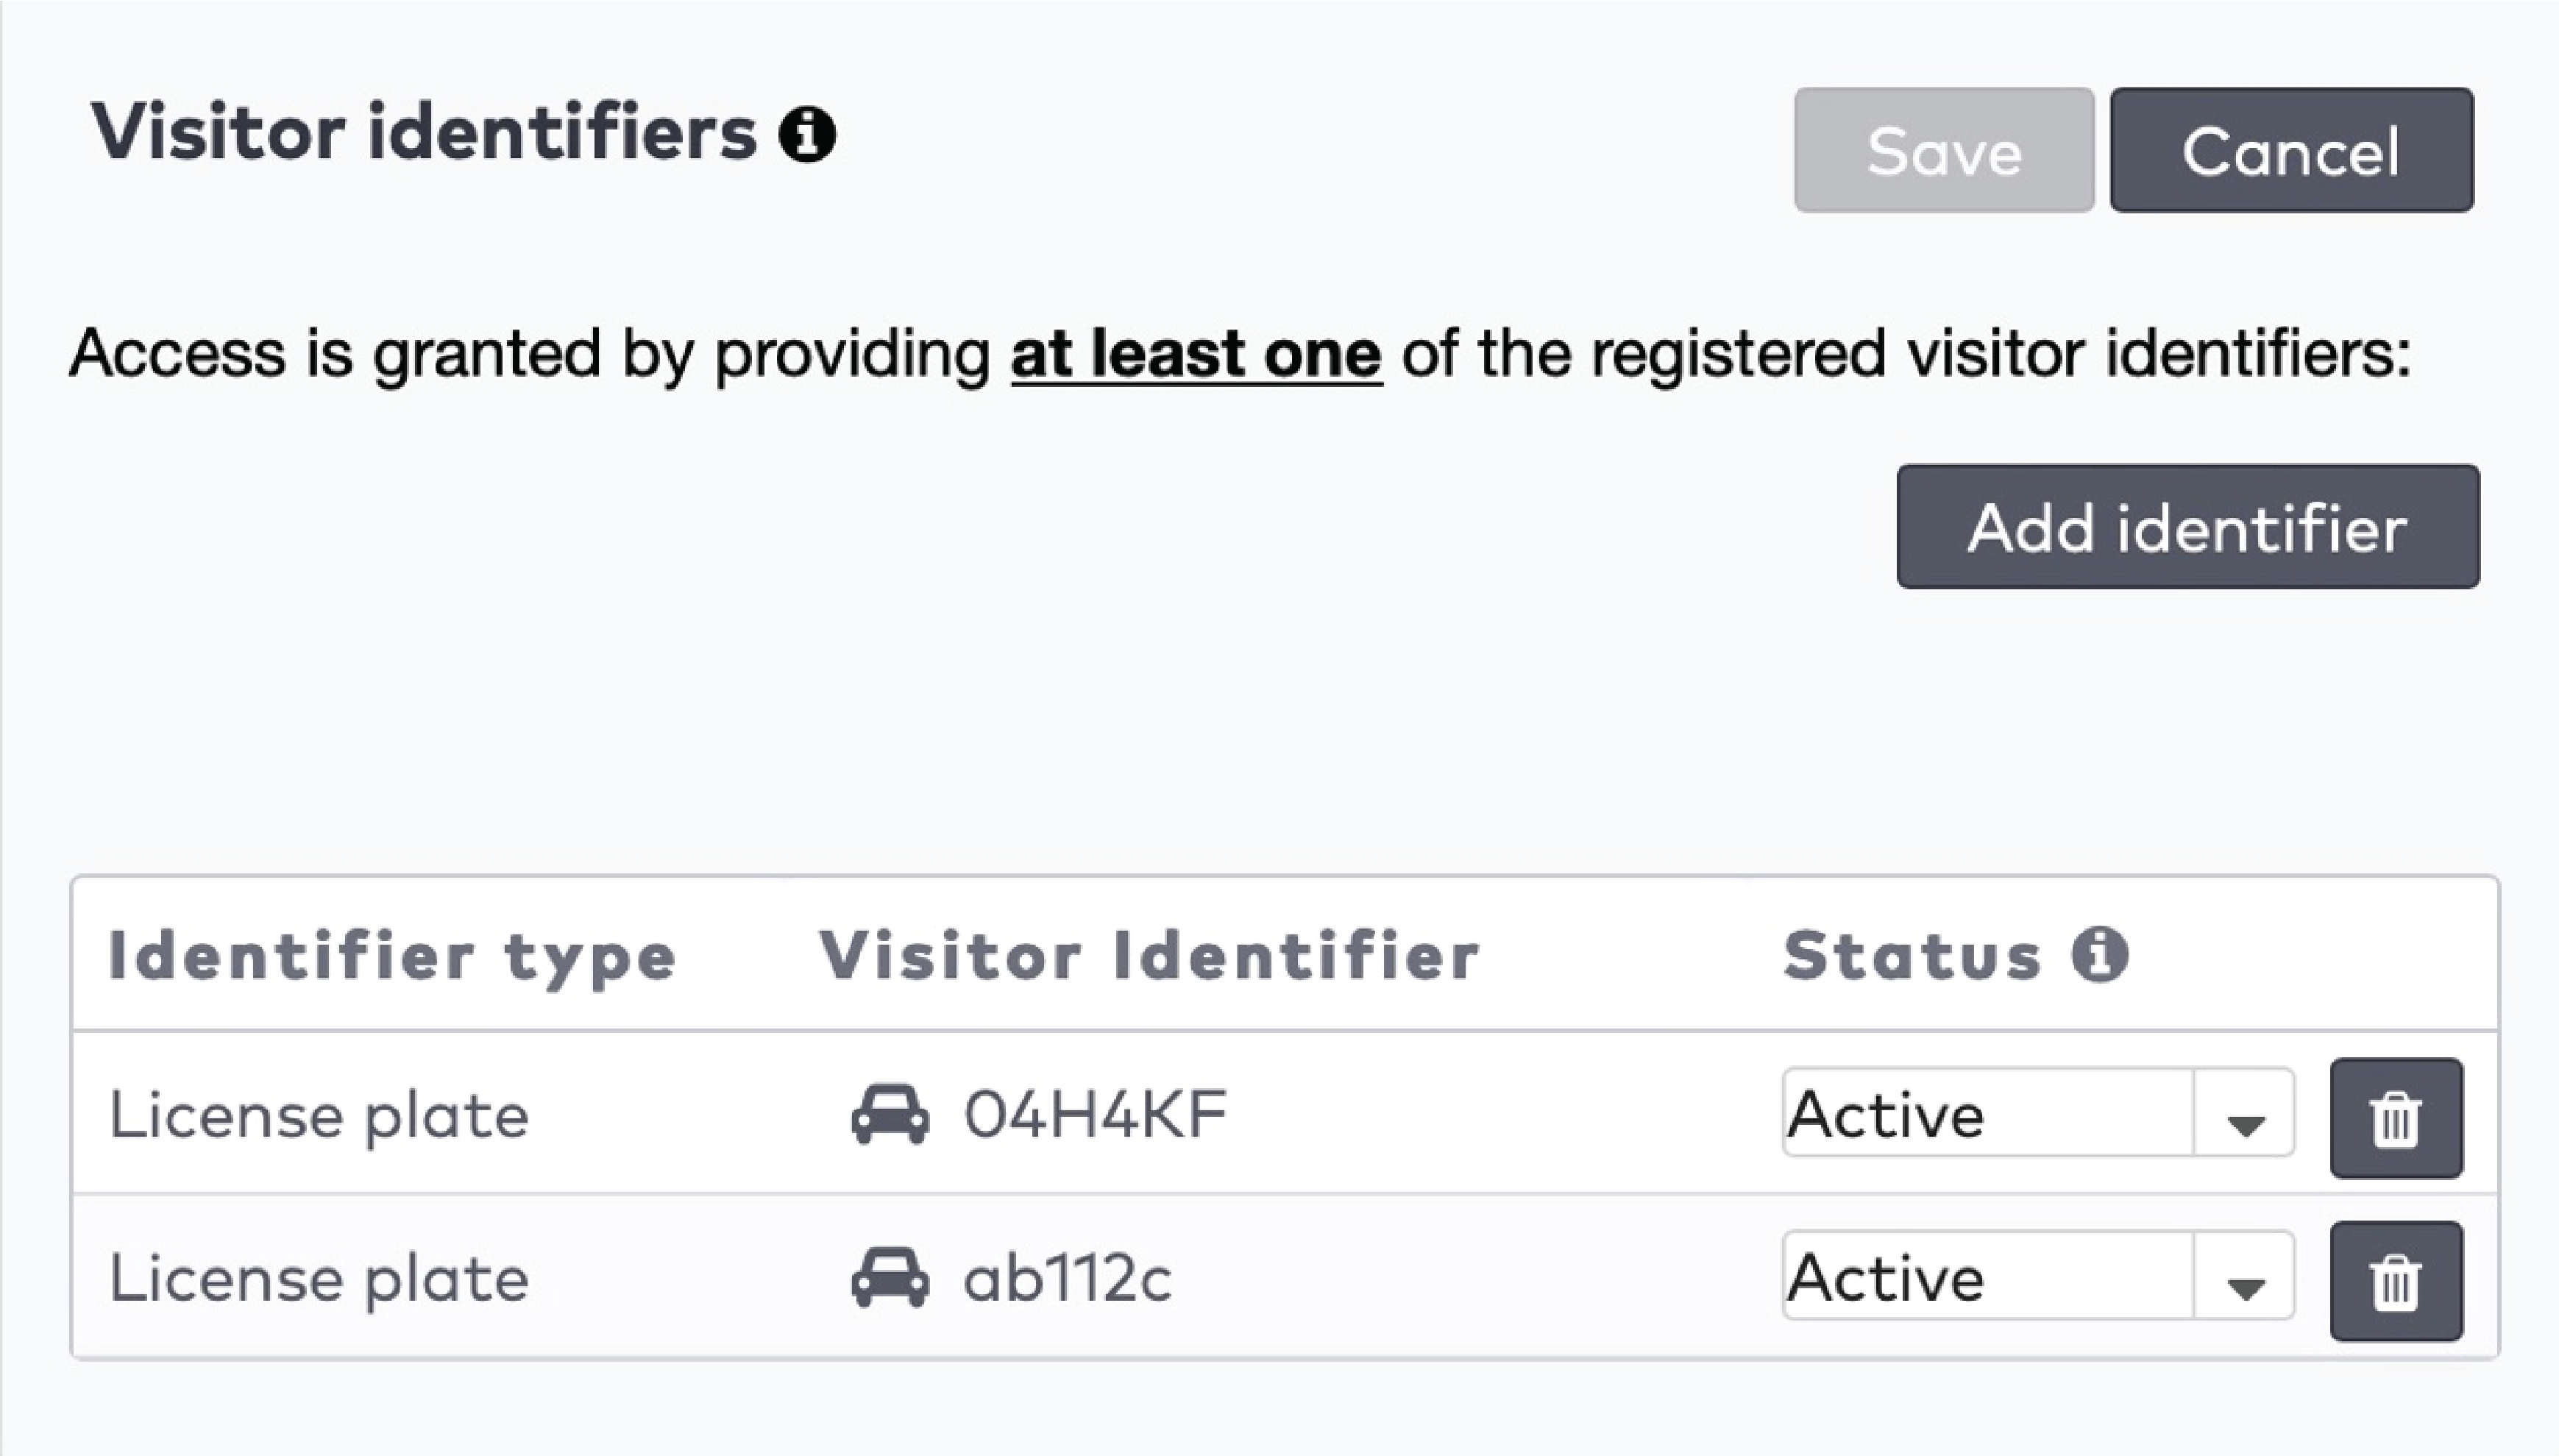
Managing identifiers
In the visitor’s record, click Manage Identifiers.
|
Click Add identifier to add another identifier. Select the identifier type from the dropdown menu, enter the identifier number in the Visitor Identifier field and set the status to Active.
Important! A warning popup is shown if a certain identifier is already used by another visitor. It is possible to remove the identifier from that other visitor and assign it to the one you’re editing.
|
Click  to delete an identifier.
to delete an identifier.
Click Save to save any changes.
Click Cancel to discard.
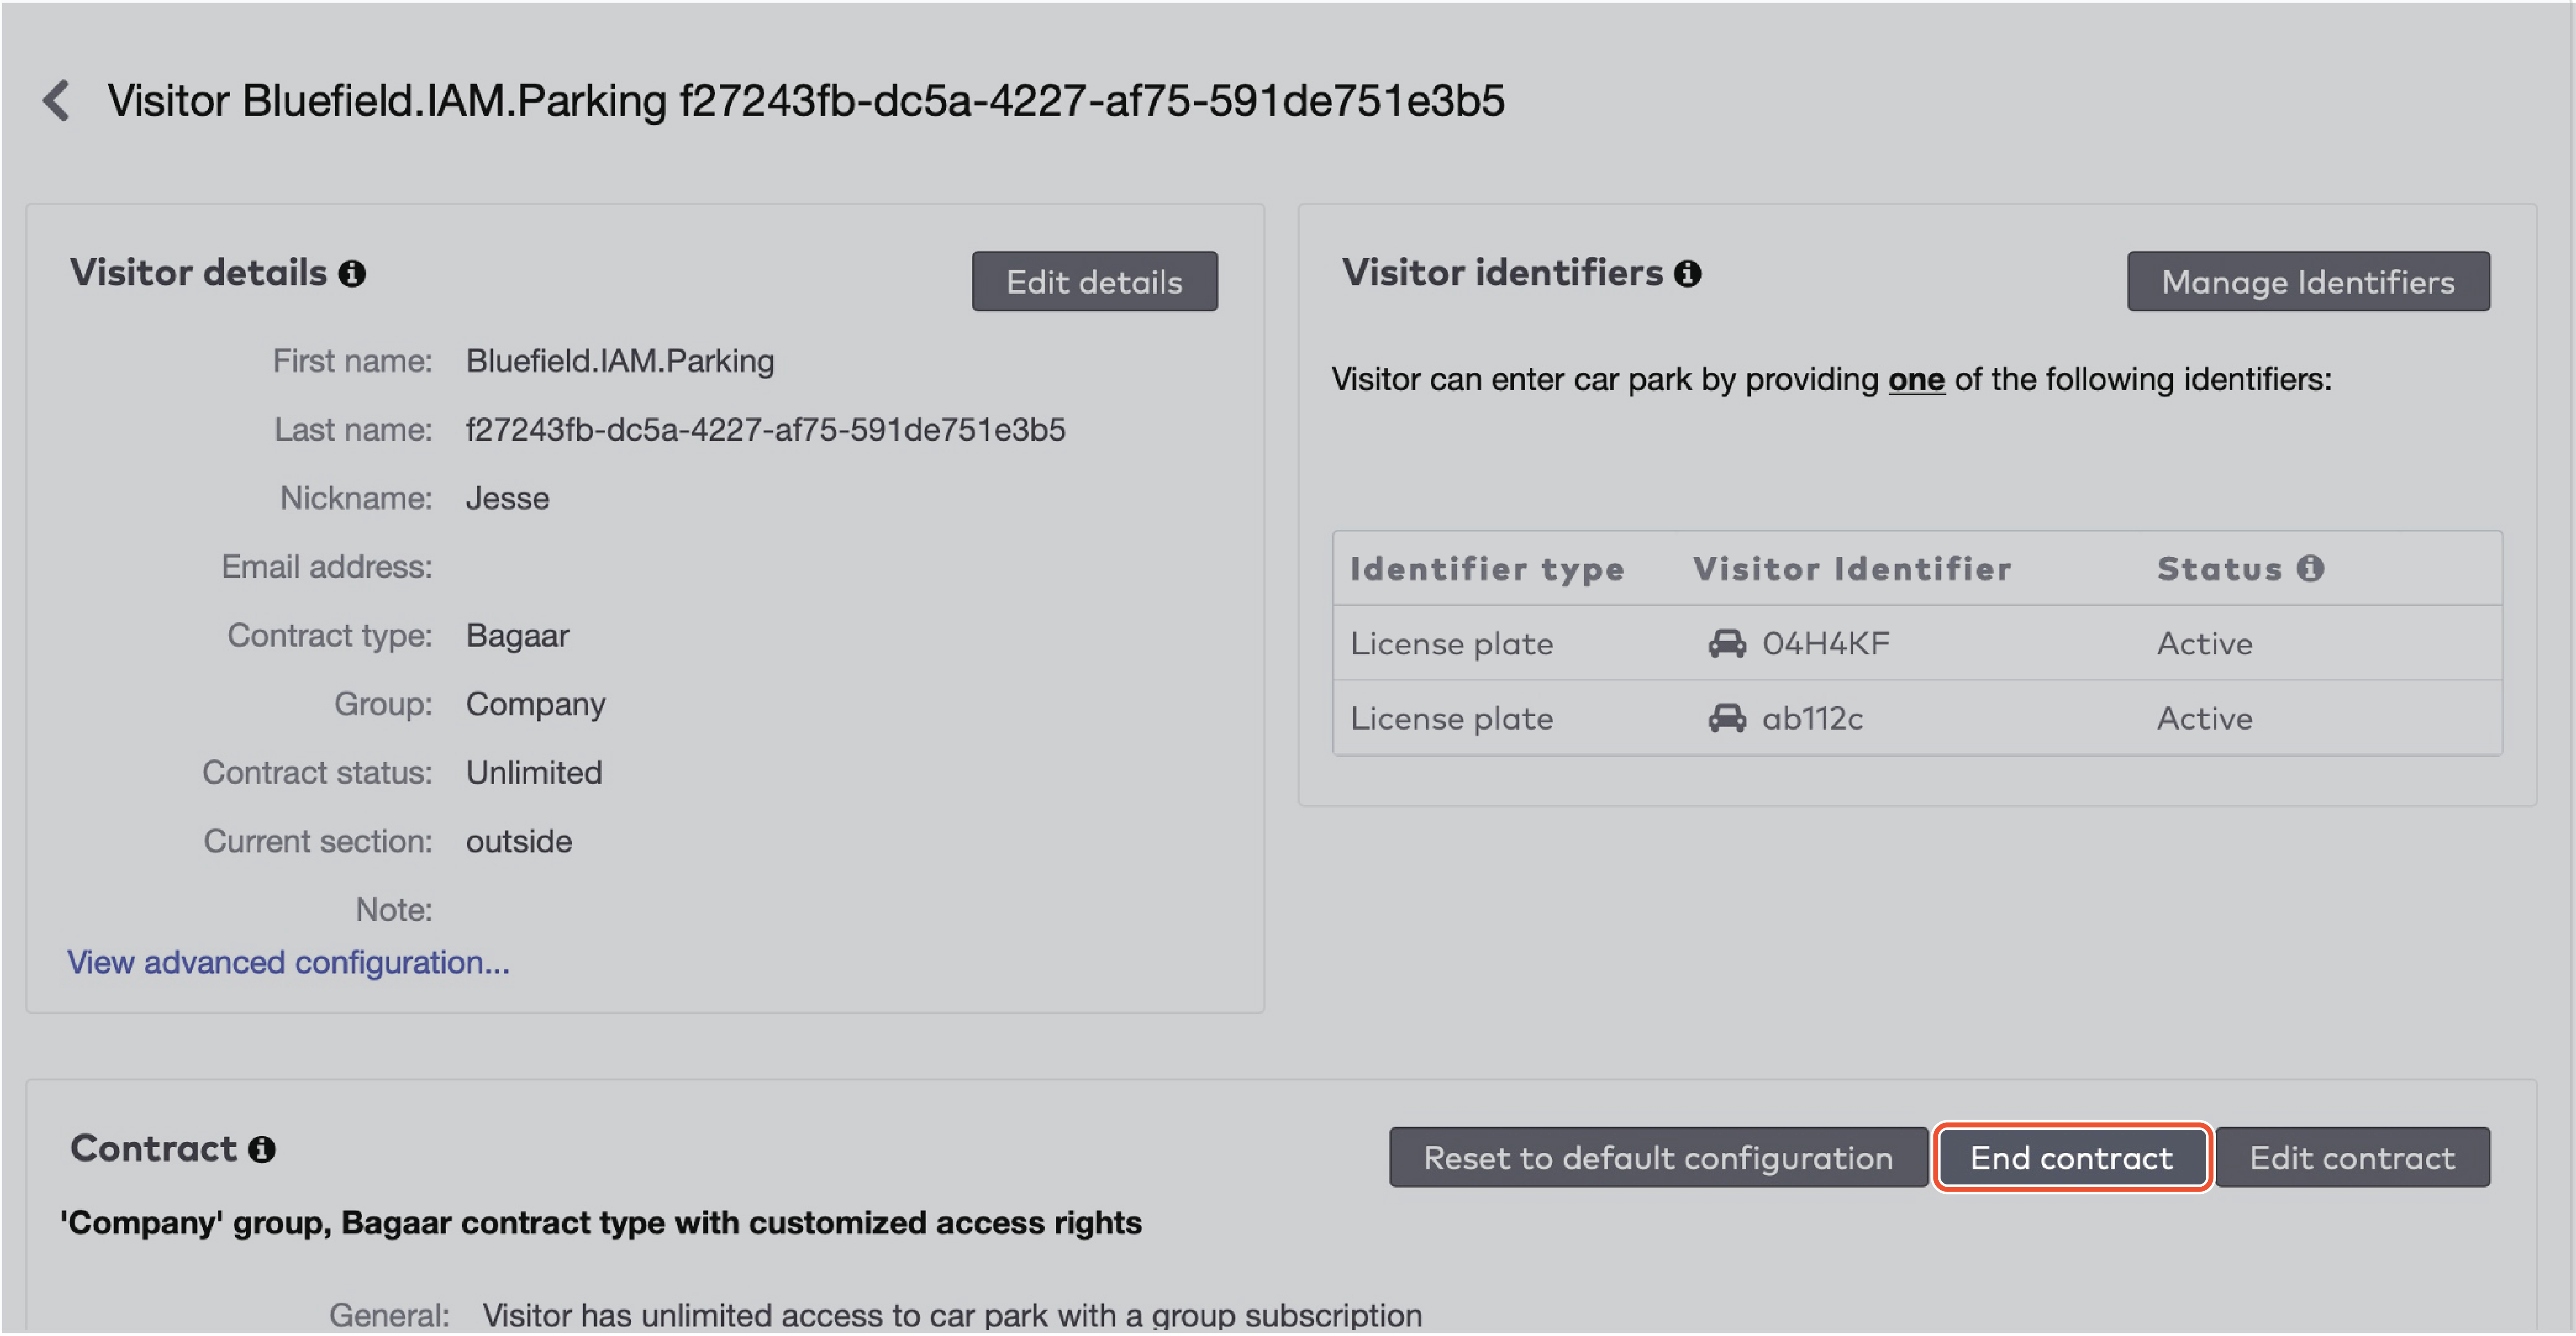
Ending a contract
In the visitor’s record, click End contract.
|
Select the end date and click Go to next step.
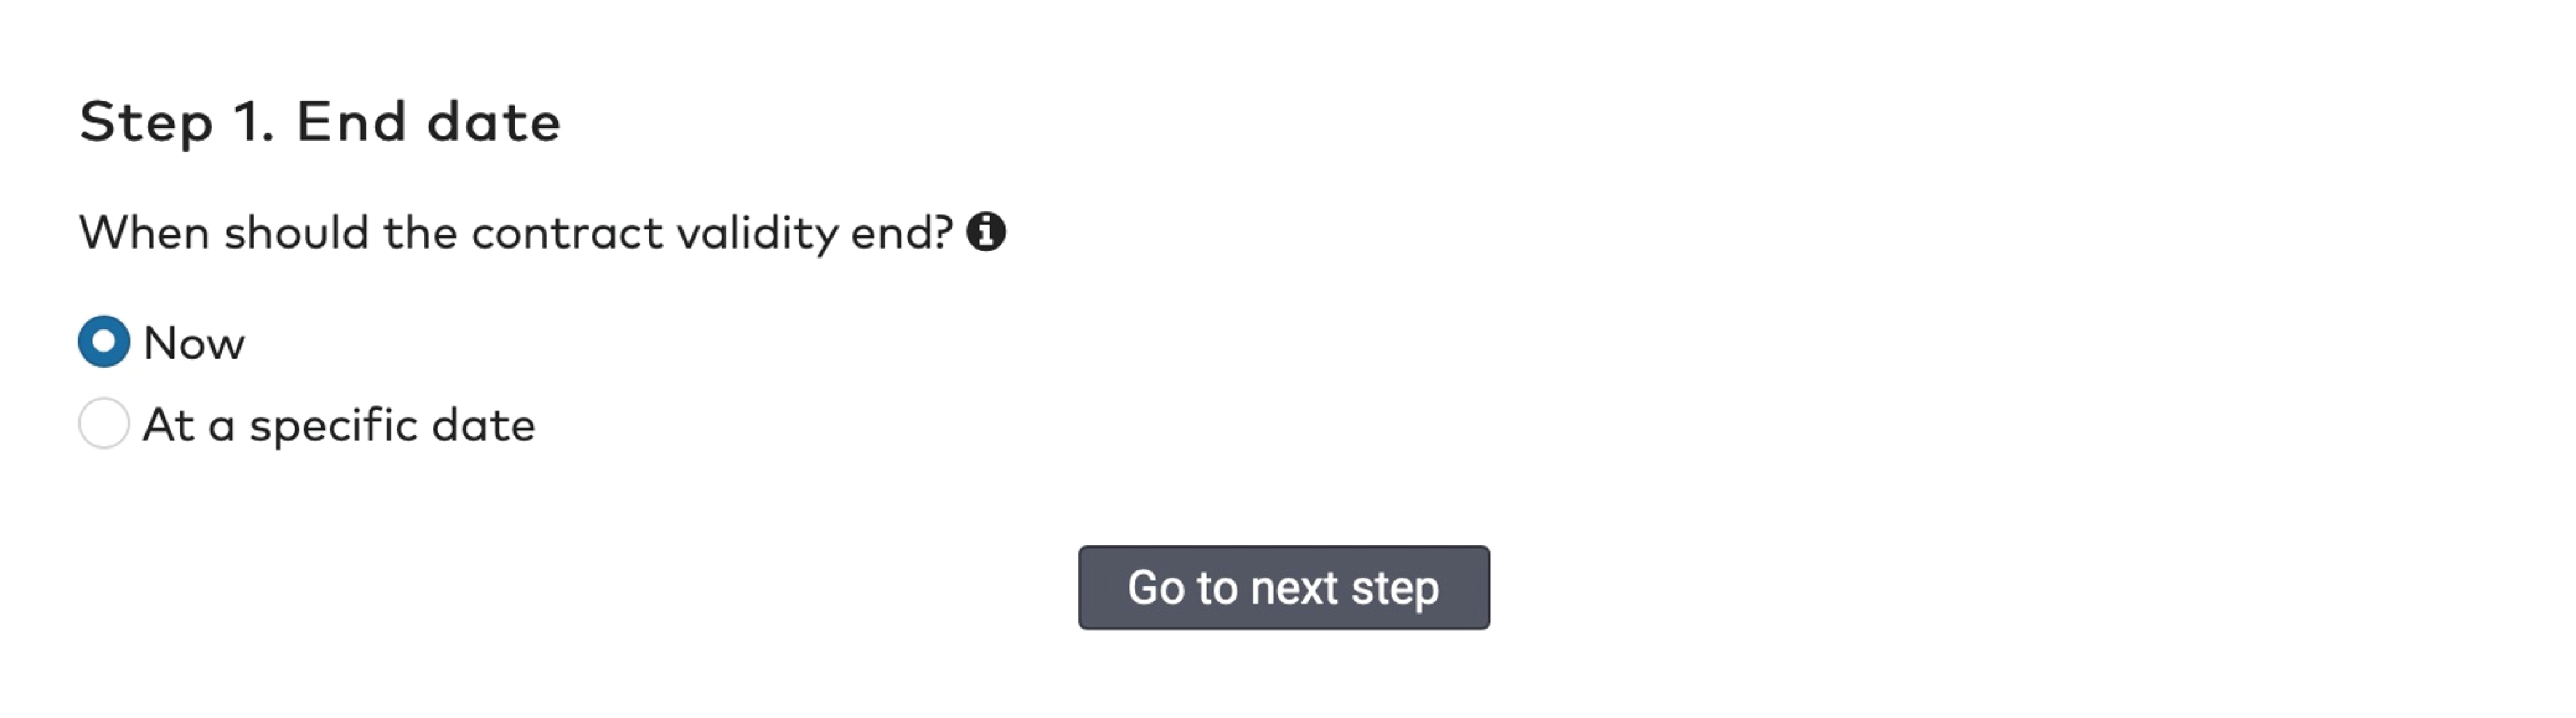
|
If you end the contract now, determine what should be done with the visitor data. Select Delete visitor data or Keep visitor data. This option is not available if you end the contract on a specific date in the future.
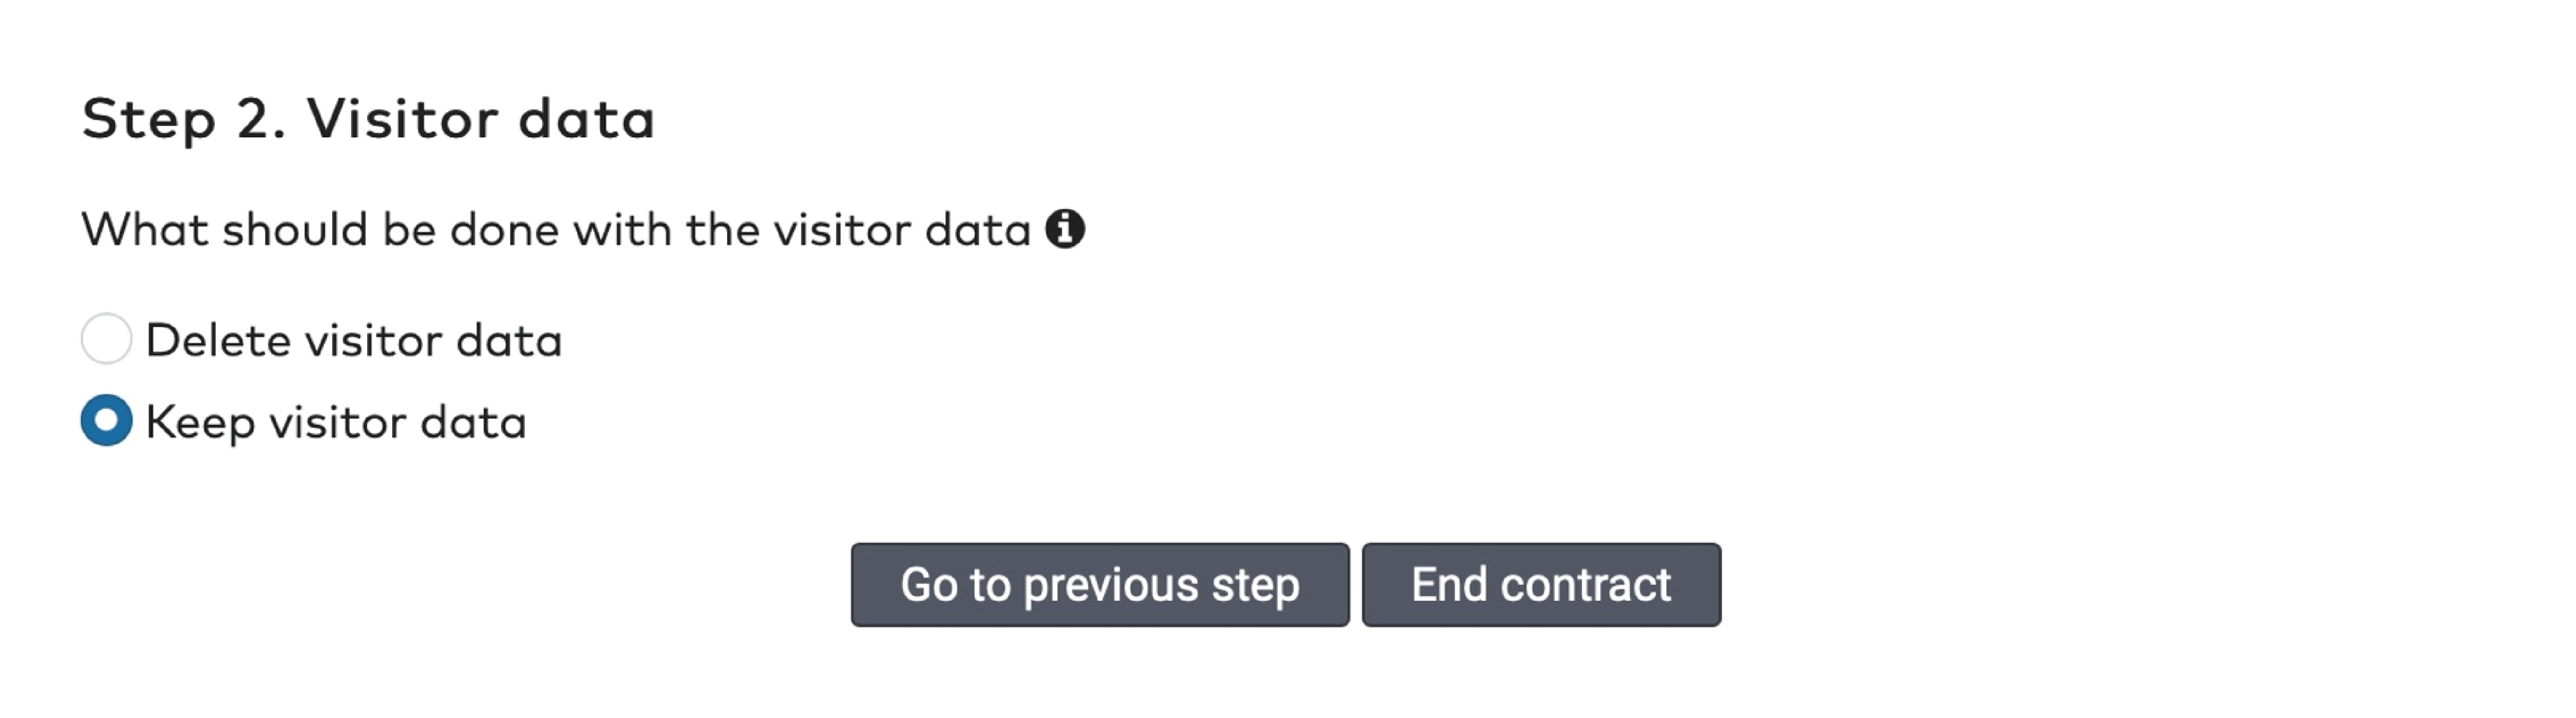
|
Click End contract to end the contract.
Editing a contract
In the visitor’s record, click Edit contract.
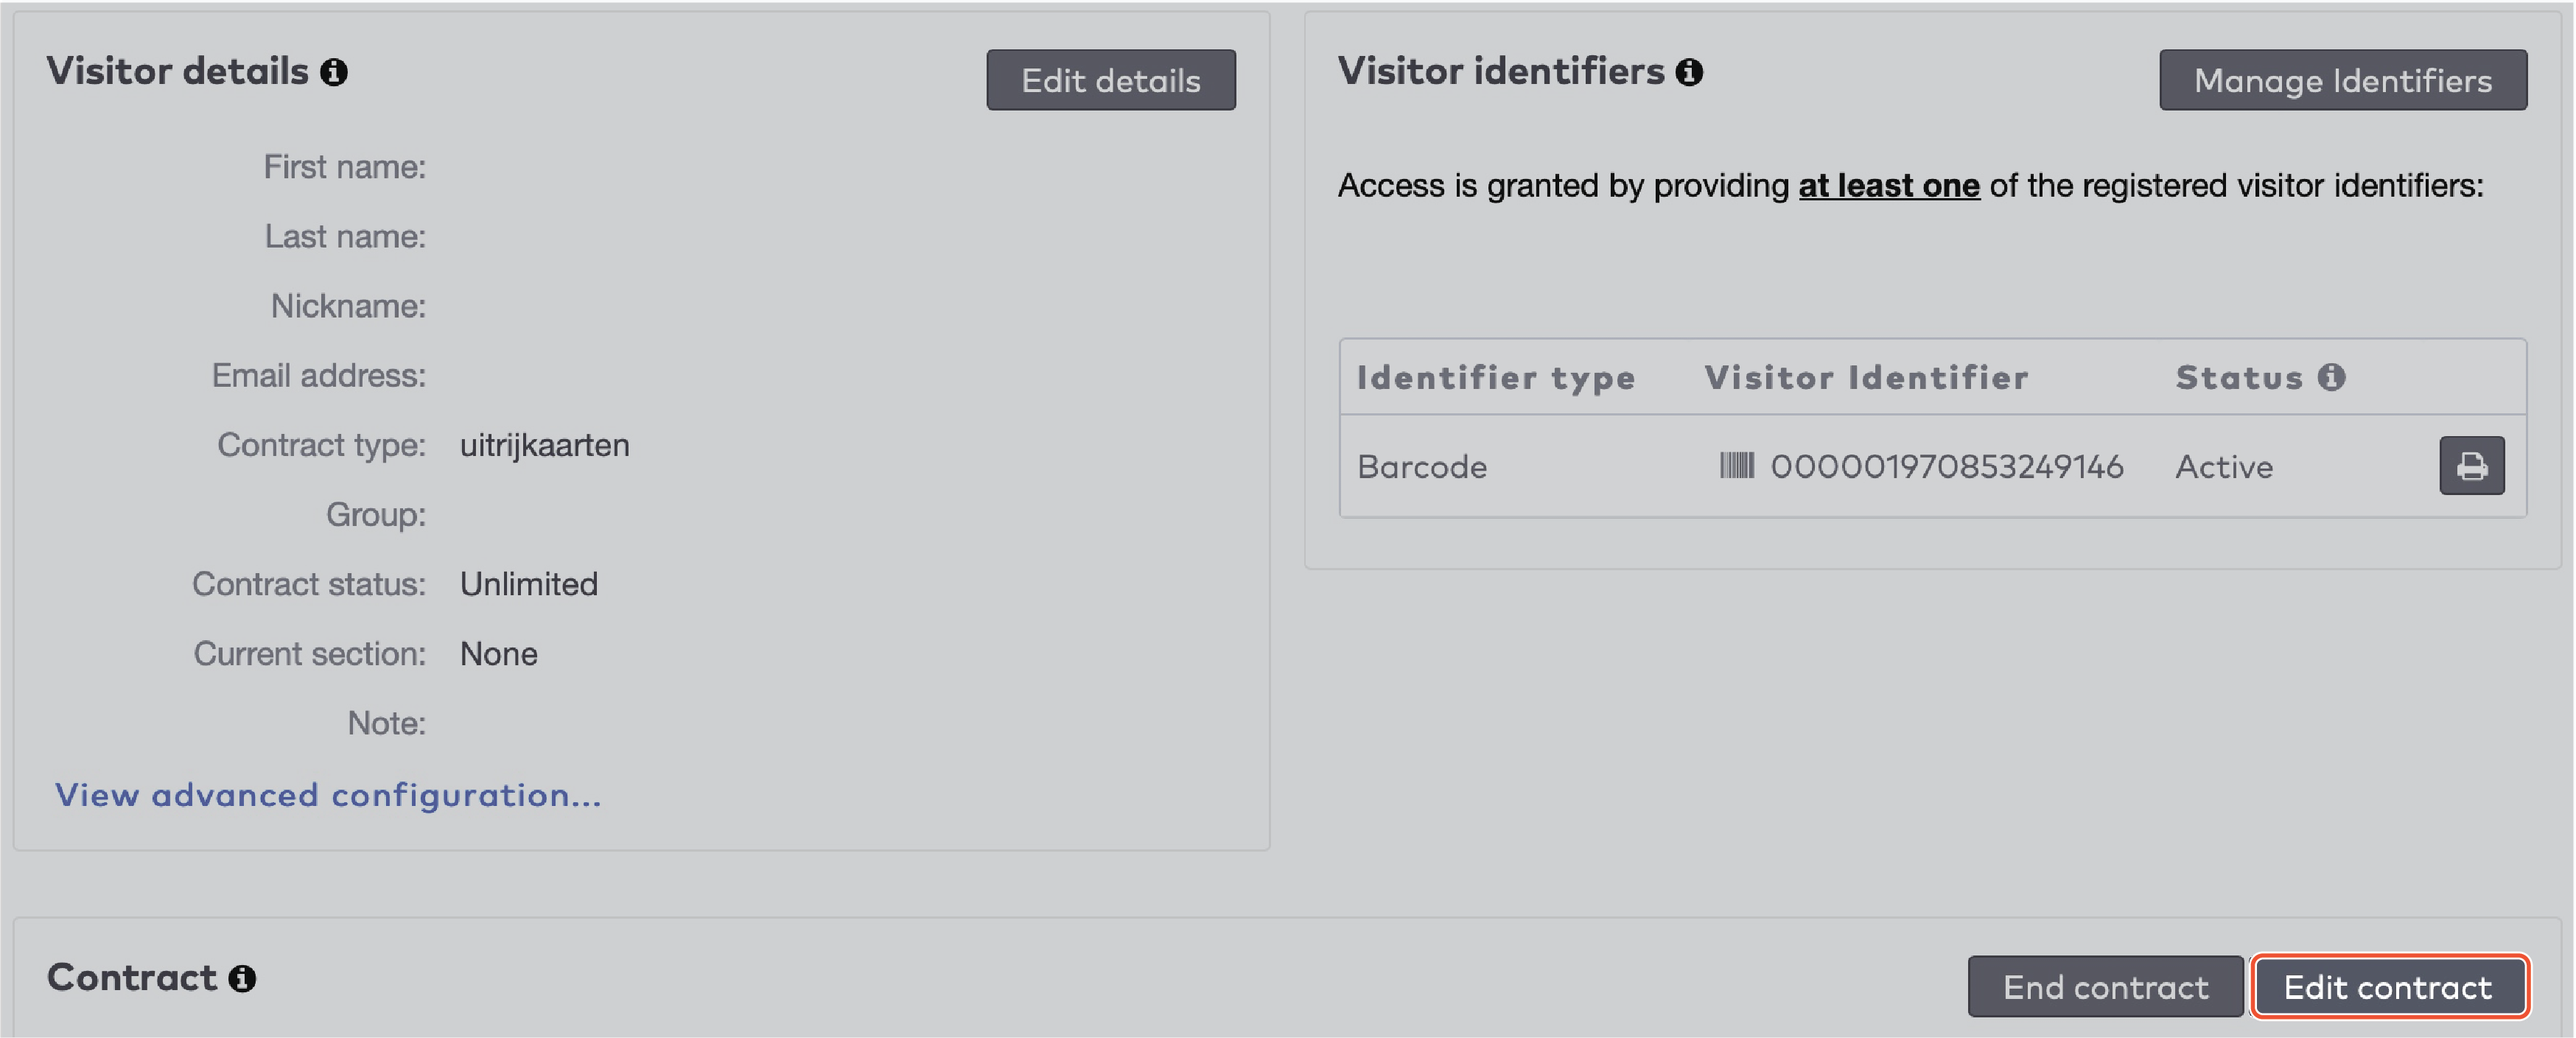
|
Make any changes and click Save.
Click Reset to default configuration to clear any overrides from the contract type.
Click Cancel to discard changes.
Deviations from the contract type are displayed in orange text. The contract type itself is not modified.

|
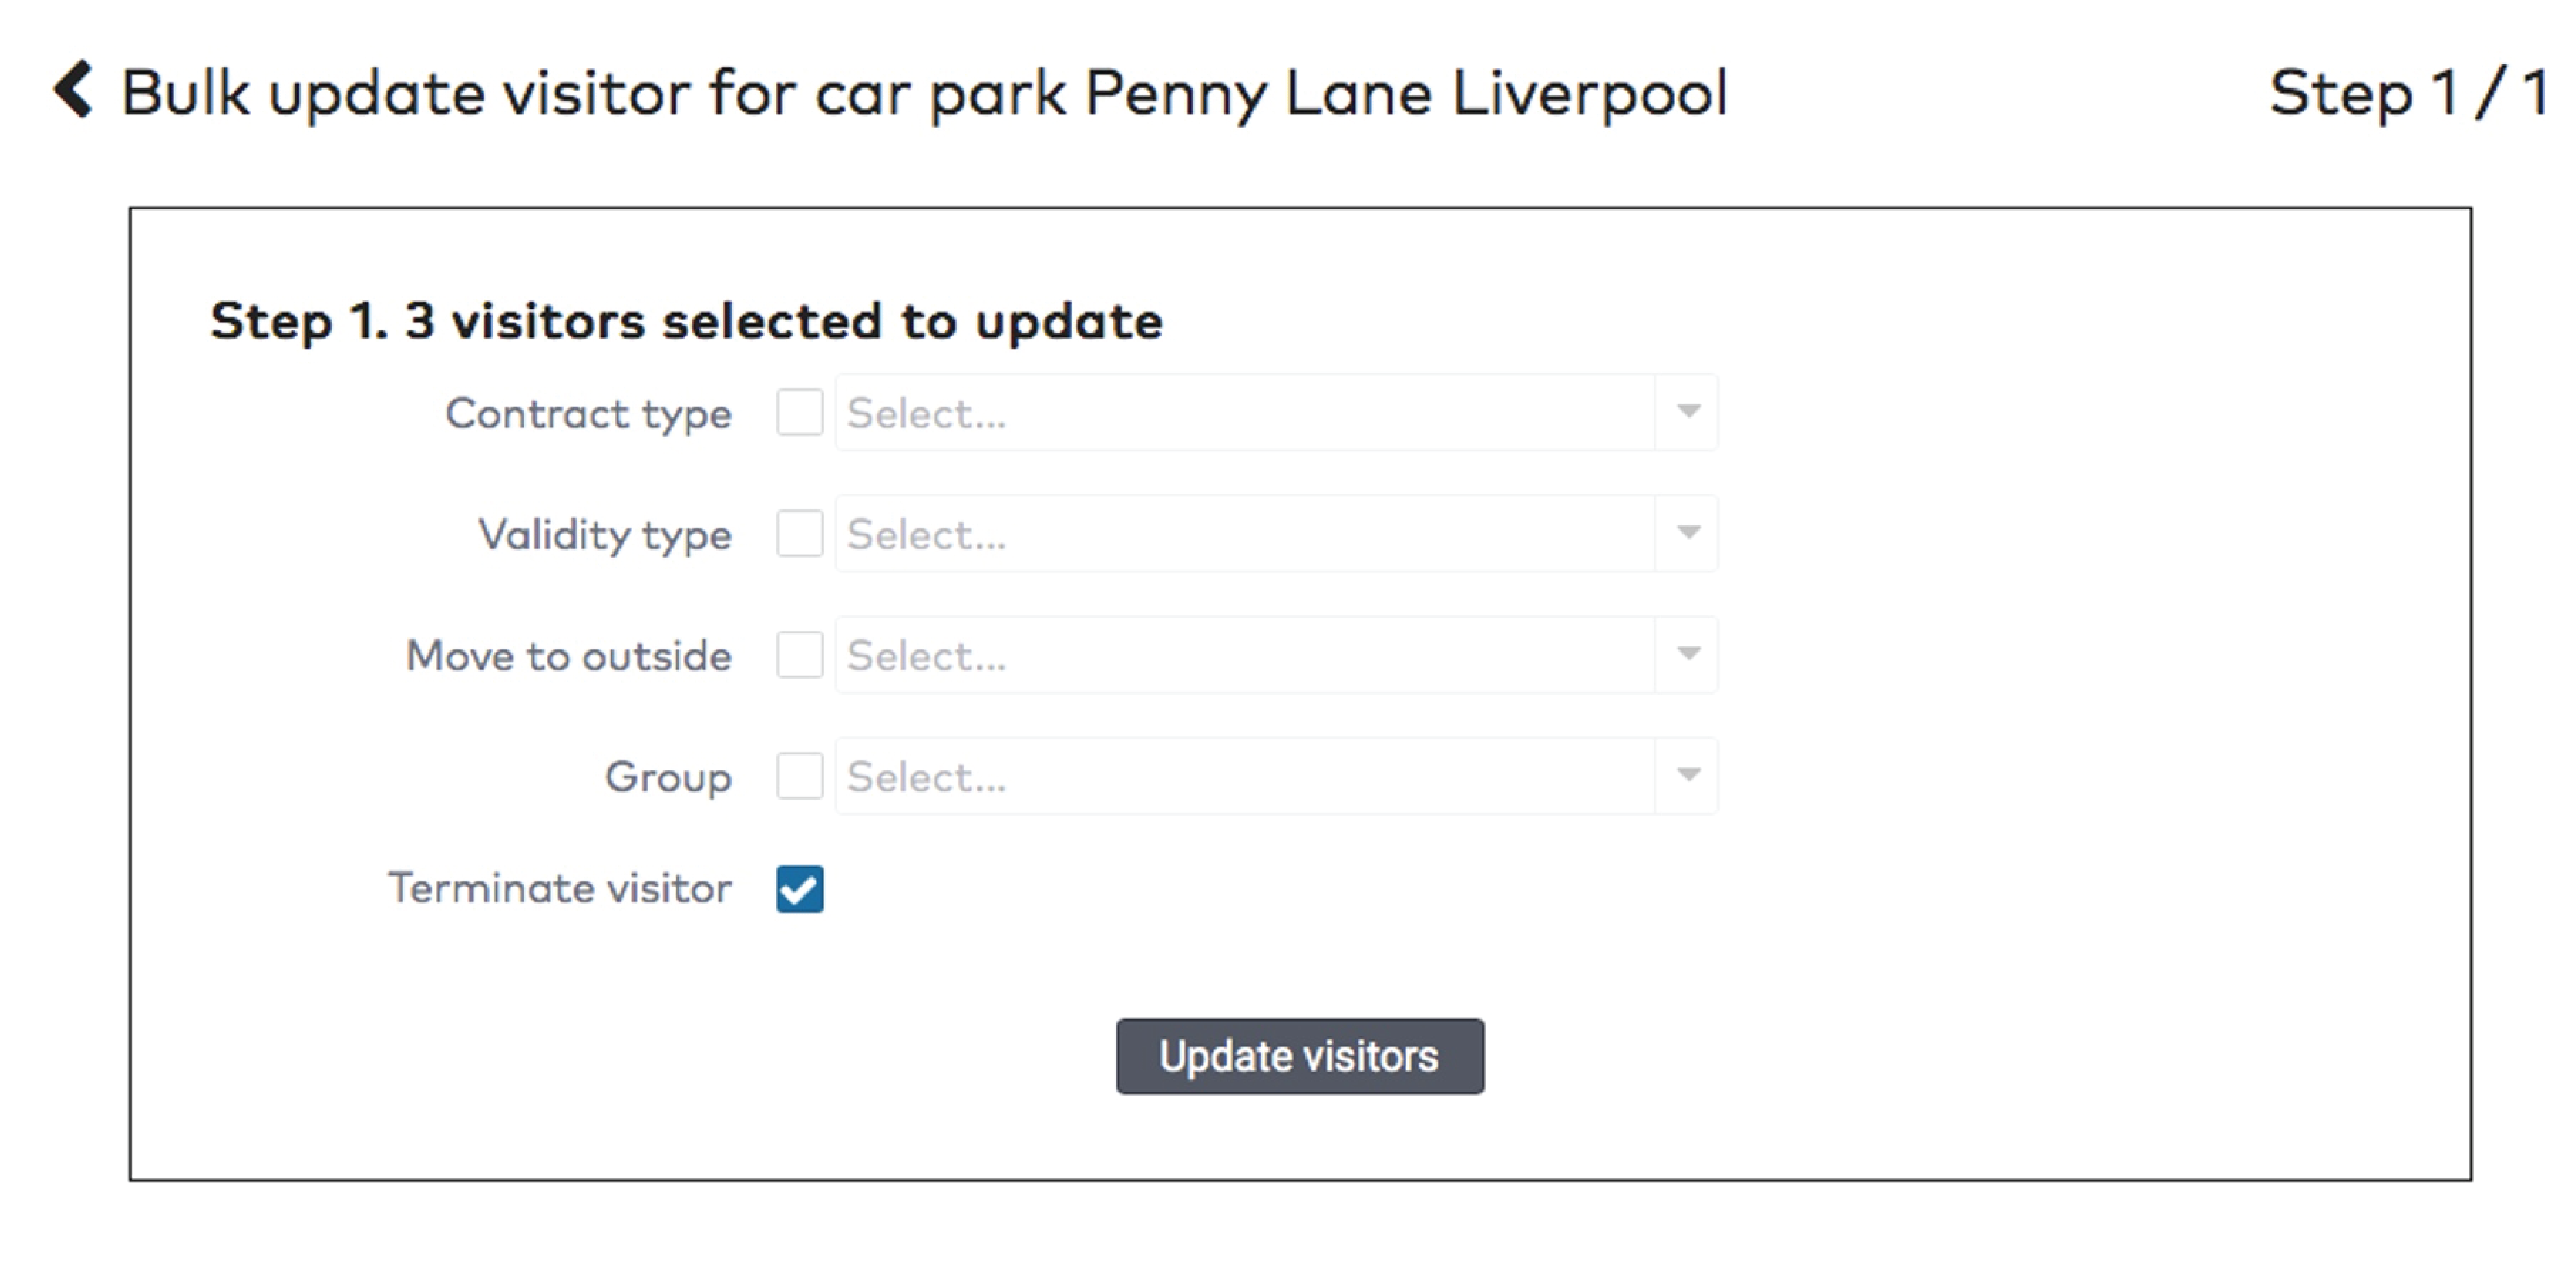
Bulk updating visitors
Use bulk update to:
Clean up the system.
Move short term customers outside and terminate them.
Move a batch of visitors to a new group.
Change the contract type for a batch of visitors.
Change the validity for a batch of visitors.
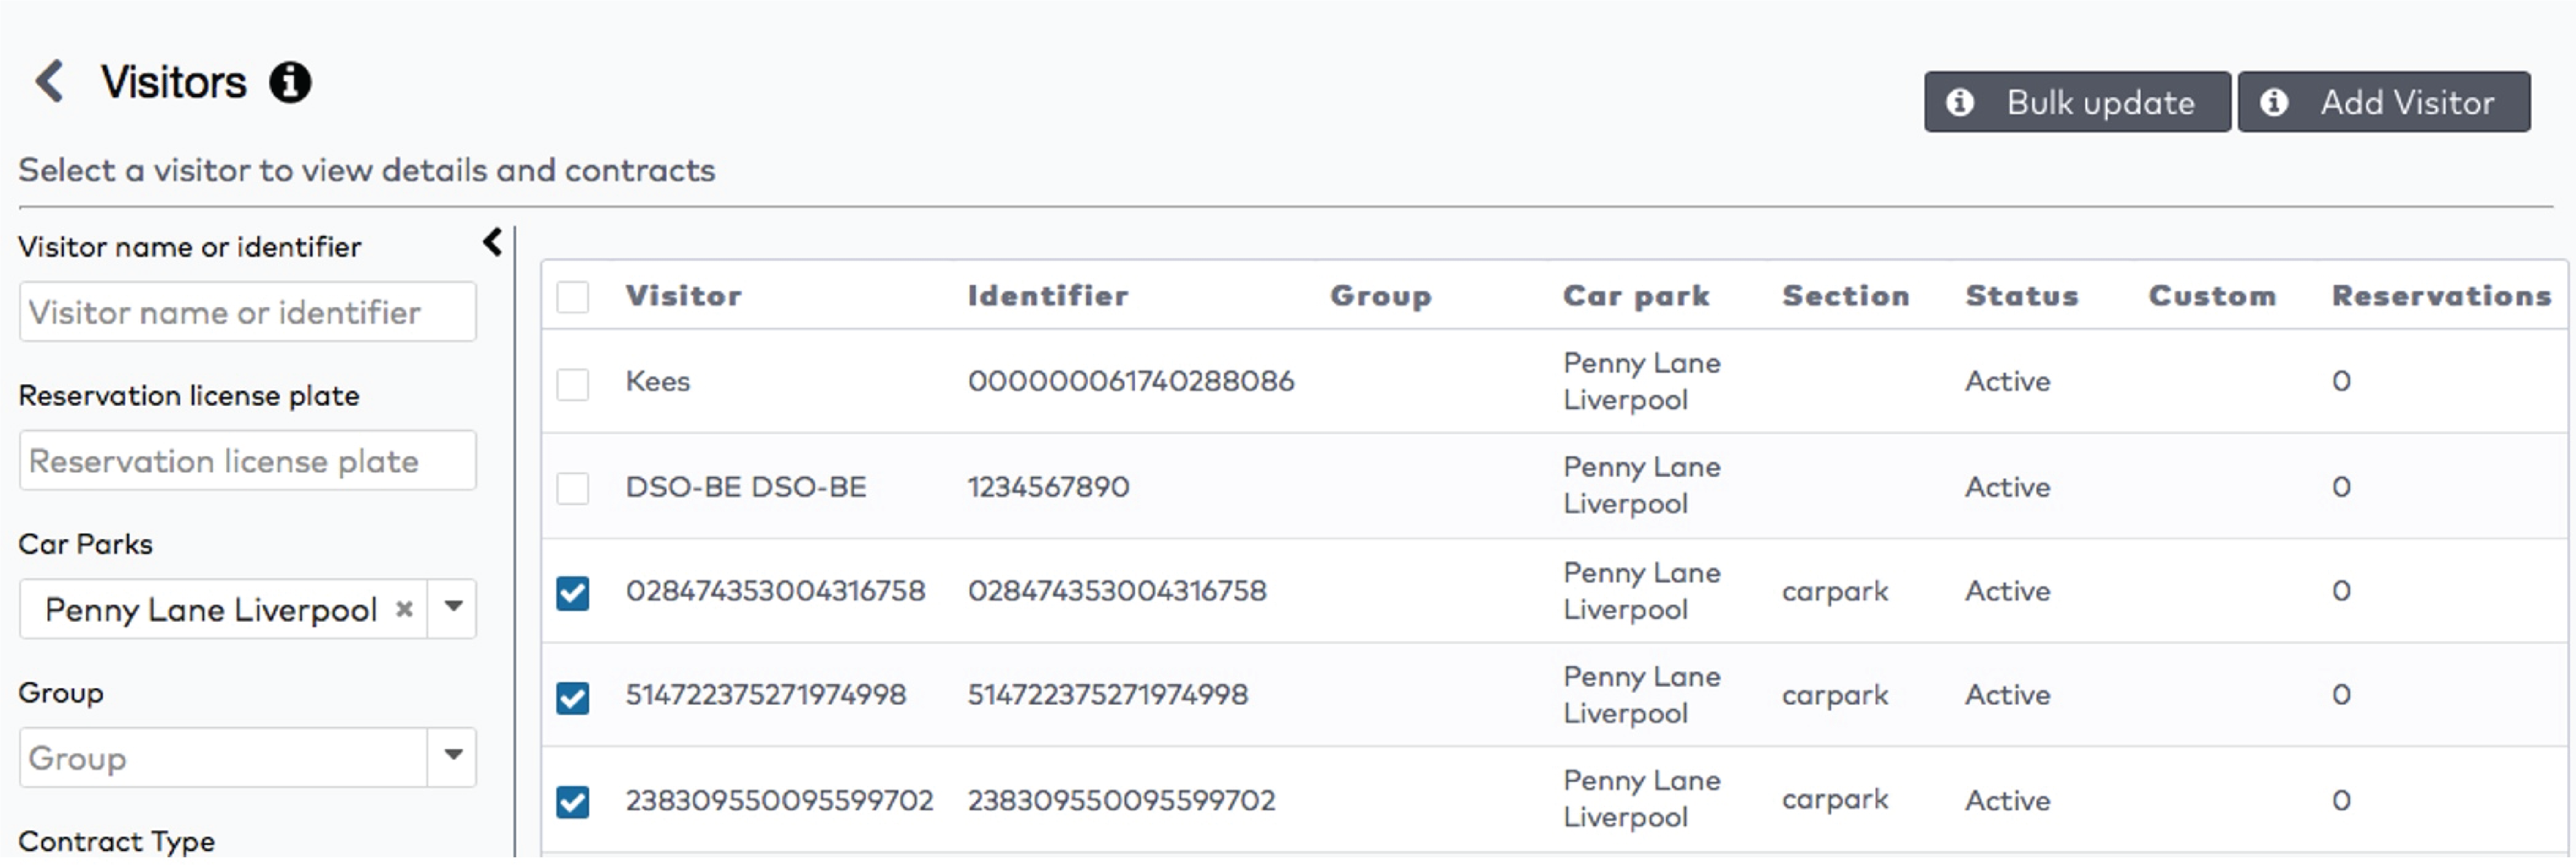
To update multiple visitors at the same time:
Click Contracts in the menu bar.
Click Visitors.
|
|
Choose a Car park.
|
|
Select the visitors you want to update at the same time.
|
Click Bulk update.
Select the properties to update.
NOTE: if you’re using Move to outside for short term customers, don’t forget to check Terminate visitor as well to keep your system clean.
|
Click Update visitors.
NOTE: Updating all visitors may take a while, please wait for the blue ribbon saying “Bulk update running” to disappear.

|
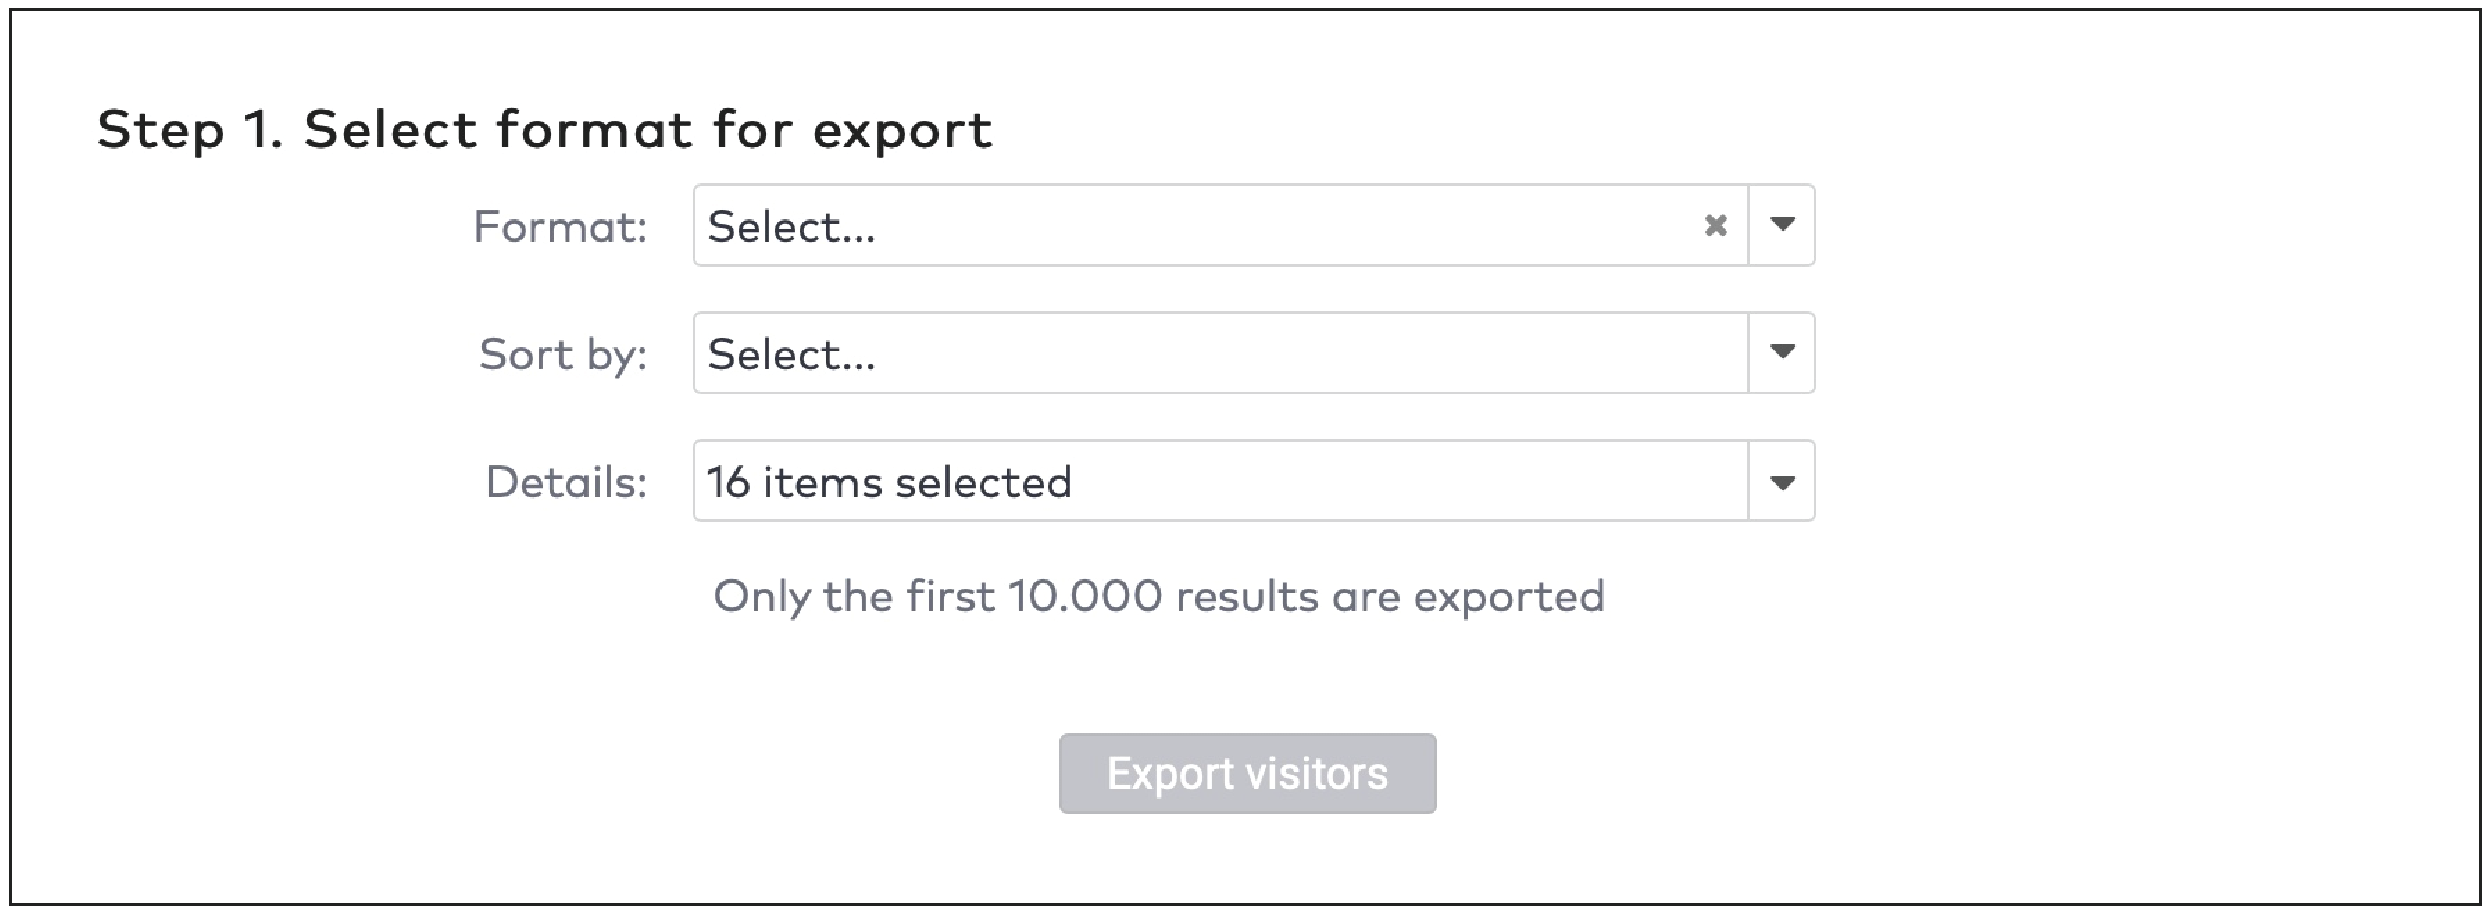
Exporting visitors
You can export a .csv- or .pdf-file with the visitor data of a car park.
To export visitor data:
Click Contracts in the menu bar.
Click Visitors.
|
|
Choose a Car park.
|
|
Click Export visitors.

|
Select the Format for your export.
|
Select whether to Sort the data by First name or Last name.
Use the checkboxes in the Details dropdown menu to determine which data fields are exported, and which aren’t.
Click Export visitors.
A file with visitor data is generated in the selected format.
Monitoring contract usage
You can monitor contract usage:
By visitor
By group
From an overview
To monitor contract usage by visitor or group, click Contracts in the menu bar and do one of the following:
Use the search bar and enter the name of the visitor, the identifier number or the group of the visitor. Click Search.
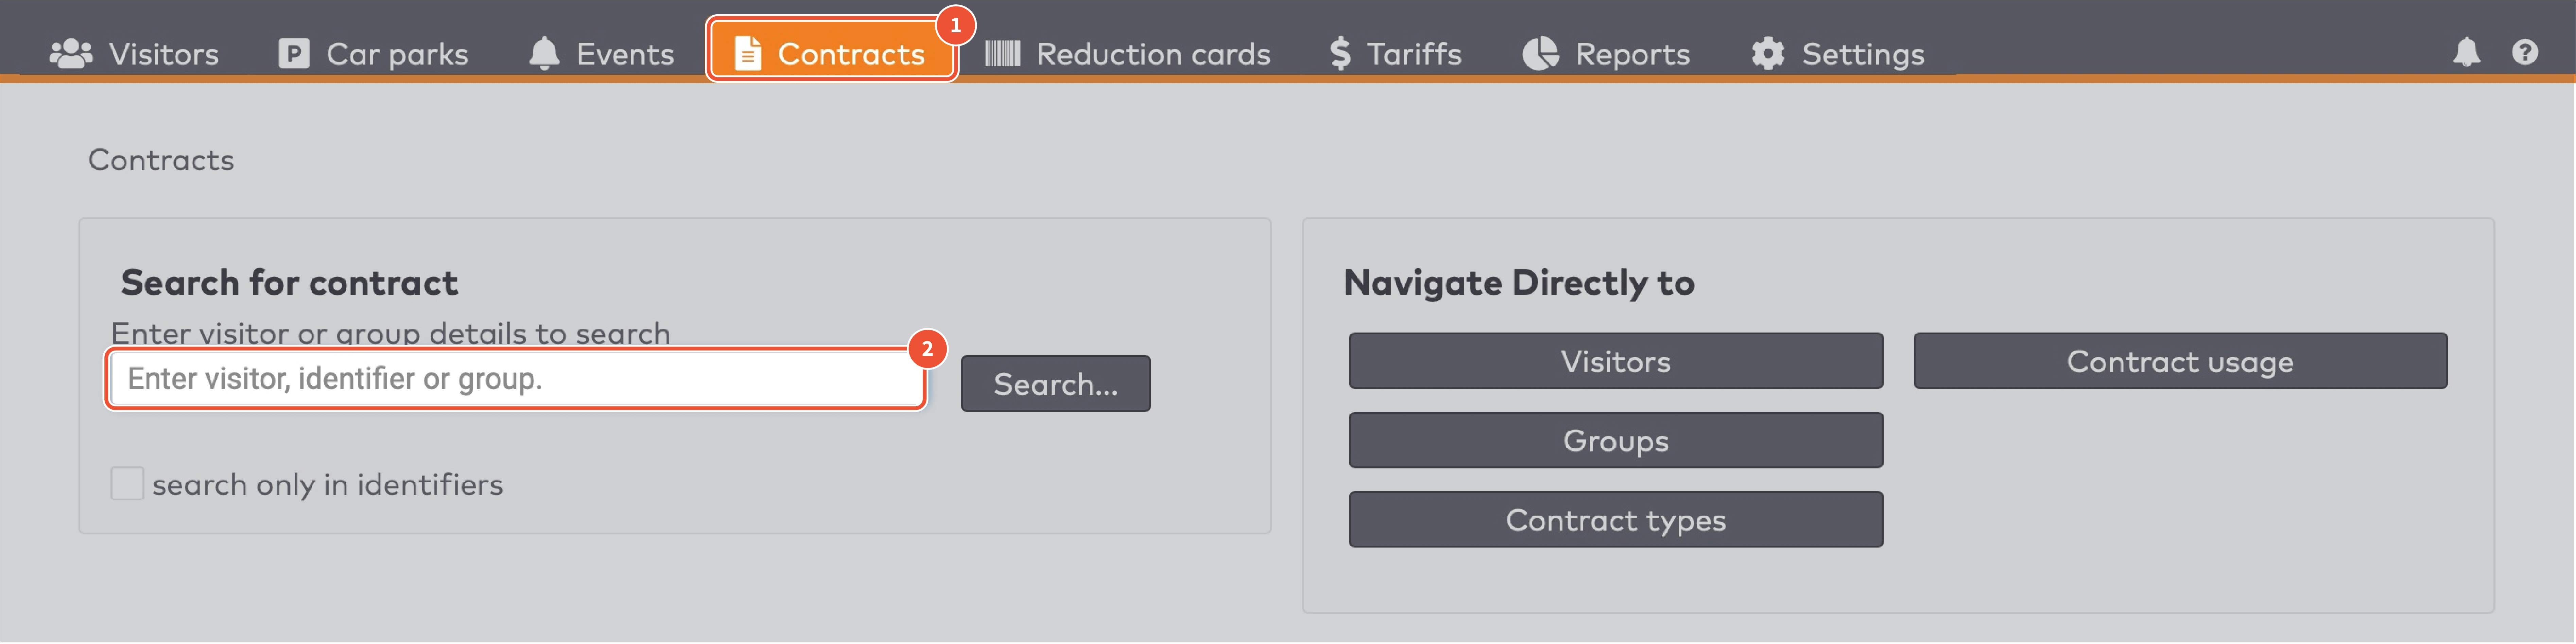
|
Click Visitors or Groups and search by name and/or car park. Click Search.
Click a visitor’s or group’s record.
Scroll to Contract Usage.
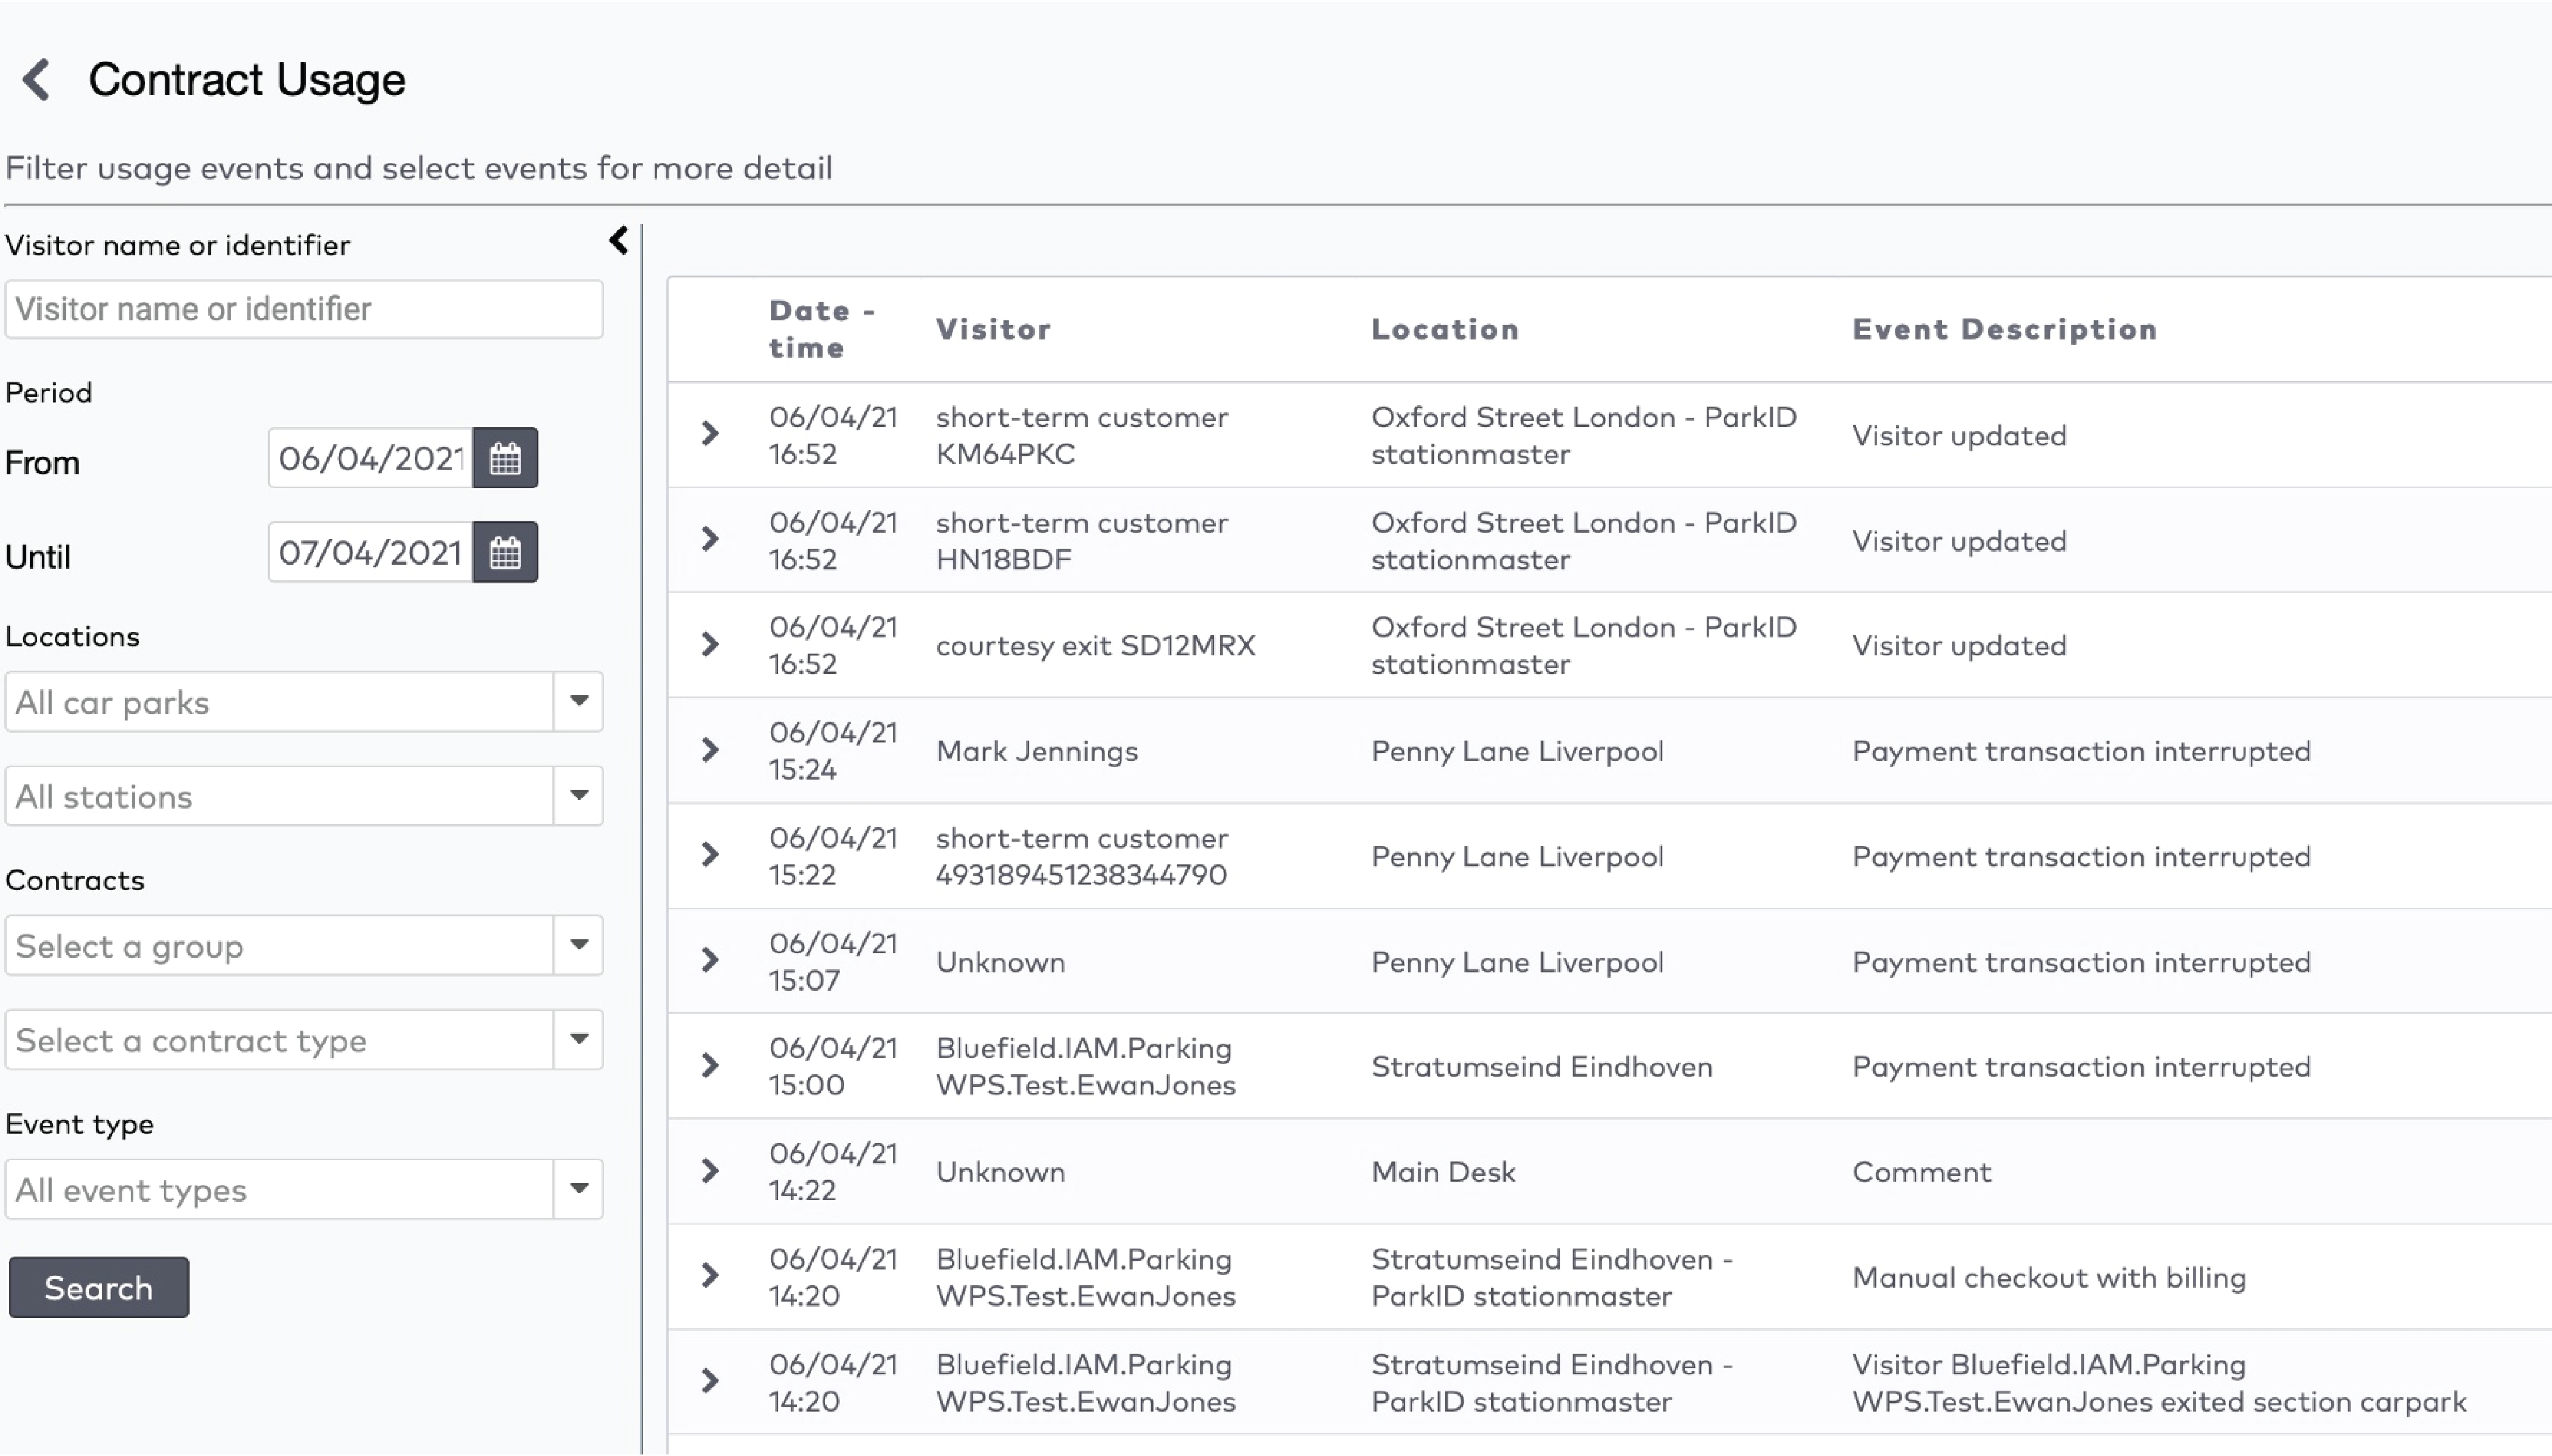
To monitor contract usage from an overview:
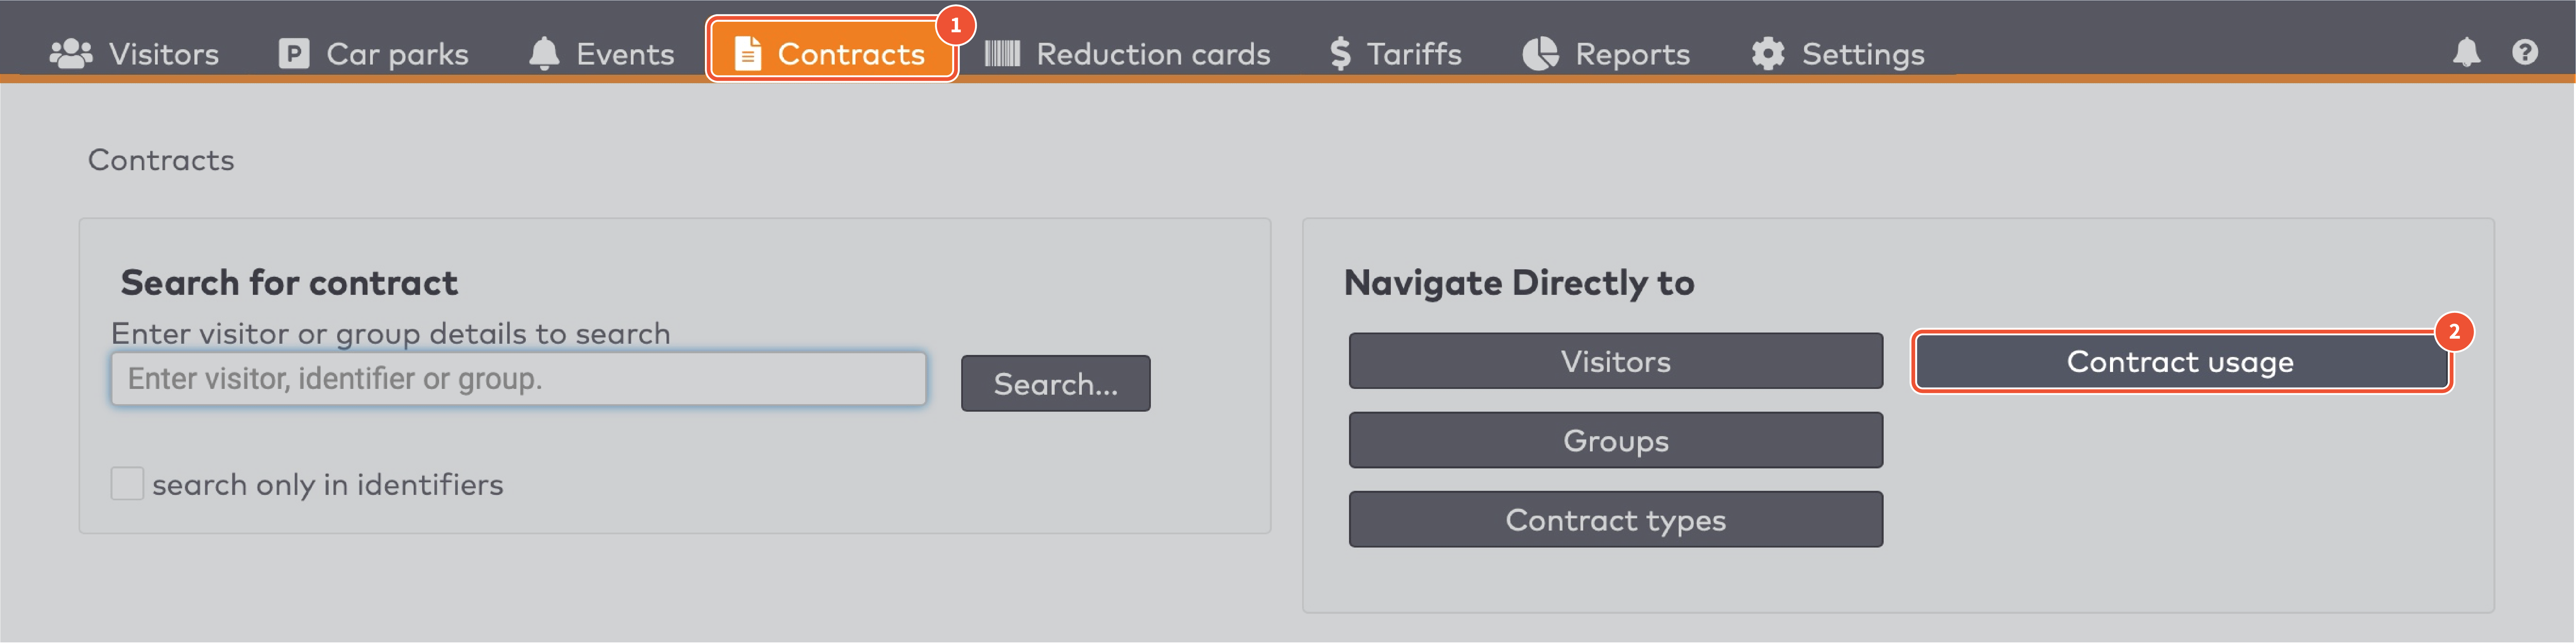
Click Contracts in the menu bar.
|
|
Click Contract usage.
In this overview, all events with contracts are displayed.
|
Click any row to display event details.
Specify any search parameters and click Search.
Tariffs
Tariff profiles contain the rules to calculate the amount the visitor has to pay for their parking time.
Visitors on a tariff profile with a Fixed Price Tariff model pay a parking fee independent of parking duration.
Visitors on a tariff profile with a Scheme Lookup Tariff model pay a parking fee dependent on entry time and parking duration.
Visitors on a tariff profile with a Scheme Lookup Tariff with Violation model pay an extra fee if they park outside their allowed hours. This model is used primarily with subscription holders.
Which tariff profile is used for a visitor is determined by the visitor’s contract.
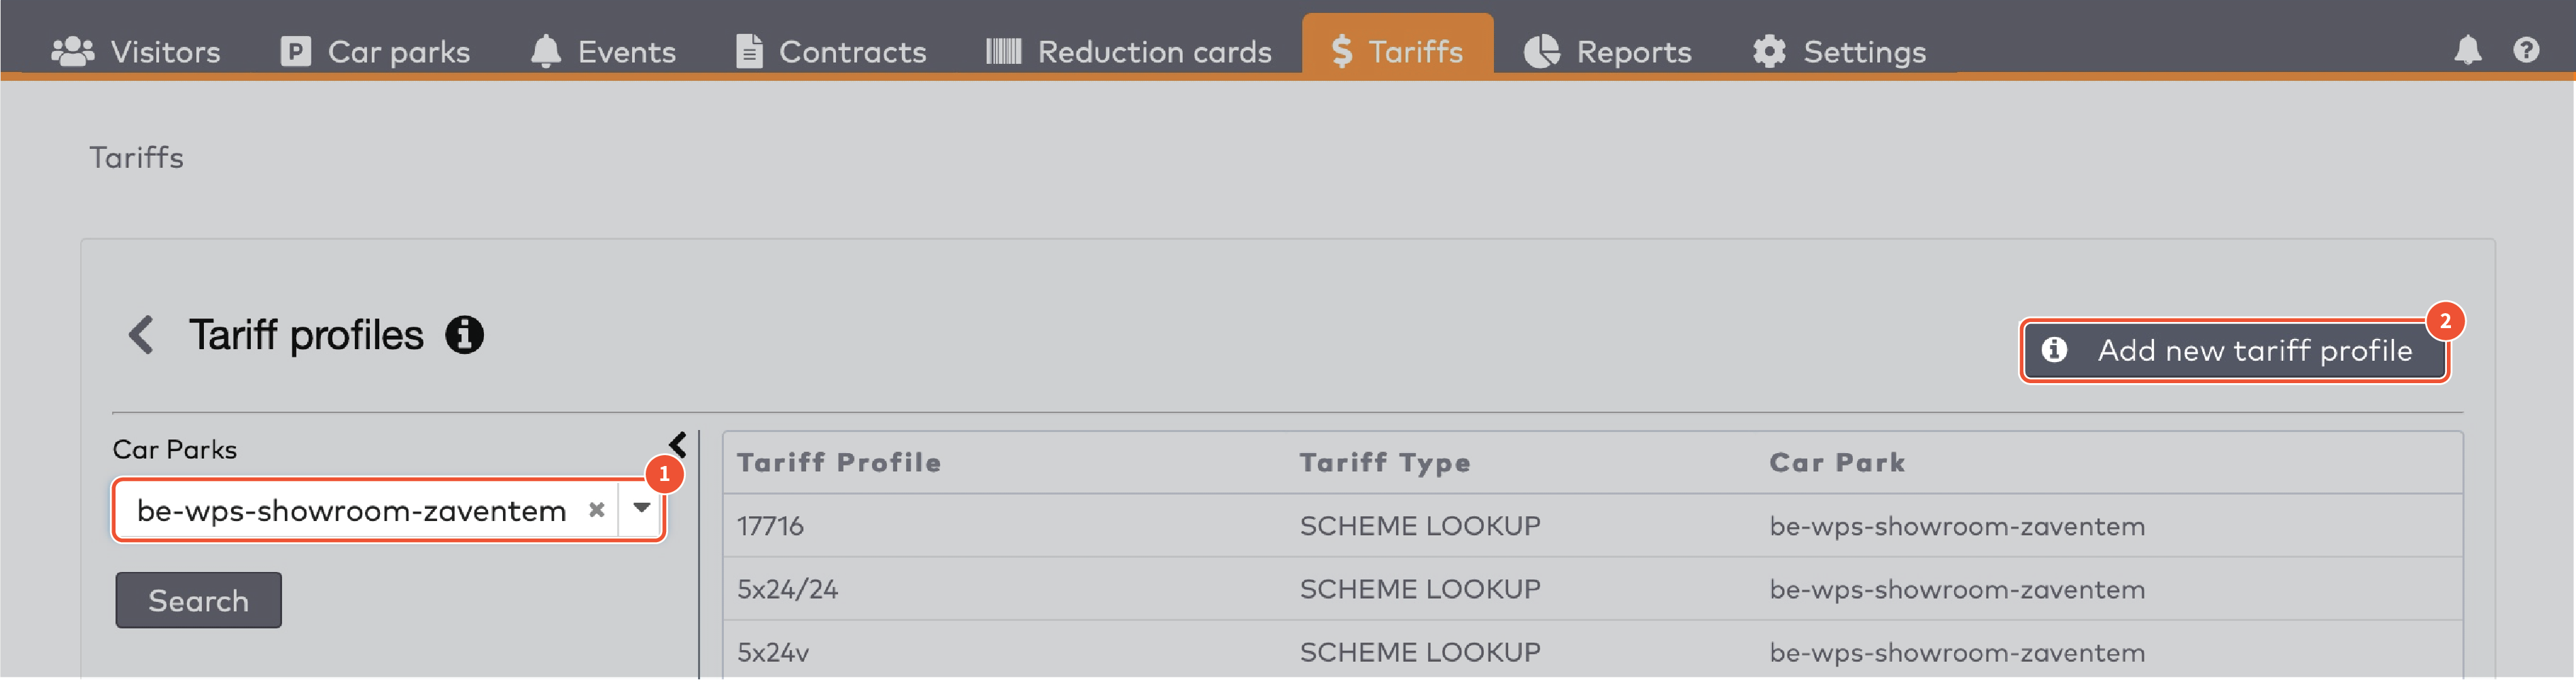
Creating a tariff profile
Click Tariffs in the menu bar.
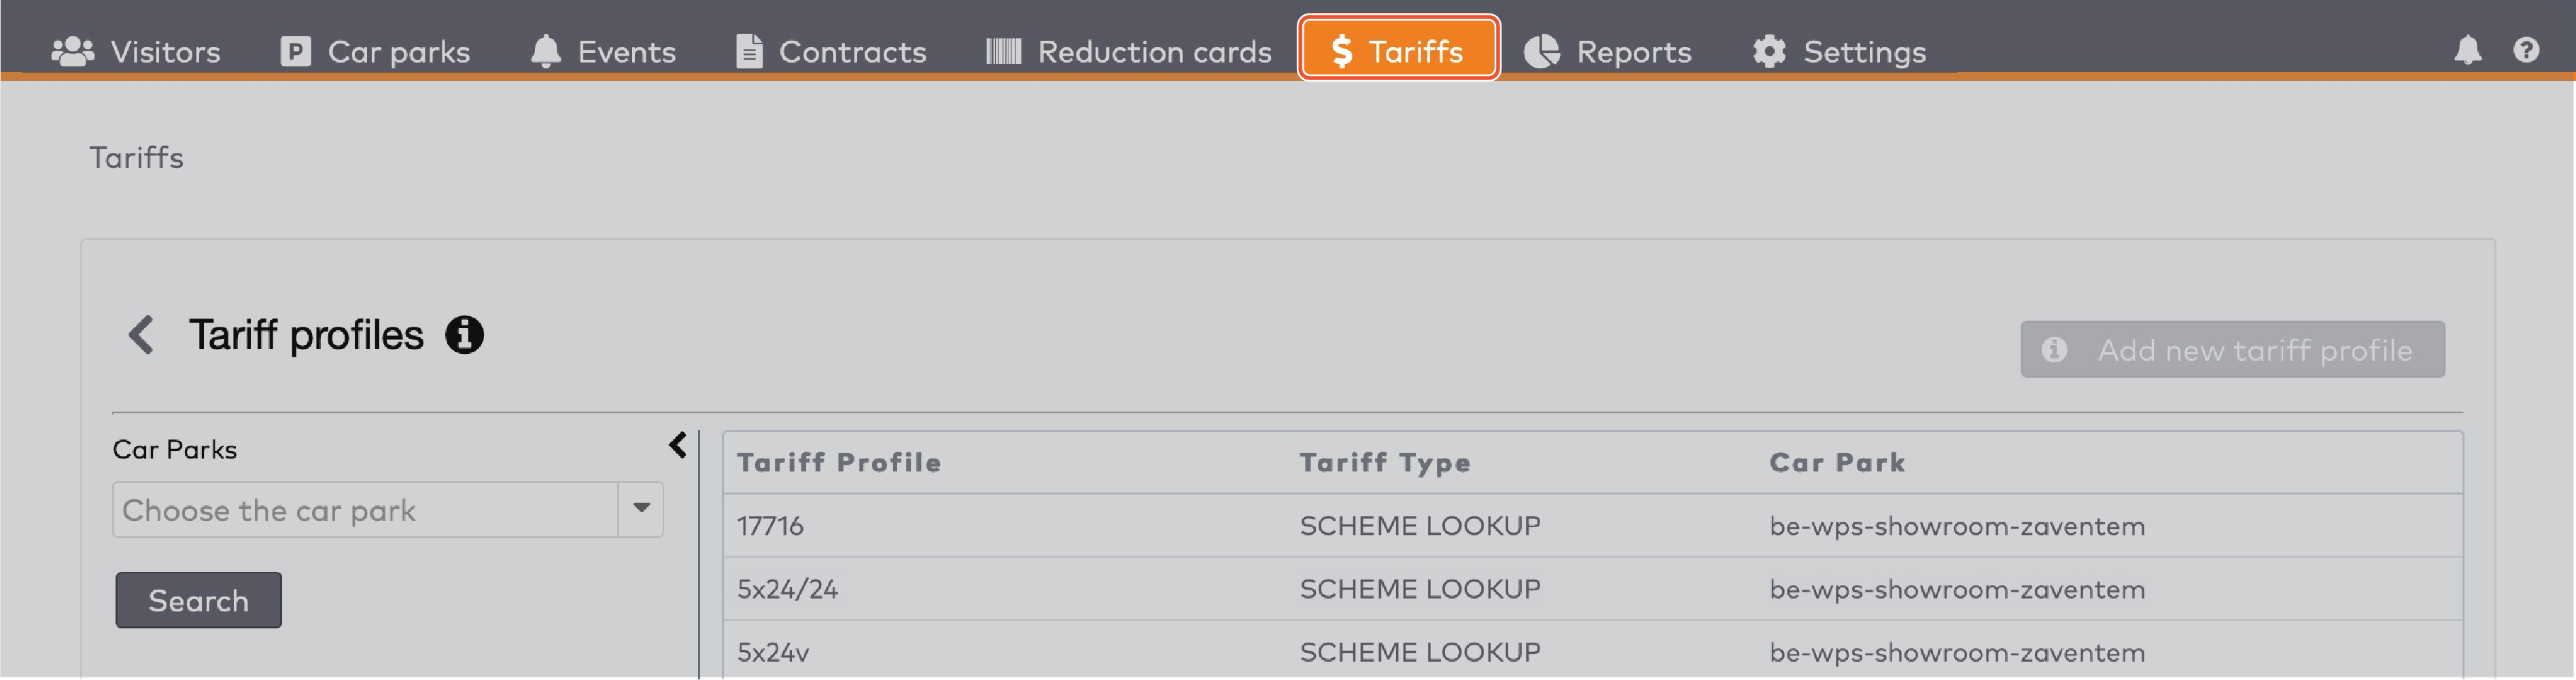
|
Select a Car park from the dropdown menu.
Click Add new tariff profile.
|
Enter a Name for this profile.
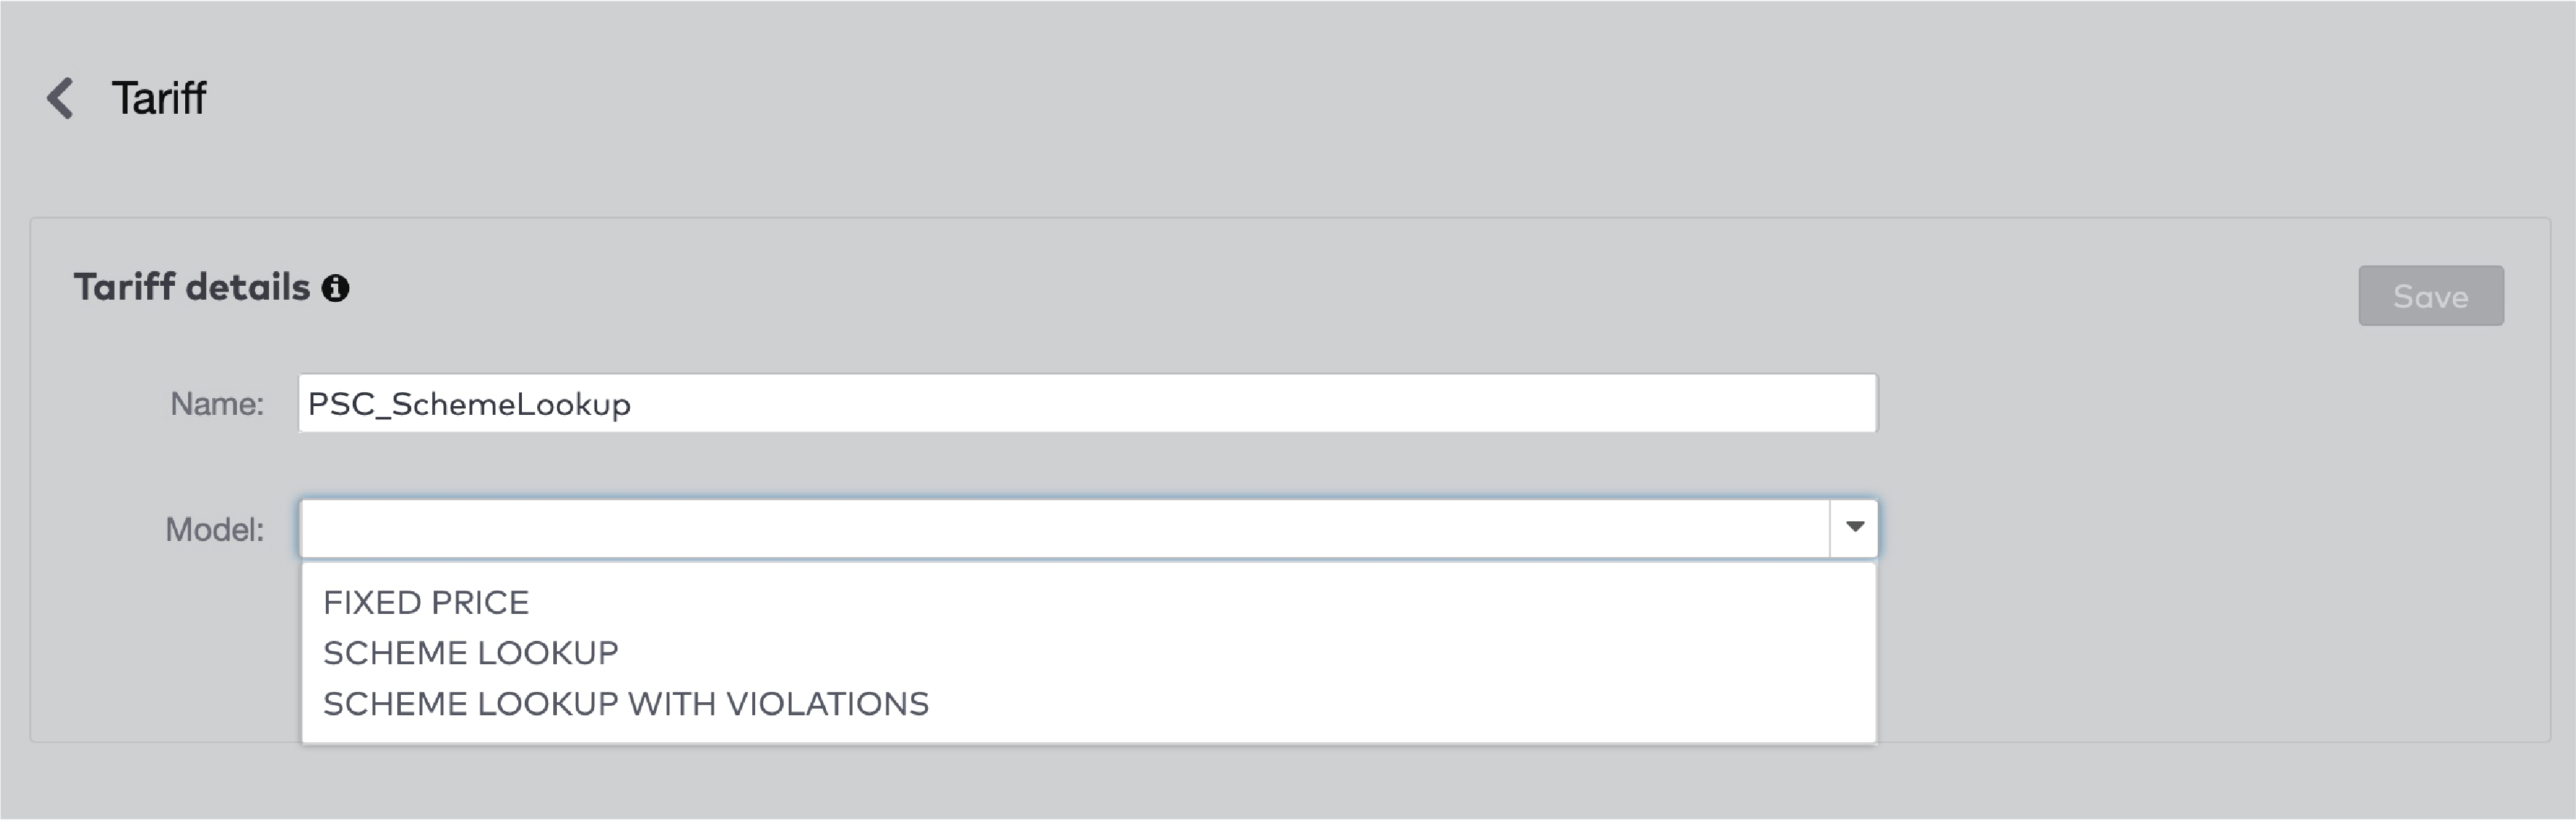
|
Select a Model for this profile.
The Calculation policy is used in the event of a tariff change. If you are creating a new Tariff profile, you can leave this to the default setting.

|
Creating a Fixed Price Tariff Profile
To finish creating a Fixed Price Tariff profile, enter the details for the tariff plan:
Set a Starting from date for this plan. This must be a date and time in the past.

|
Choose the currency from the dropdown menu next to Amount.
Enter the Amount.
Set the Global slide to Yes, unless you want to charge the visitor every time he enters a different section.
Click Save.
Creating a Scheme Lookup Tariff profile
In a Scheme Lookup Tariff profile, the sales amount depends on the visitor’s entry time and parking duration.
This type of tariff profile allows you to have a different tariff in the morning than in the evening, for example. Or a different tariff during weekdays than in the weekend. It is also possible to use this profile to charge a different amount for the first hour of parking than for the second and beyond.
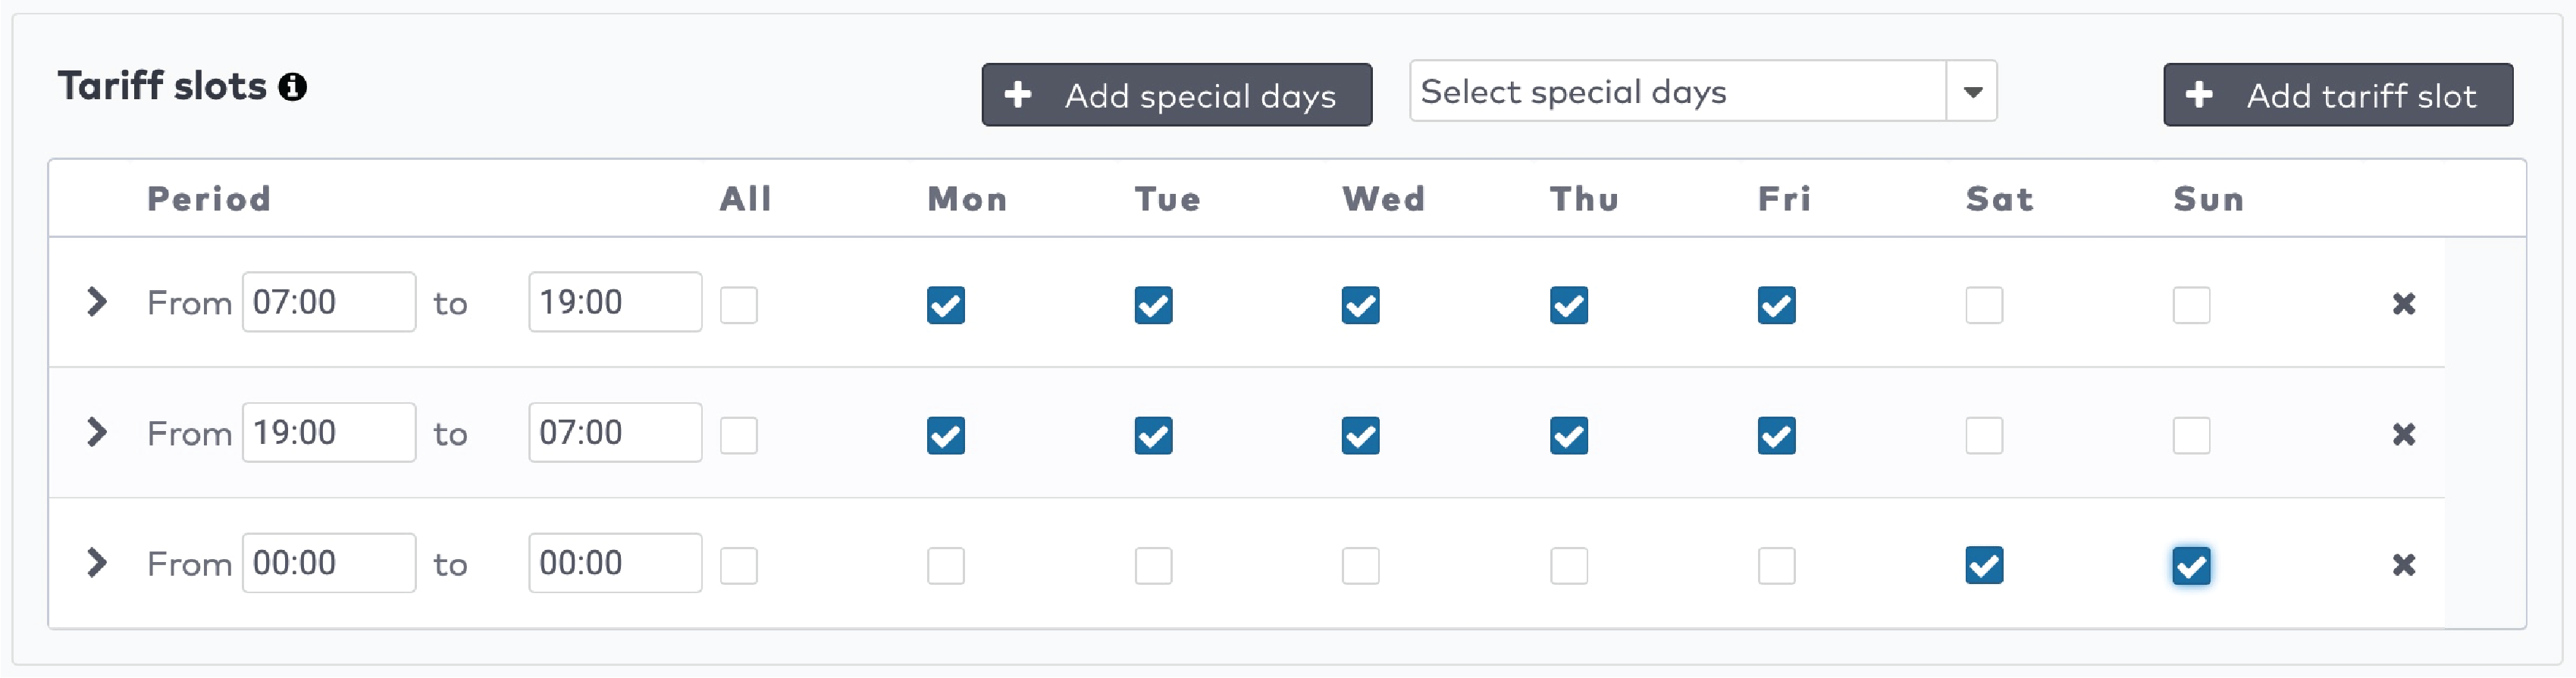
In a Scheme Lookup Tariff profile you will define a series of tariff slots. A tariff slot runs for example from 07:00 to 19:00 or simply from 00:00 to 00:00.

|
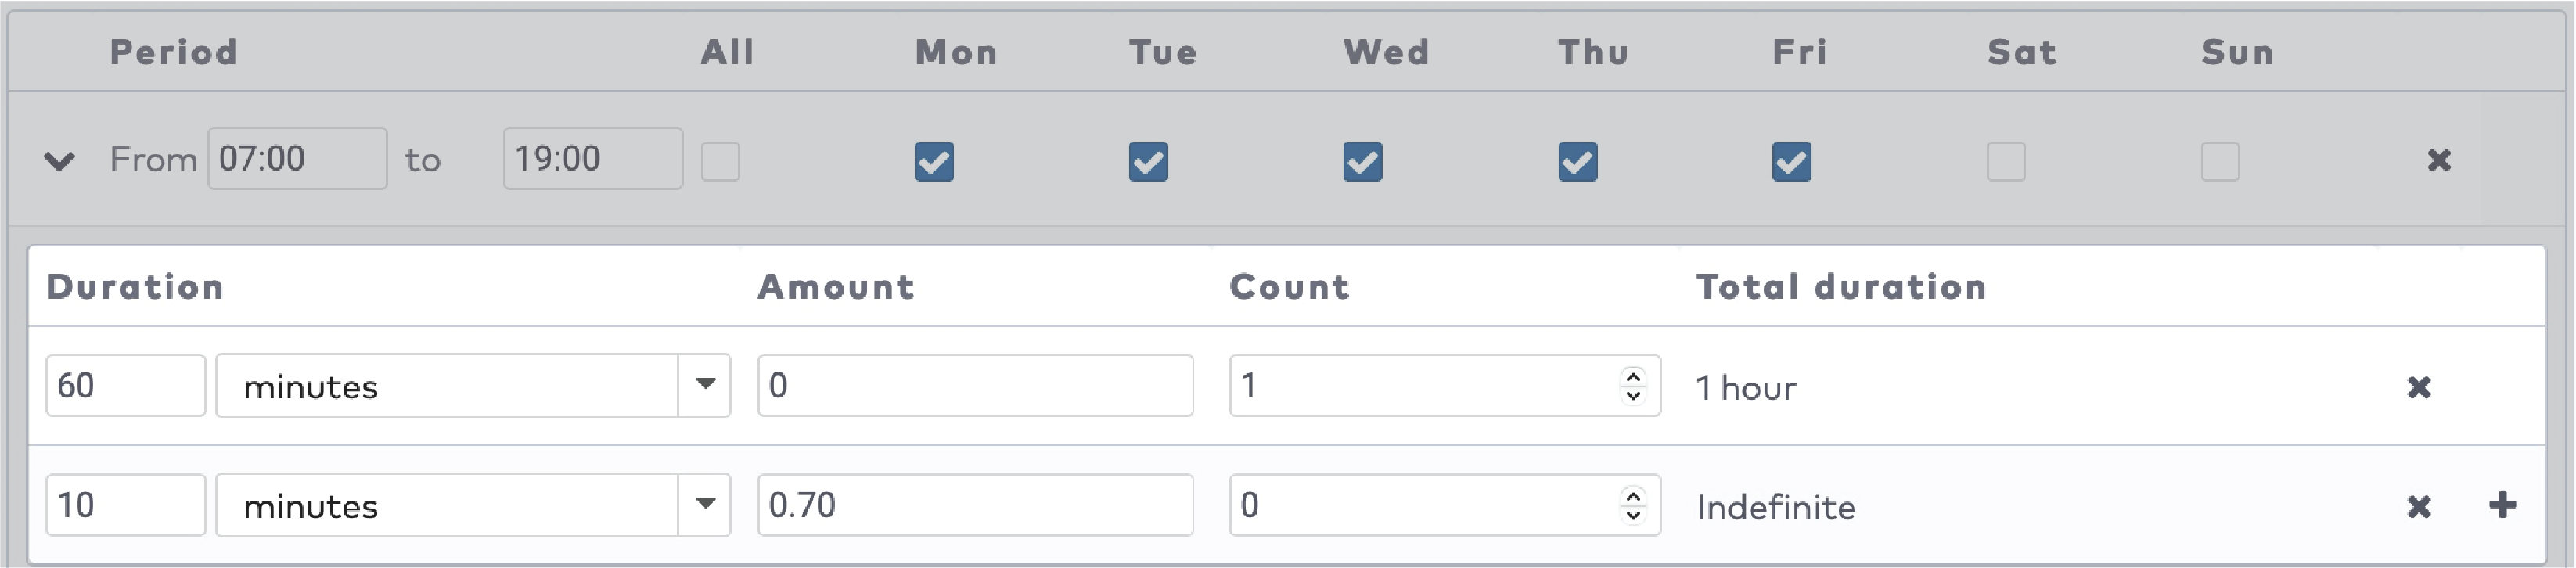
Within a tariff slot, you can define multiple duration entries with a duration and a price (amount).

|
In this example, the first duration entry has a Duration of 60 minutes, a price (Amount) of €0,00 per 60 minutes and runs for 1 time (Count). The second duration entry has a Duration of 10 minutes, a price of €0,70 per 10 minutes and repeats until the end of the tariff slot (the Count is set to 0, which makes the Total Duration indefinite). The amount of €0,70 is added to the total amount due every time a new duration entry starts, until the end of the tariff slot or when the visitor leaves the car park.
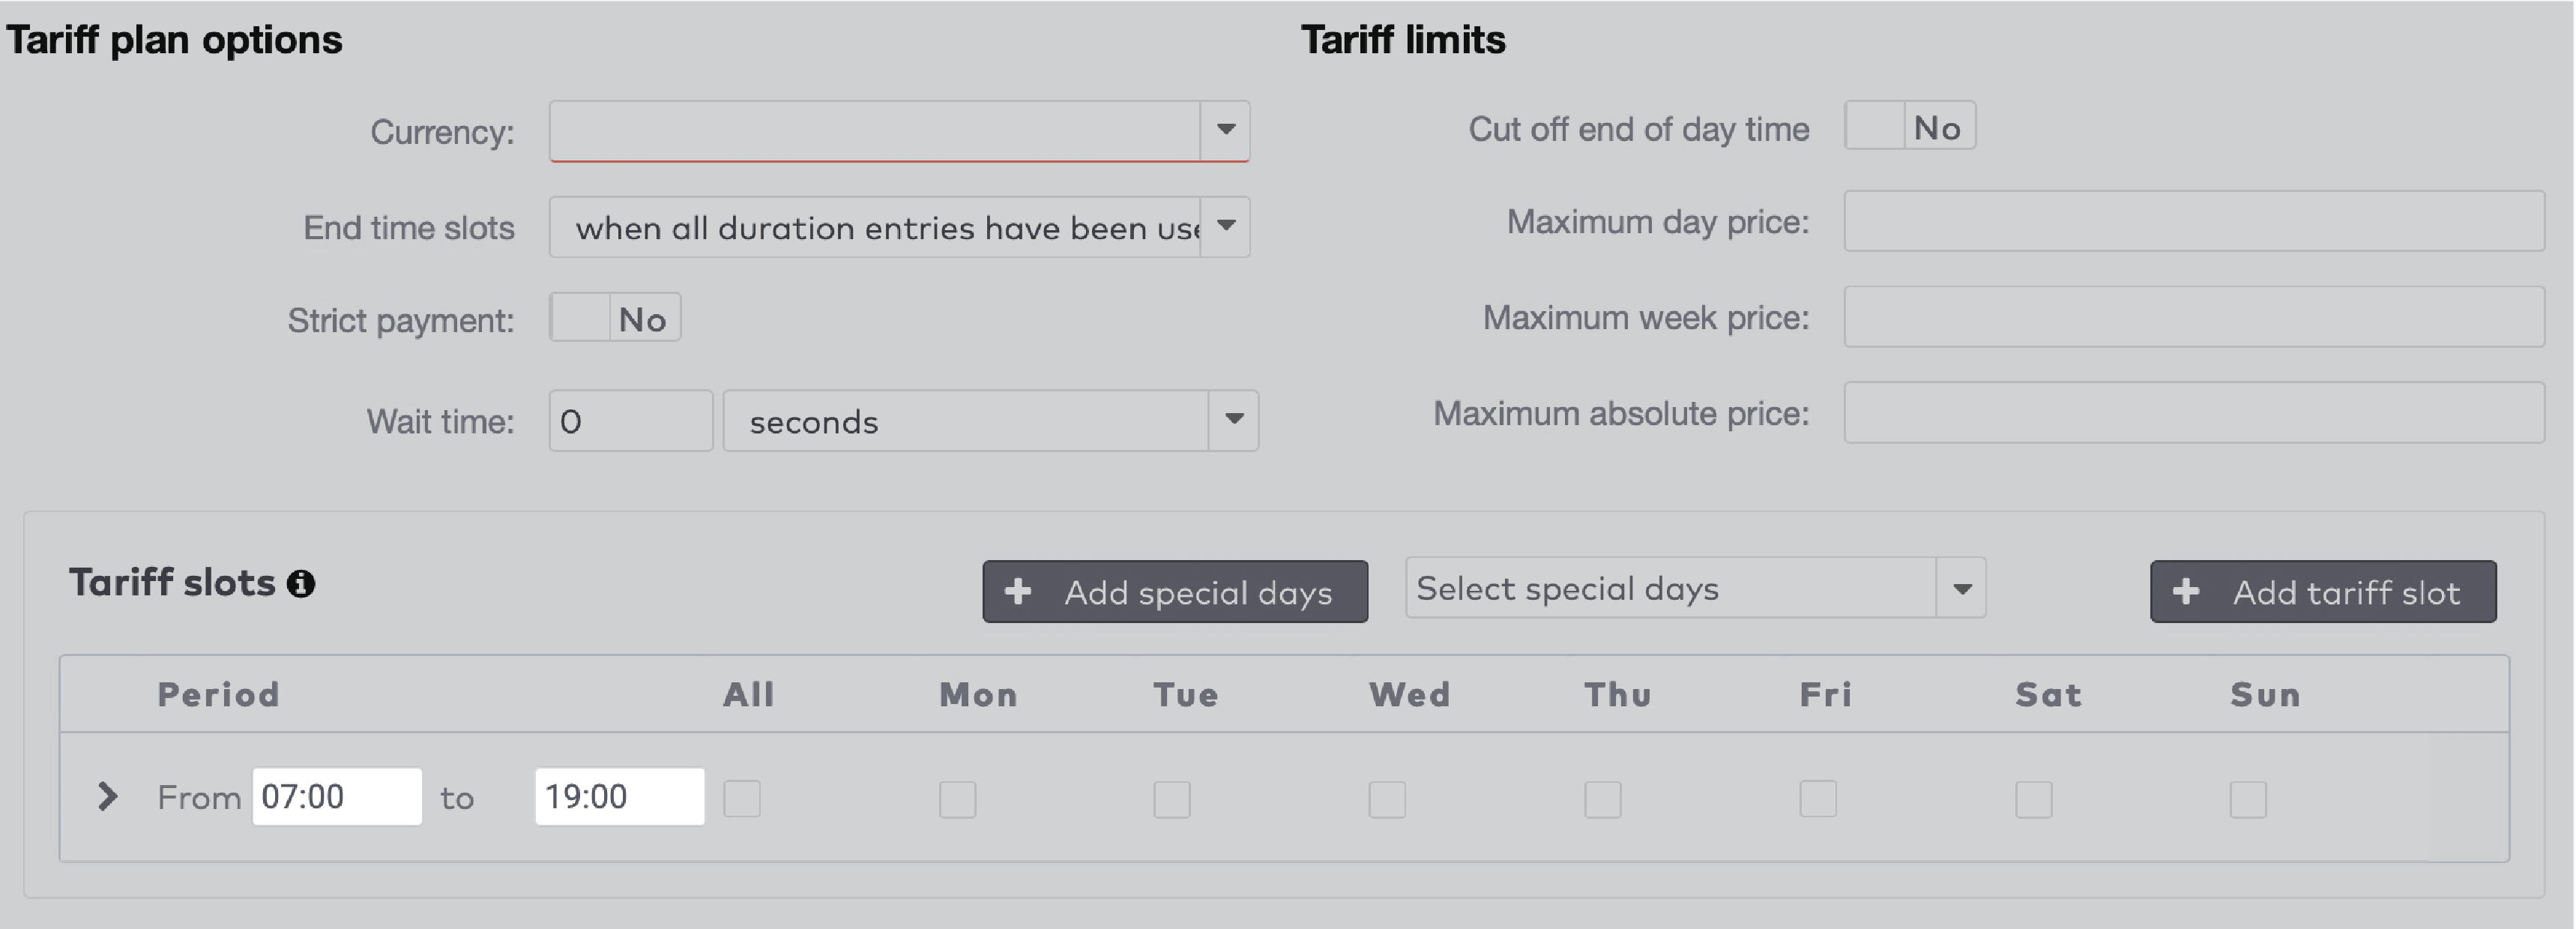
In the Scheme Lookup Tariff profile you just created, scroll to the Tariff plan options to define your timeslots.
Enter the Period for the first tariff slot.
|
Select the days to which this tariff slot applies. These can be regular weekdays, or special days. You can use a tariff slot with special days to set a 0-tariff for the holidays for example.

|
Click Add tariff slot to create another tariff slot. In this example, we have created two tariff slots per day for weekdays and one tariff slot per day for the weekend.
|
Click  to create the duration entries for this tariff slot. Press
  to add a new duration entry.
to add a new duration entry.
|
If you set the end time equal to or earlier than the start time, the end time will apply to the next day.
Even more advanced options and conditions can be set to further customize each tariff slot. Learn how.
Repeat the previous steps for the other tariff slots.
Scroll up to Tariff plan options.

|
Select a Currency for this plan.
In the End tariff slots dropdown menu, select As specified in their end time to stop the duration entries according to the specified end time of the tariff slot. Select When all durations have been used for the duration entries to run for their total duration.
In the example we have created before, the second duration entry is set to run indefinitely. If you select As specified in their end time, this duration entry will stop running as soon as this tariff slot ends. A new tariff slot starts after 19:00, and the first duration entry of that new tariff slot starts at the same time. If you have selected When all durations have been used, the second tariff slot will keep running after 19:00 and the new tariff slot will be ignored.
|
|
If you have selected As specified in their end time, the option Cut off after timeslot becomes available.
Example 1: cutting off duration entries
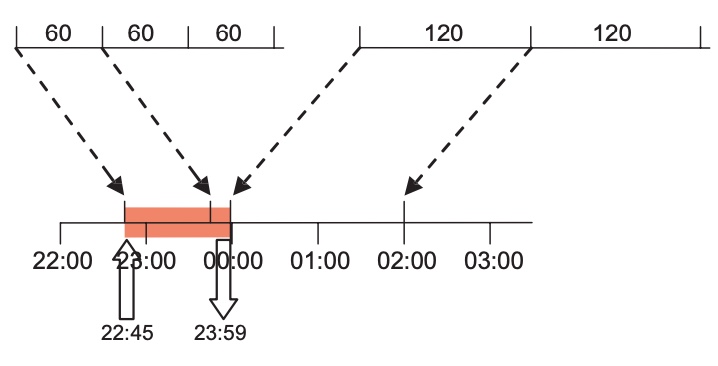
Let us look at an example that illustrates the effect of the available cut off settings. It is based on a tariff plan that contains an evening tariff slot followed by a night tariff slot:
The evening tariff slot runs from 20:00 until 24:00
This tariff slot has four duration entries of 60 minutes (only three are shown in the illustrations below)
The tariff amount for the first duration entry is €1.00
The tariff amount for the second and next duration entries is €2.00
The next tariff slot (the night tariff slot) starts at 0:00
The night tariff slot has several duration entries of 120 minutes (only two are shown in the illustrations below)
The tariff amount for each night duration entry is €5.00
Cut off after tariff slot is set to No
A visitor enters the car park at 22:45
The visitor leaves the car park at 23:59.
The visitor enters the car park between 20:00 and 24:00, so the evening tariff slot is applied. The tariff calculation starts with the first duration entry of that evening tariff slot. This duration entry starts at 22:45 and runs for 60 minutes, until 23:45. As the visitor leaves the car park after 23:45, the next duration entry is added. Because 23:45 is still in the evening tariff slot, this second duration entry is used.
In total, the visitor has to pay for the two full evening duration entries:
€1.00 + €2.00 = €3.00
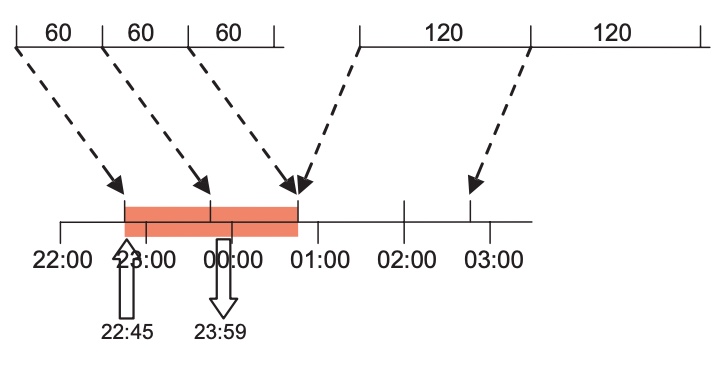
|
If the visitor would have left at 0:10 (i.e. 11 minutes later), he would also have had to pay for the full two evening duration entries, because he leaves before the second evening duration entry ends:
€1.00 + €2.00 = €3.00
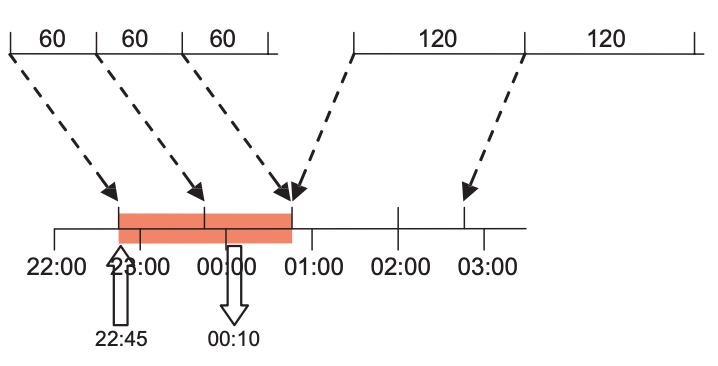
|
In this situation, the 11 minutes delay does not make a difference. These 11 minutes (or even less), however, can make a large difference. For example, when cut off after tariff slot is switched on.
In this new situation, at the end of the evening tariff slot (i.e. at 24:00) the second evening duration entry is cut off.
If the visitor leaves at 23:59, he stays in the evening tariff slot, so he only needs to pay for the evening duration entries. The visitor now has to pay for the first and the second evening duration entry:
€1.00 + €2.00 = €3.00
|
But if the visitor leaves at 0:10, he runs into the night tariff slot. This means that a night duration entry is added to the calculation. The visitor now has to pay for both evening duration entries plus for one full night duration entry:
€1.00 + €2.00 + €5.00 = €8.00
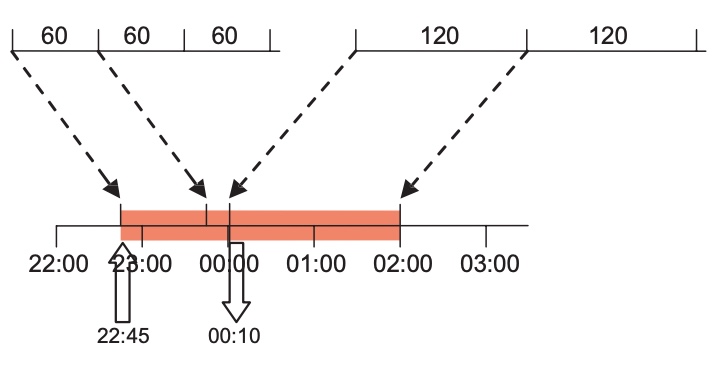
|
Example 2: cutting off duration entries with a multiple day tariff slot
To illustrate the calculation with a multiple-day tariff slot, let’s have a look at the following tariff plan:
End time slots is set to: when all durations have been used.
Only one tariff slot that runs from Monday unit Sunday from 00:00 until 24:00
The first duration entry has 12 hours and costs EUR 10.00
The second duration entry has 12 hours and costs EUR 7.50
The third duration entry has 24 hours and costs EUR 5.00
A visitor enters the car park on Tuesday at 12:00 and leaves on Saturday at 10:00 (four days)
An important item to keep in mind in this situation is the count of the last (i.e. third) duration entry. If all the durations have been used, the calculation starts all over again as if the visitor starts a new visit to the car park. Depending on the tariff slot of the arrival, the calculation uses the applicable tariff build-up.
If the third duration entry is defined with a count of 2 (situation A), the visitor has to pay:
€10.00 + €7.50 + €5.00 + €5.00 + €10.00 + 7.50 = €45.00
If the third duration entry is defined with a count ‘indefinite’ (situation B), the visitor has to pay:
€10.00 + €7.50 + €5.00 + €5.00 + €5.00 = €32.50
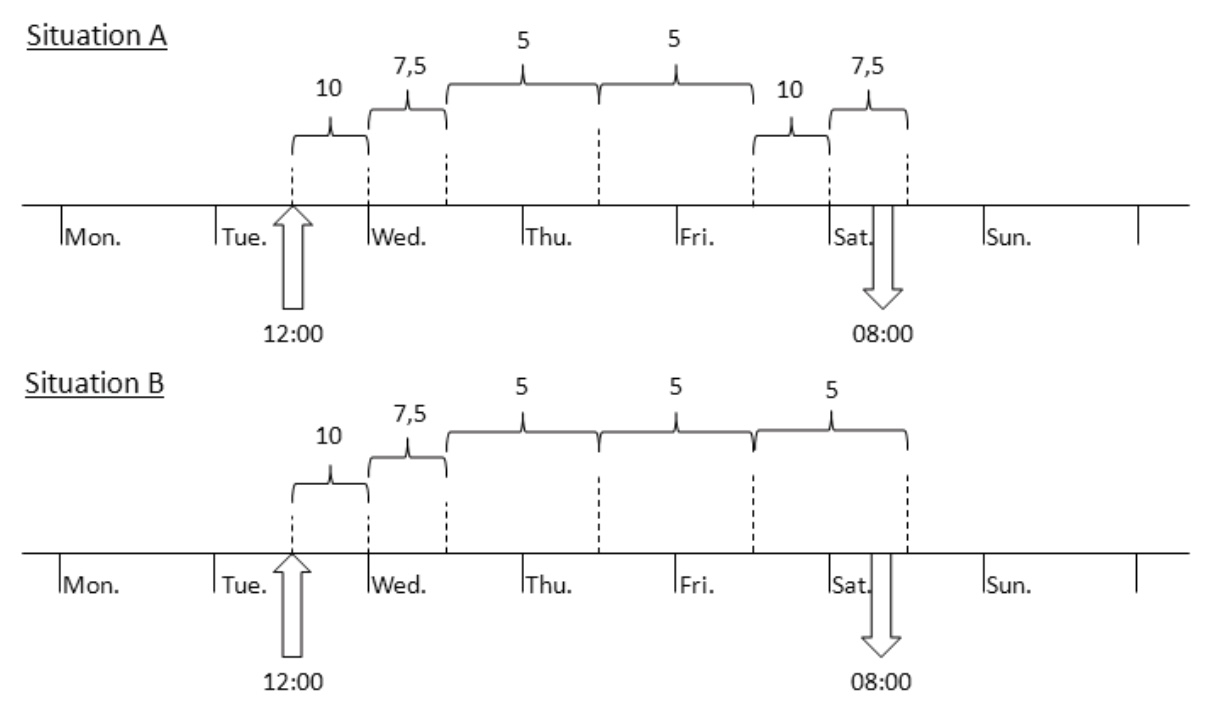
|
Use these examples to gain an understanding of the Cut off after timeslot setting.
Set Cut off after timeslot according to your requirements.
Set Strict payment to Yes to allow the visitor only the configured exit time to get his vehicle and leave the car park. Set Strict Payment to No to allow the visitor the configured exit time plus the time left in his current duration entry.
Set the average Wait time you expect the visitor to wait in a queue at the payment station. This wait time is deducted from the parking time.
Optionally, enter a Maximum day price, maximum week price and/or maximum absolute price to limit the tariff.
Set the Cut off end of day time to Yes to specify a custom end of day time. The standard end of day time is 00:00.
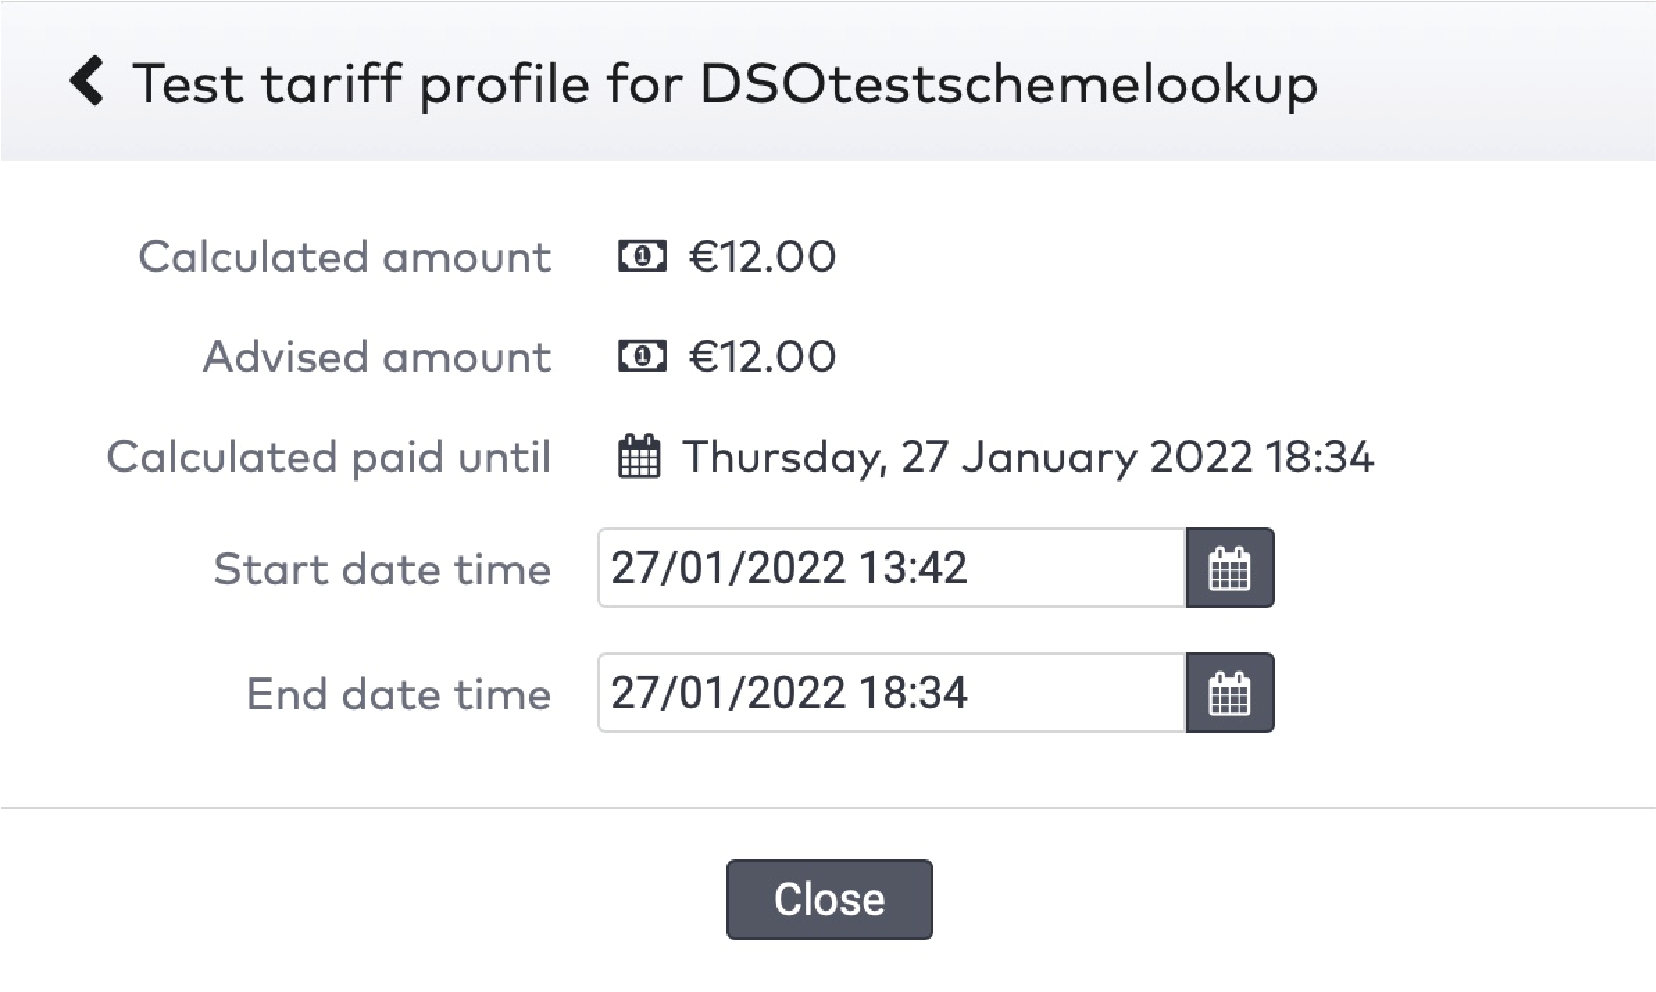
Scroll up and click Test tariff profile.
Enter a Start date time and an End date time to test different parking scenarios. Adjust your tariff slots, duration entries and amounts if necessary.

|
Click Save.
Creating a Scheme Lookup with Violation Tariff profile
This profile is a variant on the Scheme Lookup Tariff profile. The only difference is that each tariff slot must be indicated to be a Normal visit or a Violation:
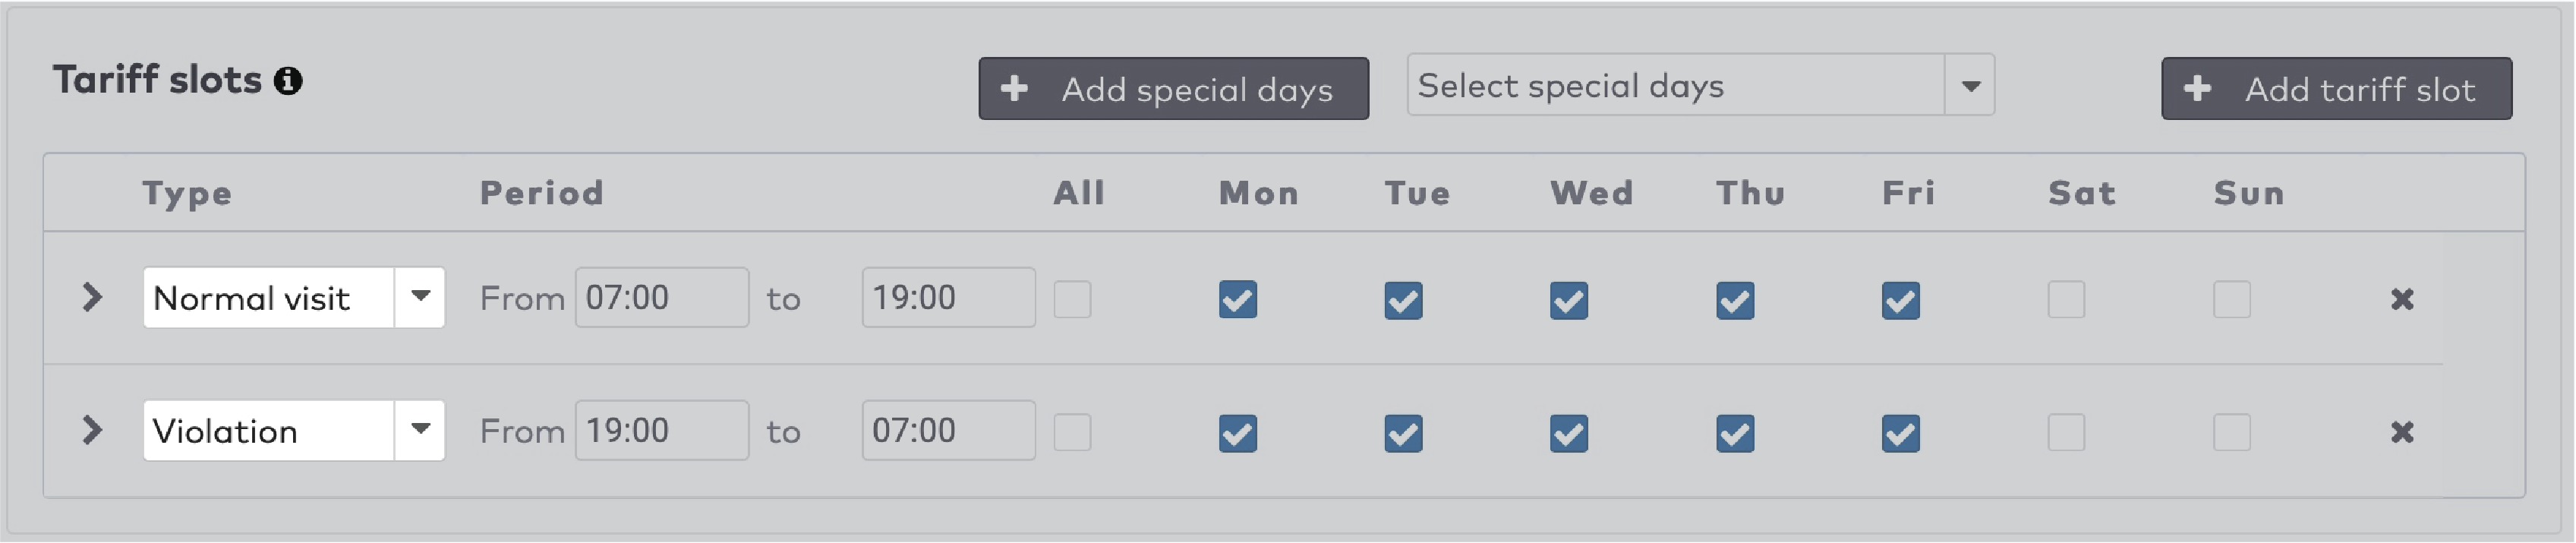
|
For example, the tariff plan for a subscription holder can regard parking during office hours (weekdays from 7:00 till 19:00) as normal visit and parking during non-office hours (all others hours) as violation.
Setting options and conditions for tariff slots for advanced use
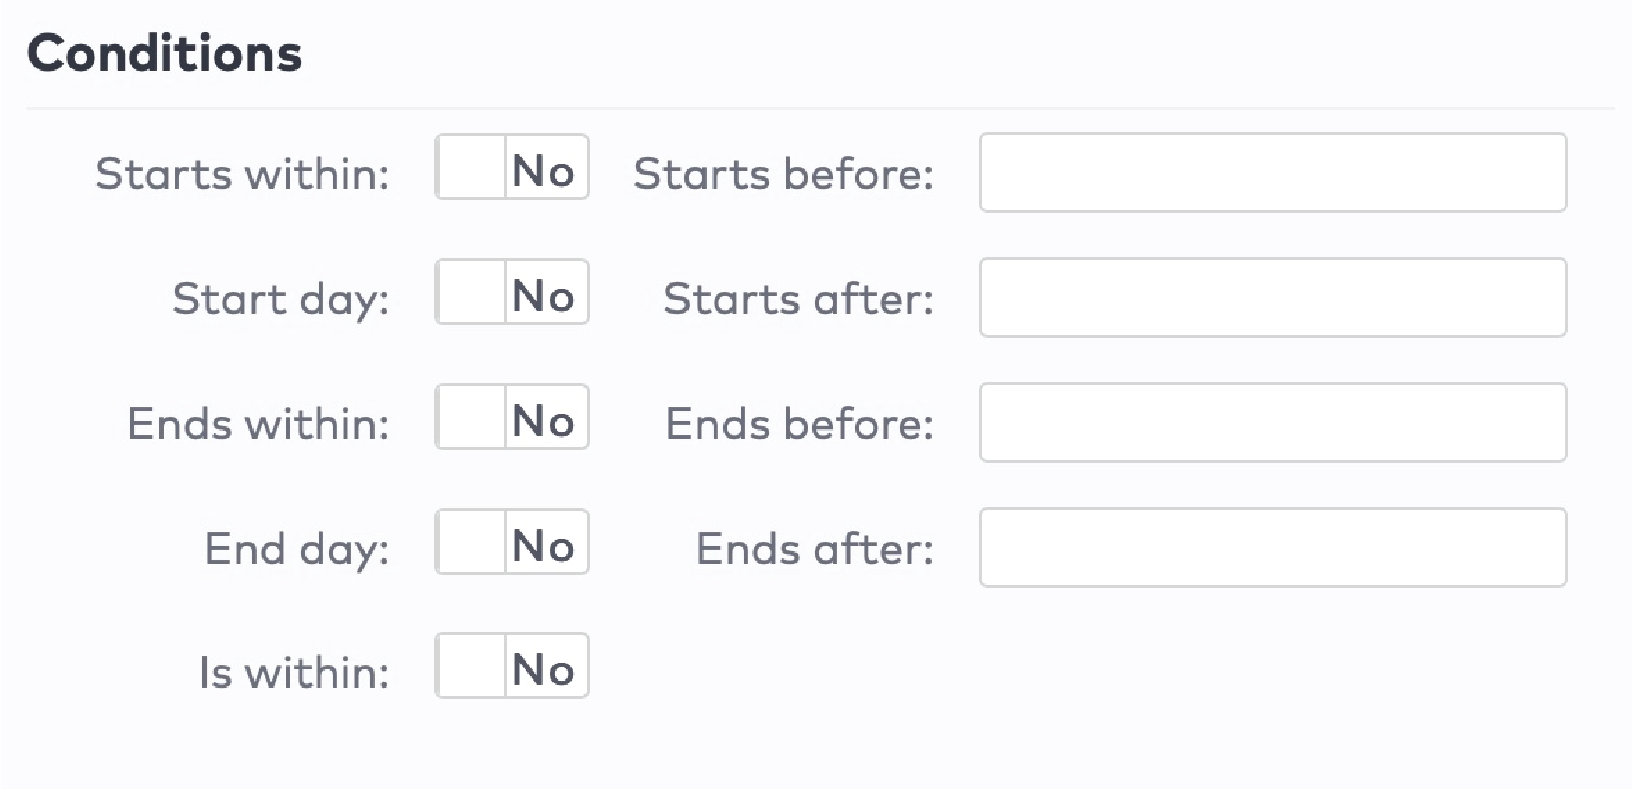
You can set conditions for the tariff slot to be applied.
If this tariff slot applies only when the visit is started during this slot set Starts within to Yes. For example, if a visitor is eligible for a special rate only when he enters in time.
|
If this tariff slot applies only when the visit ends during this slot, set Ends within to Yes.
Is within requires the entire time of the visit to be within this tariff slot. Setting Is within to Yes renders this tariff slot invalid if another tariff slot became active during the visit.
If this tariff slot applies only when the start day is within this timeslot, set Start day to Yes. The same goes for End day.
The Starts before, Starts after, Ends before and Ends after fields allow you to choose specific times within or outside of this tariff slot.
To limit the amount this tariff slot contributes to the total amount of the full day, enter a limit in the Max day price field.

|
The Cut off after setting can be used to overrule the cut off settings as specified for the tariff plan. Select Tariff plan from the dropdown to follow the settings for the tariff plan. Select Cut off to cut off the duration entry at the end of the tariff slot. Select No cut off if the last duration entry is allowed to overflow in the next tariff slot.
Using tariff plans to schedule a change in tariff
To schedule a change in tariff for a tariff profile:
Click Tariffs in the menu bar.
|
|
Find the tariff profile in the list. Use the Car parks dropdown menu to filter the list, if necessary.
Click the tariff profile to open it.
As you might have noticed when Creating a tariff profile, every tariff plan has a Starting date.
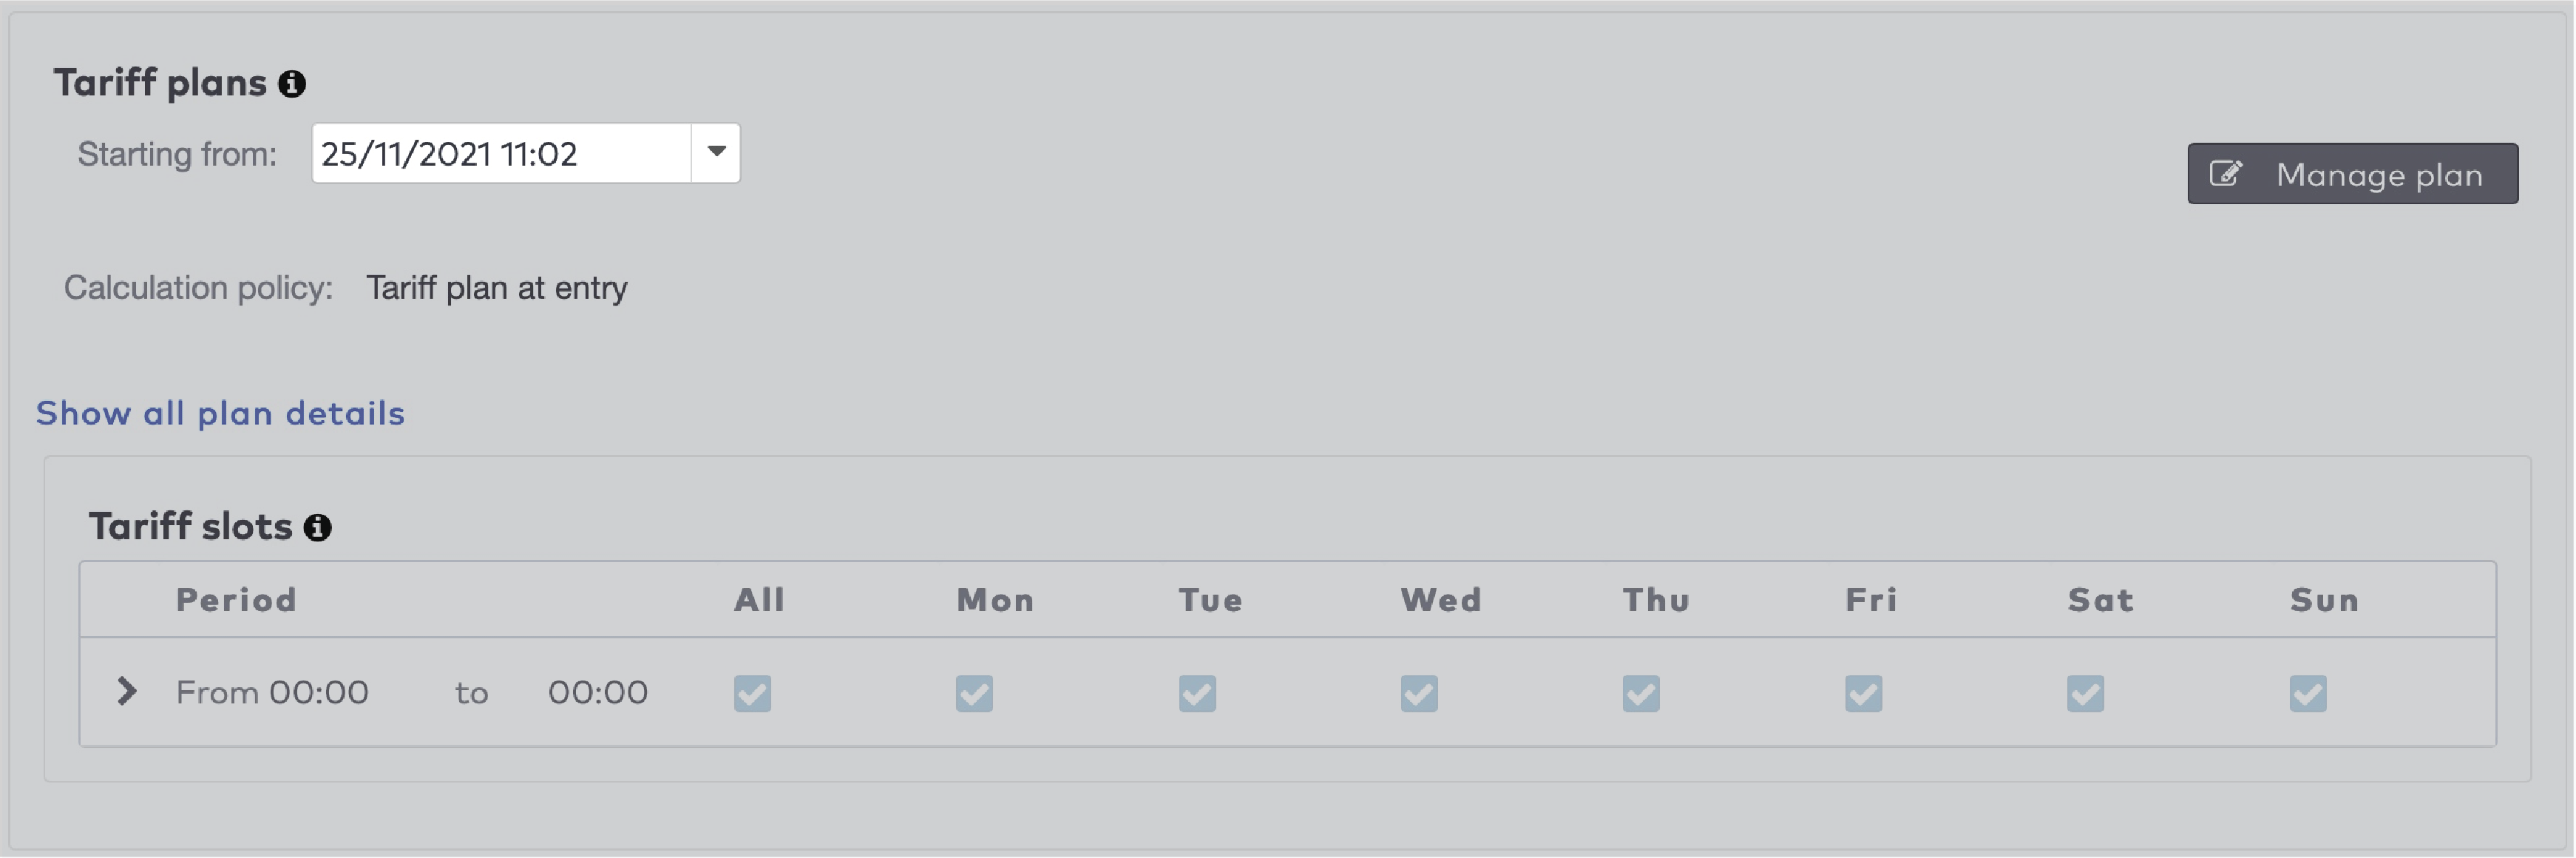
|
To schedule a change in tariff, you need to create a new tariff plan for this tariff profile with a future starting date. Be careful not to delete the current tariff plan.
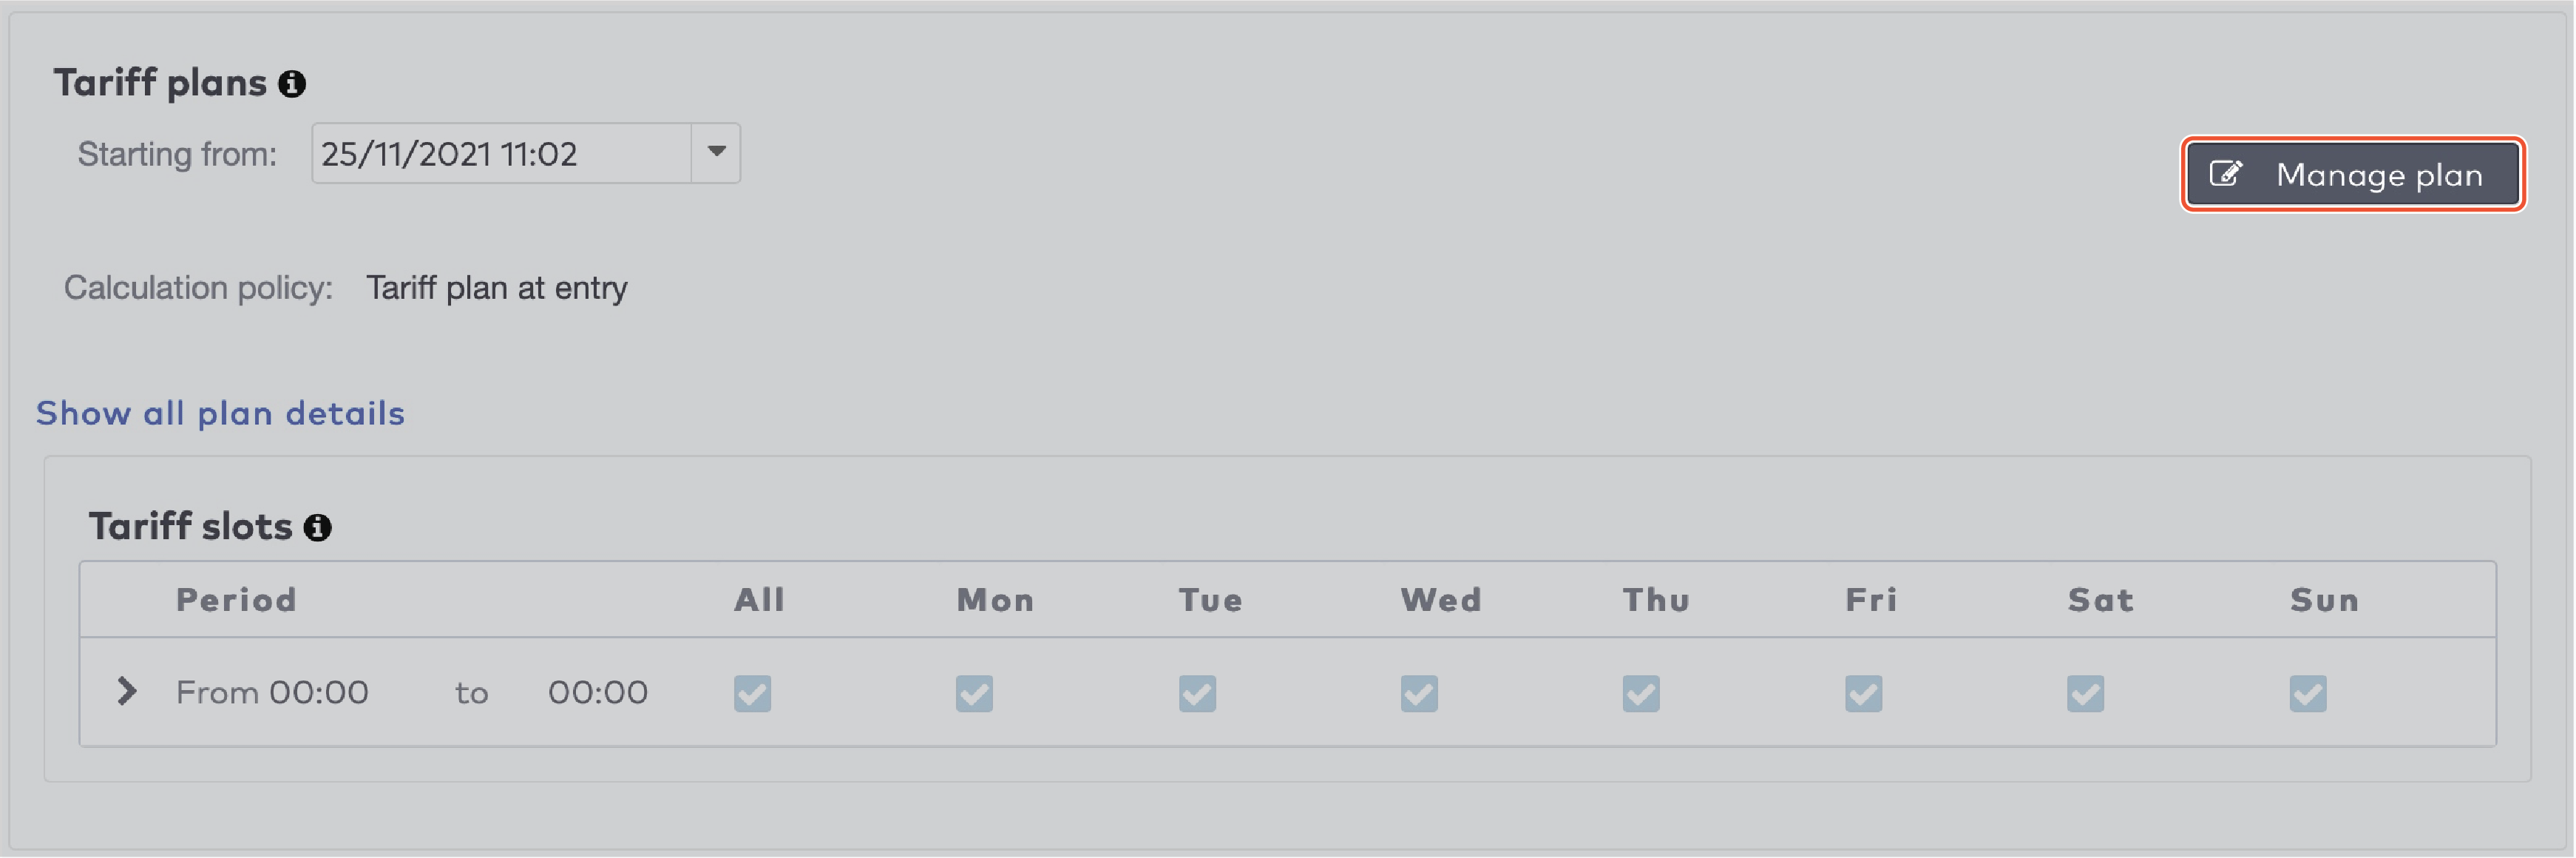
Click Manage plan.
|
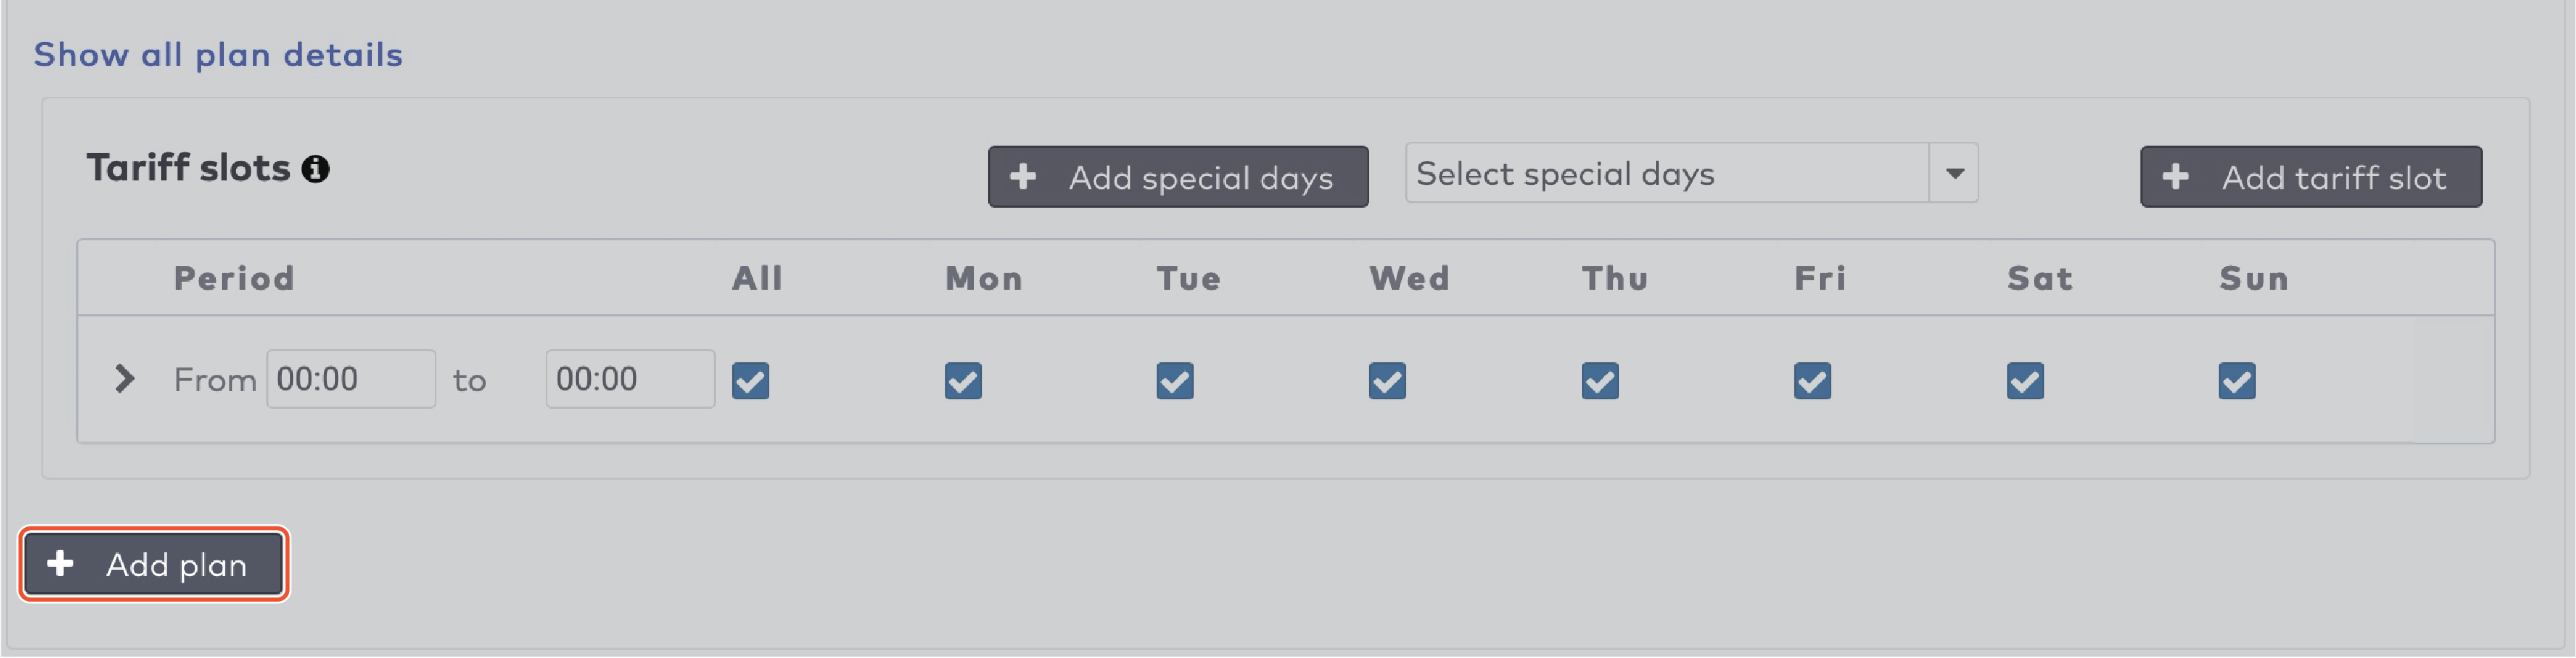
Click Add plan.
|
Set the future Starting date for this plan. From this date onwards, this plan will be used instead of the plan with the older starting date.
Select the Calculation Policy to determine how to handle the transition between the old and the new plan.
For example, if a visitor enters the car park on December 31 and leaves on January 1, a higher rate might apply in the new year. Tariff plan at entry means the total amount is calculated according to the tariff that was valid on December 31. The amount due for January 1 will be calculated according to the rates of December 31. Tariff plan at payment means that the total amount will be calculated according to the rates of January 1. The amount due for December 31 will be calculated according to the rates of January 1. All tariff plans of visit means that the amount is calculated according to the valid tariffs from that day. The visitor pays for their parking time on December 31 according to the rates of that day and pays for January 1 according to the new rates.
Create the new tariff plan. See Creating a tariff profile for more details about this step.
Scroll up and click Test tariff profile.
|
|
Enter a Start date time and an End date time to test different parking scenarios. Adjust your tariff slots, duration entries and amounts if necessary.
|
Click Save.
Reports
Reports show the details and the overviews of what happens within the parking system.
To generate a report:
Click Reports in the menu bar.
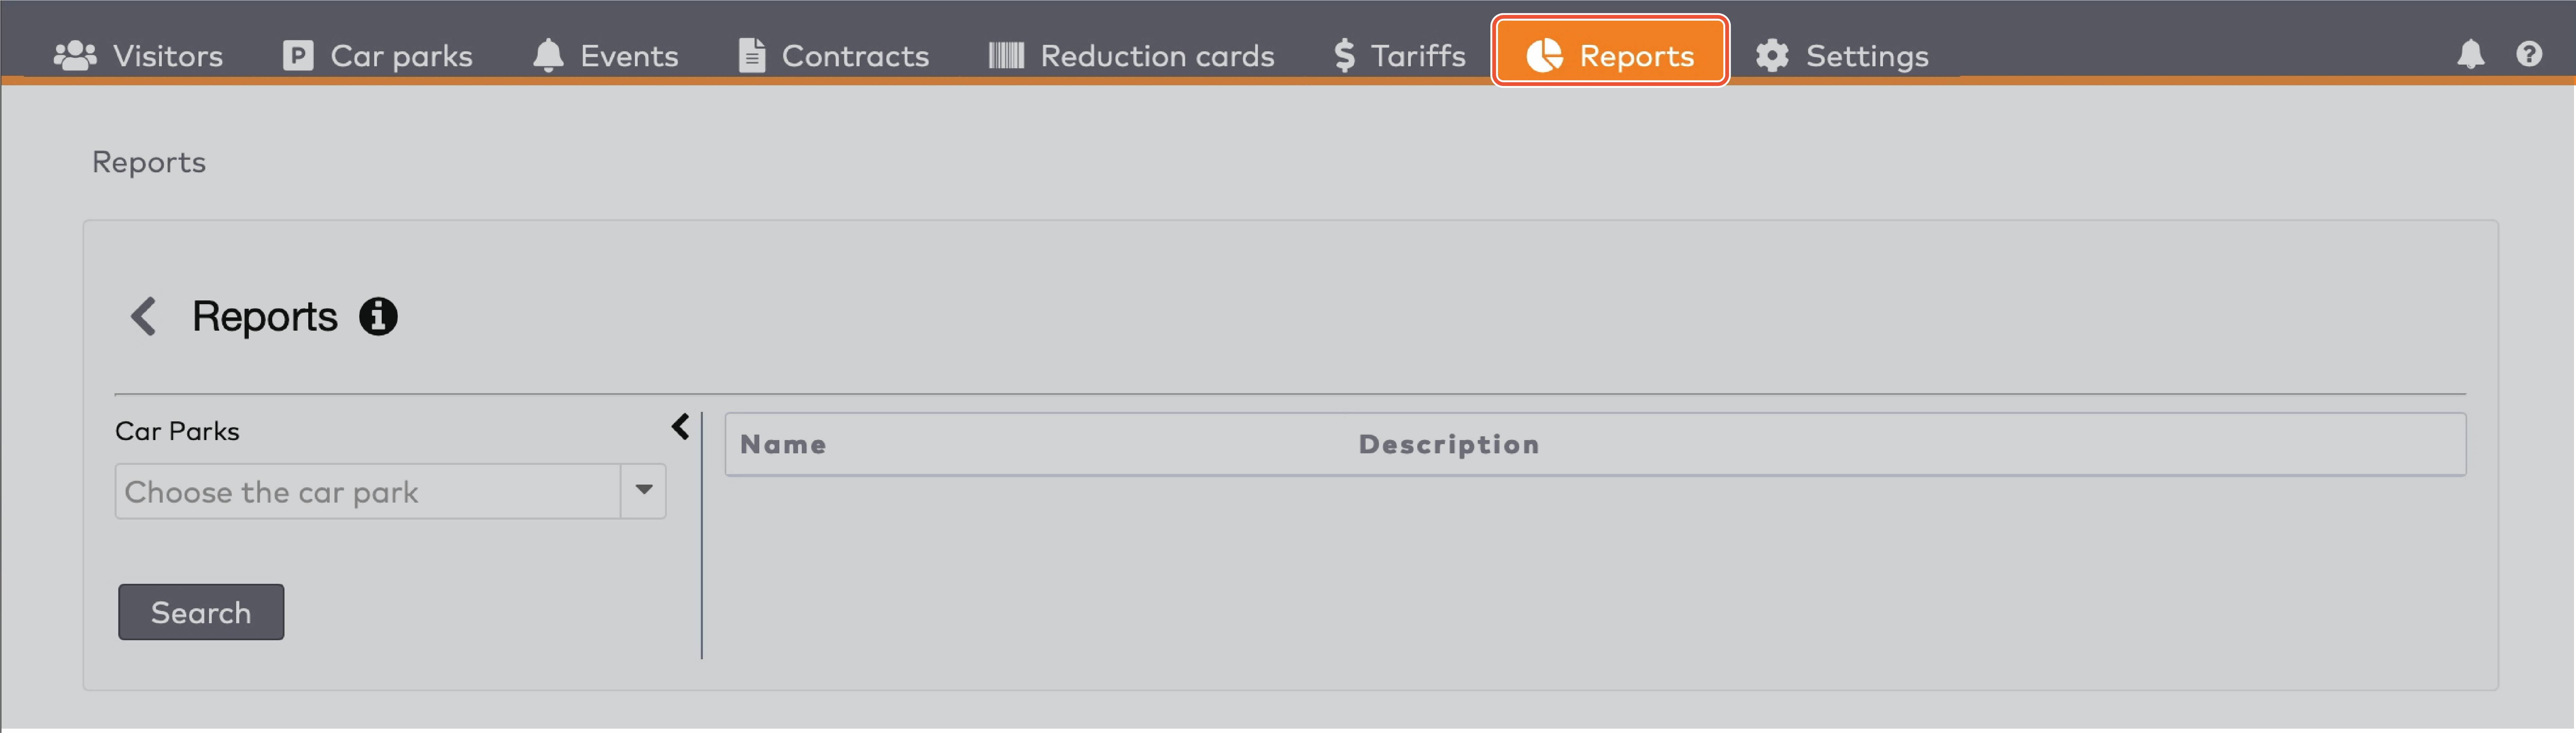
|
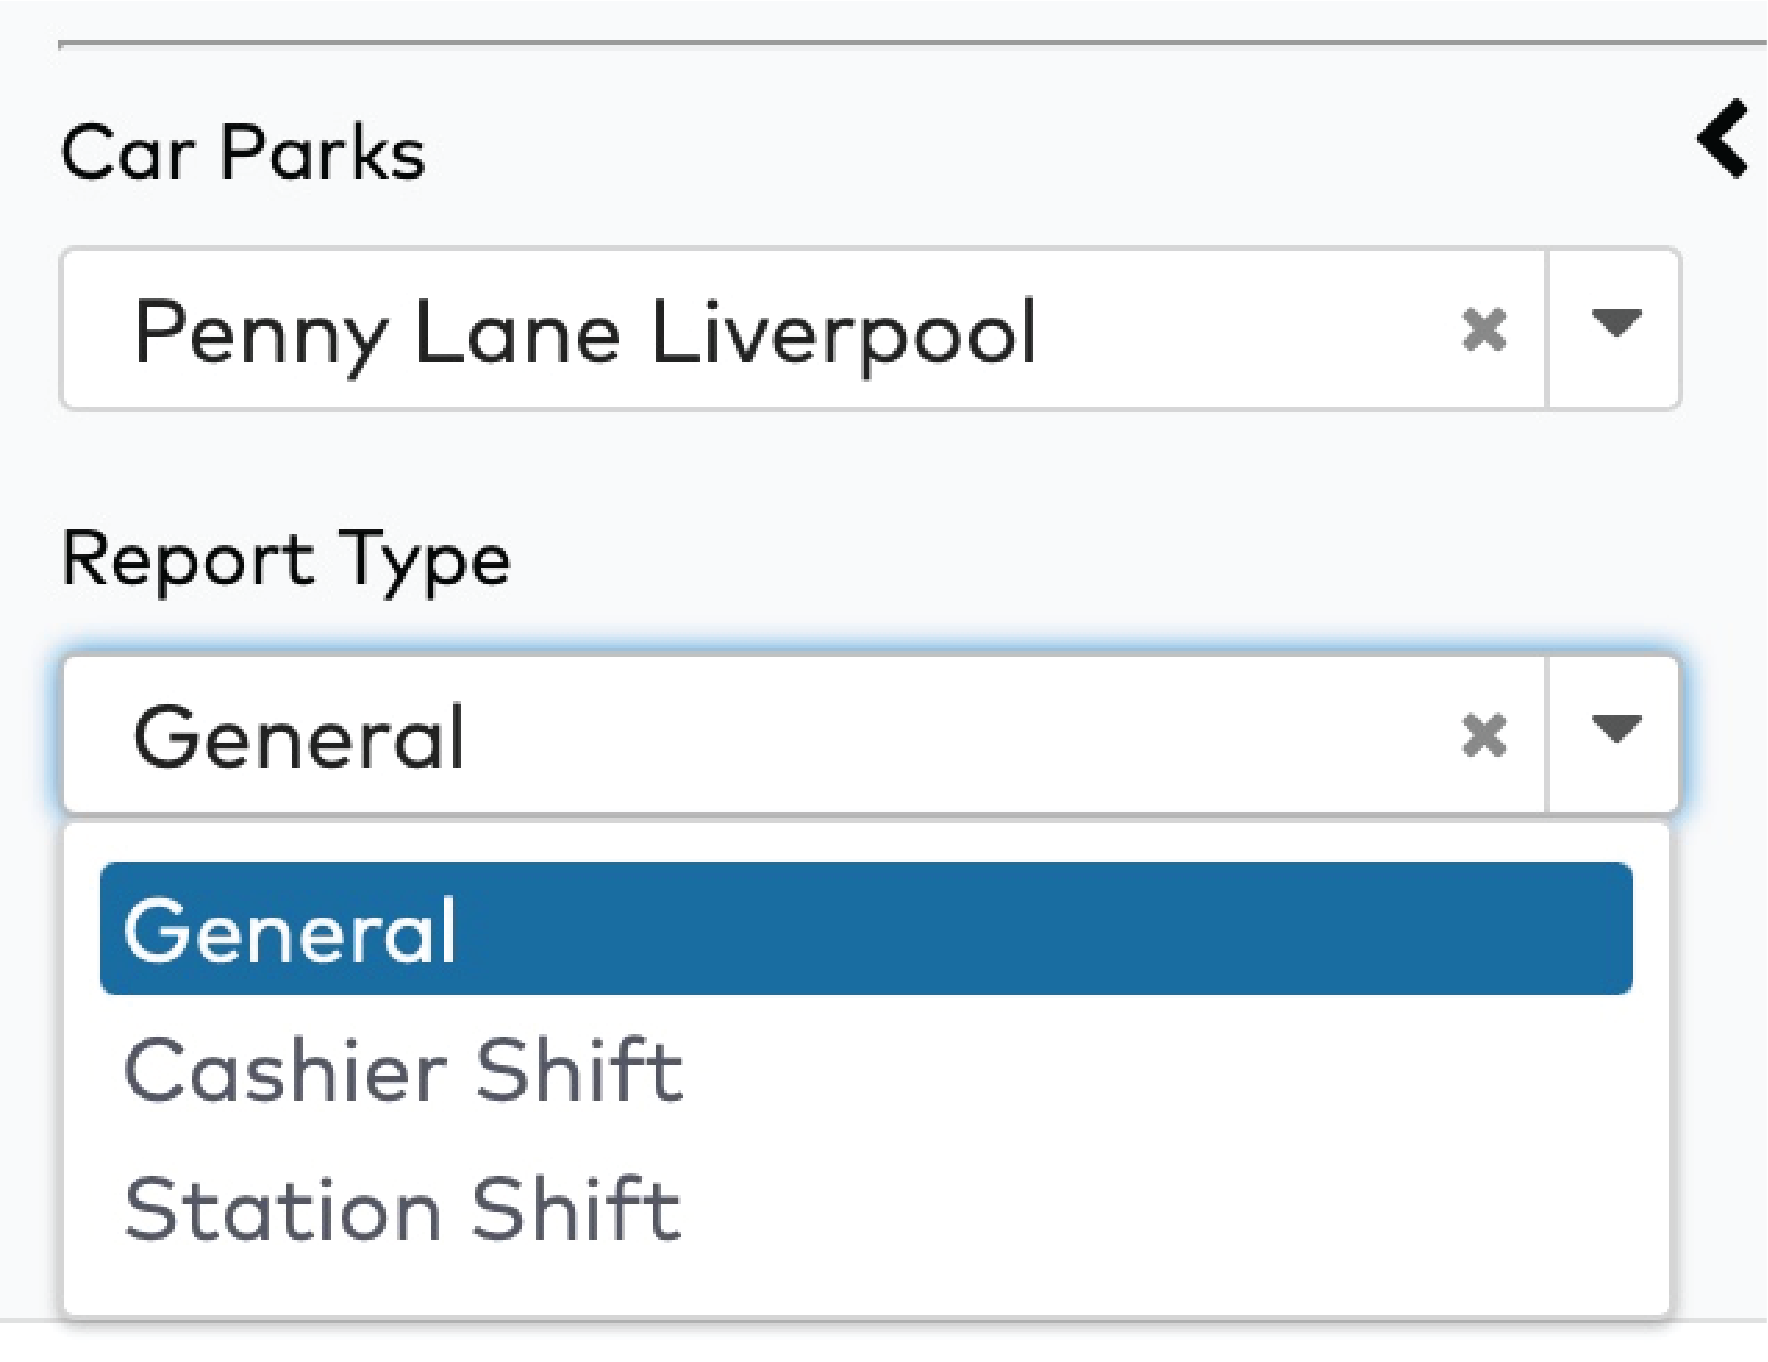
Select a Car park from the dropdown menu.
Select a Report Type from the dropdown menu.
|
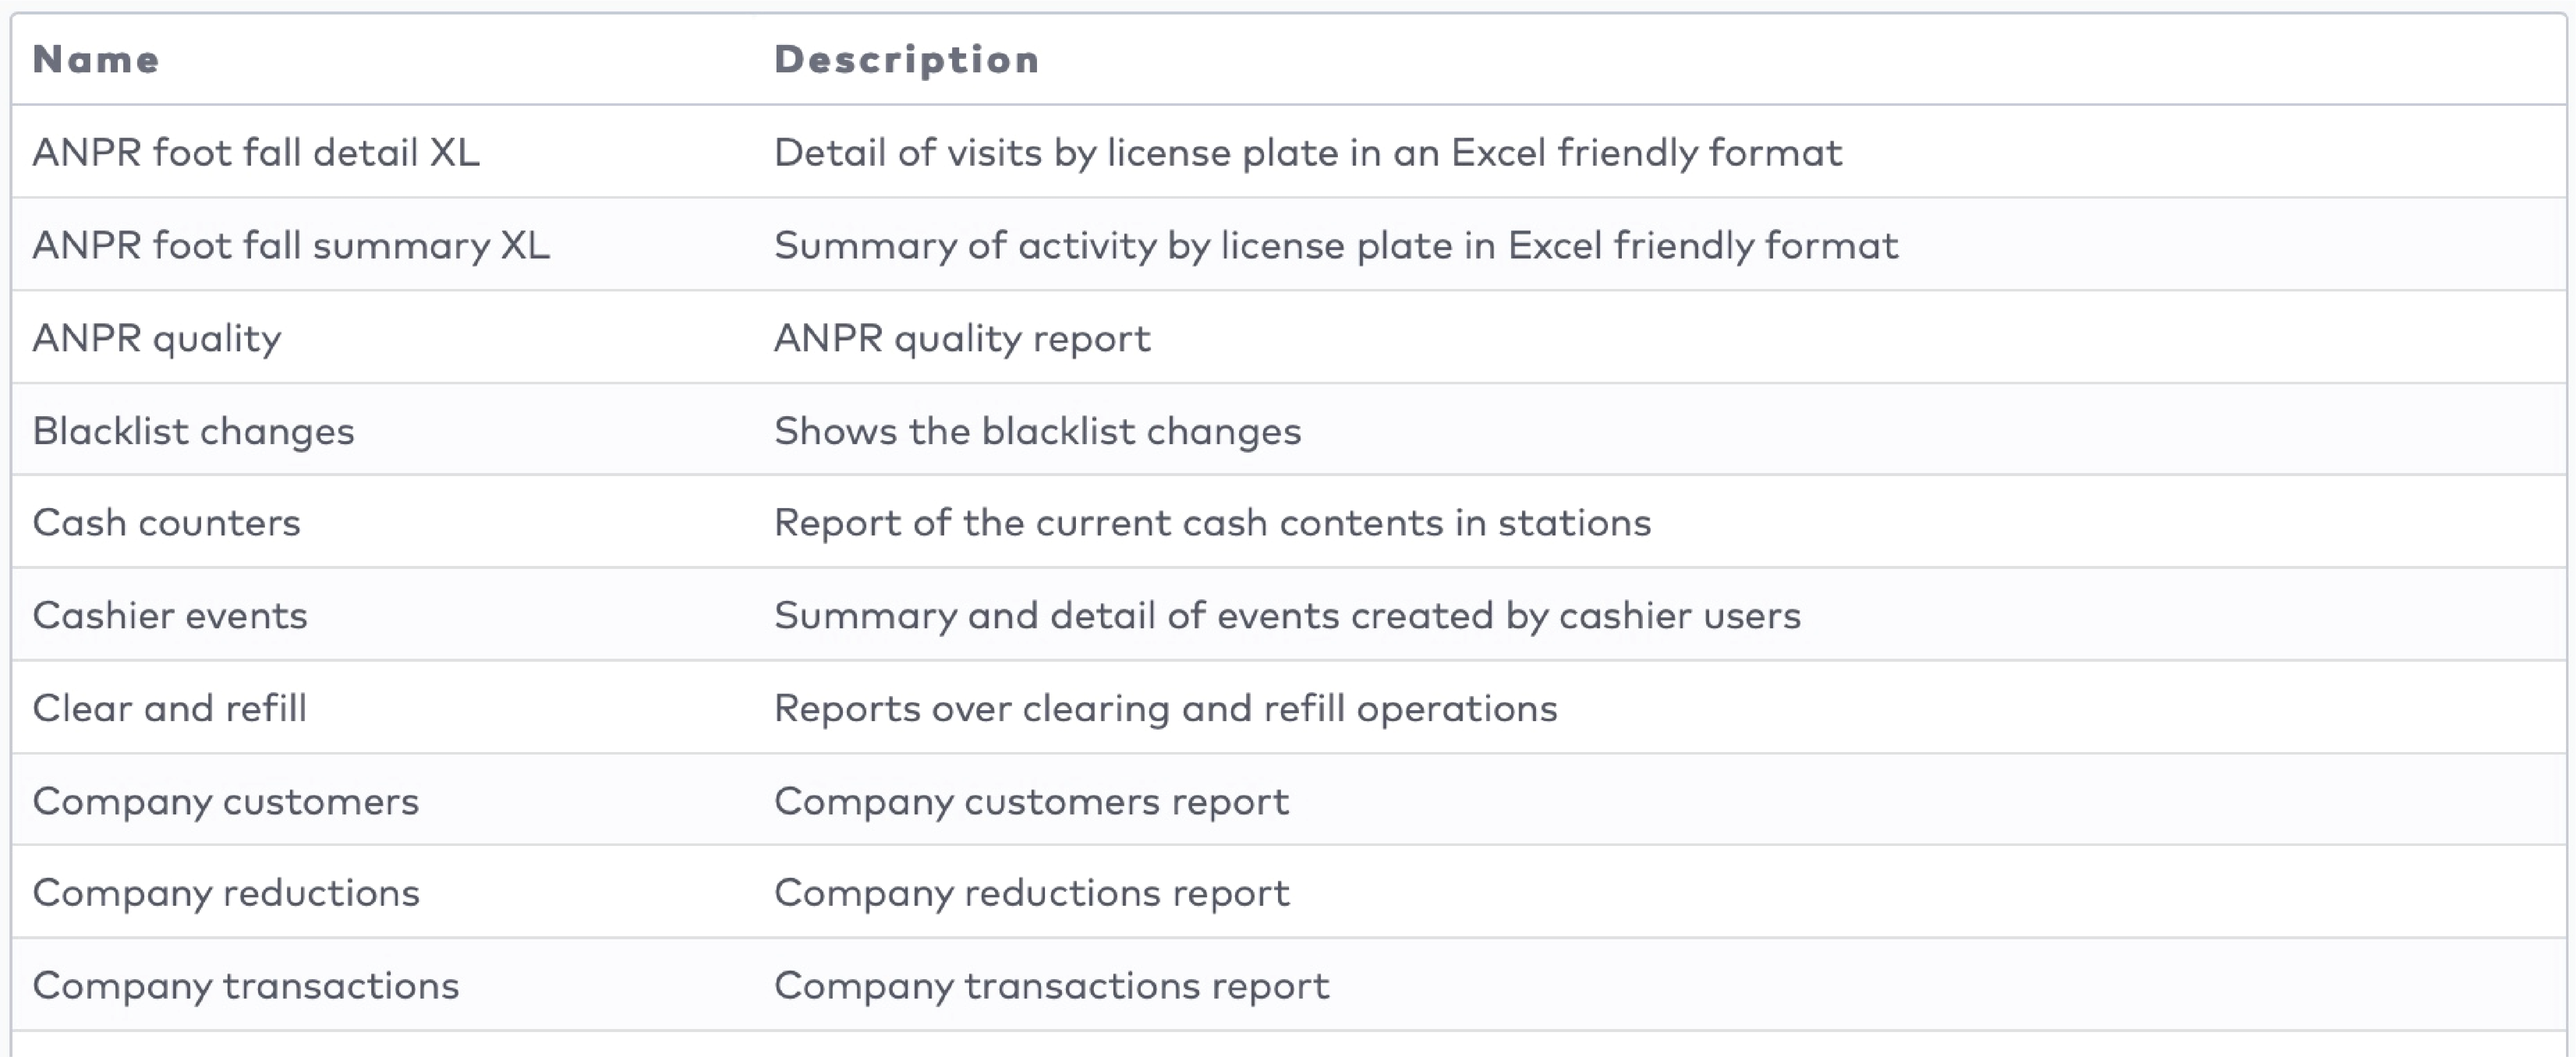
Generating a general report
To generate a general report type:
Select General and click Search.
Click a report name from the list.
|
Fill out the required details and click Next step until the Export to XLS format checkbox and the Execute button are displayed.

|
By default, reports are generated in PDF-format. Check the Export to XLS format checkbox if you want to generate a report in Microsoft Excel instead.
Click Execute.
The report is generated and downloaded in the format you requested.
Generating a cashier or station shift report
A station shift report is a report on activities on a station in a selected period of time. A cashier shift report is a report on the activities of a cashier at a selected shift.
To generate one of those reports:
Select a Car Park.
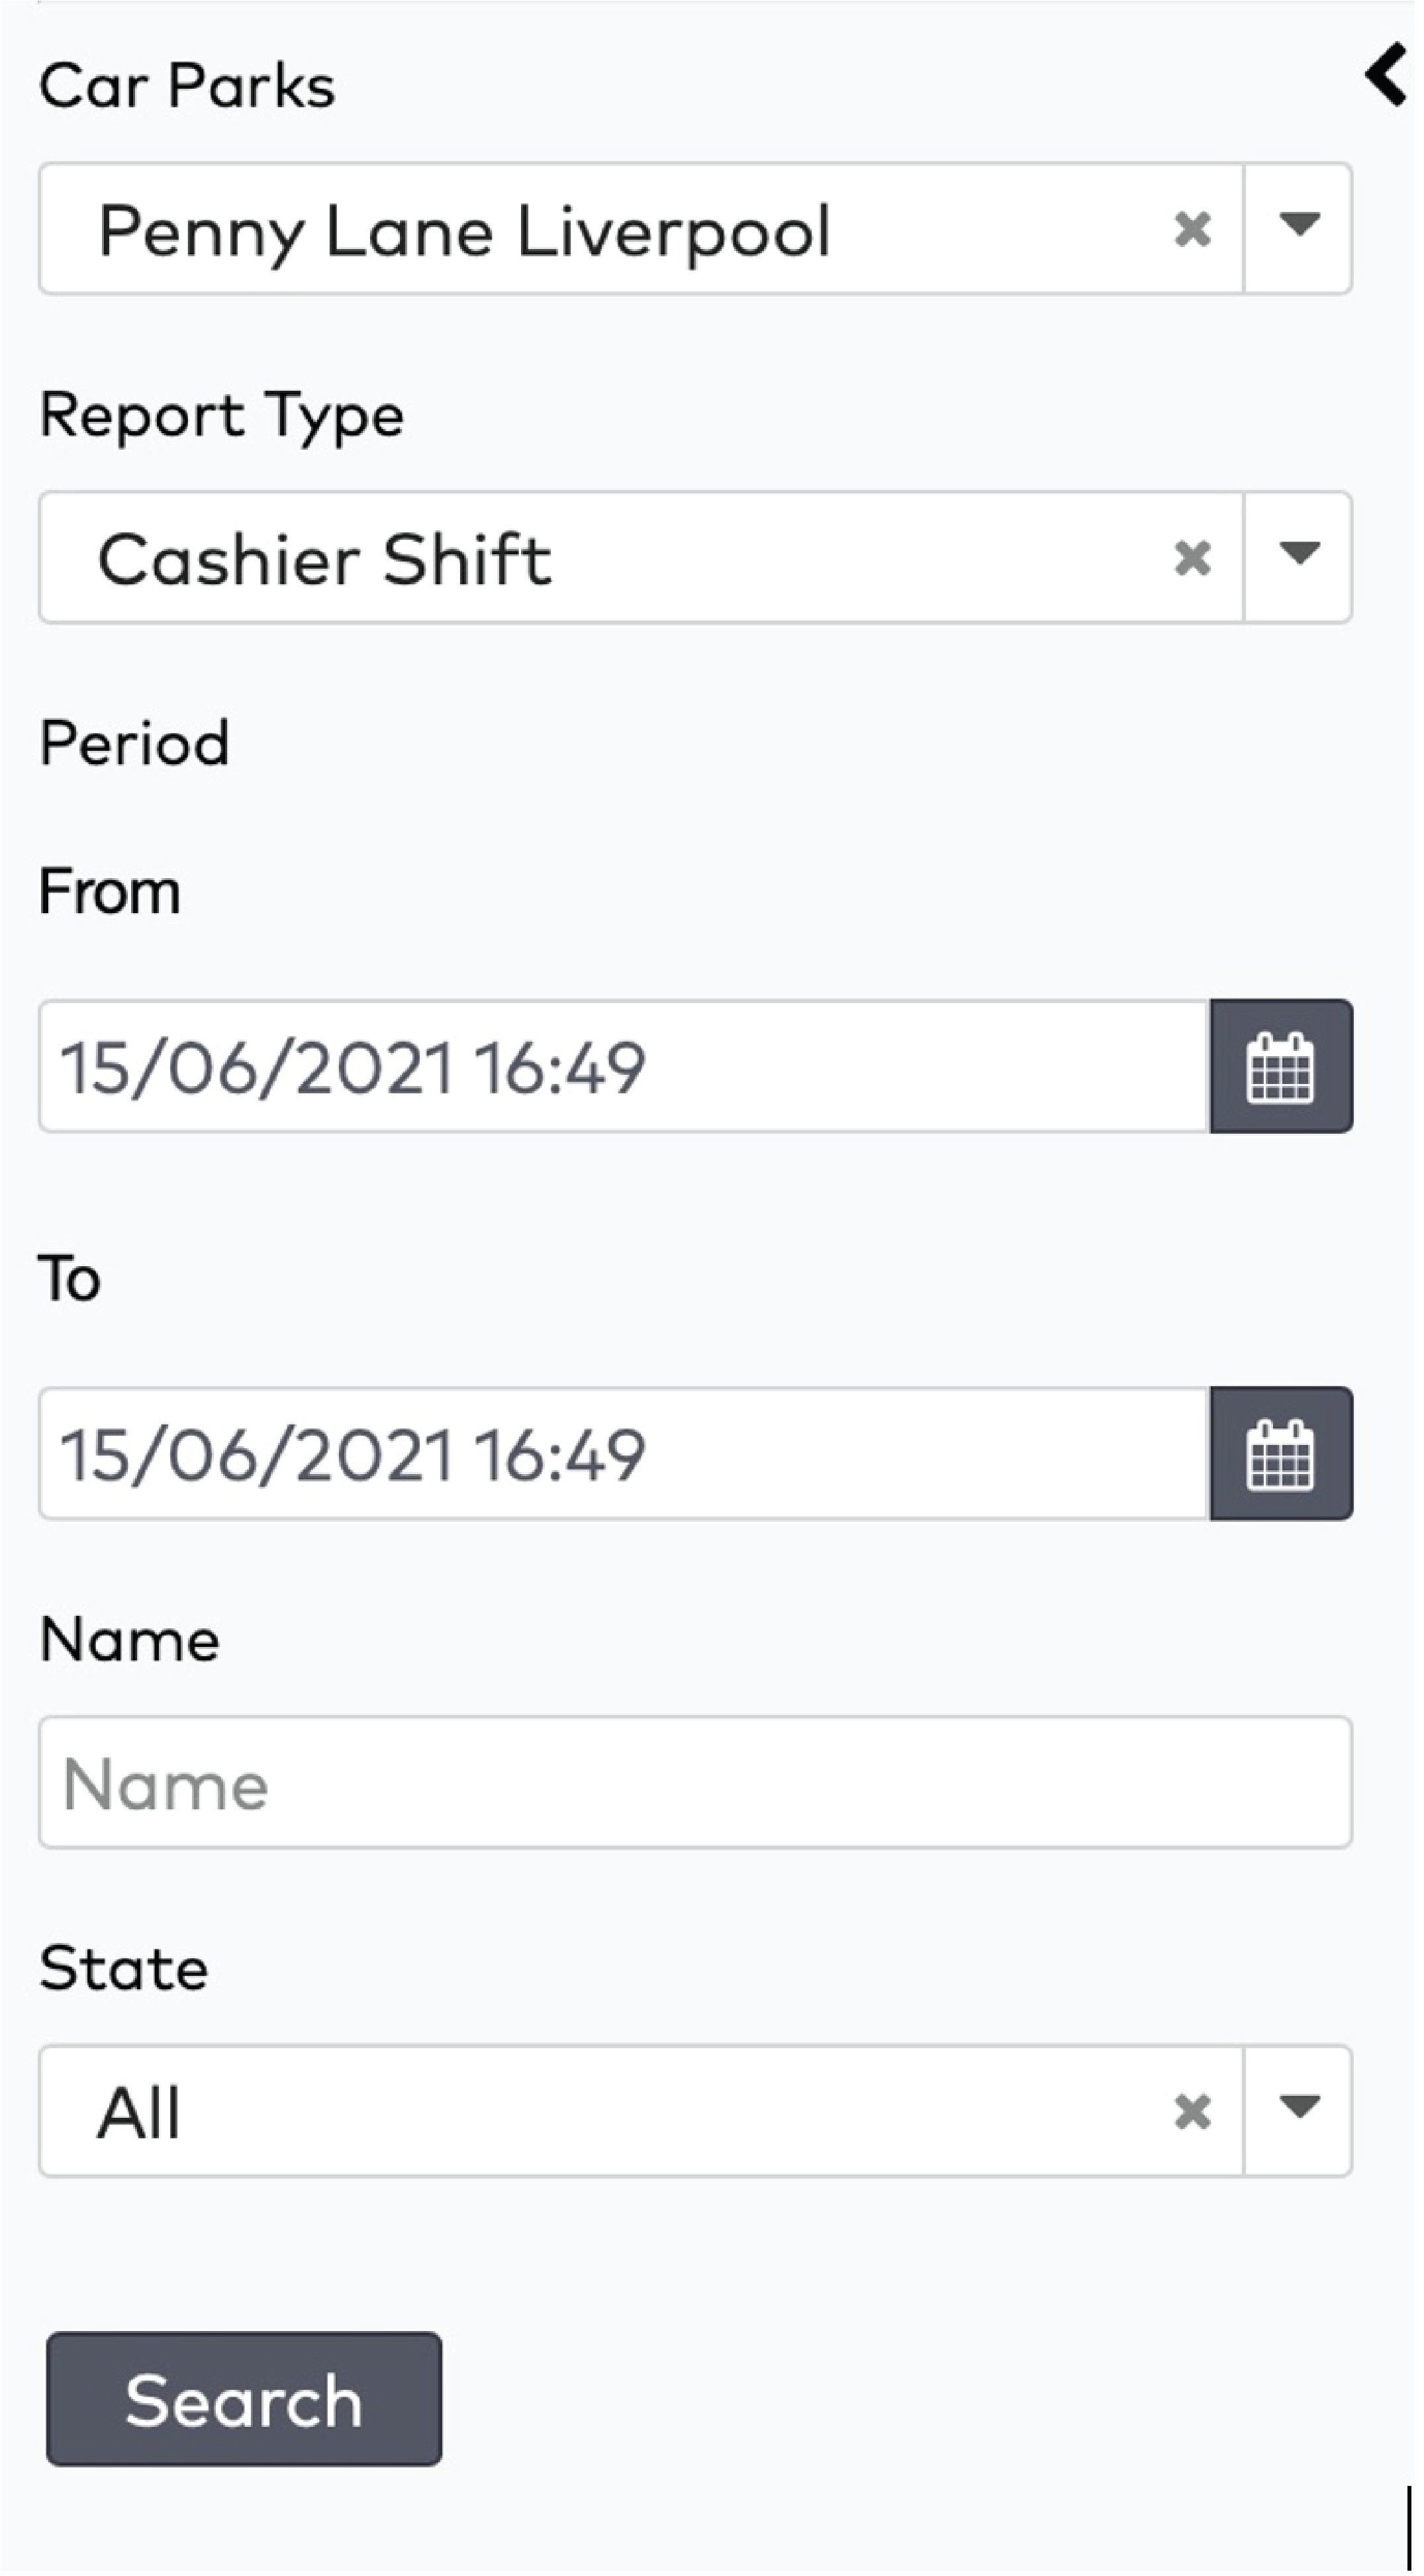
|
Select a Report Type.
Select a From and To date.
Optionally, search by Name or State.
Click Search.
Settings
In settings, you can manage:
Car park configuration
The car park configuration screen is used to add or edit bidirectional lanes.
A bidirectional lane is a lane with either:
One barrier with terminals on both sides, or
|
|
Two barriers with a terminal of their own.
|
|
A bidirectional lane can be configured to act like an entry or an exit station.
To access the Car park configuration screen:
Click Settings in the menu bar.
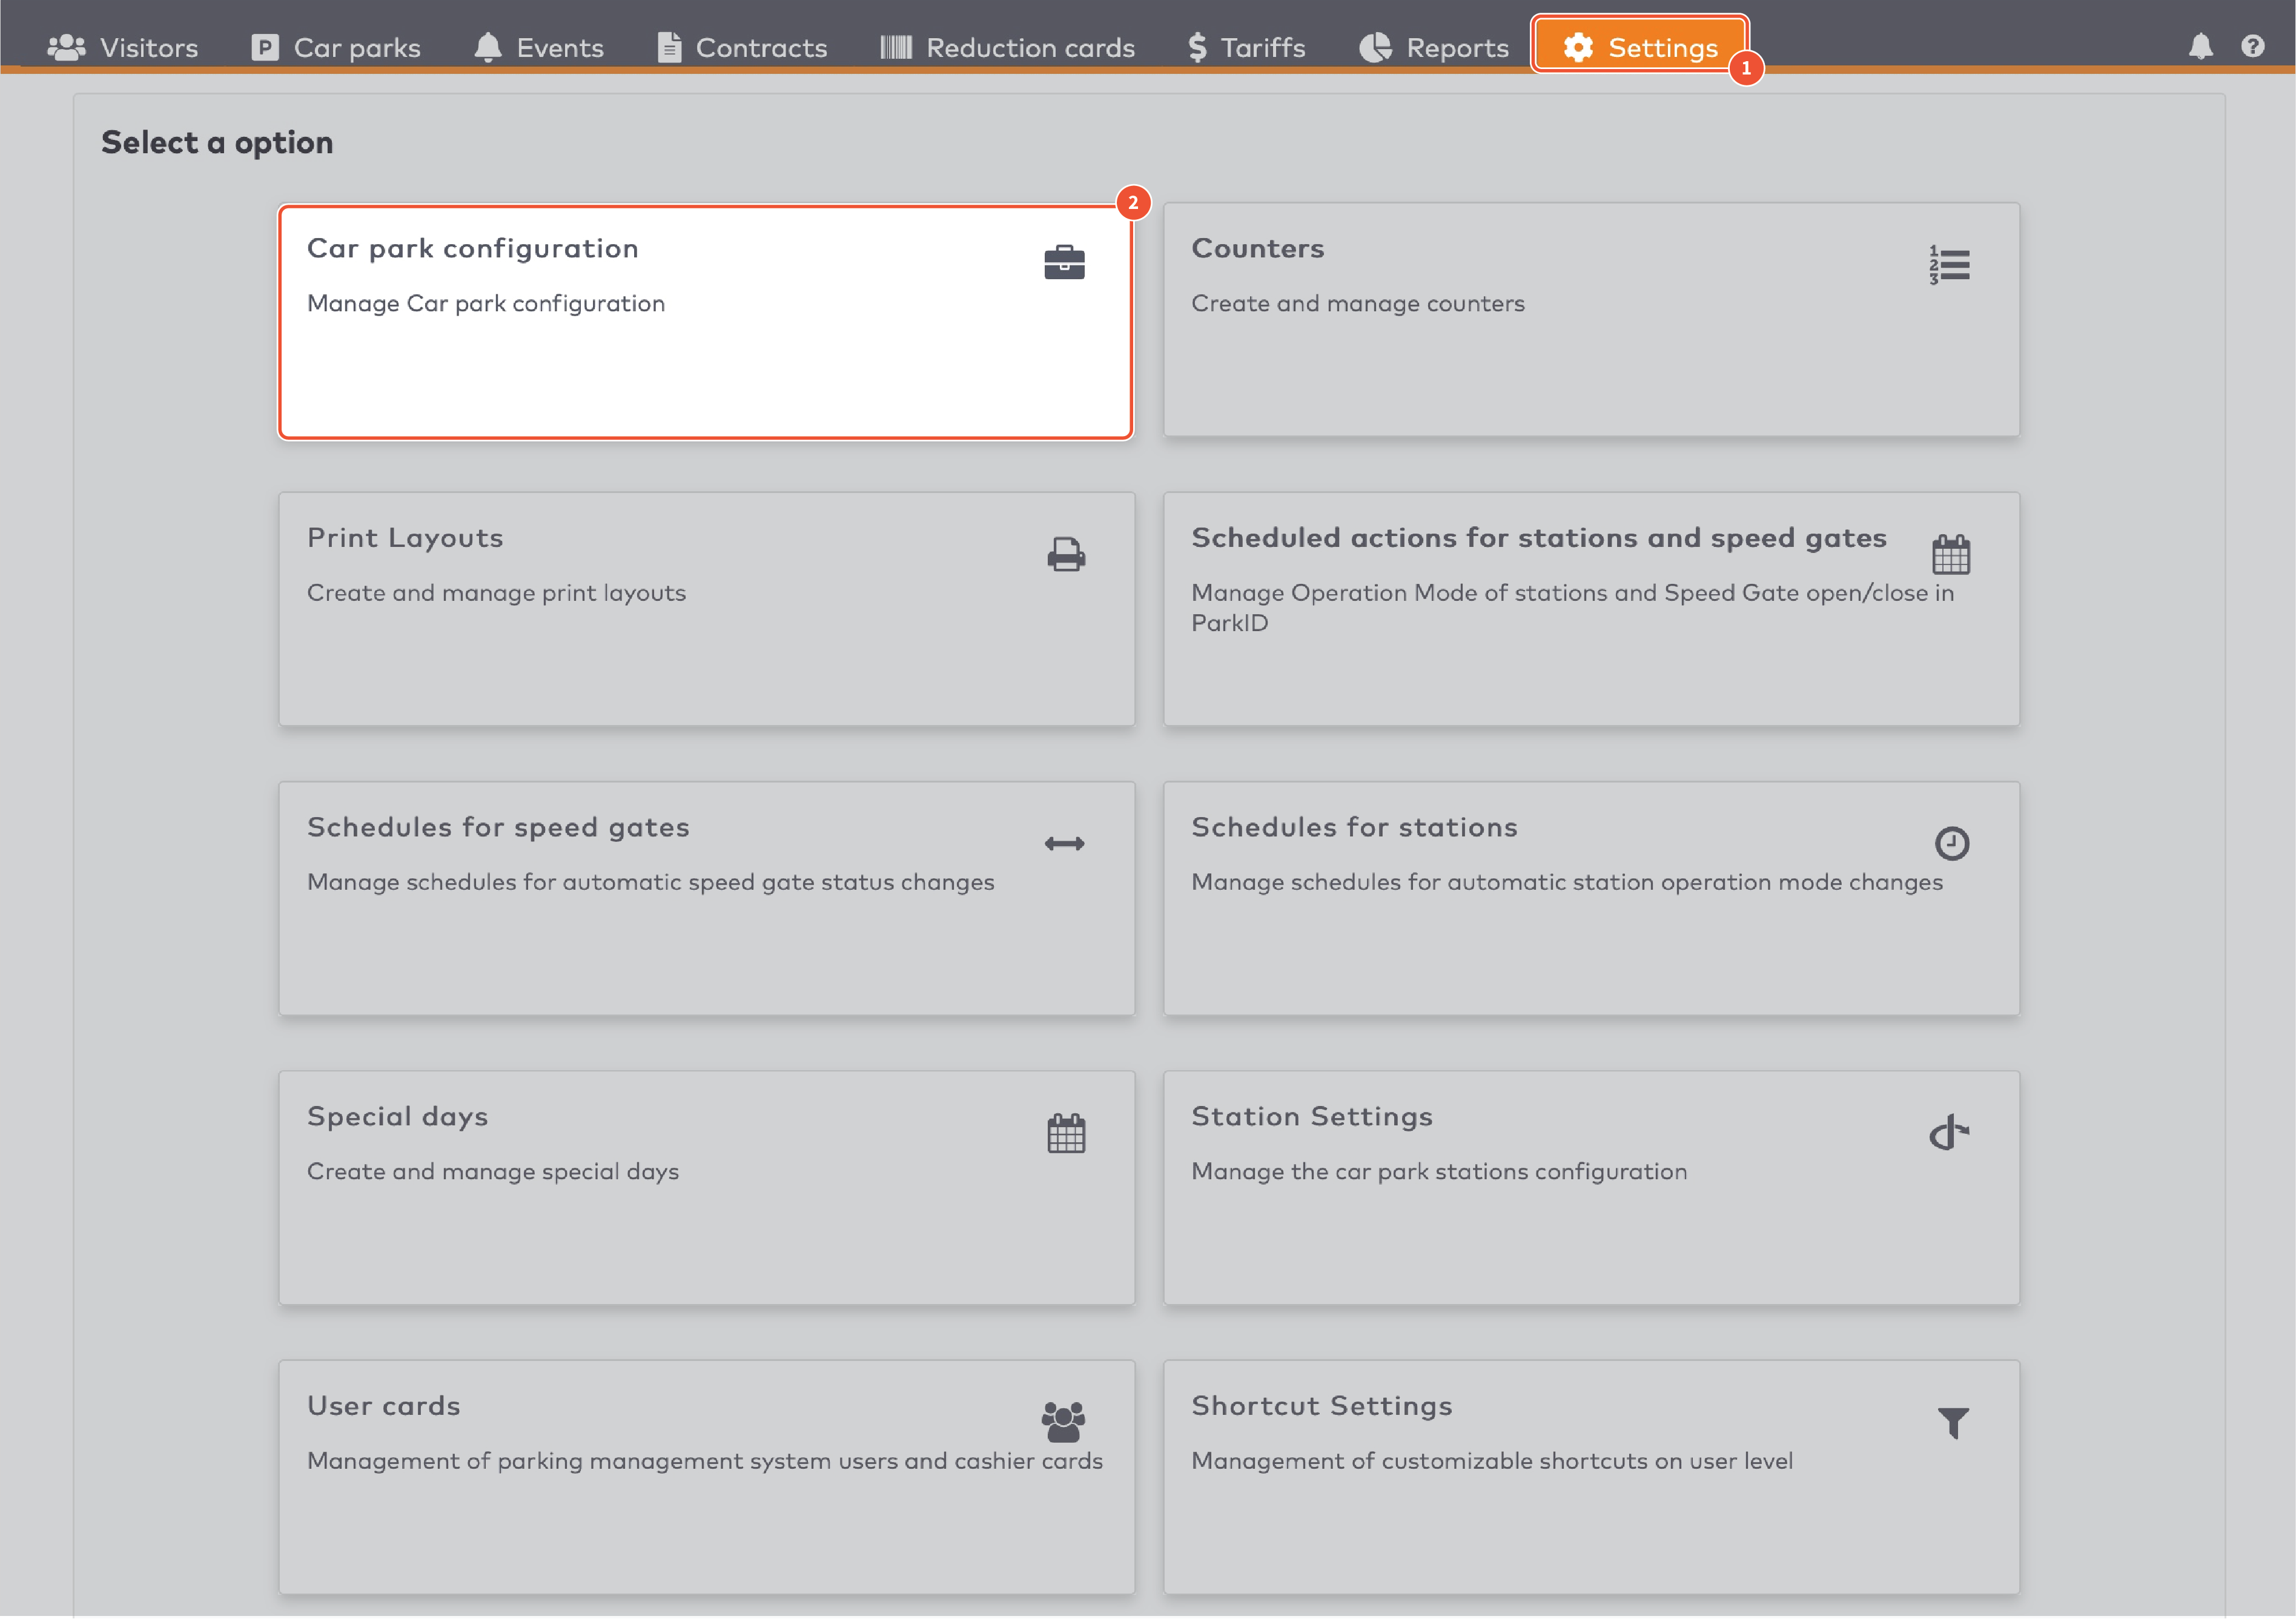
|
Click Car park configuration.
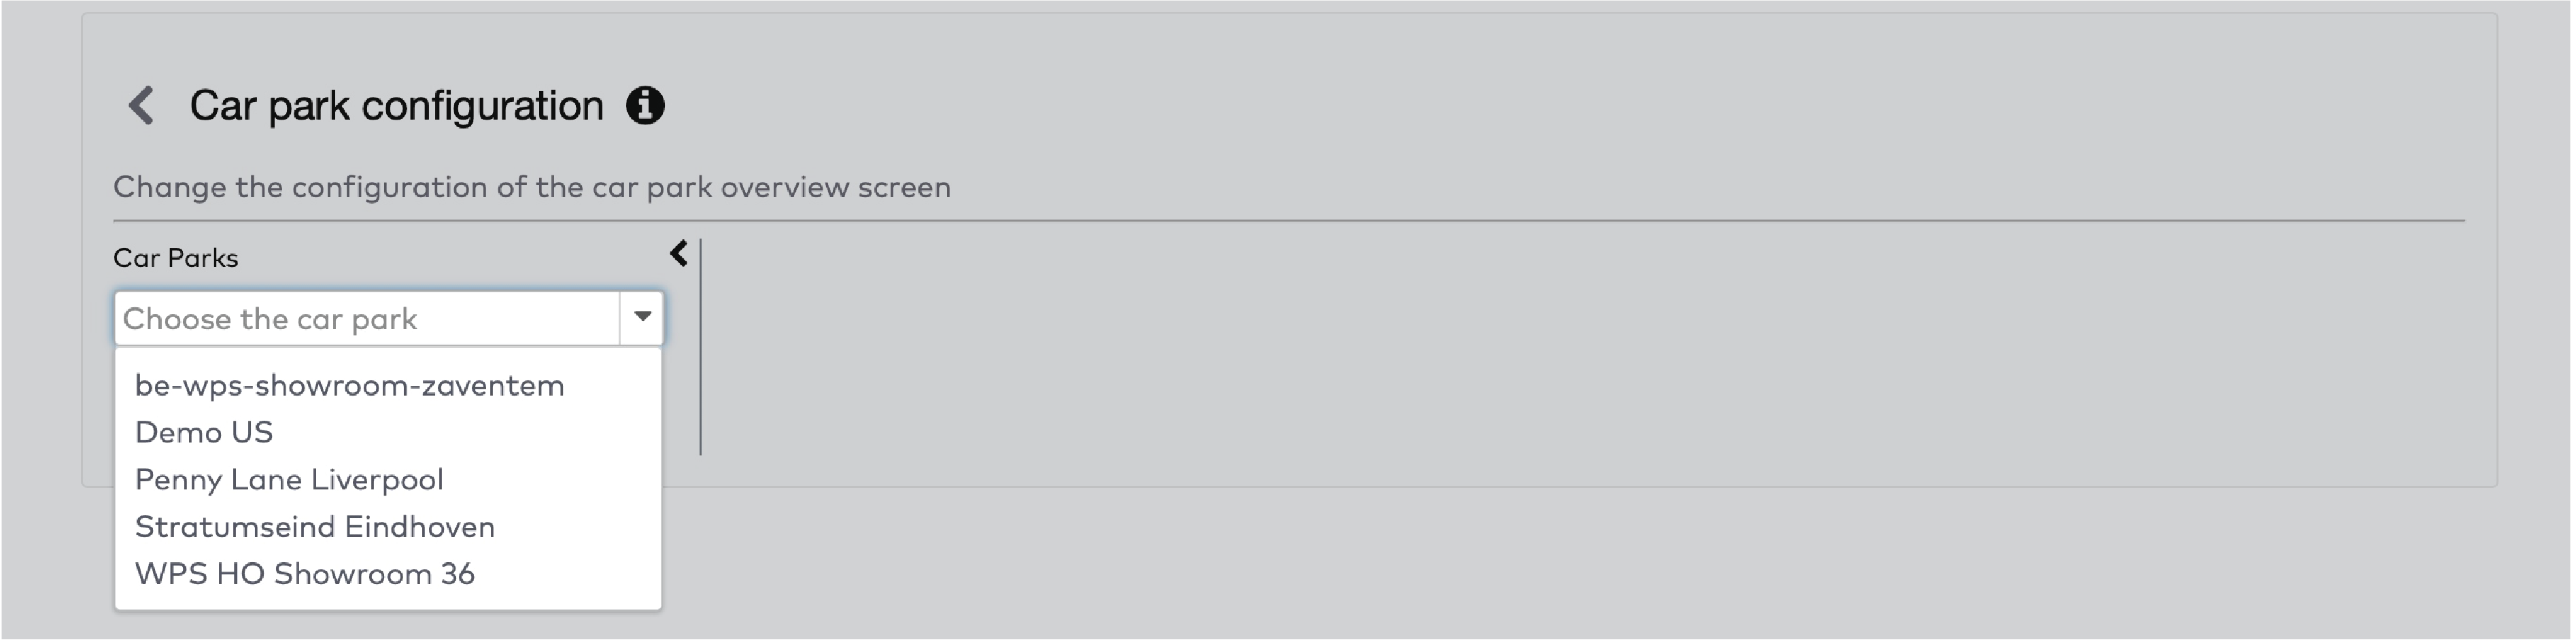
|
Select a car park from the dropdown menu.
Click Search.
Click Manage (Bi)directional lanes.
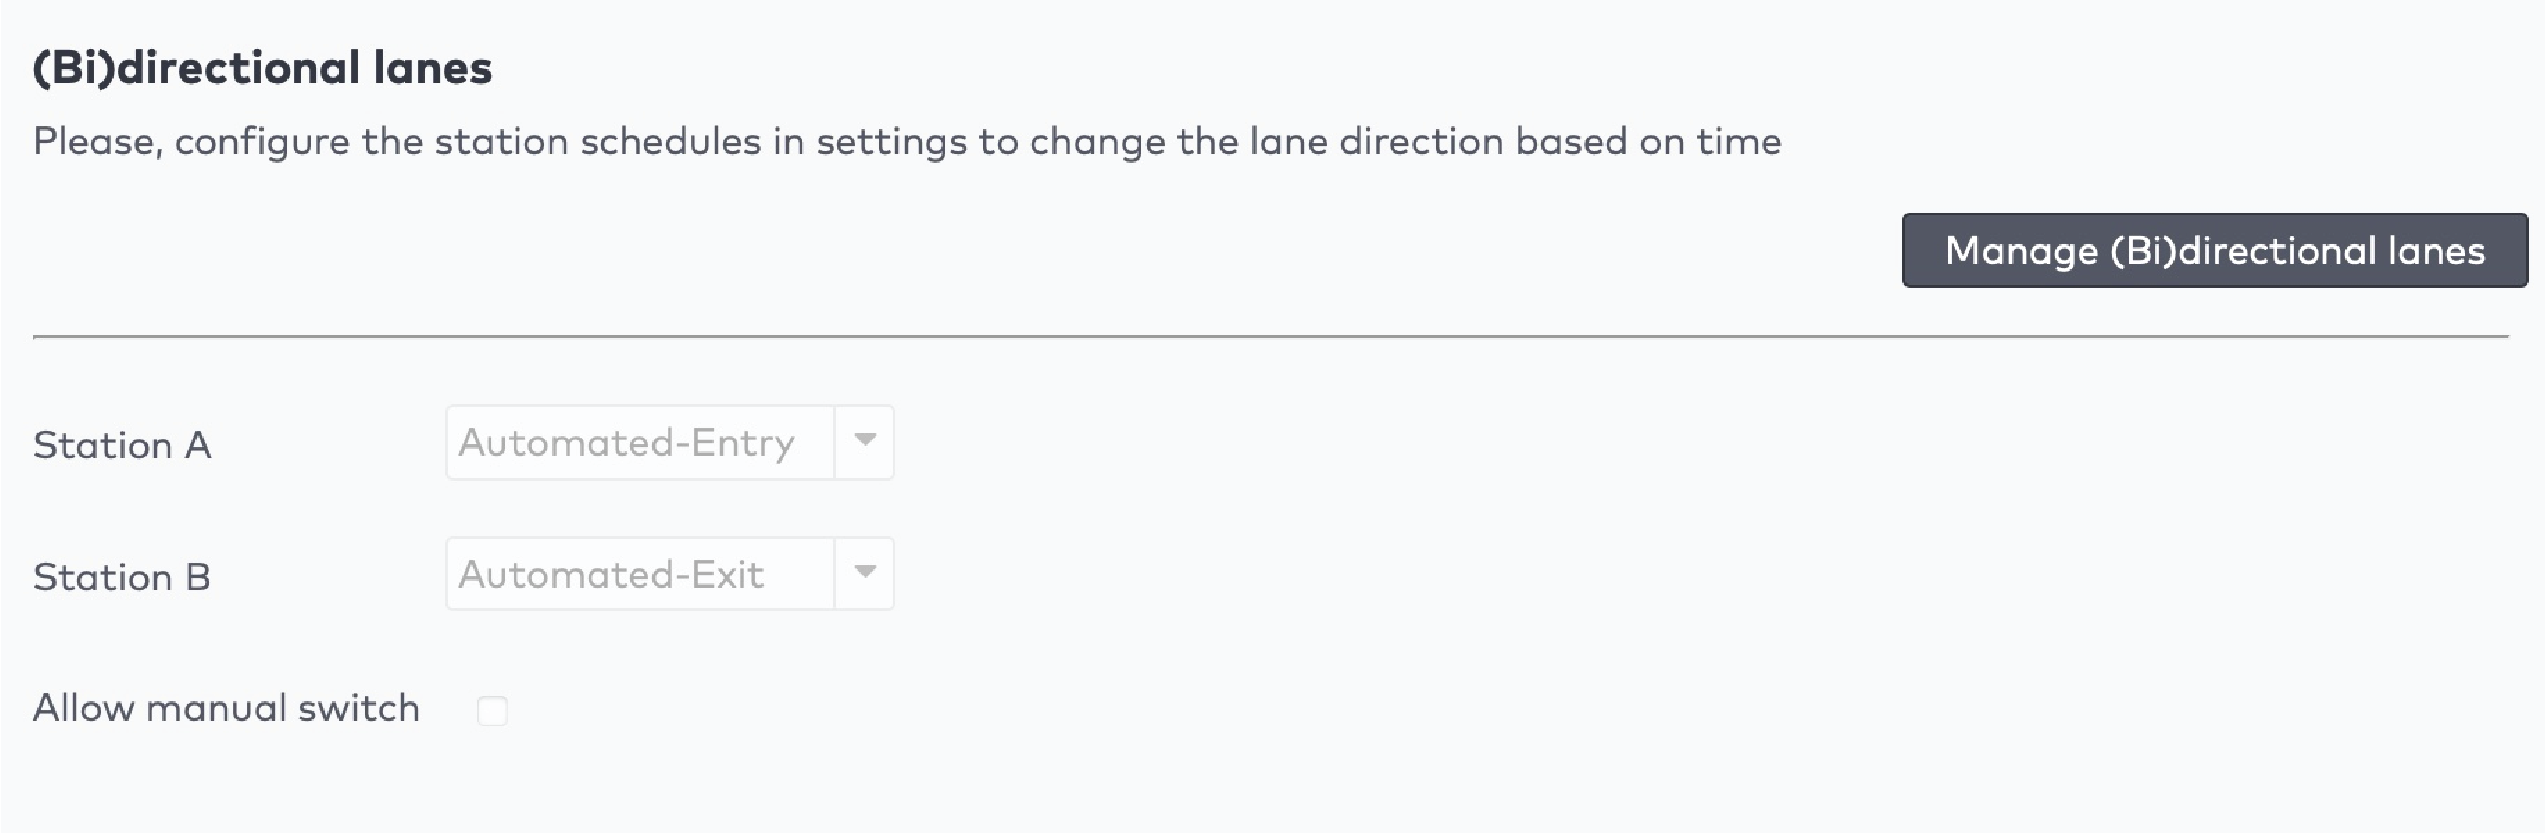
|
Select which station will act as Station A. This station is active in the In schedule. See Schedules to learn more about schedules.
Select which station will act as Station B. This station is active in the Out schedule.
Select the Operation mode for the inactive station.
Select Allow manual switch if you want to allow a manual override of the schedule.
See Operating stations to learn how bidirectional lanes are used in a car park.
Counters
Counters are used to keep track of, for example:
The number of visitors in the car park
The number of visitors in a group, now present in the car park
The number of visitors with a certain contract type in the car park
Etc.
Counters can be displayed in the car park overview:
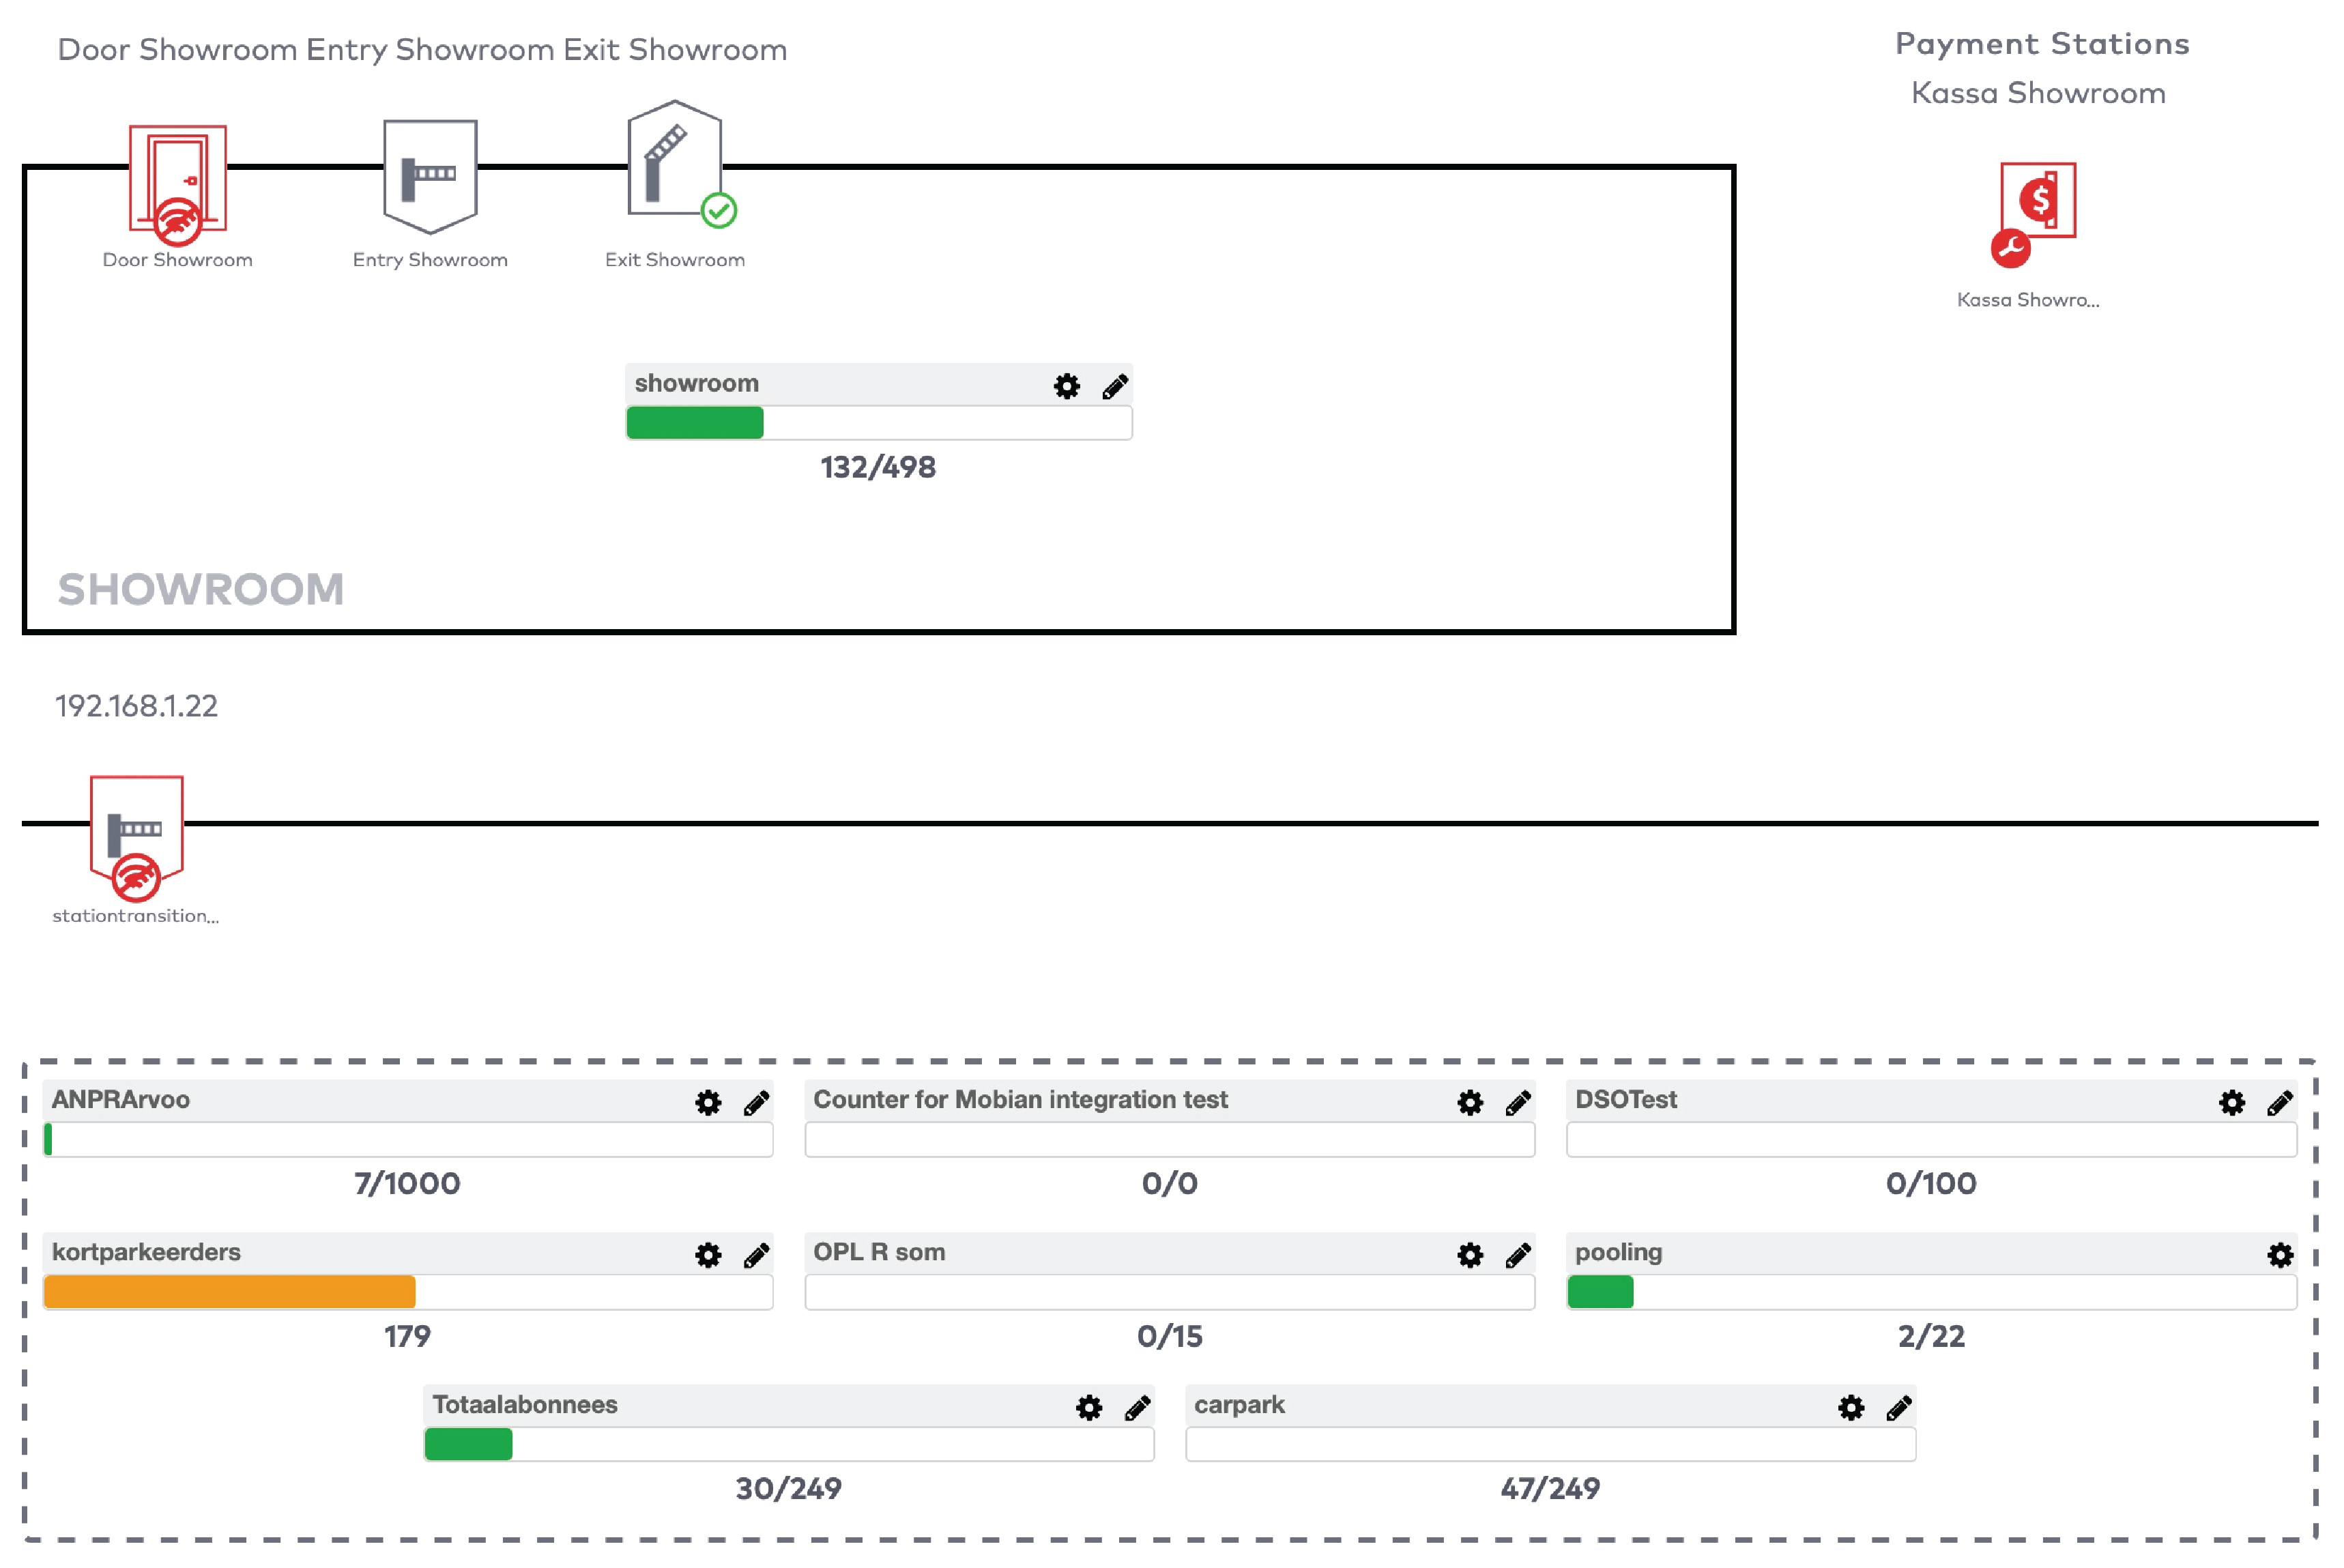
|
Counters can be configured to have minimum and maximum values. For example, the counter that keeps track of the number of visitors in the car park has a maximum value corresponding to the total number of parking spots in the car park.
Counters can be configured to flag a signal equal to or higher than a set maximum value. The signal can be configured to trigger an action, for example: closing the car park when it’s full.
The signal will be unflagged when the counter value is equal to or lower than a set minimum value.
|
Example
You use a counter to count the number of visitors in a car park. The maximum capacity of your car park is 100 visitors. You configure a signal to be flagged when the car park reaches 100 visitors. The car park is closed and a message “Full” is displayed. You have configured the minimum value for the signal to be unflagged to be 98. When at least two visitors leave, the car park is opened again, and the message “Full” disappears.
|
Creating and editing counters
To create or edit a counter:
Click Settings in the menu bar.
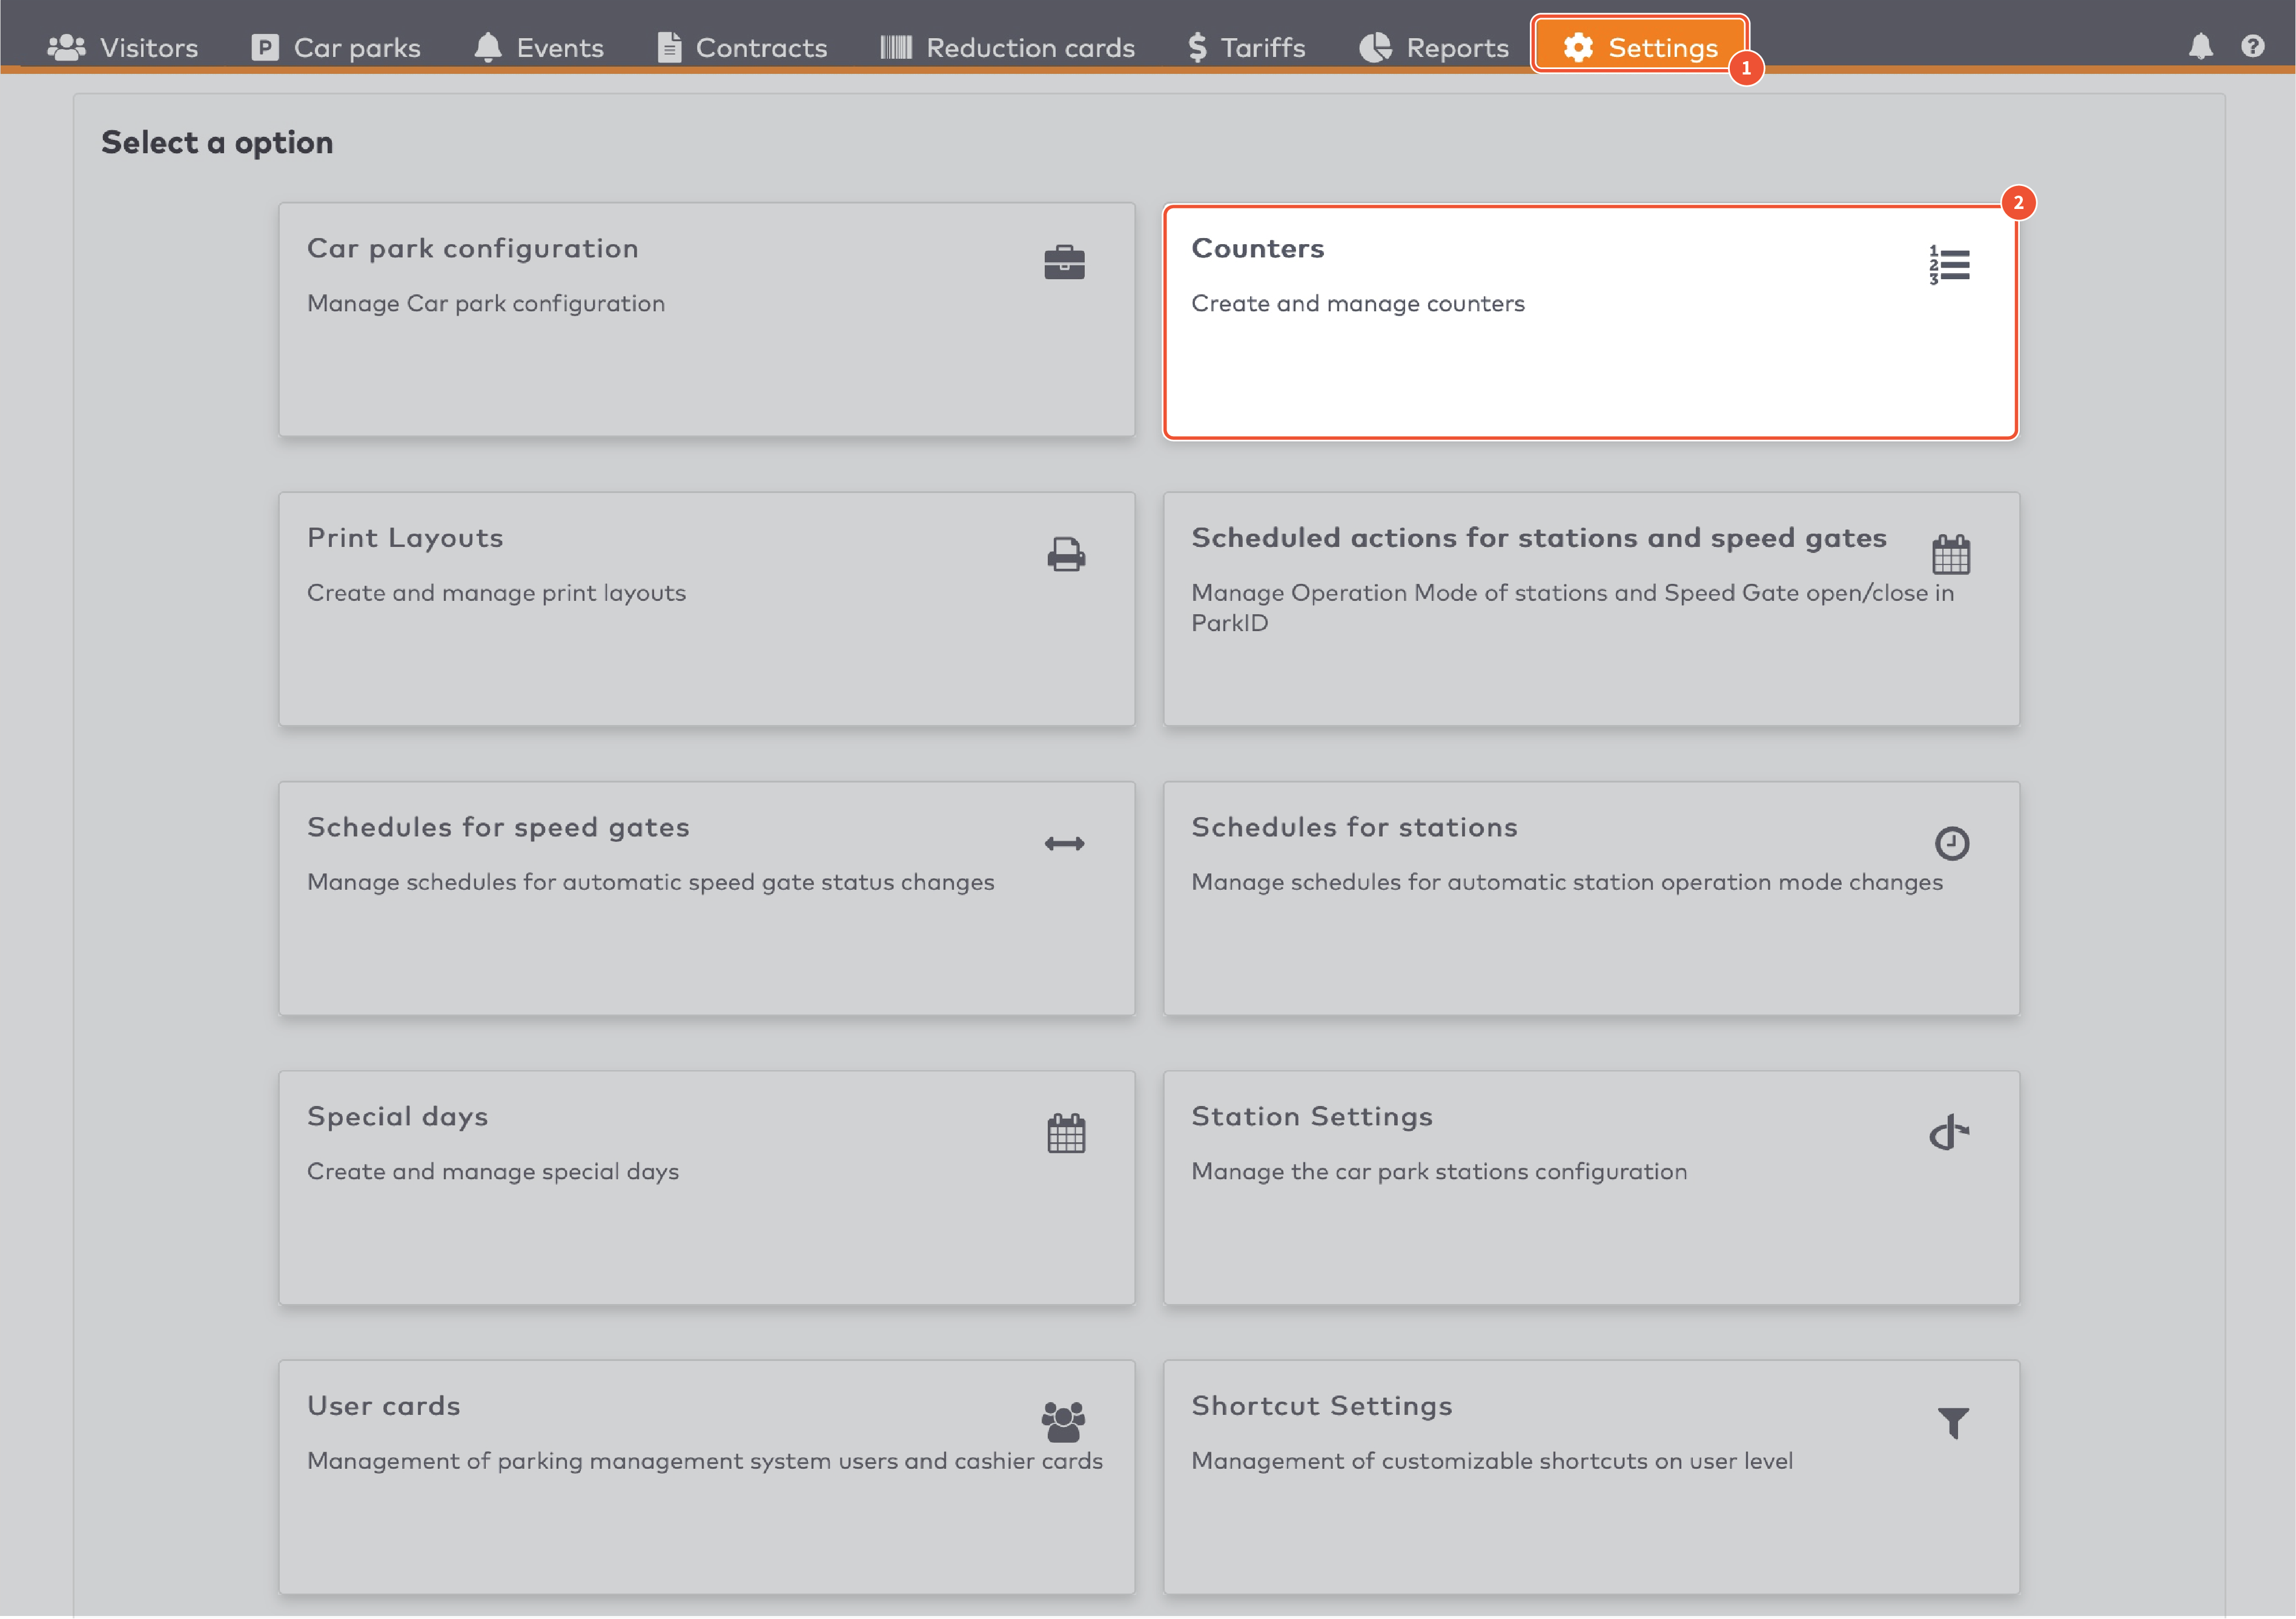
|
Click Counters.
Select a Car Park.
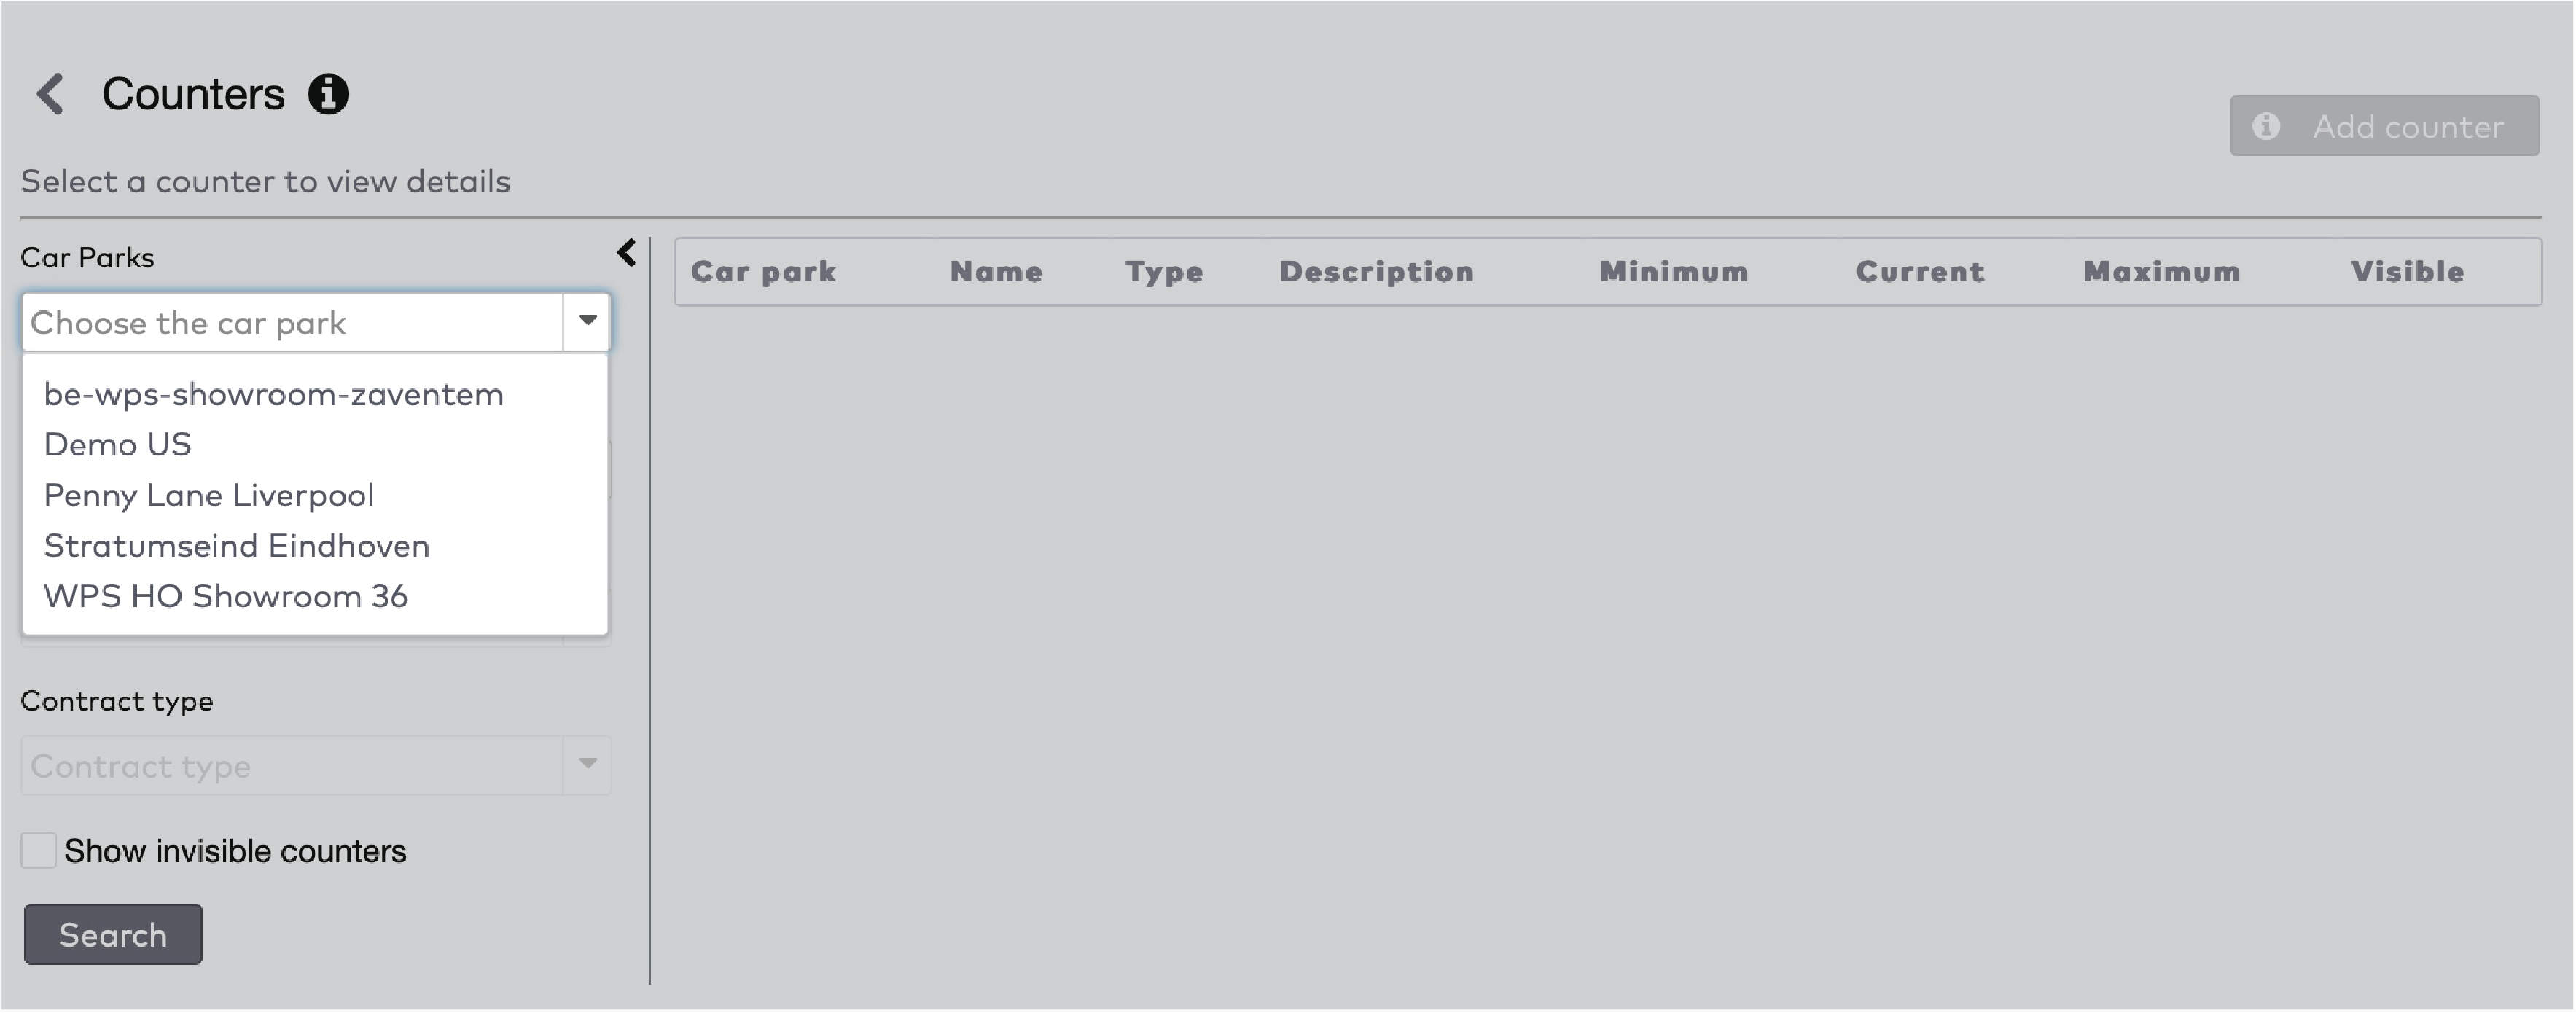
|
Click Add counter.
Enter a Name for your counter.
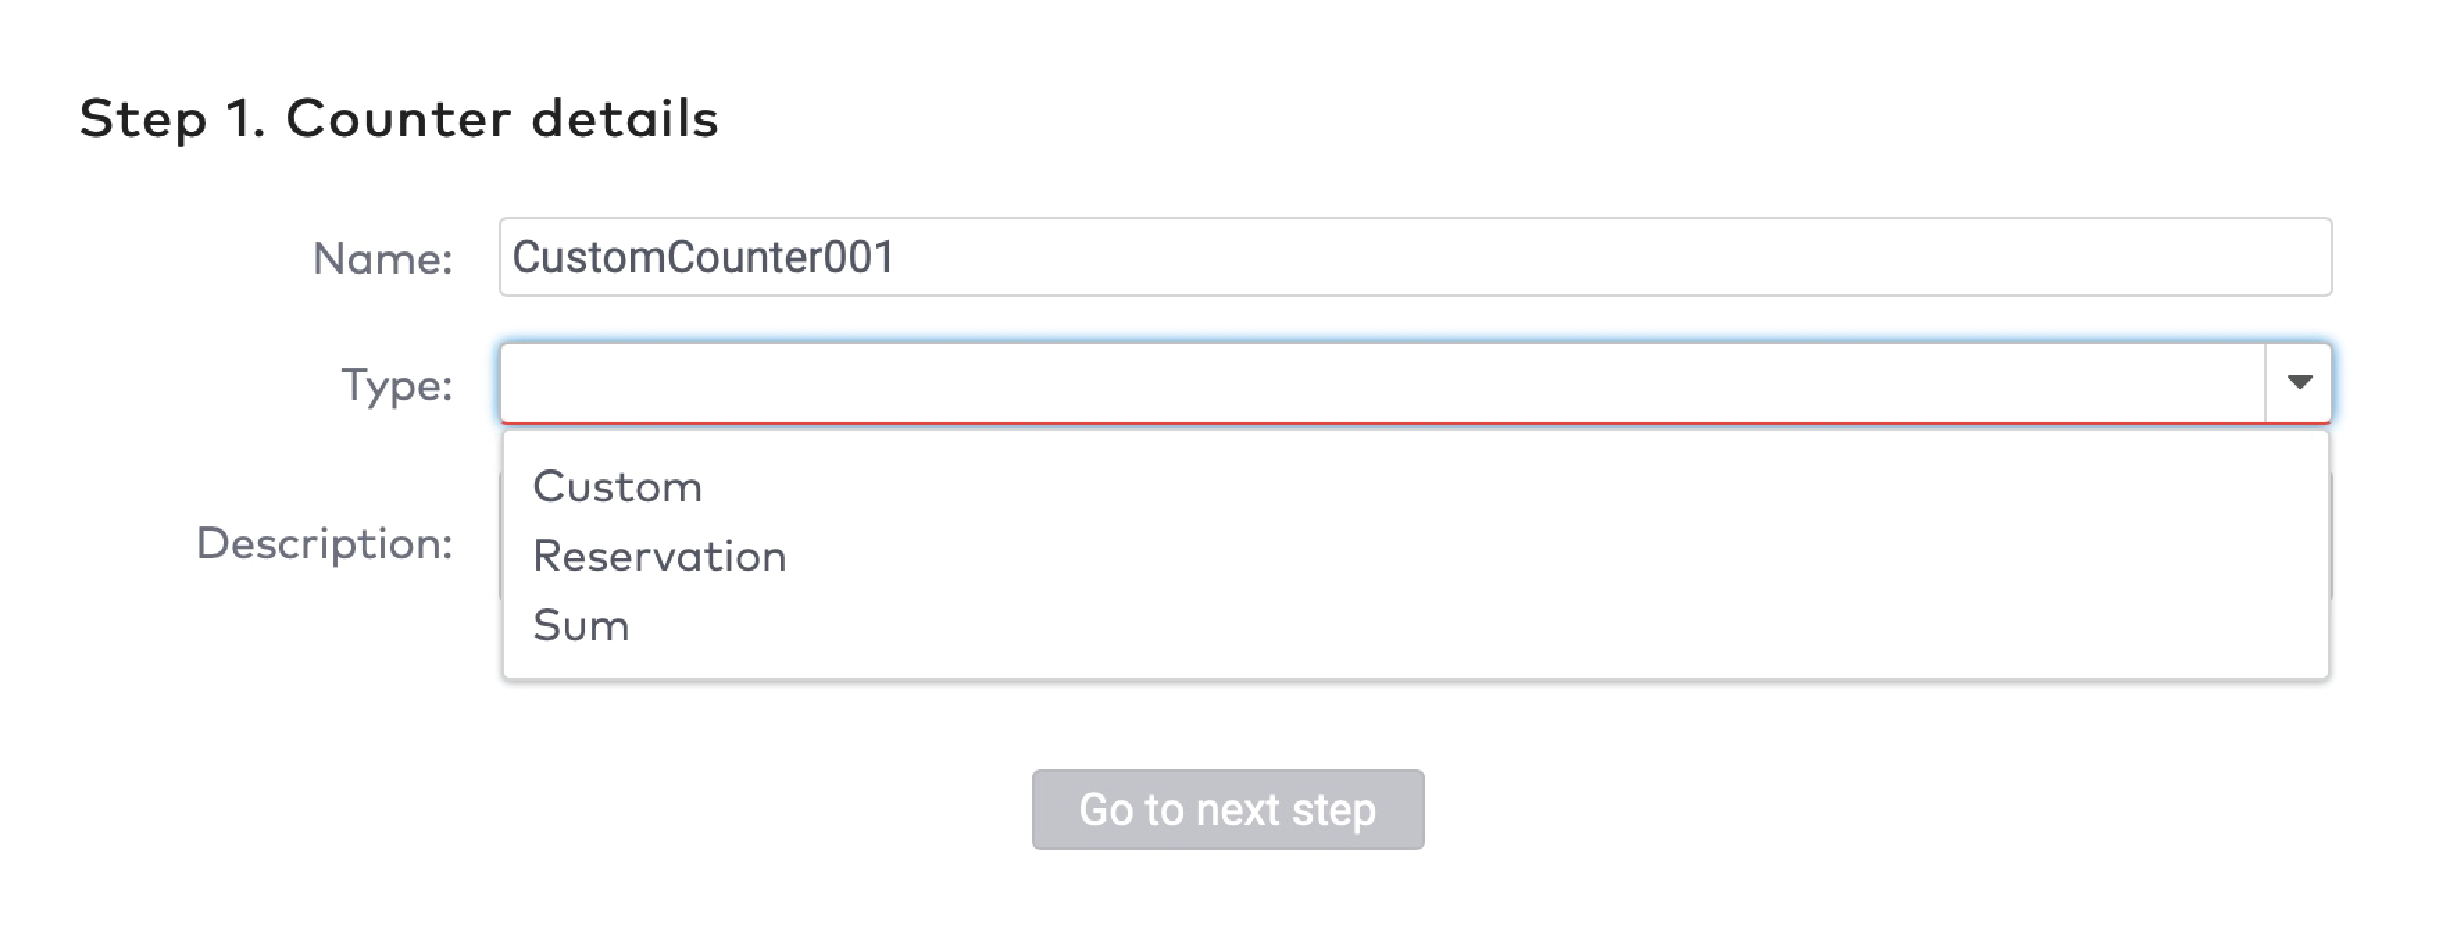
|
Select a Type.
A custom counter counts visitors with contract types that are explicitly configured to be counted by this counter. After you have created the custom counter, you can configure this in Contract types.
A reservation counter counts visitors with a reservation.
A sum counter can add or subtract the amounts of other counters. For example, in a hotel car park, a sum counter can sum up the employee counter and the visitor counter.
Optionally, enter a description for your counter.
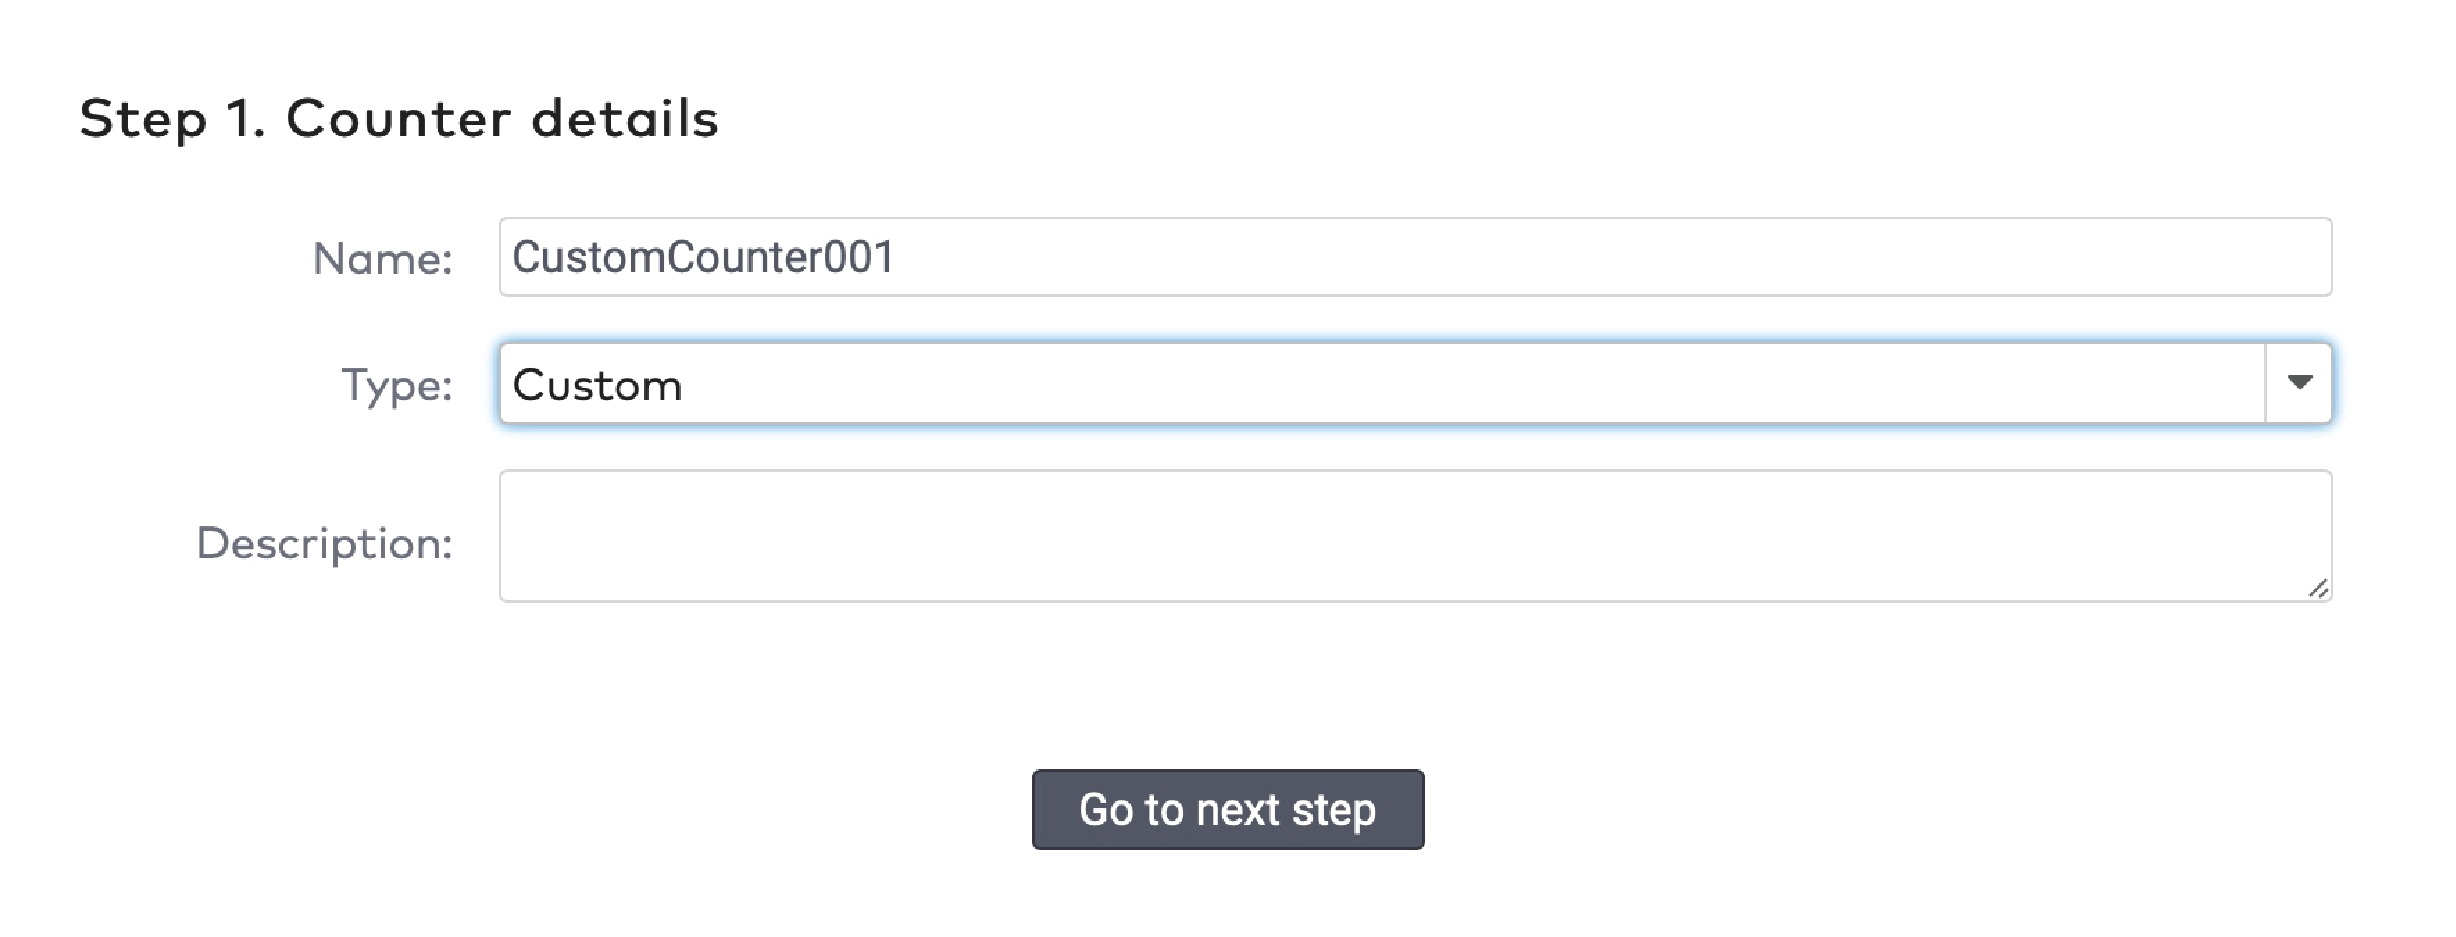
|
Click Go to next step.
Enter the Minimum and Maximum value for this counter.
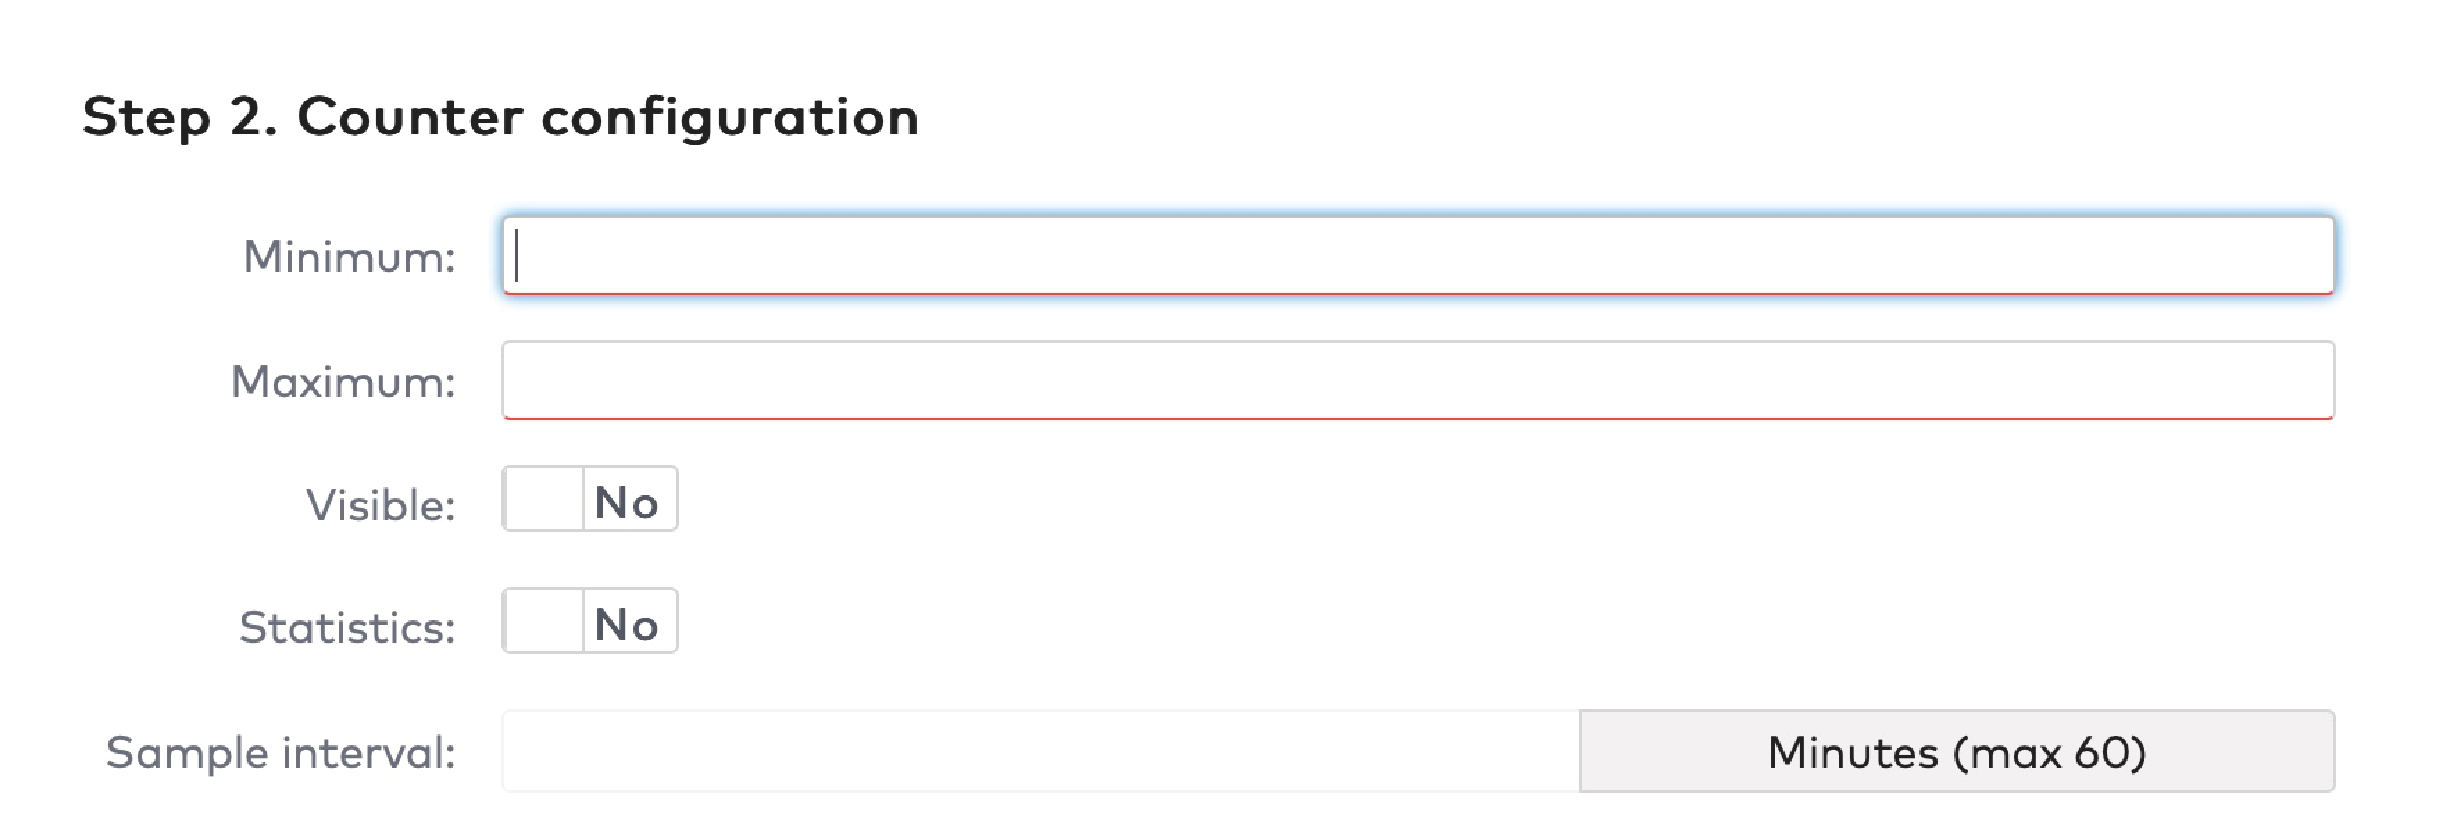
|
Set Visible to Yes to display the counter in the car park overview.
Set Statistics to Yes to use this counter in the statistics reports of the car park.
Set the Sample interval for statistics reporting. Typically, this is 15 minutes.
If you are configuring a custom counter, you can select a station.
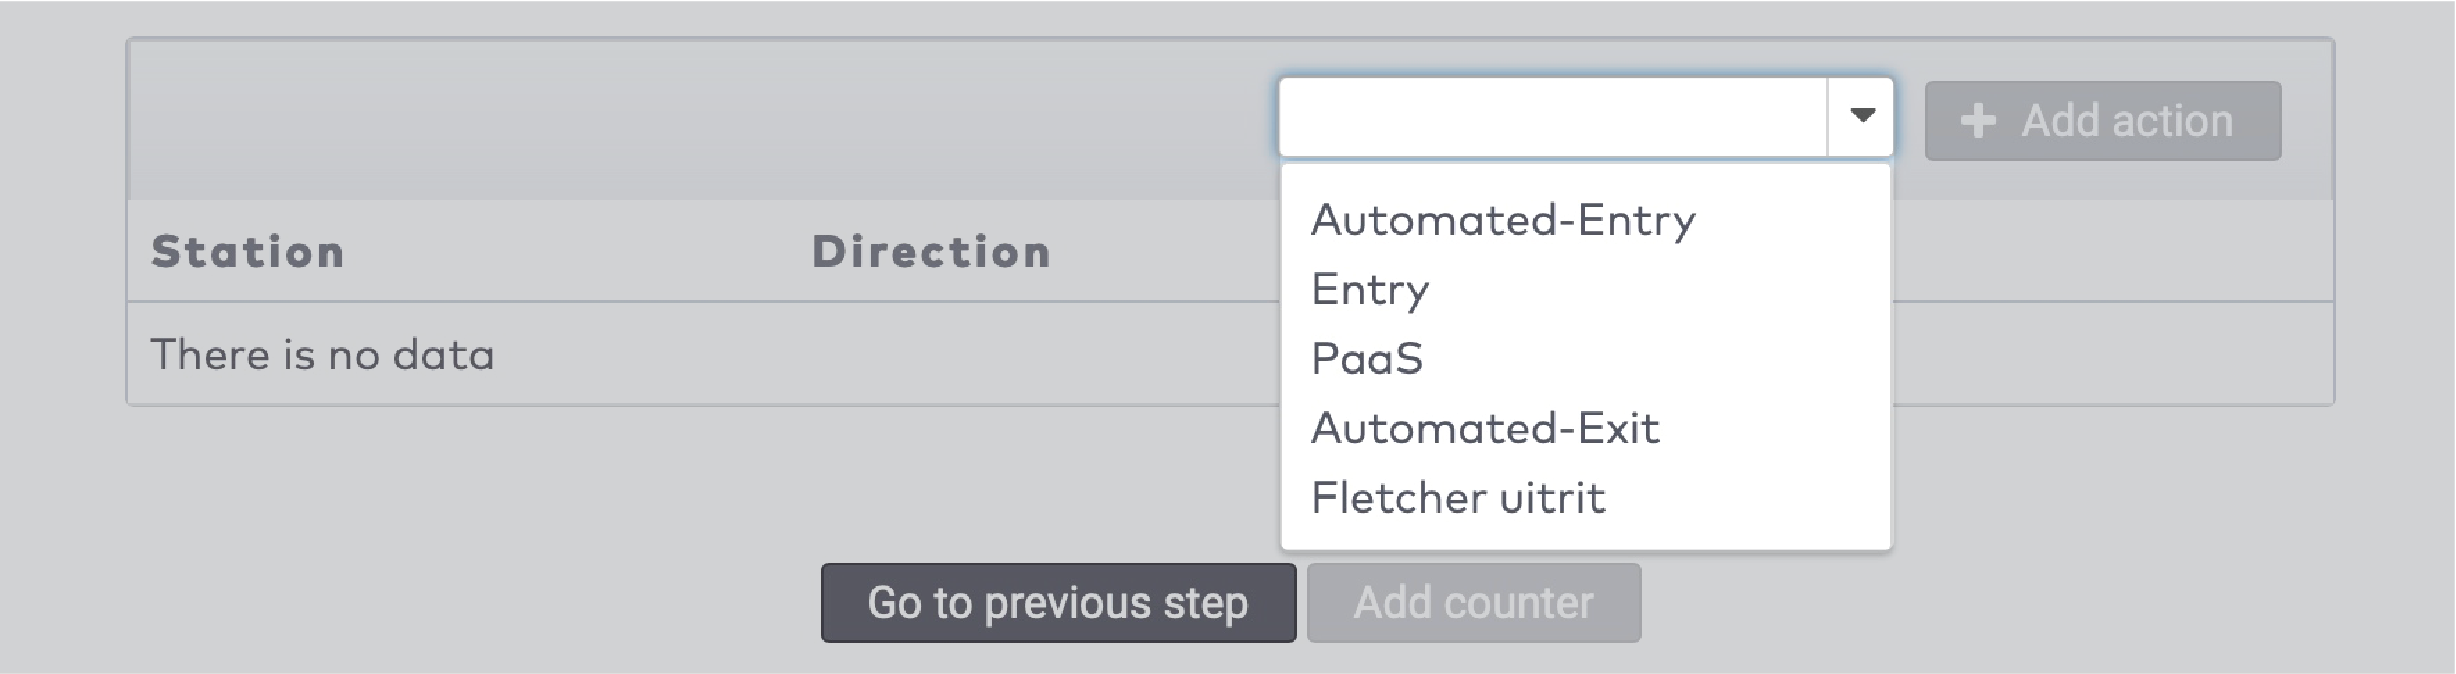
|
Click Add action.
Select a Direction for the counter. Use Decrease for exit stations, and Increase for entry stations.
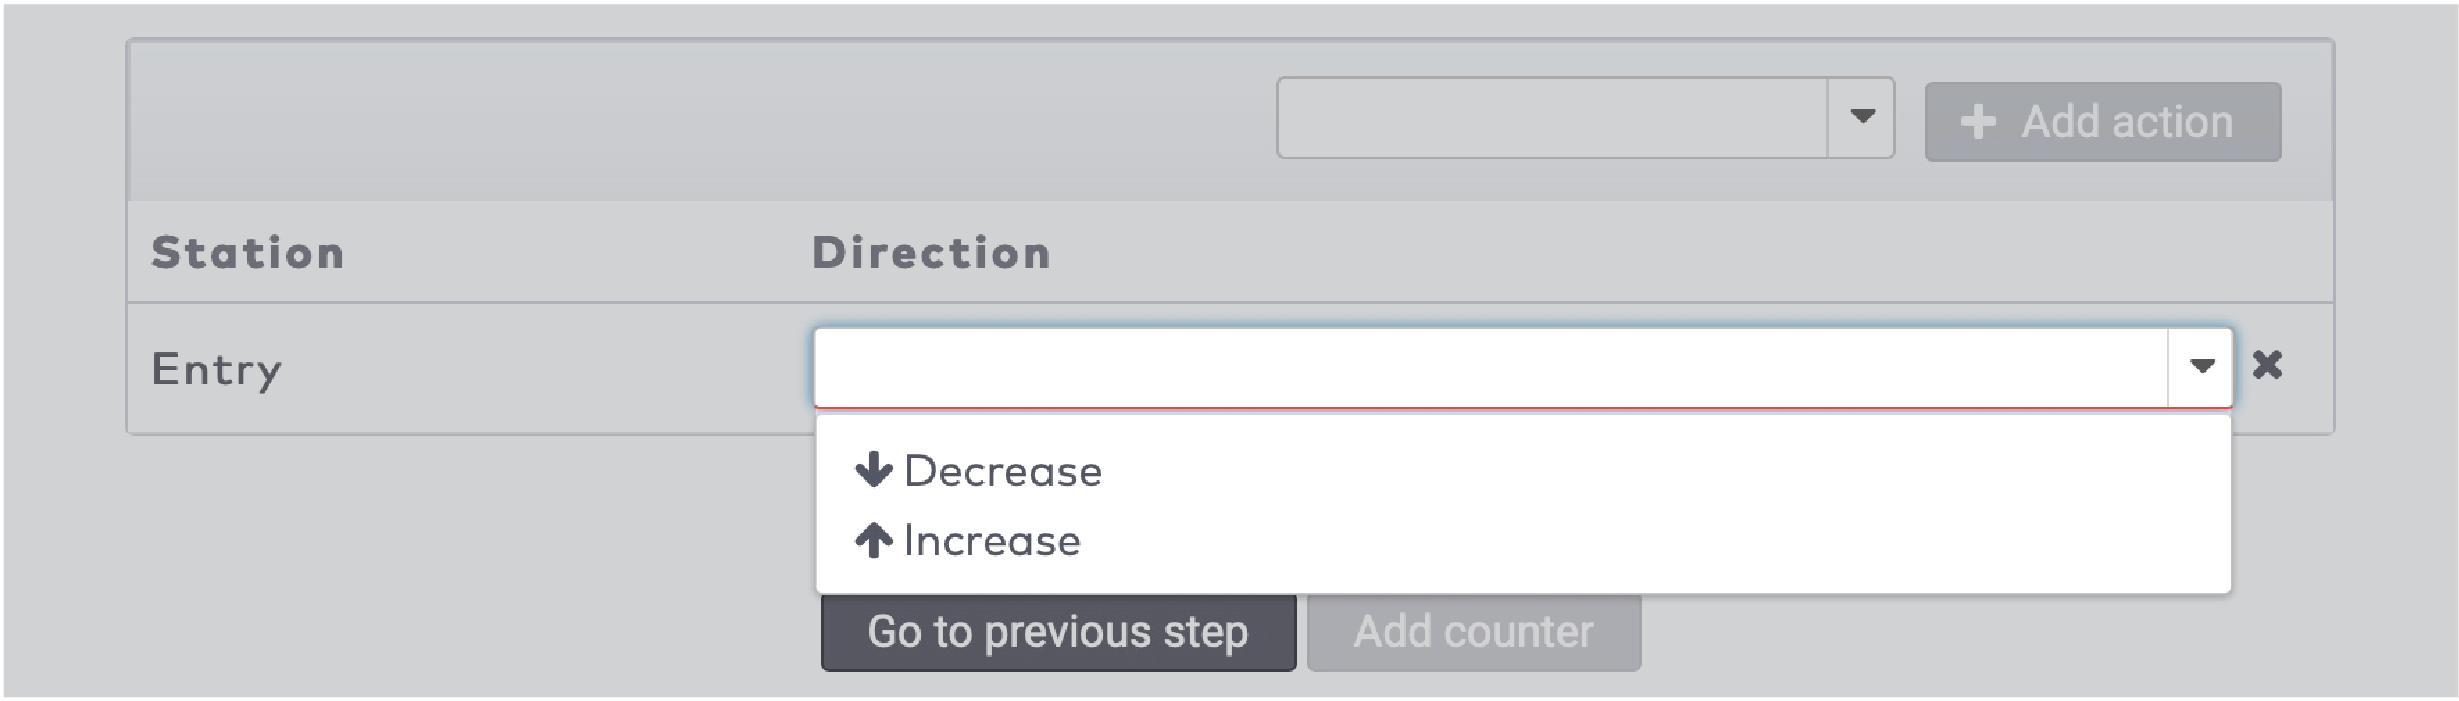
|
If you are configuring a Sum counter, enter the Formula. You can use + and – signs to add and subtract counters. For example: Counter1+Counter2–Counter3.

|
Click Add counter.
To edit a counter:
Select a car park and click search to display a list of counters.

|
Click the counter you want to edit.
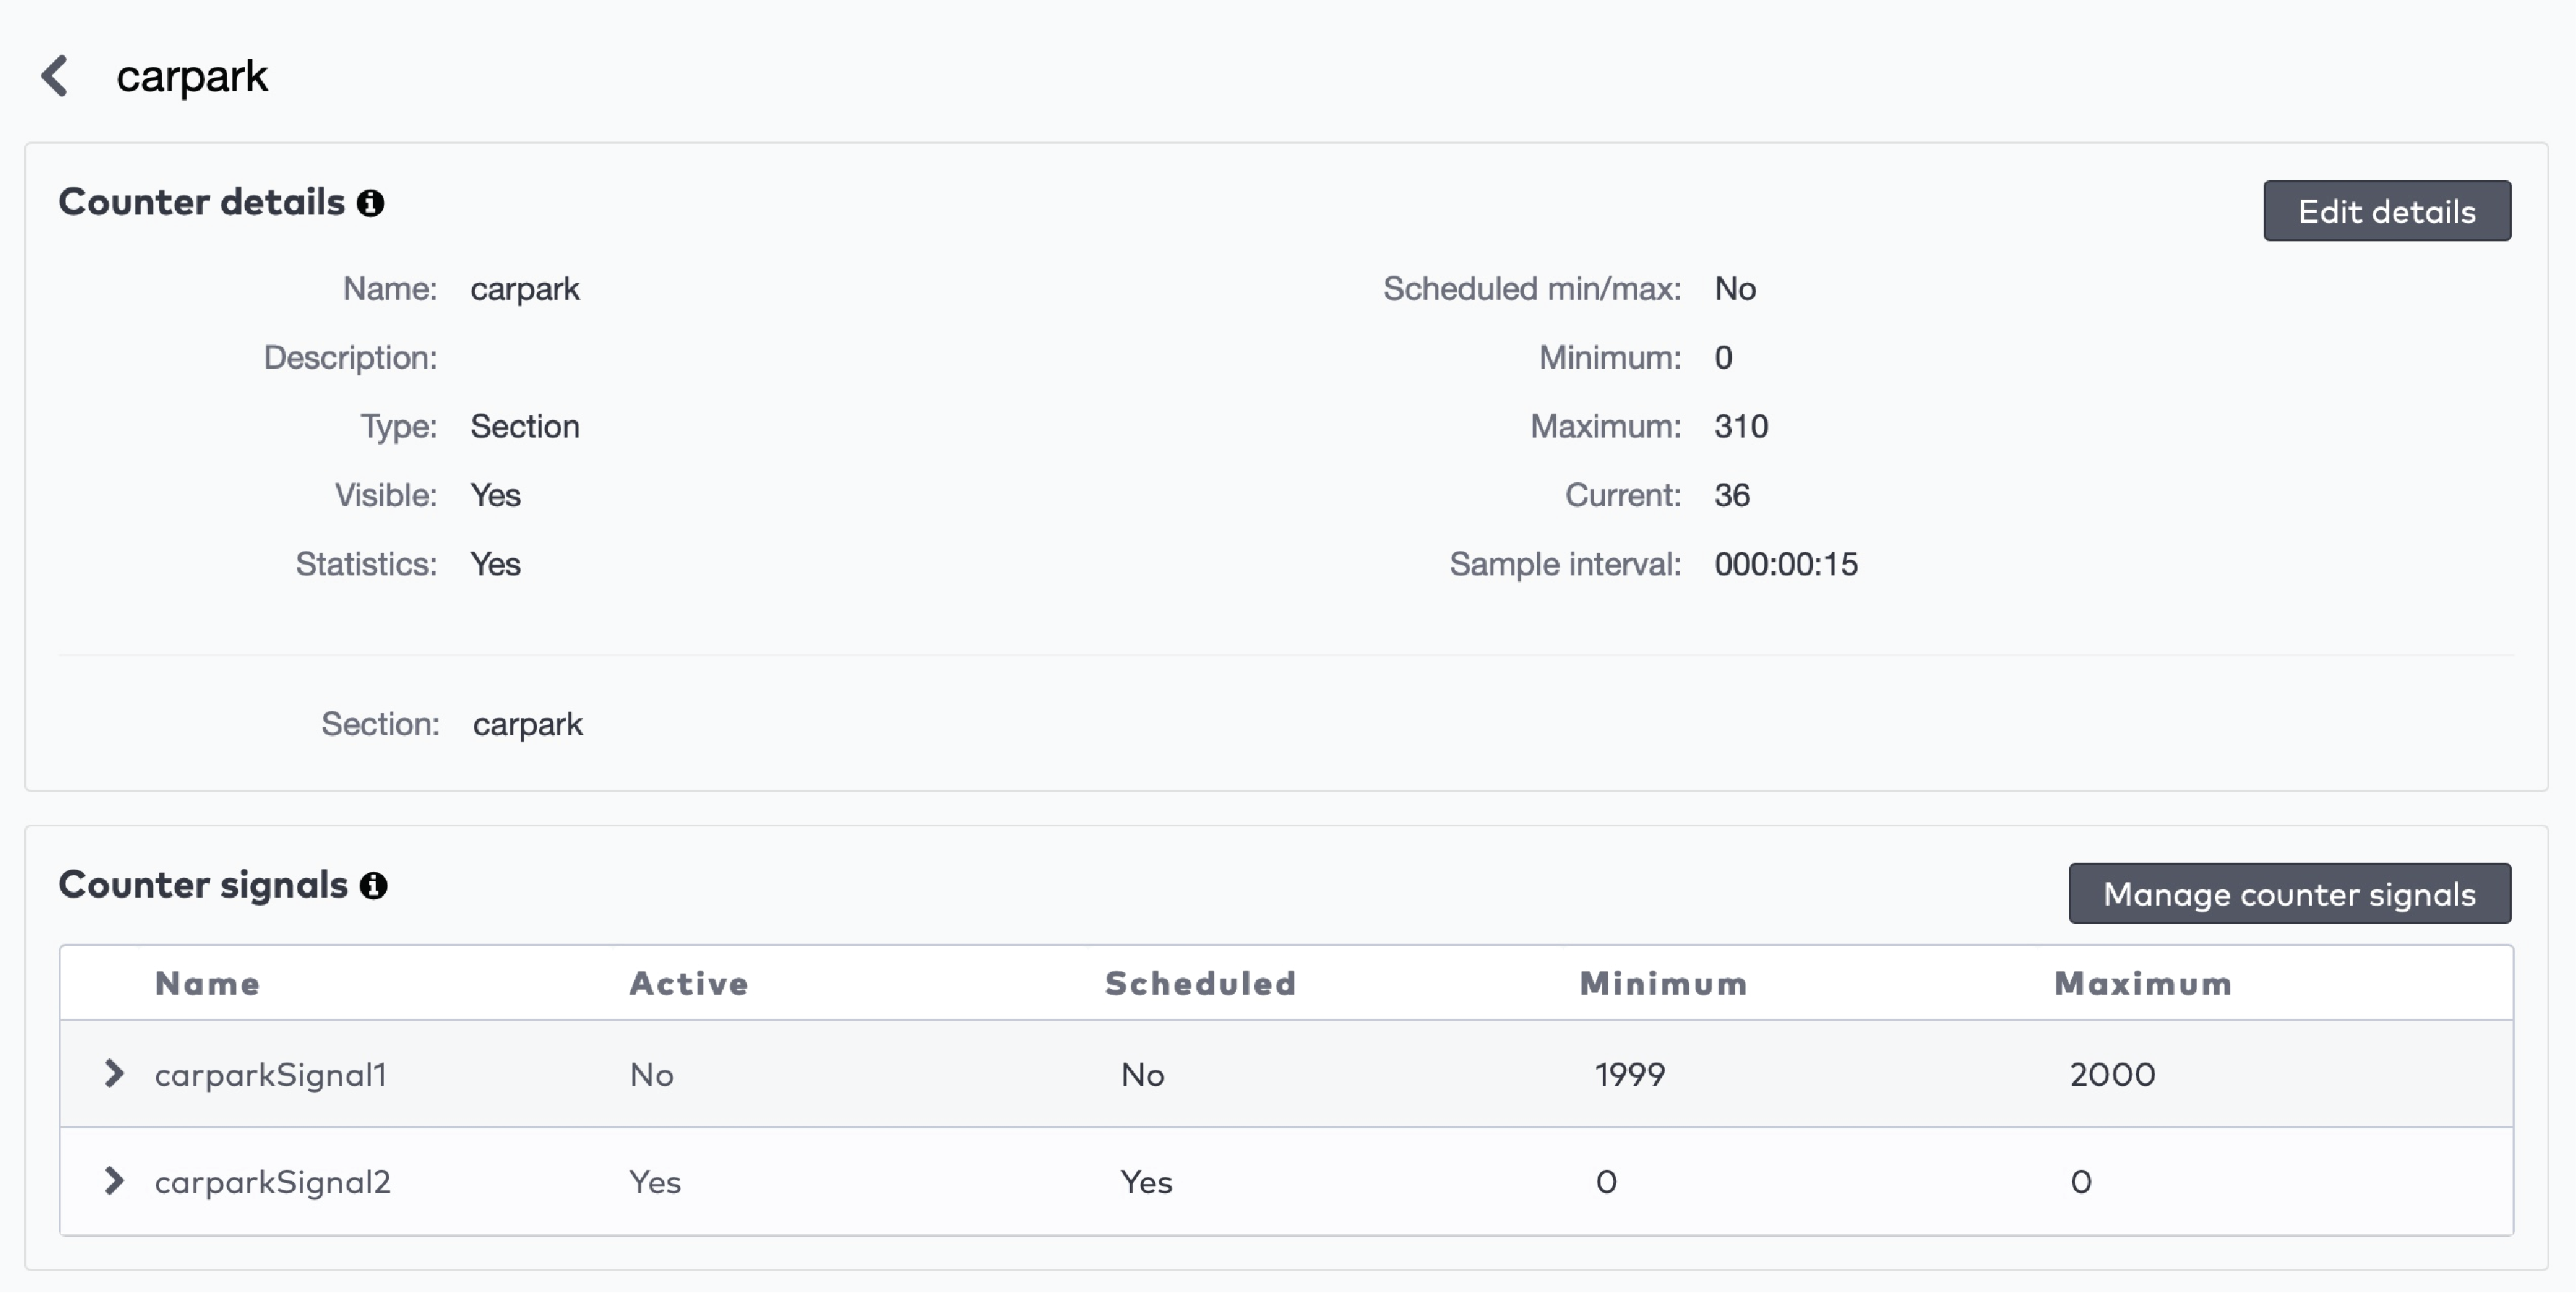
|
Click Edit details.
Make any changes and click Save.
Configuring signals and actions
To configure signals and actions:
Select the counter.
Click Manage counter signals.

|
Click Add signal to add a signal.
Enter a Minimum and a Maximum value for your signal.

|
Click next to the signal.

|
Fill out the details for the available action.
Click Save.
The signal is added to the counter.
Print layouts
Print layouts are used to print tickets, such as visitor cards, exit cards and reduction cards on a desktop printer. These layouts are not used to print tickets at stations. Depending on paper size and orientation, multiple tickets can be printed on one sheet of paper.
You can edit print layouts or create a new print layout based on an existing one.
Editing a print layout, creating a new print layout
To edit an existing print layout or create a new one:
Click Settings in the menu bar.
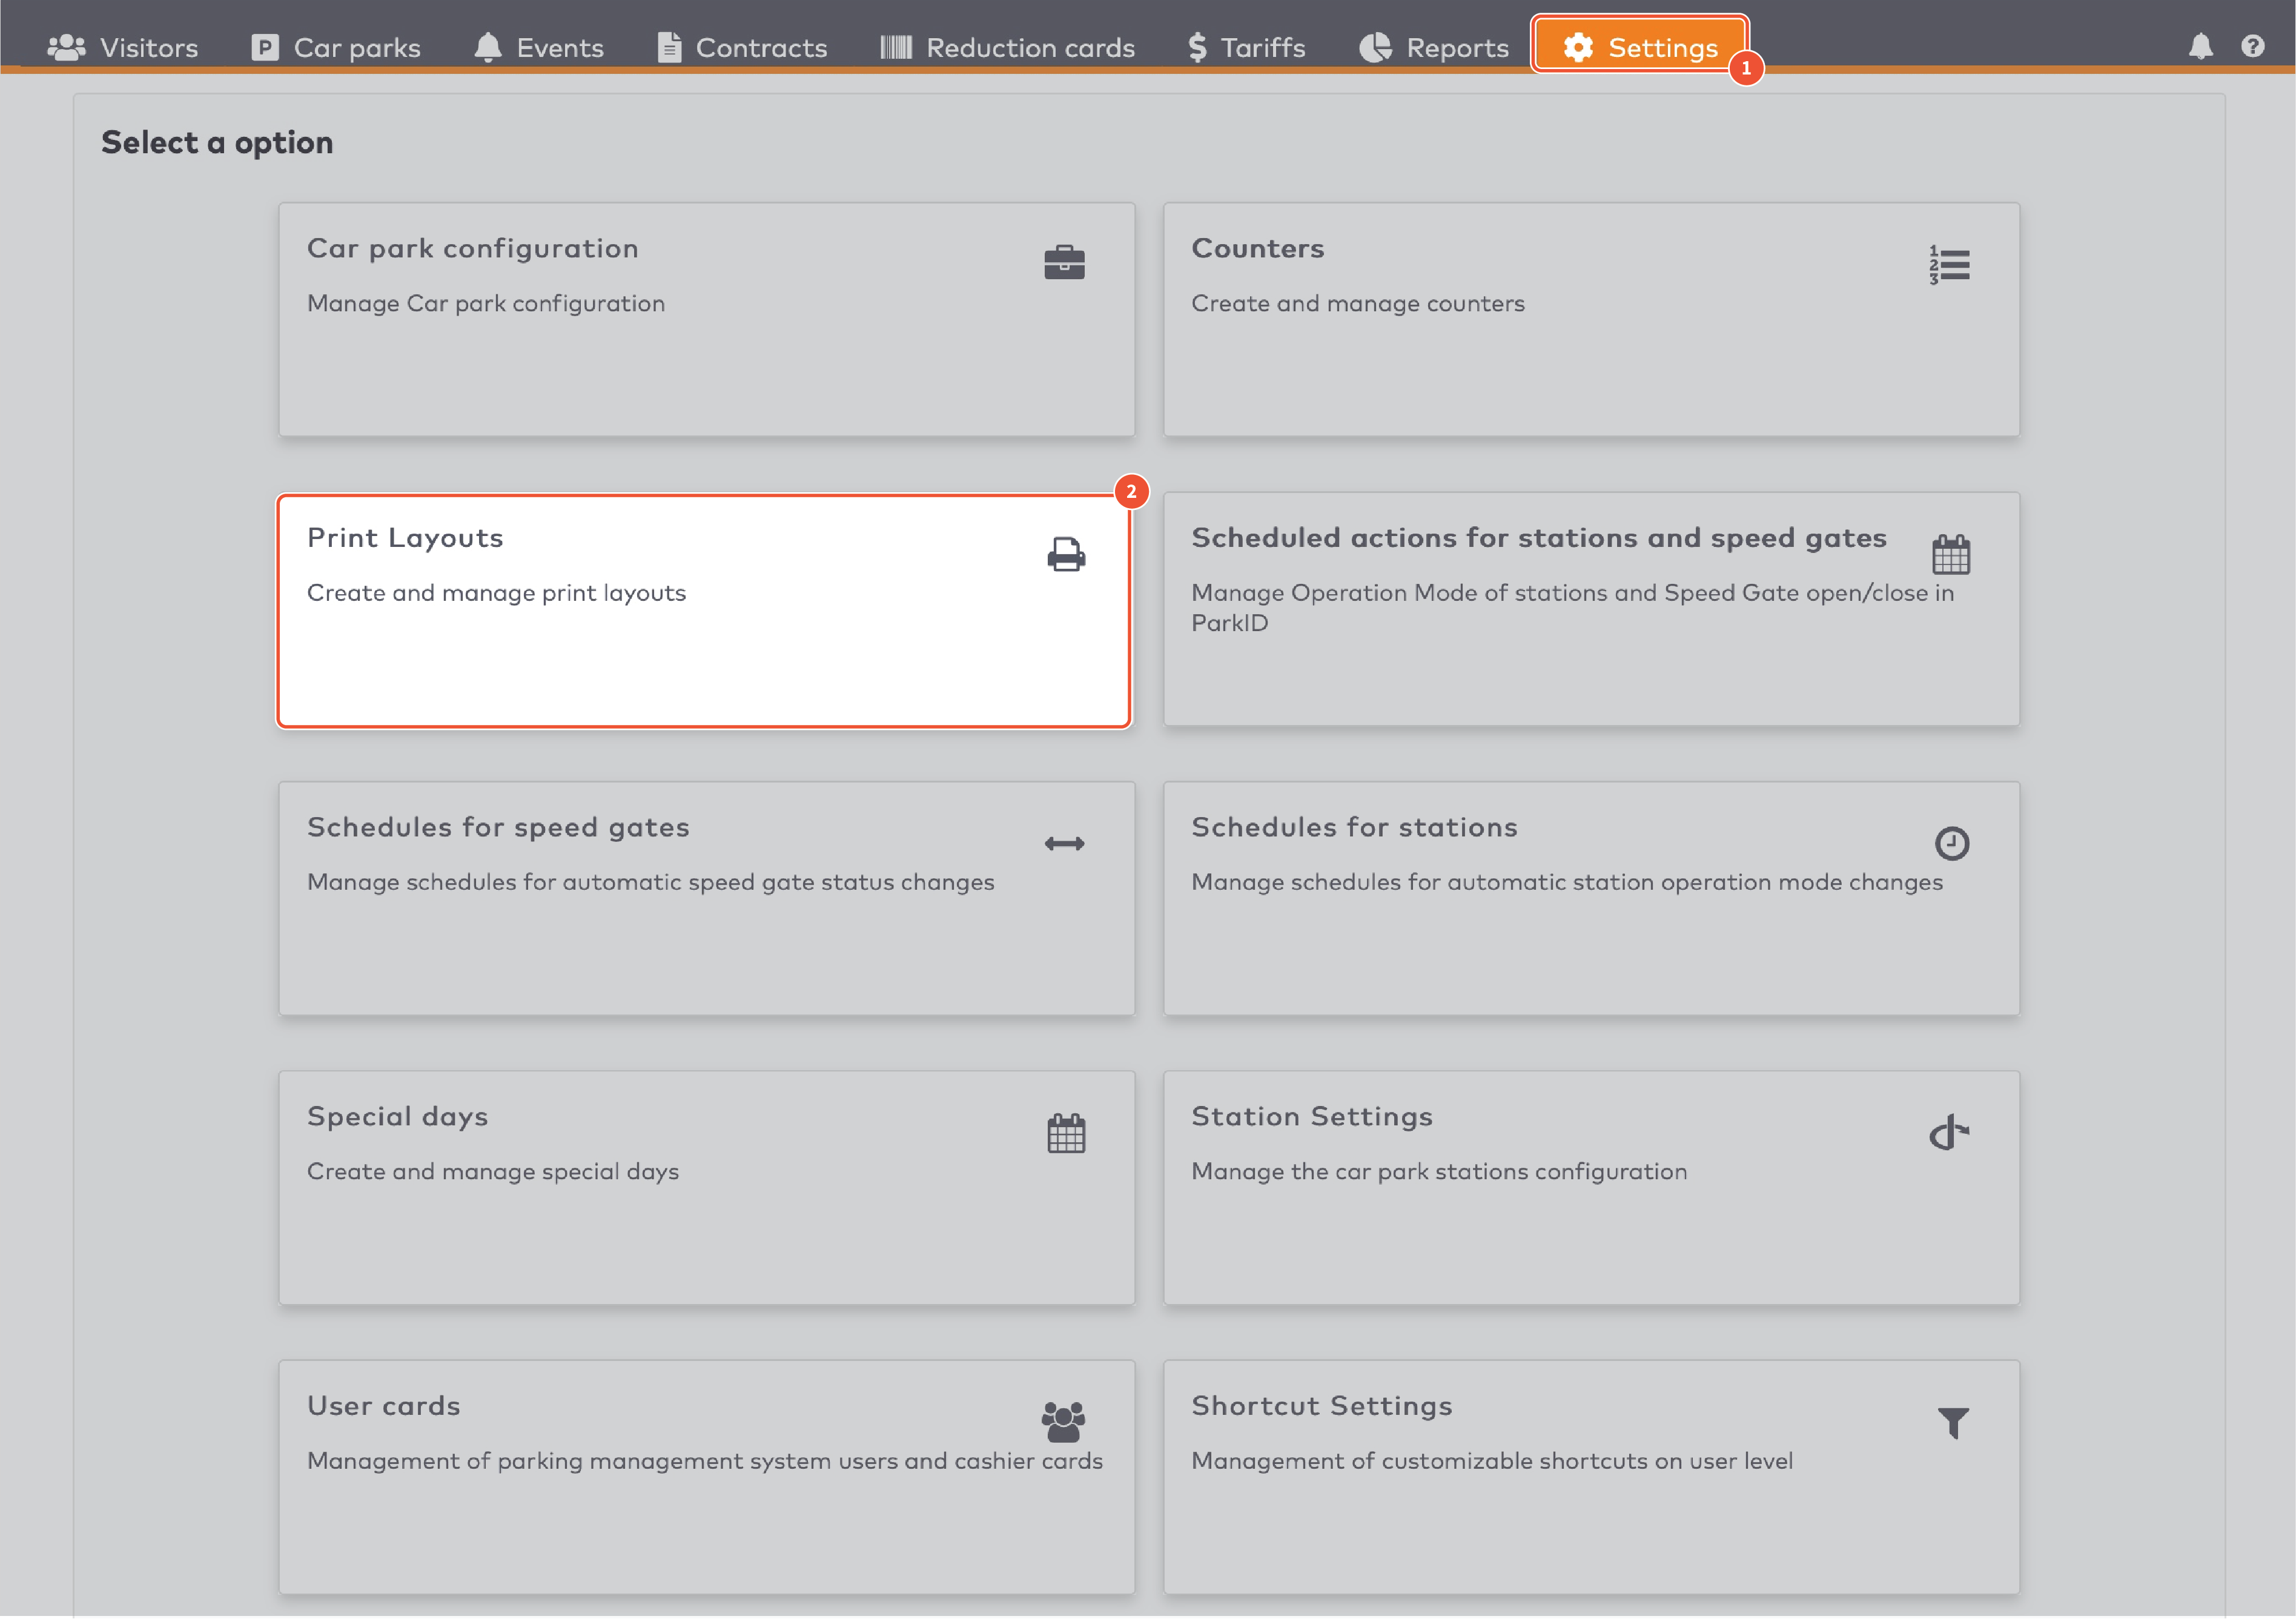
|
Click Print Layouts.
To edit a print layout, select a layout from the list or use the Car Parks search bar to display a list of layouts belonging to one car park.
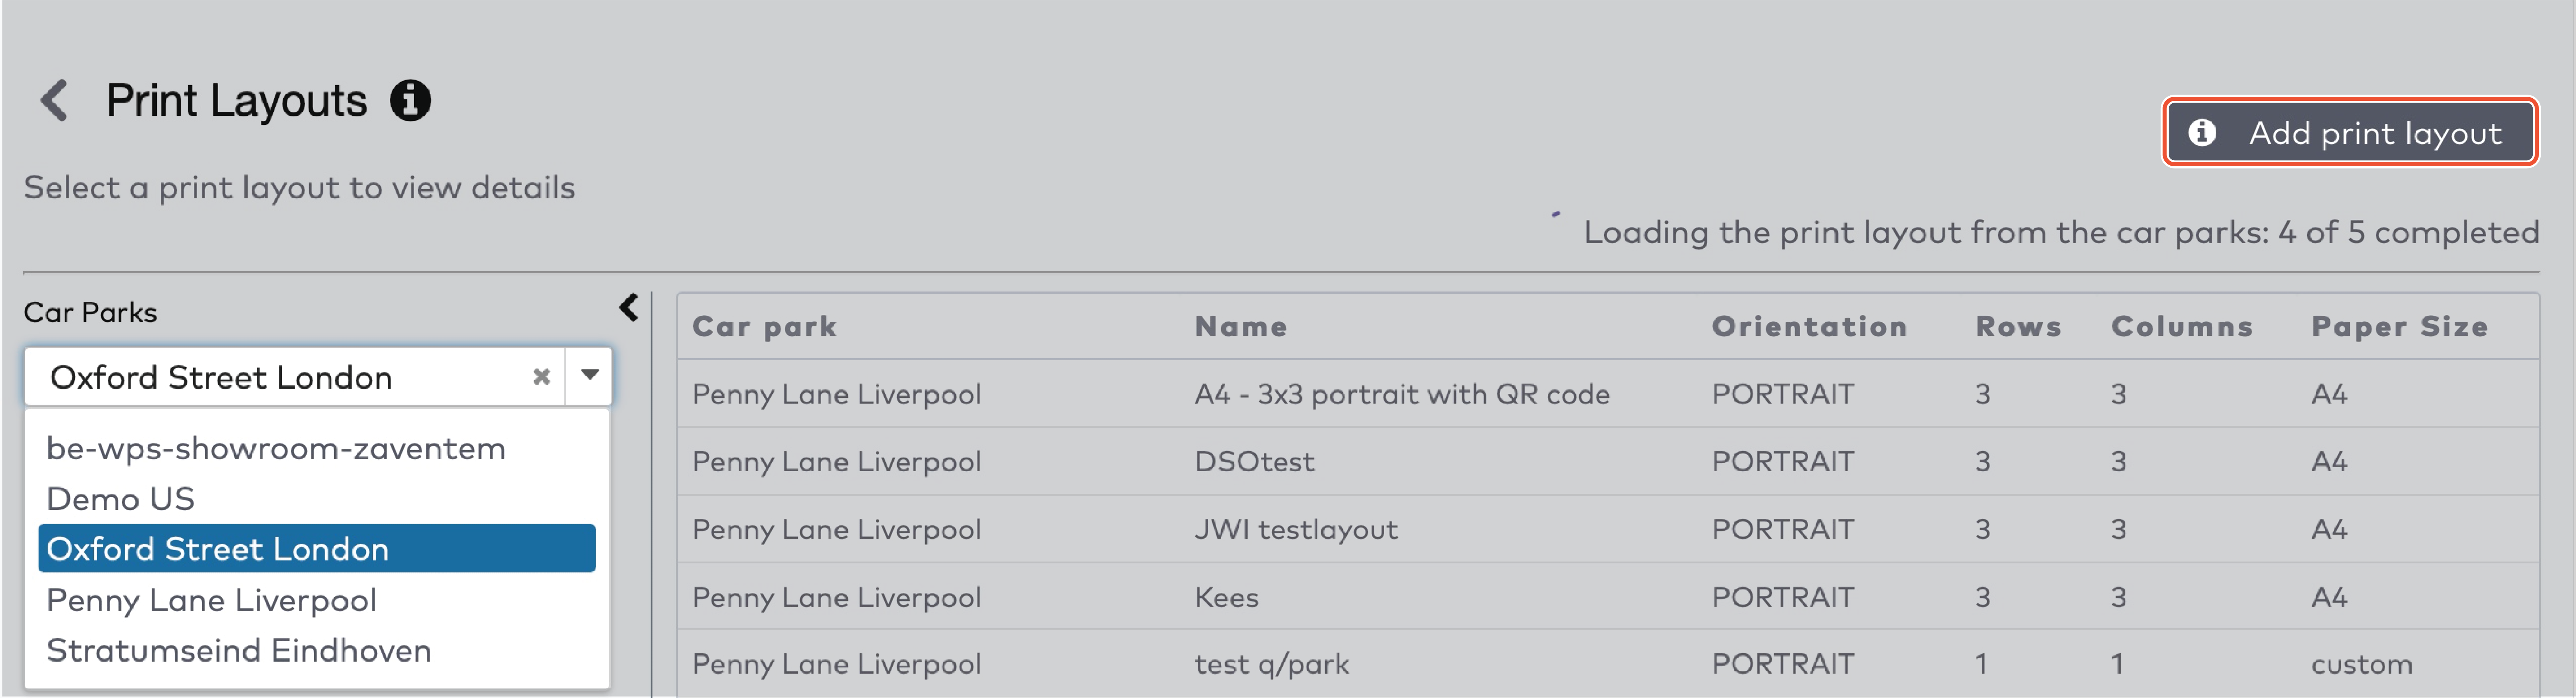
|
To create a new print layout, select a Car Park from the search bar and click Add print layout.
Select the print layout you want to use as a template in the Copy from dropdown menu, enter a name for the new layout and click Add print layout.
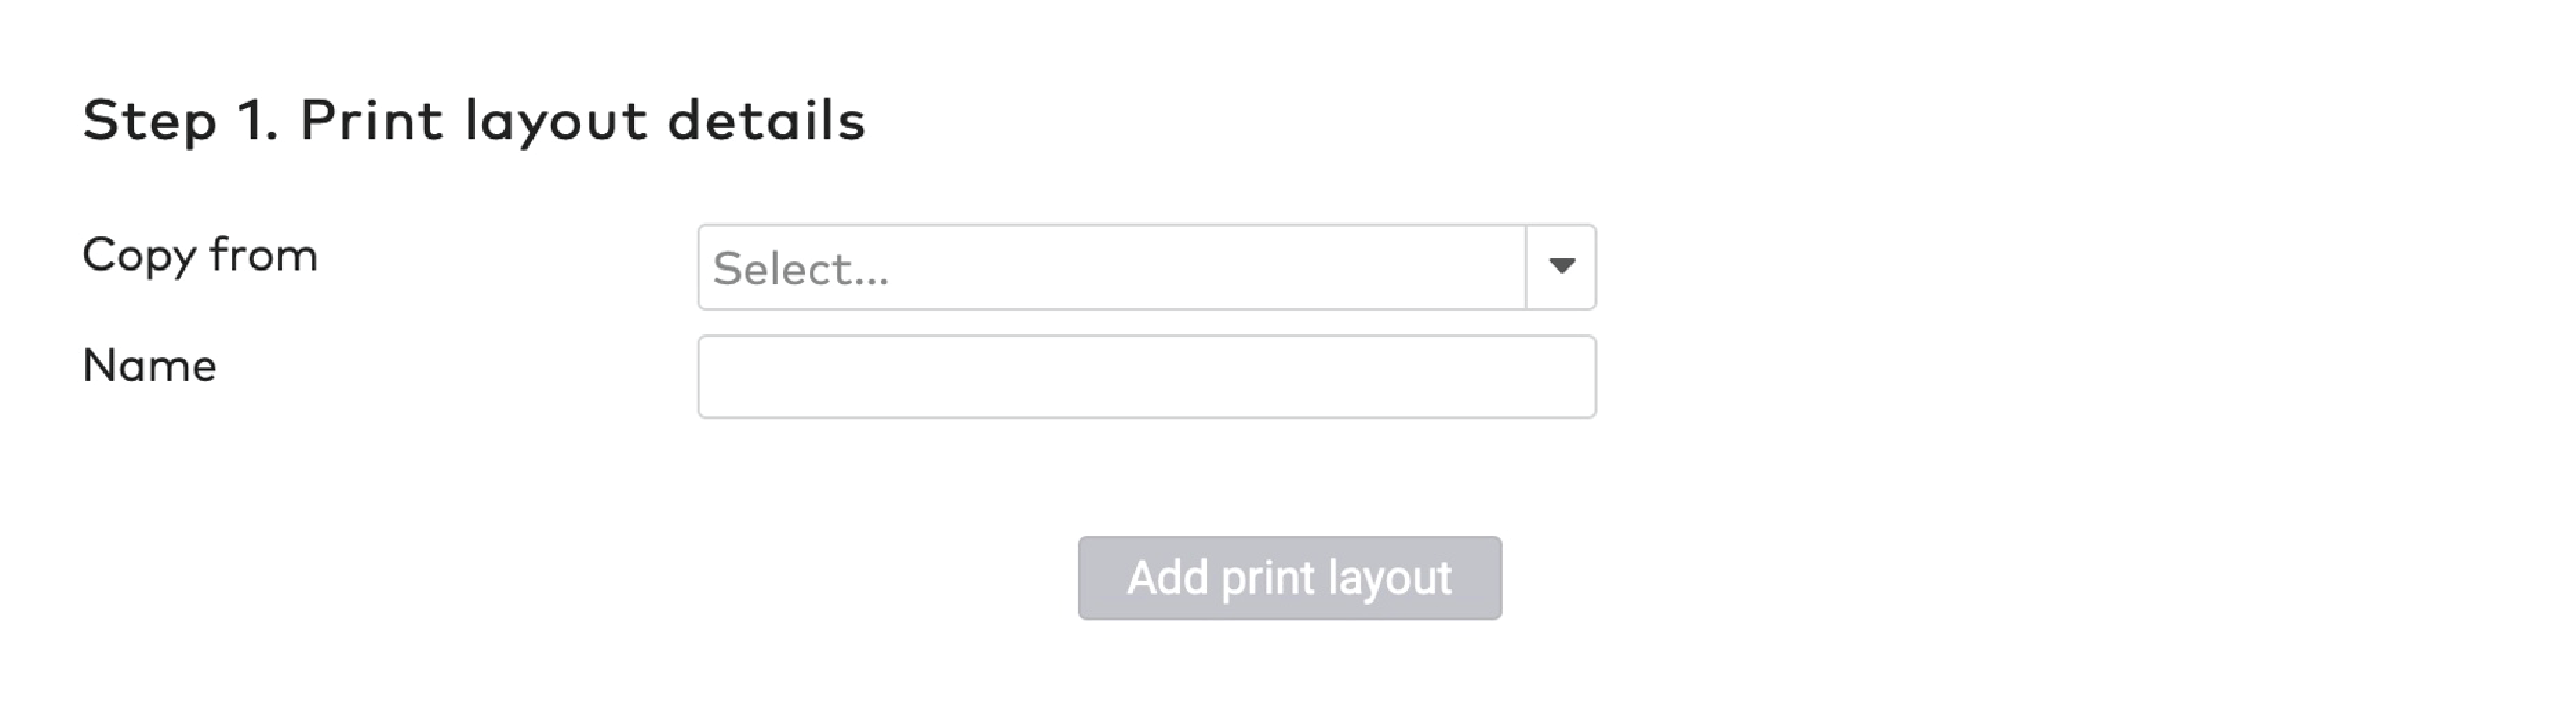
|
You can now edit the print layout.
The Print layout details determine the size of the individual cards, the margins and the number of columns and rows. Do not change these unless you are switching to a different type of paper.
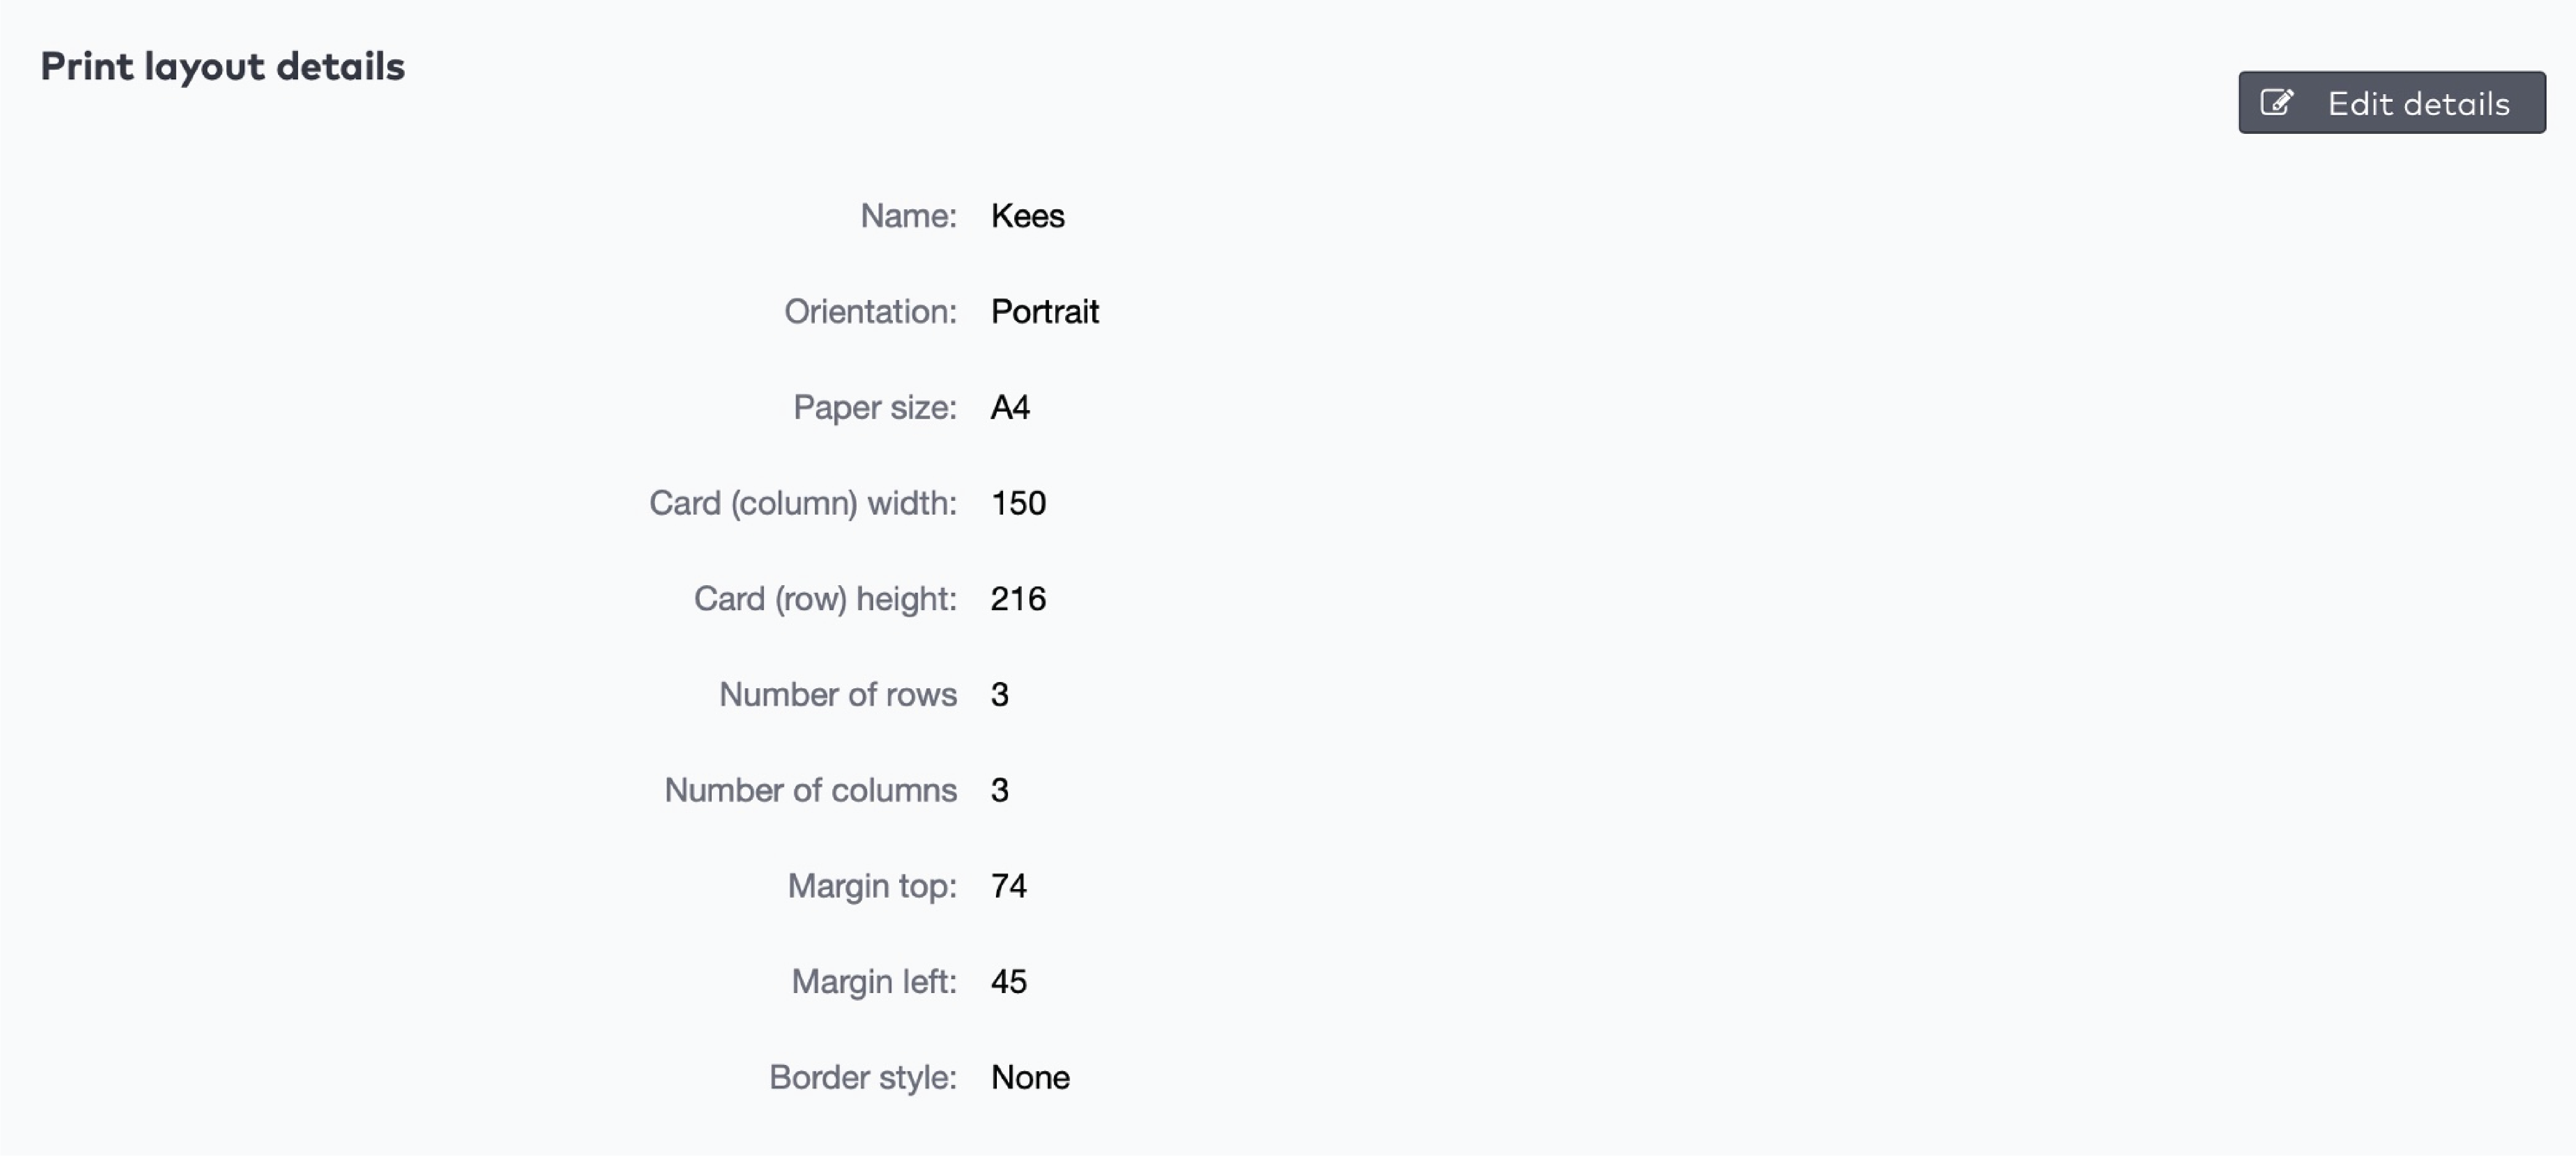
|
In the Ticket Layout section, you can move, edit, delete or add items to the ticket.
Warning! Whatever changes you make, always make sure the barcode is positioned in the middle of the ticket. Otherwise, the ticket might not be accepted.
Click an item to edit it.
If the item is a barcode:
Check Subtitle to display the barcode in digits.
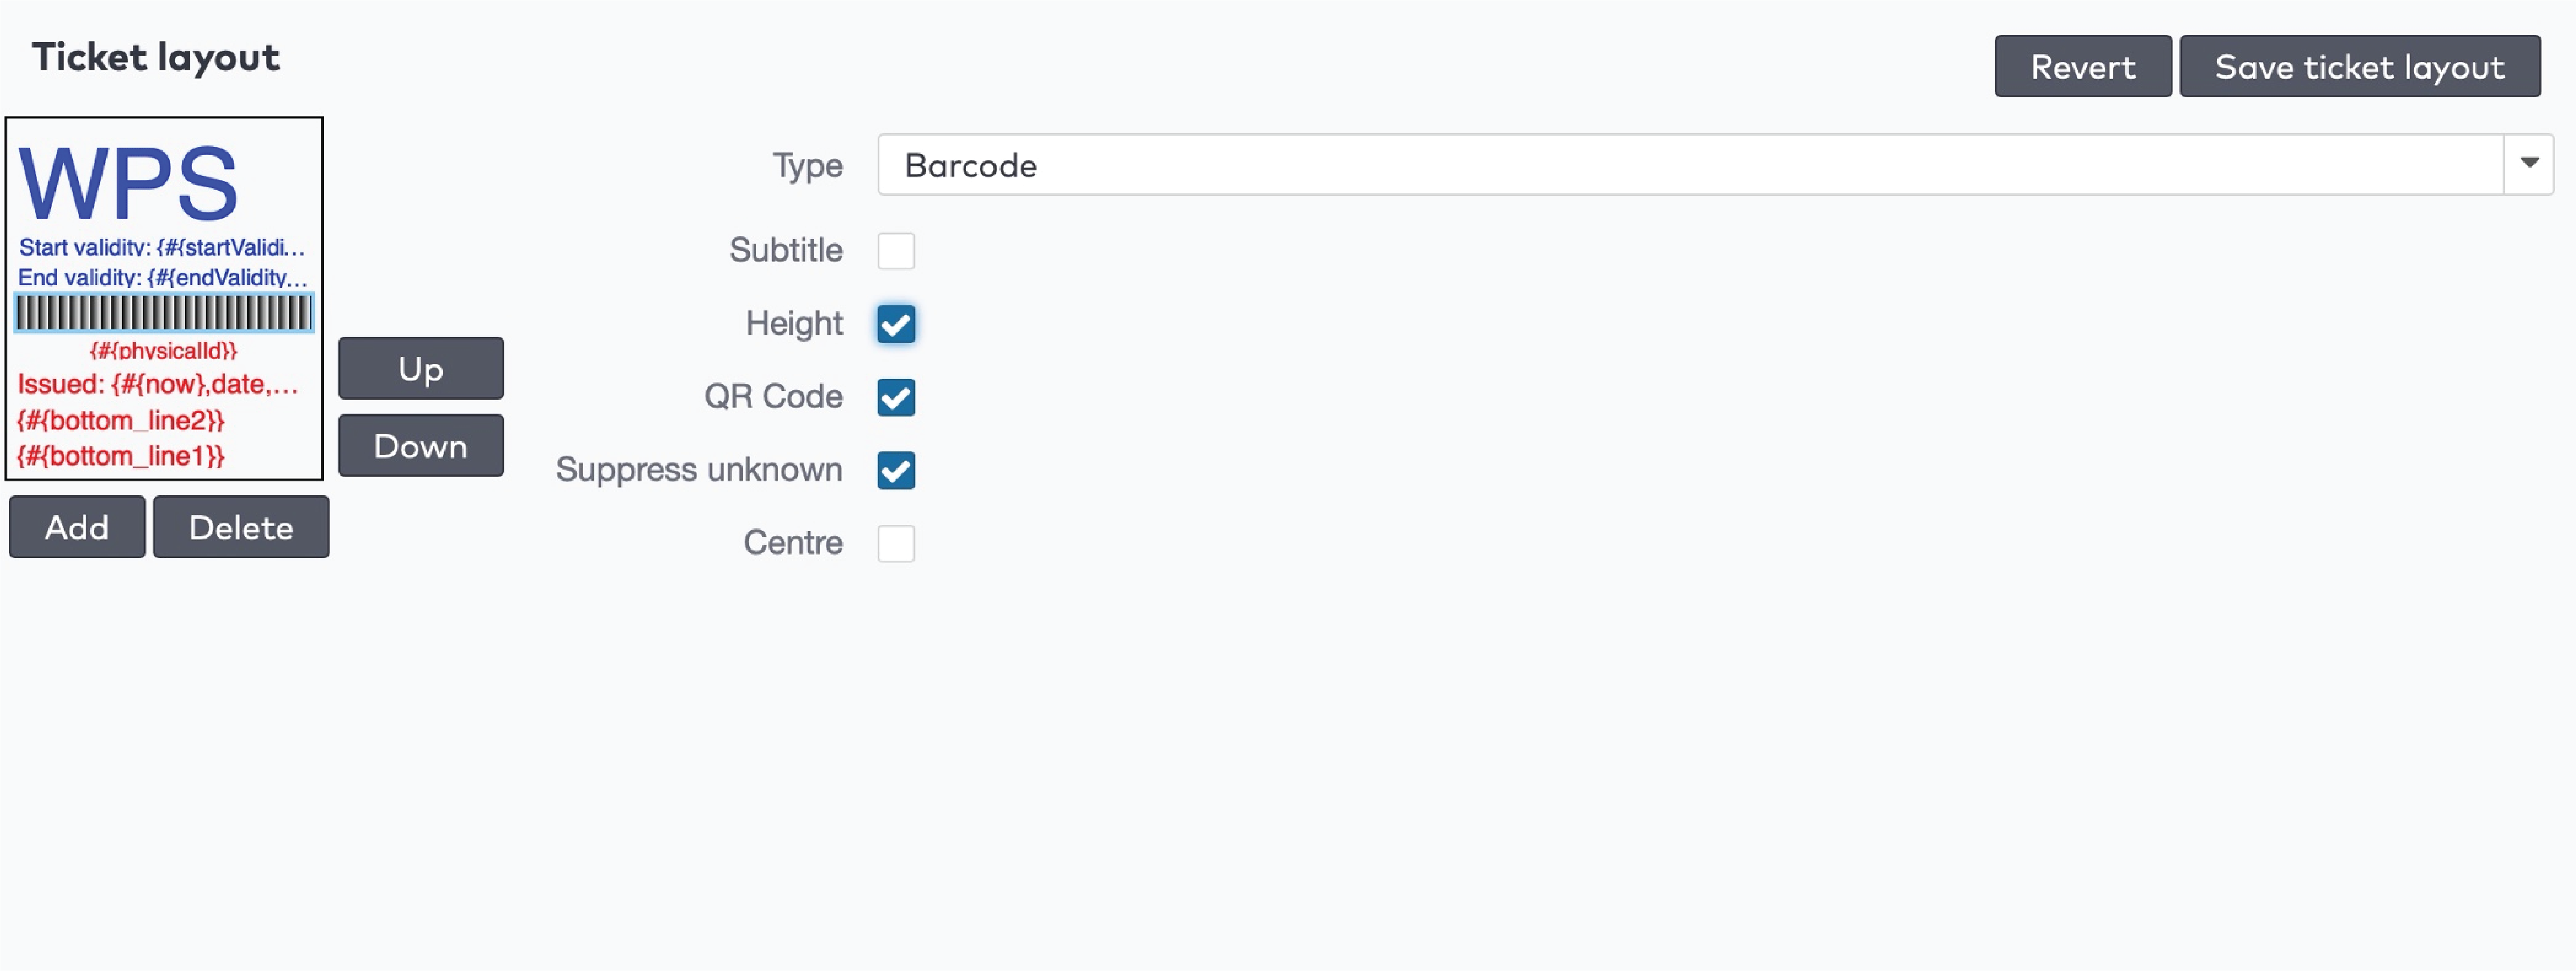
|
Check Height to use a large barcode, uncheck Height to use a small barcode.
Check QR Code to generate a QR Code as well as a barcode.
Check Suppress Unknown so the barcode is not displayed if it is not generated.
Check Centre to horizontally align the barcode in the centre.[PS7] [PS8]
If the item is any other item:
Select a Type in the dropdown menu.
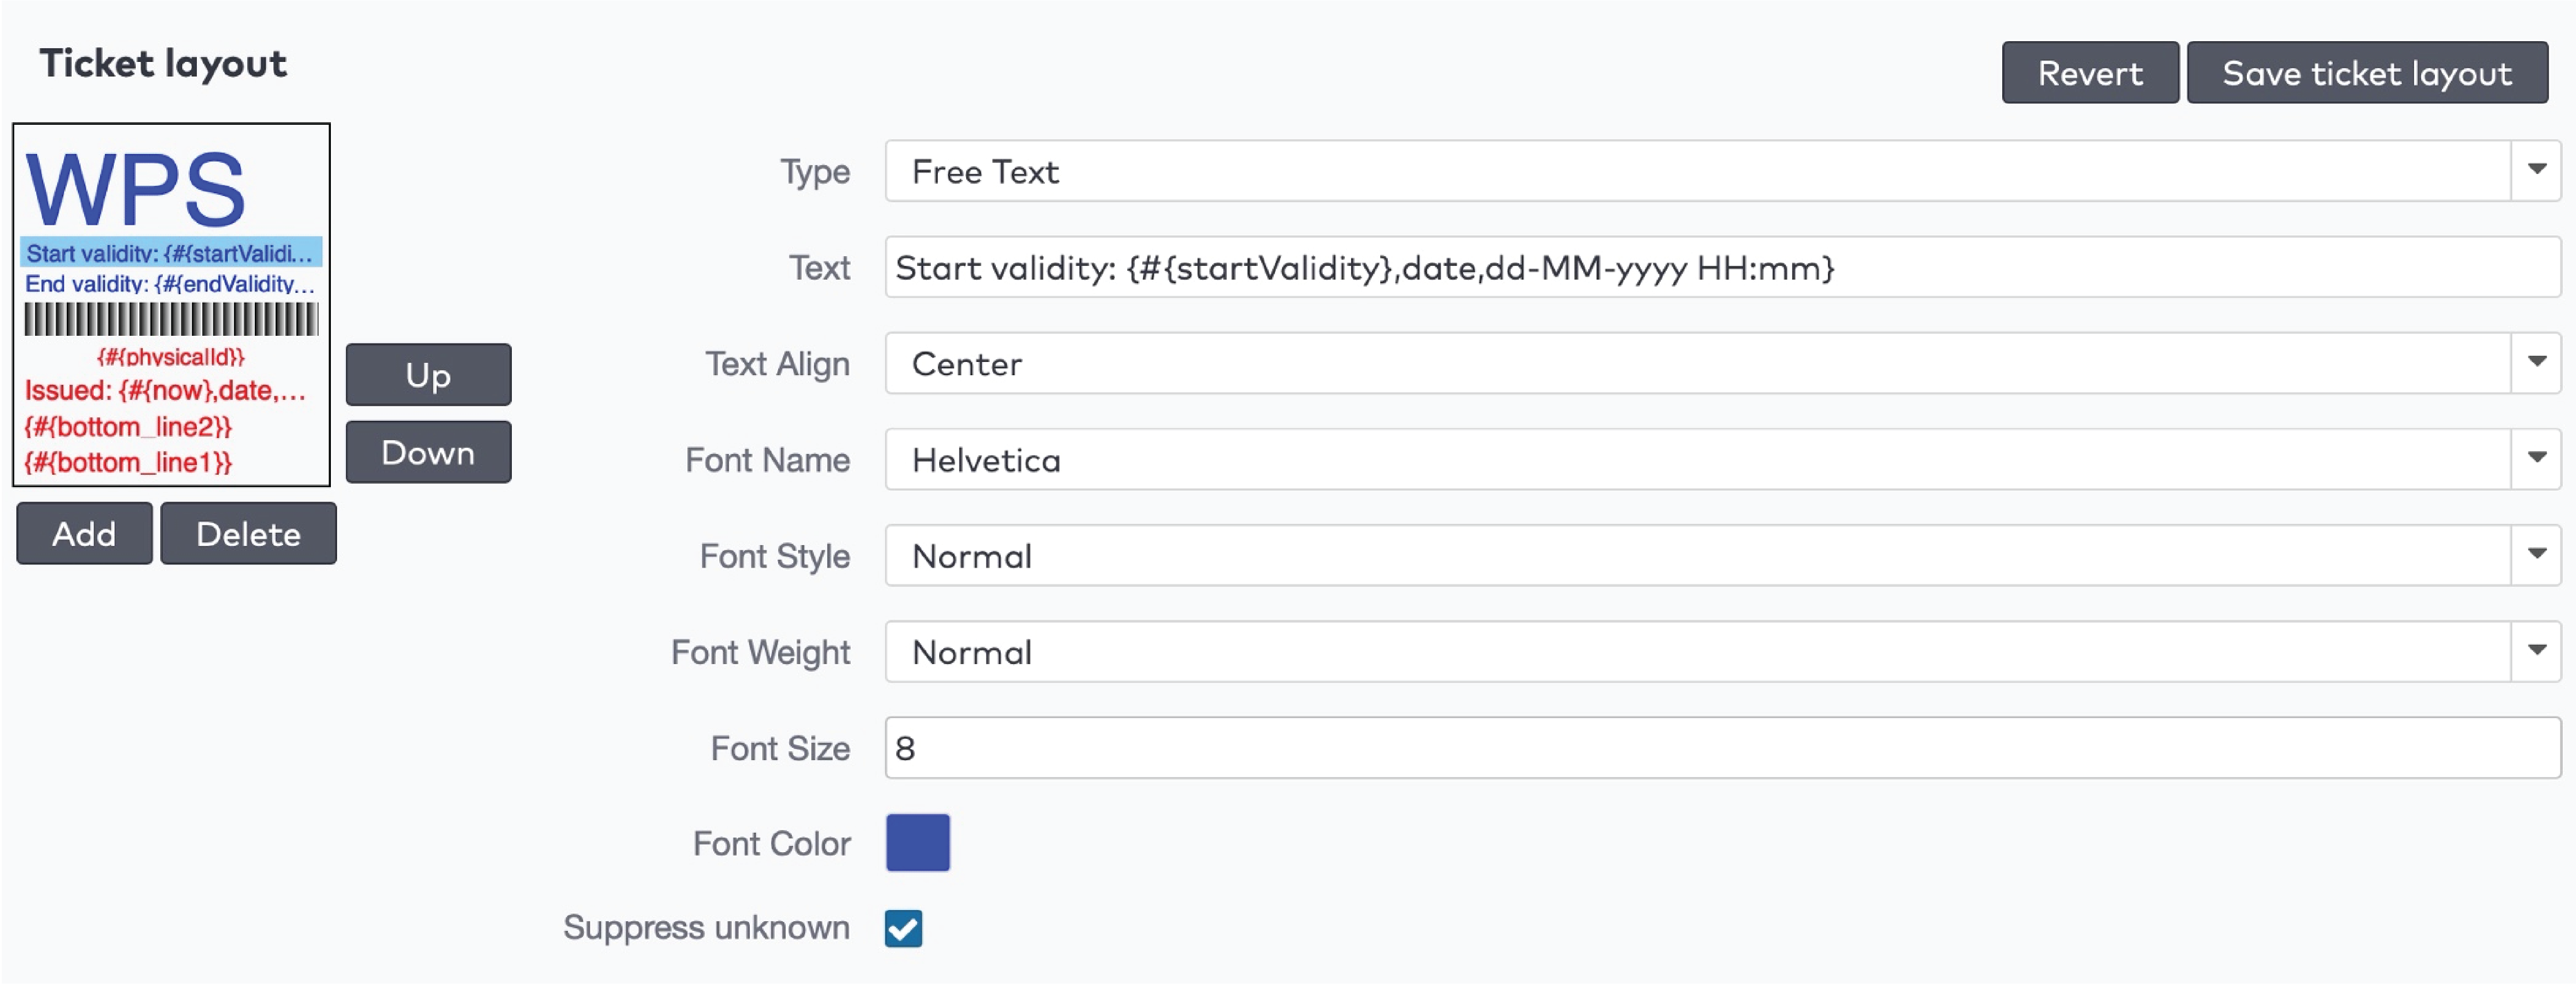
|
Make any changes to the Text displayed.
Make any changes to the styling of the text.
Check Suppress Unknown so this item is not displayed if it is not available.
Use the Up and Down buttons to move an item.
Click Delete to delete an item.
Click Add to add an item.
Click Save ticket layout to save all changes. Click Revert to discard any changes to the ticket layout.
Schedules
With schedules and scheduled actions you plan the status of speed gates and stations. For example, when speed gates are open or closed, and when stations are active or closed.
Use schedules to determine when speed gates and stations are in schedule or out schedule. Use Scheduled actions to determine the status when in schedule, and the status when out schedule.
To view or edit a schedule:
Click Settings in the menu bar.
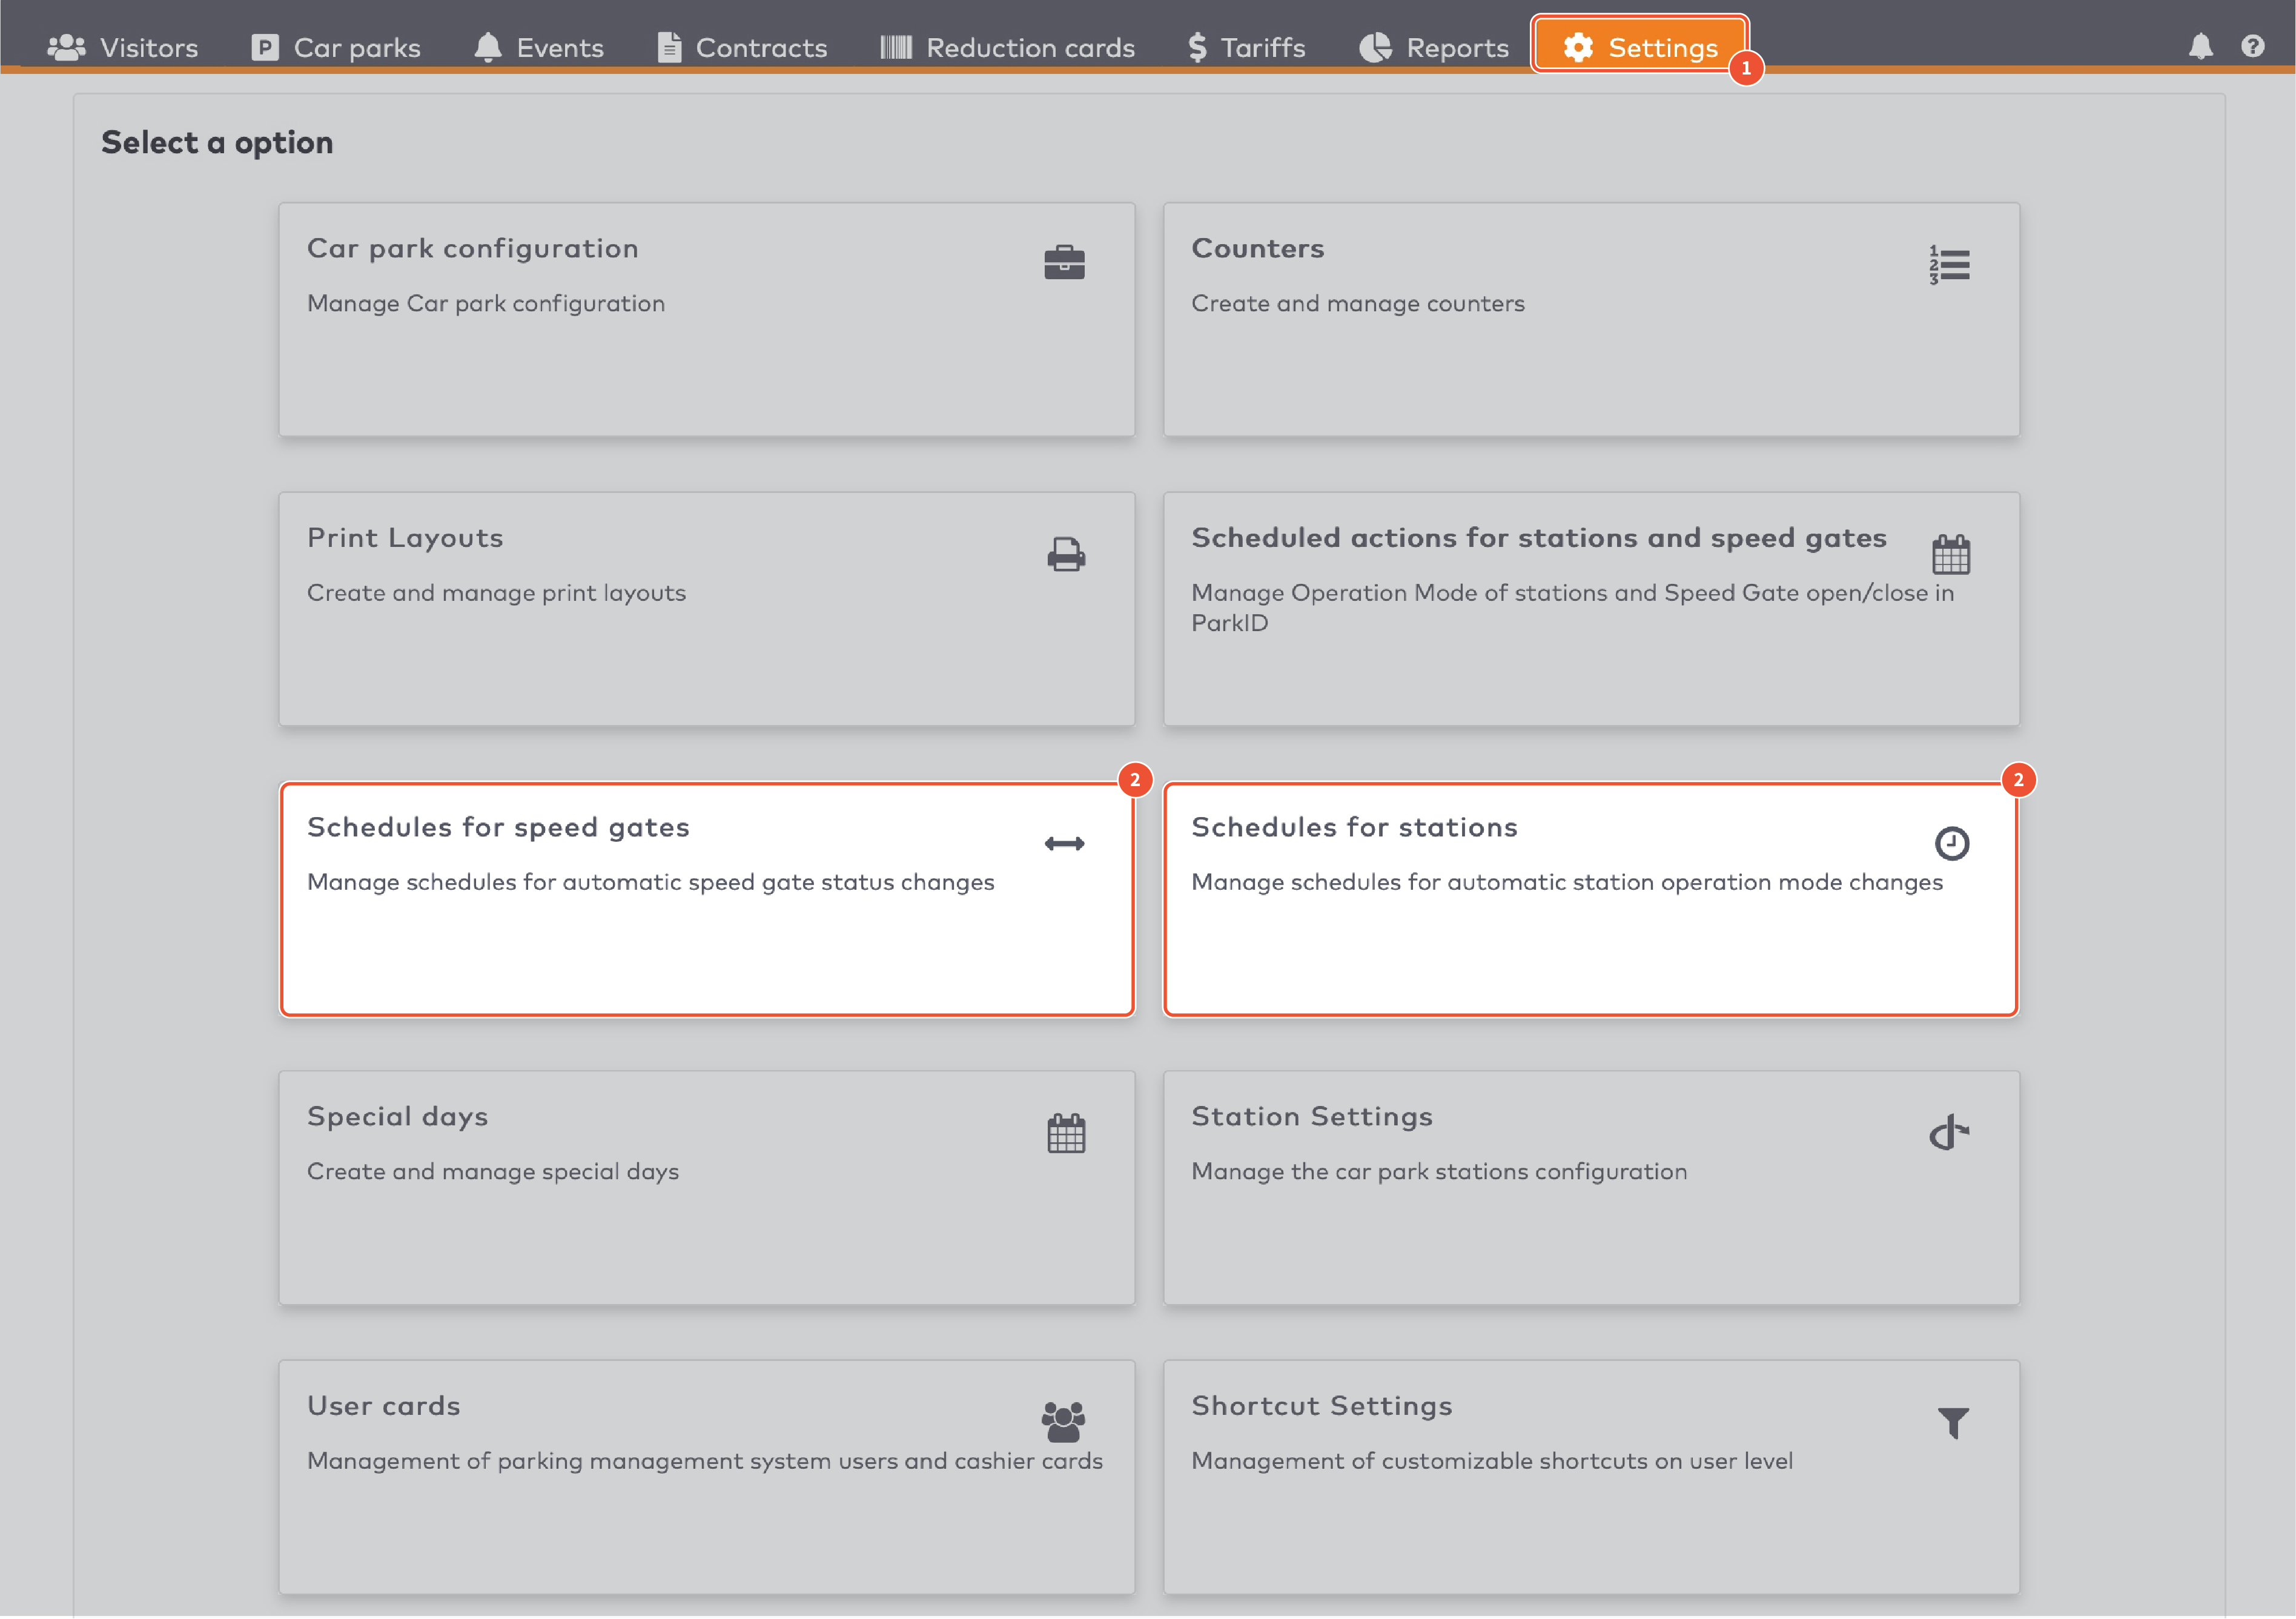
|
Click Schedules for speed gates or Schedules for stations.
Select a Car park from the dropdown menu.
|
Select a Set from the dropdown menu. A set is used to group stations or speed gates. Use multiple sets for example when different sections of the car park have different opening times.
Click Search.
The schedule for this set is displayed. The In schedule is displayed in orange. The Out schedule is displayed in grey.
Drag the orange bar to change the In schedule.
|
|
Click to remove the orange bar.
to remove the orange bar.
Click anywhere in the grey bar to create a new orange bar and drag to resize it.
|
|
Schedules are repeated every week. To make an exception, for example, when there is a bank holiday, select a Special day from the dropdown menu and click Add. If you want to remove the schedule for a special day, select the Special day from the dropdown menu and click Remove.
Scheduled actions
With schedules and scheduled actions you plan the status of speed gates and stations. For example, when speed gates are open or closed, and when stations are active or closed.
Use schedules to determine when speed gates and stations are in schedule or out schedule. Use Scheduled actions to determine the status when in schedule, and the status when out schedule.
To view or edit scheduled actions:
Click Settings in the menu bar.
|
Click Schedules for speed gates or Schedules for stations.
Select a Car park from the dropdown menu.
|
Click Edit to edit the Schedule configuration for stations or speed gates.
Select an In Schedule status and an Out Schedule status from the dropdown menus.
|
Check the Priority enabled checkboxes to override normal manual changes. The priority setting is in turn overruled when a manual change is enforced.
Click Save to save any changes or click Cancel to discard them.
Special days
Use special days to create different schedules for bank holidays or other special days.
To view or edit special days:
Click Settings in the menu bar.
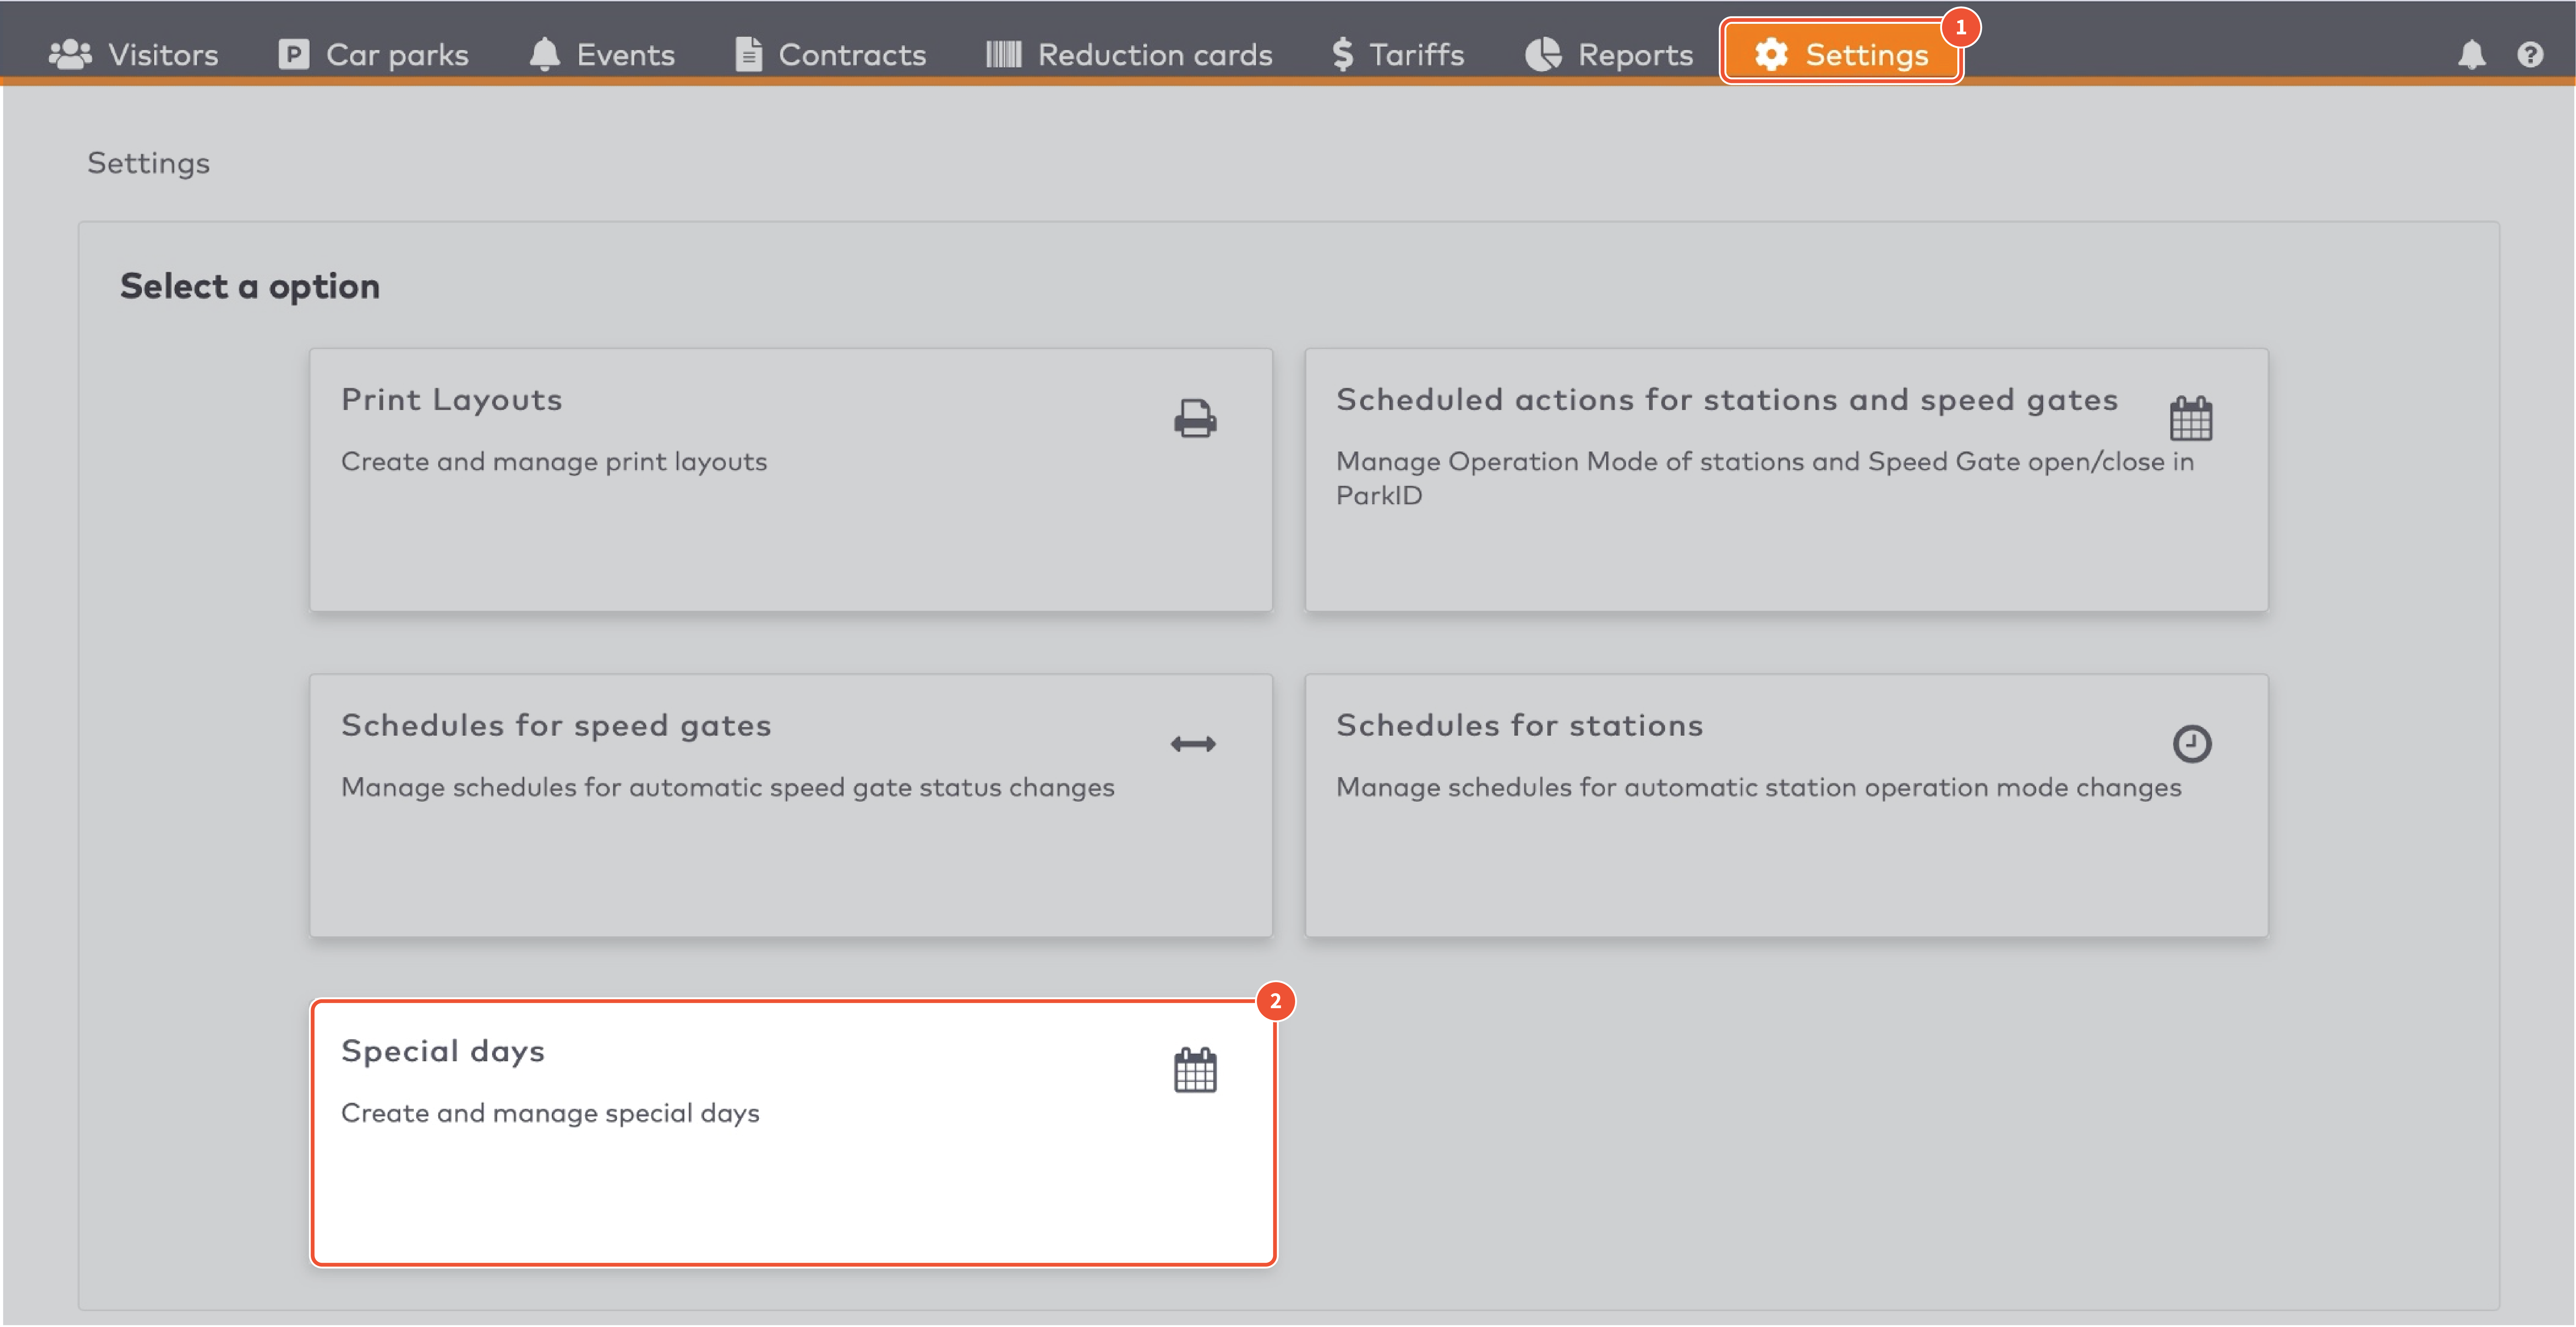
|
Click Special days.
Select a Car park from the dropdown menu.
Select a Set from the dropdown menu.
Click Search.
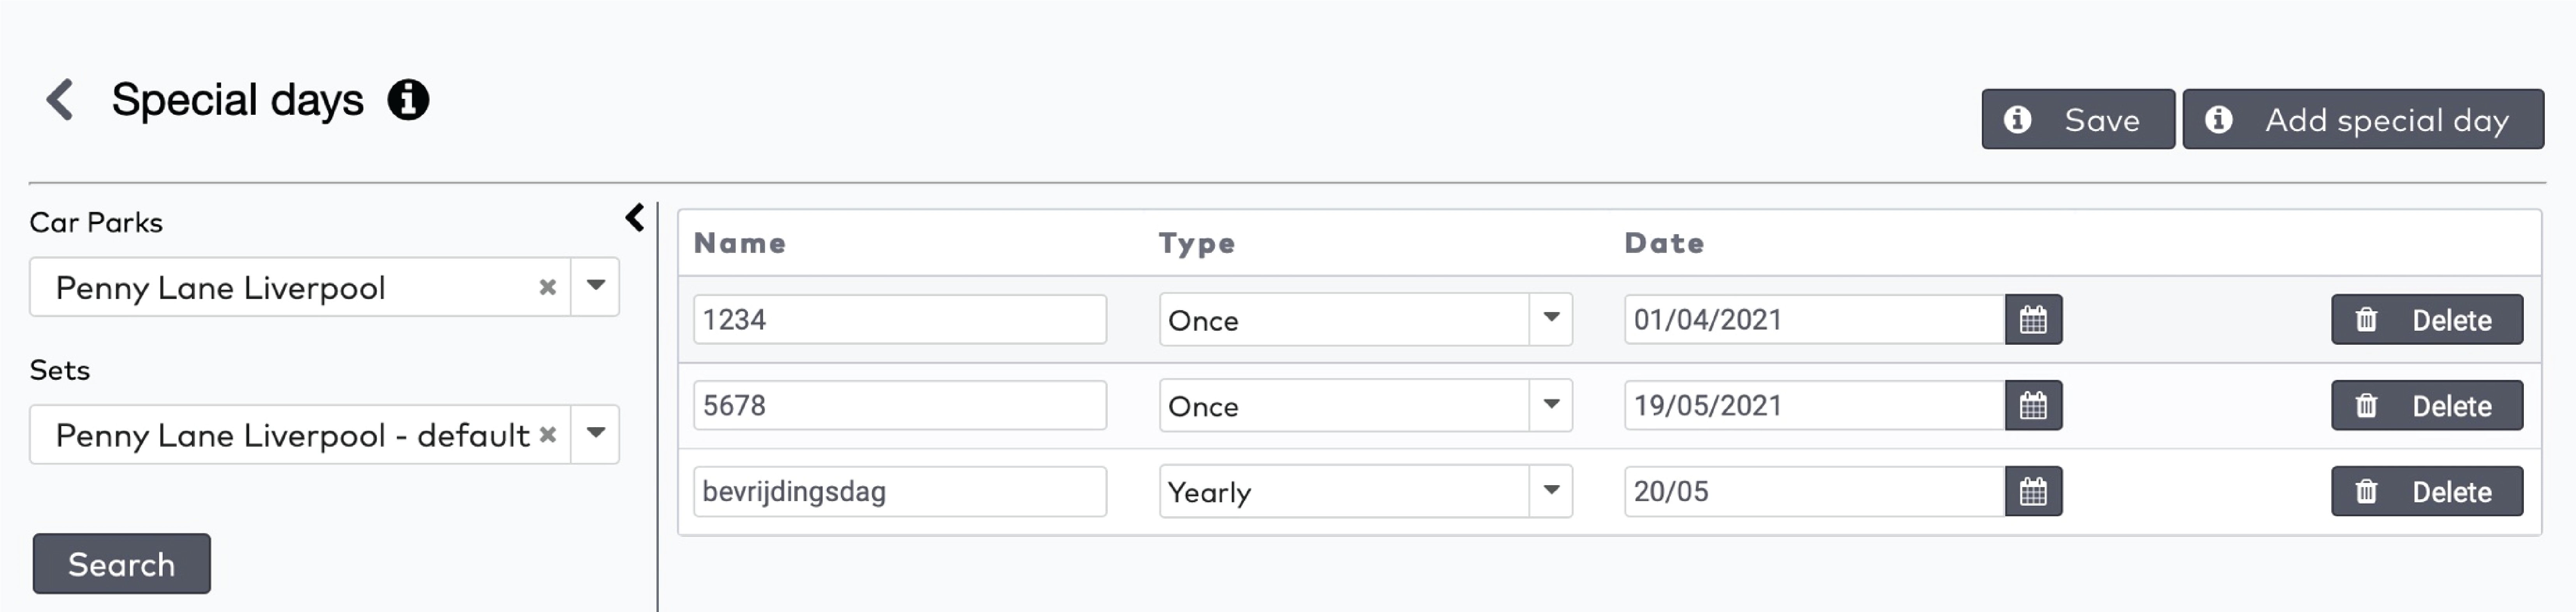
|
To add a special day, click Add special day.
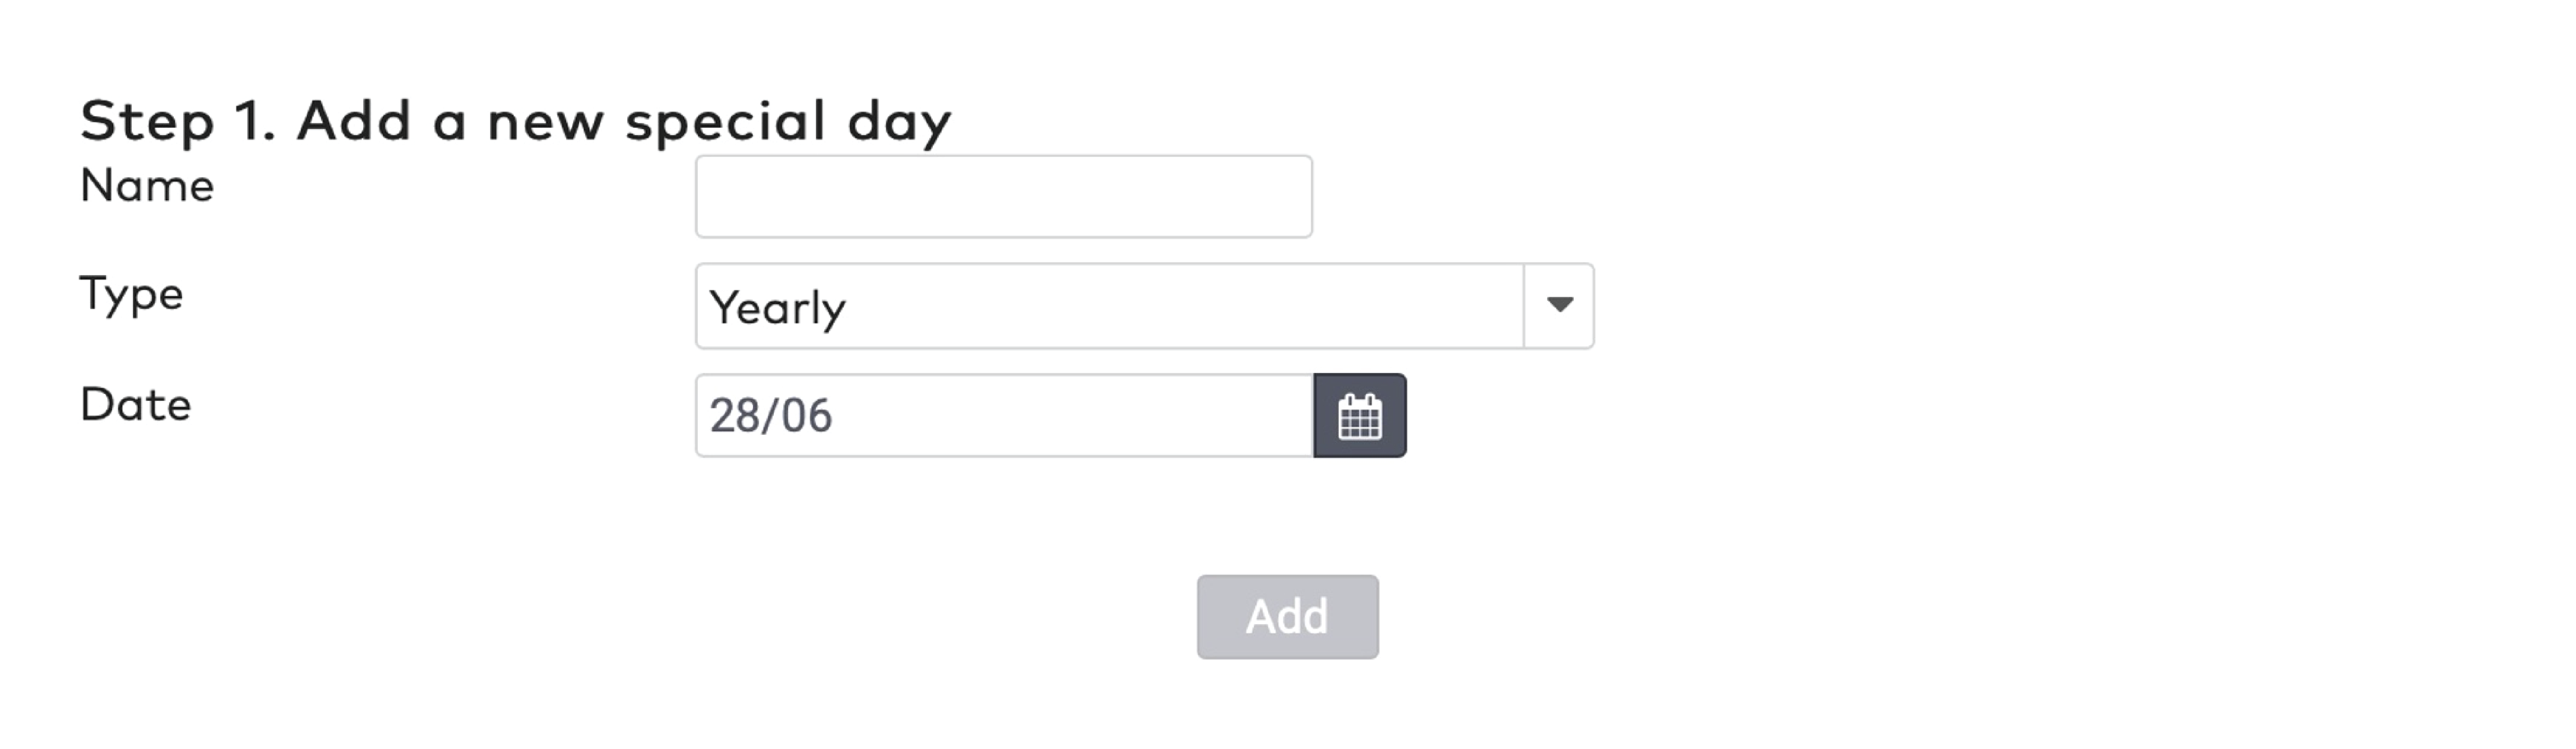
|
Fill in a Name for the special day.
Select whether this special day occurs Once or Yearly from the Type dropdown menu.
Enter the Date and click Add.
Click Save.
To edit existing special days, change their Name, Type or Date and click Save.
To remove a special day, click Delete and click Save.
Station settings
With station settings, you can
View station details
Check the video link of a station, if available
Enable and disable station capabilities. A capability is any device or service required for the station to be able to operate.
To access a station:
Click Settings in the menu bar.
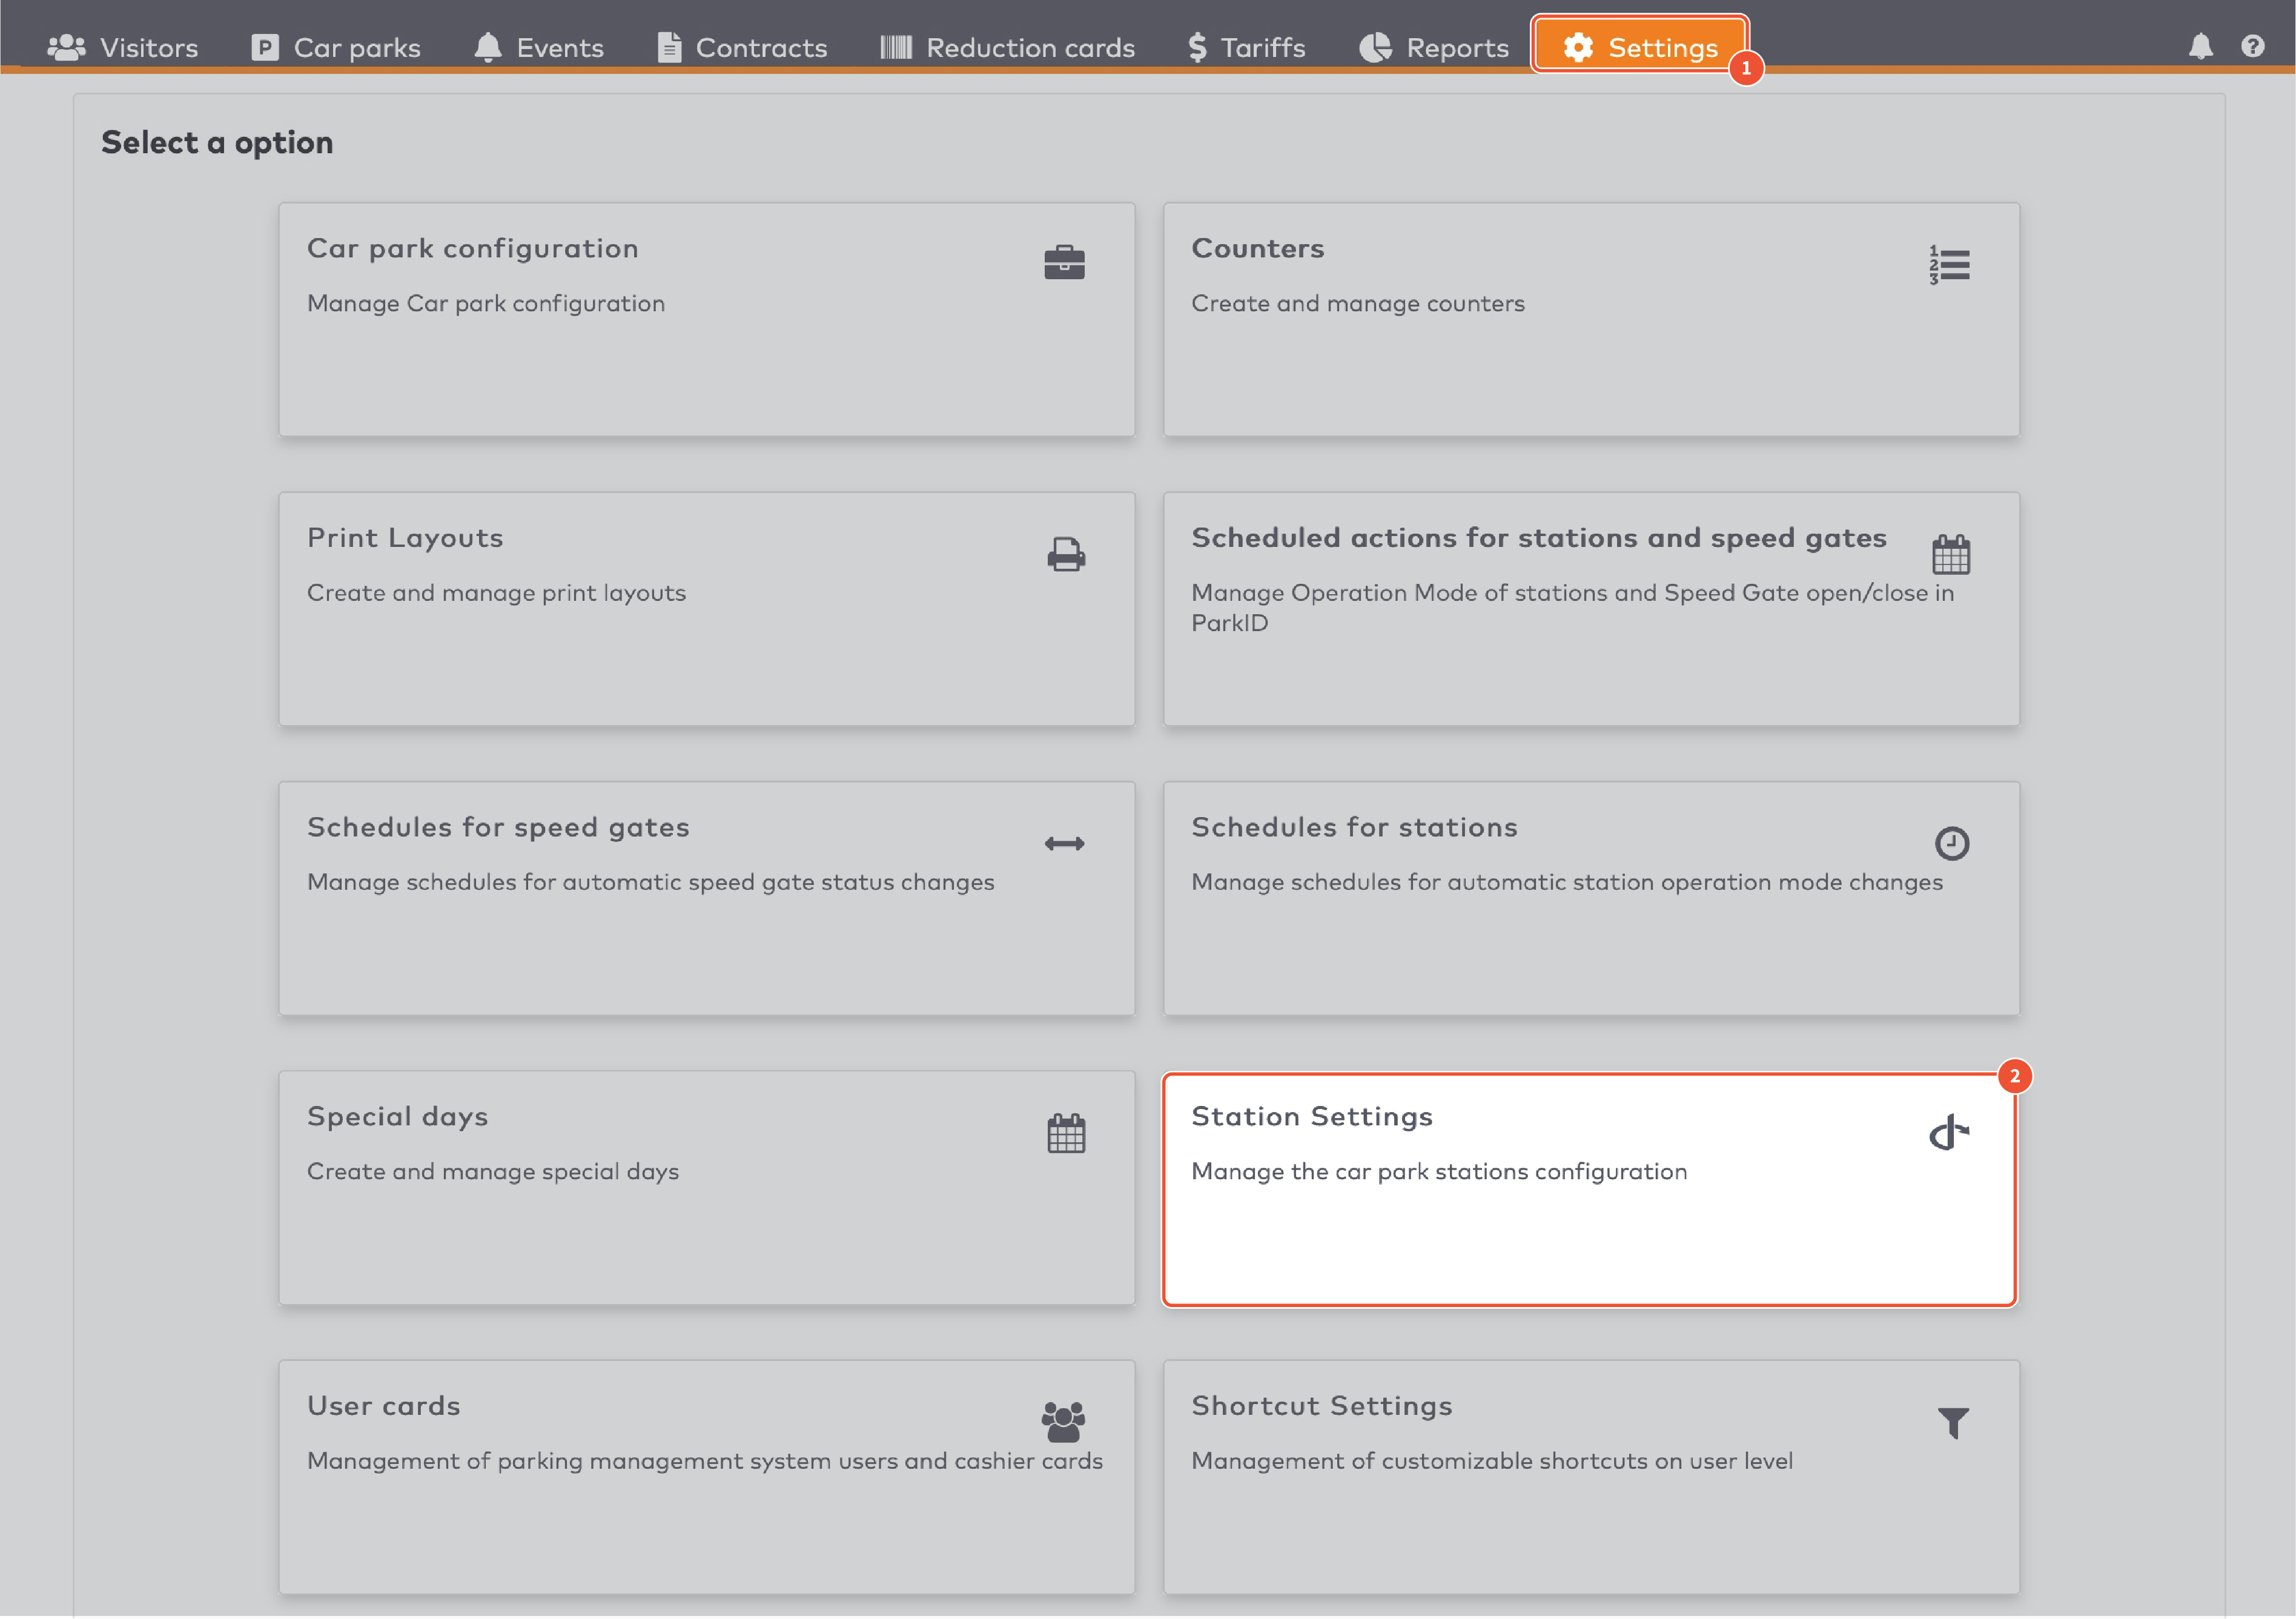
|
Click Station Settings.
Select a car park from the dropdown menu.
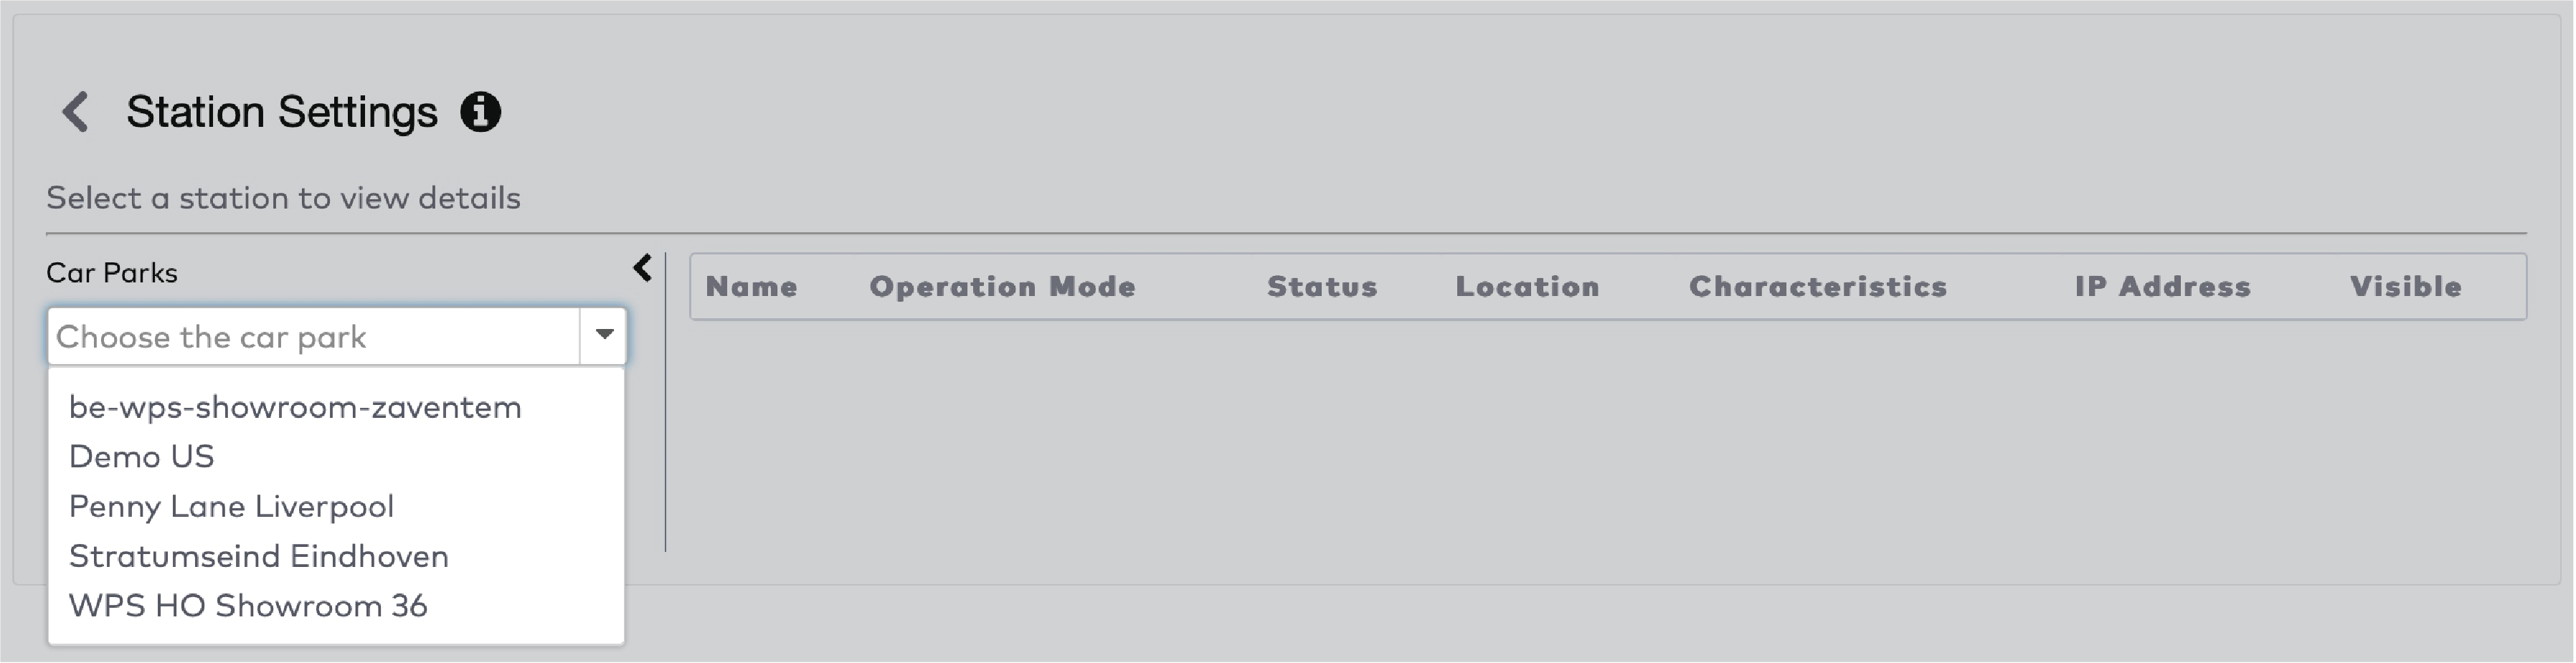
|
Click Search.
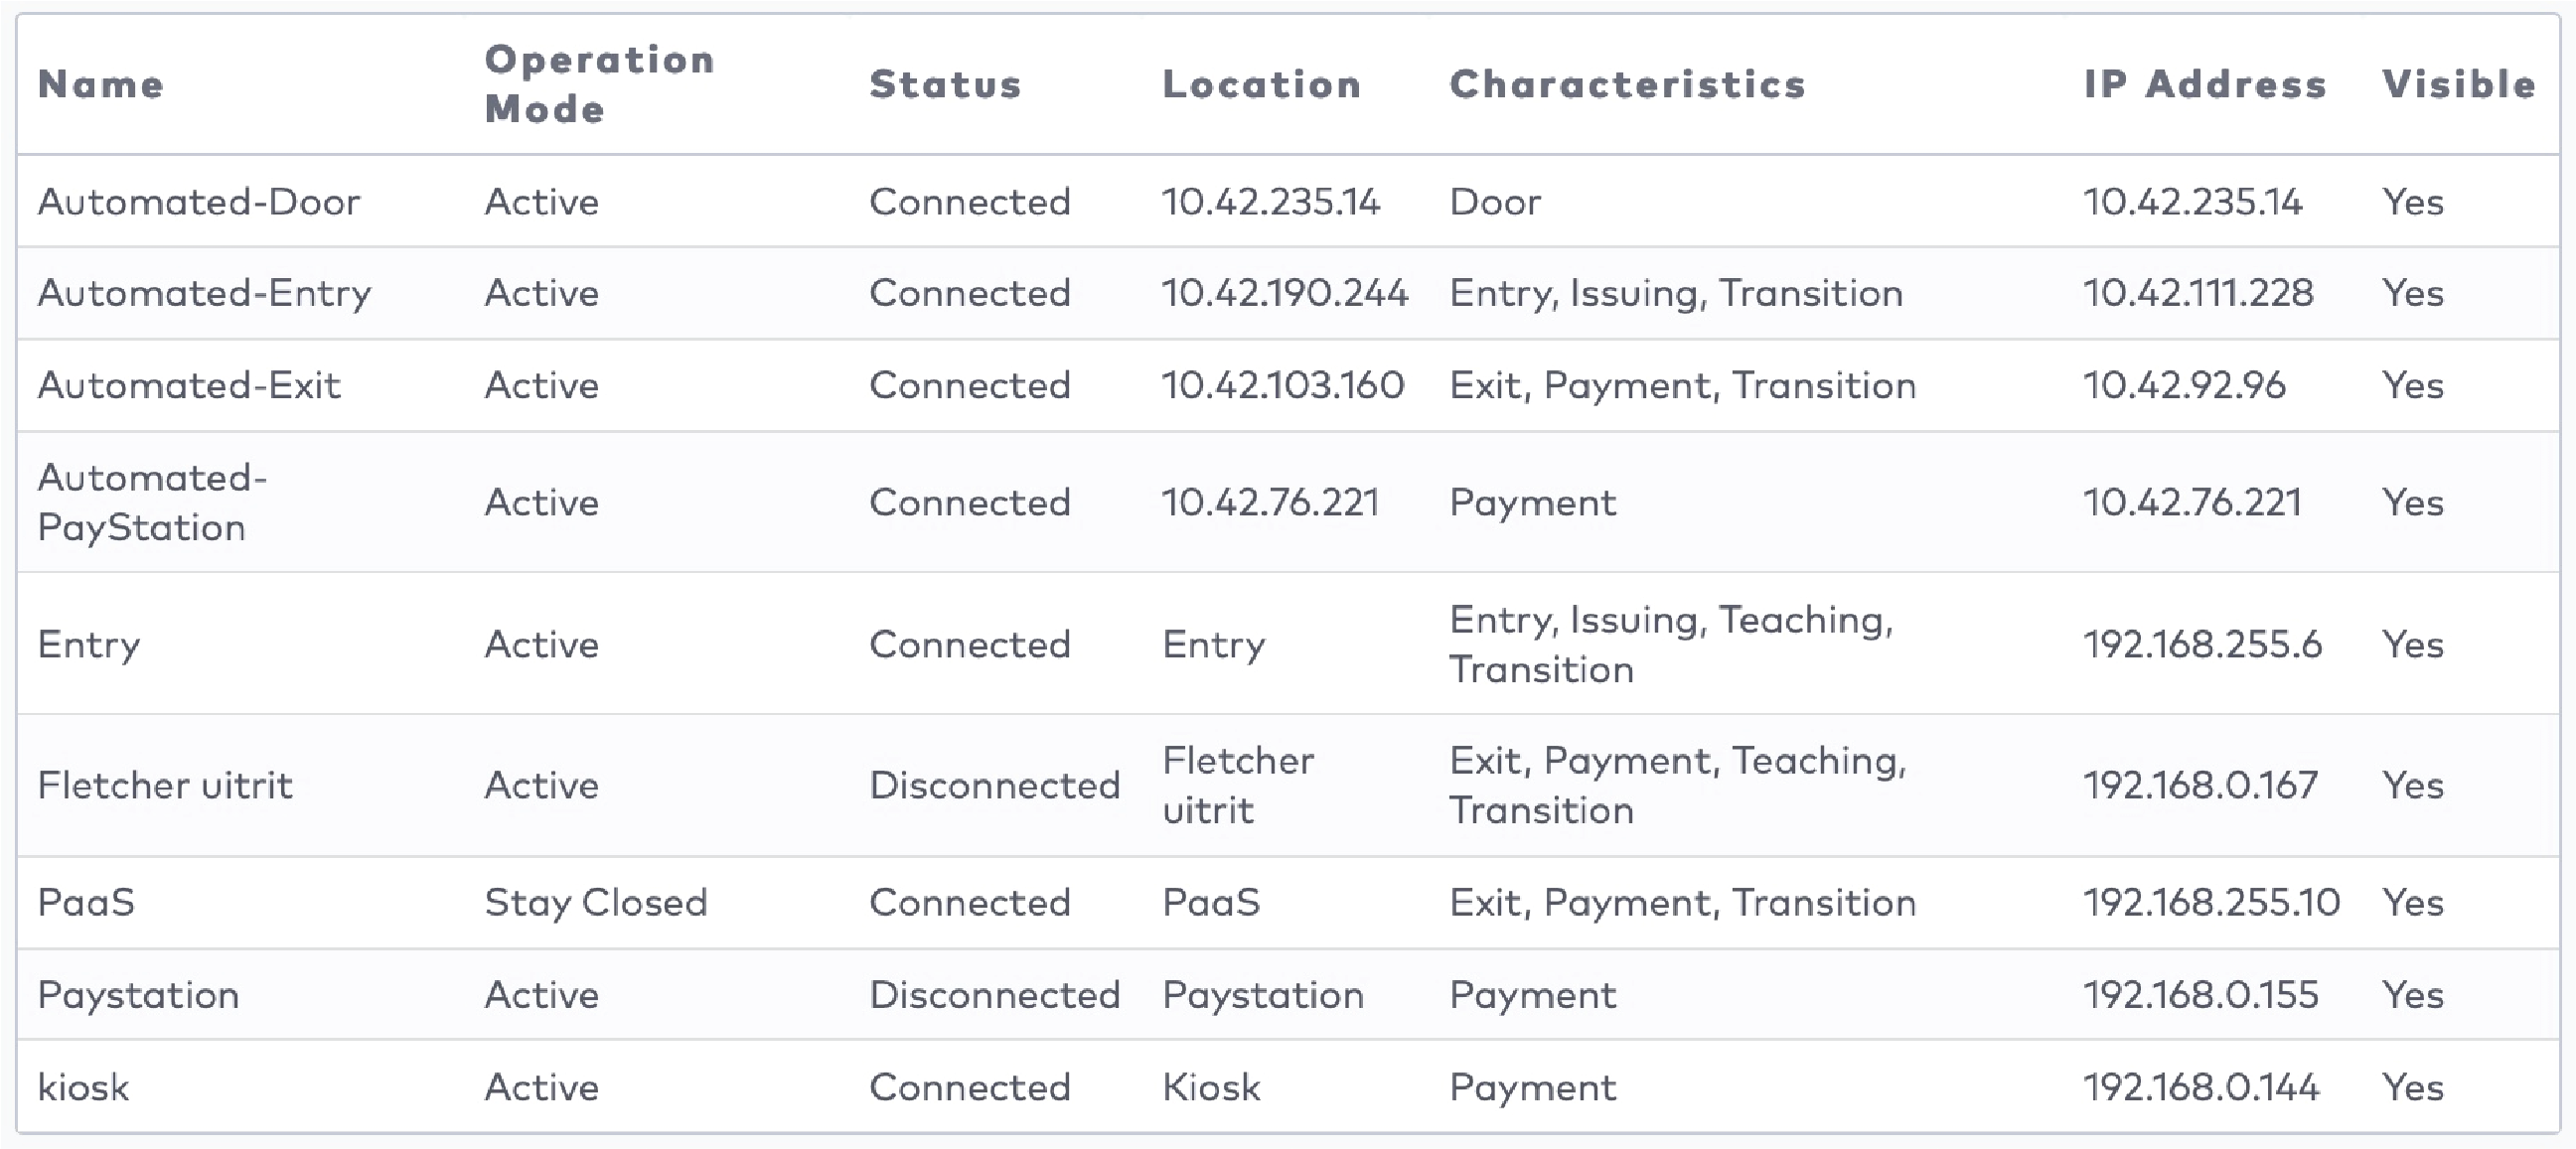
|
Click a station from the list.
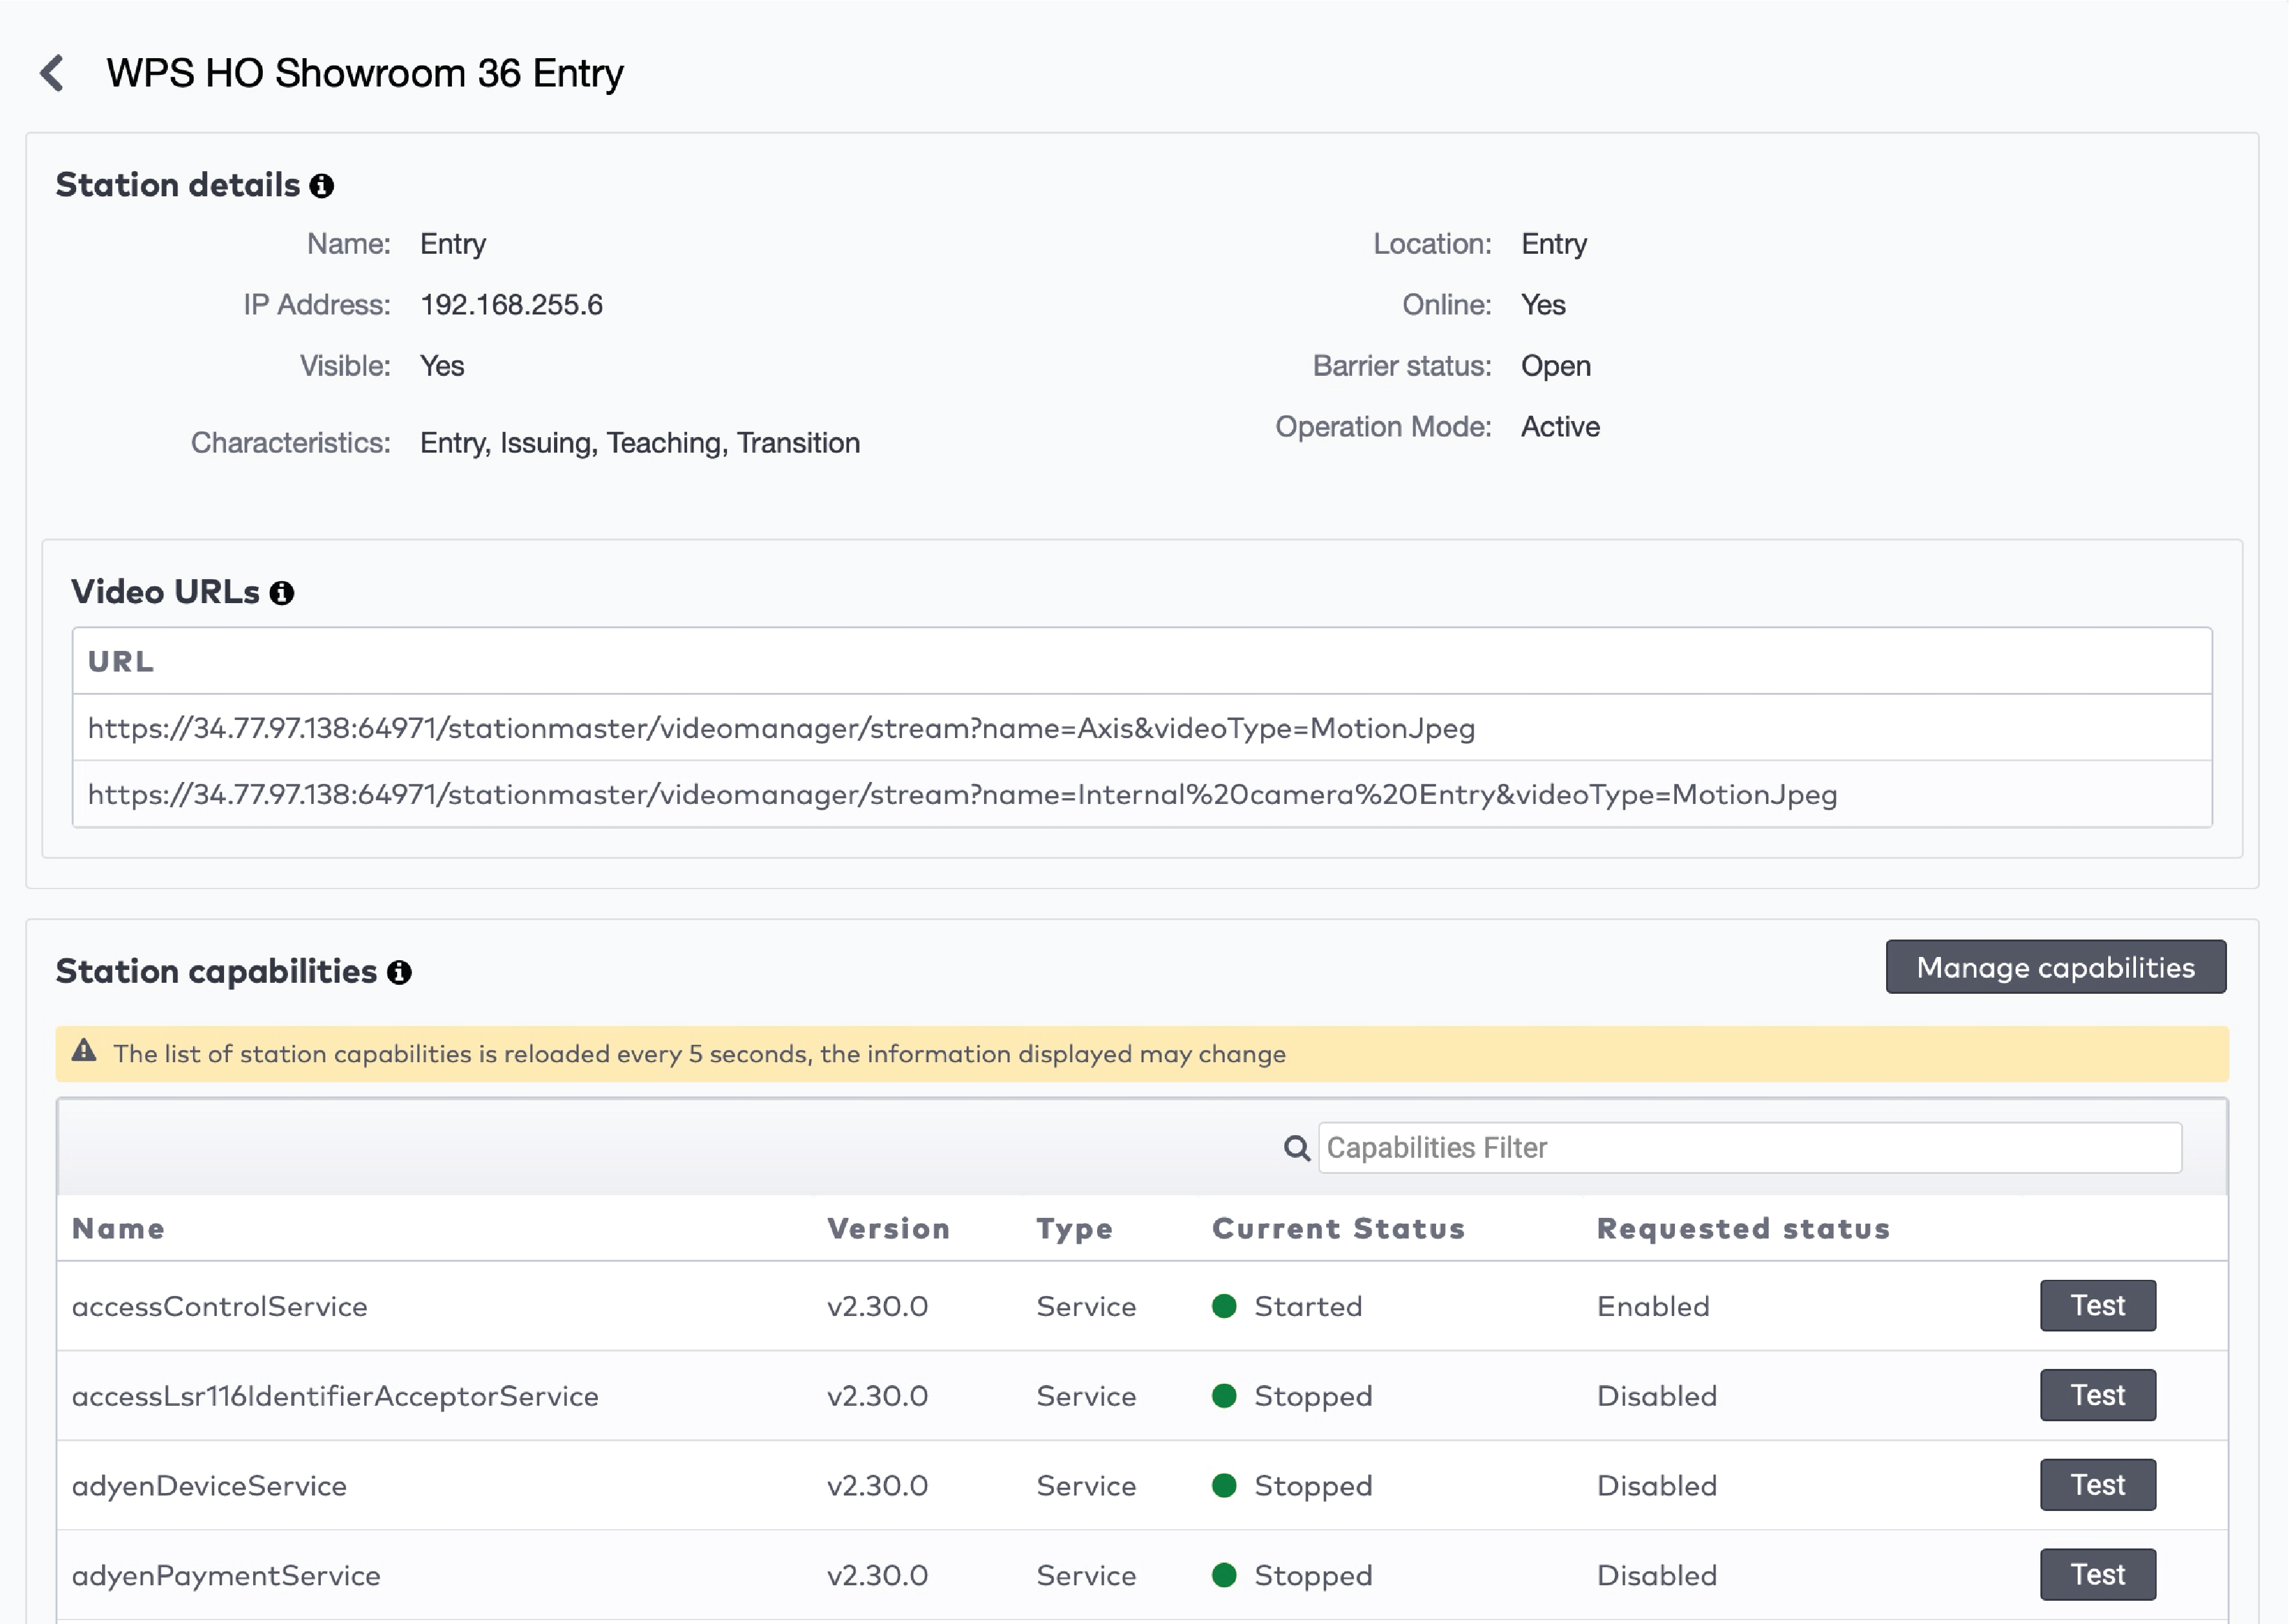
|
To test any of the station’s capabilities, click Test.
To enable or disable a capability, first click Manage capabilities.

|
Use the checkboxes to enable or disable a capability. To reset a capability, first disable it and click Save. Then enable it and click Save again.
Shortcut settings
Shortcuts are used in the visitor screen for quick actions and changing contract types. In Shortcut Settings you can:
Create and edit shortcuts
Assign shortcuts to users, roles, or customer types
To create or edit a shortcut:
Click Settings in the menu bar.
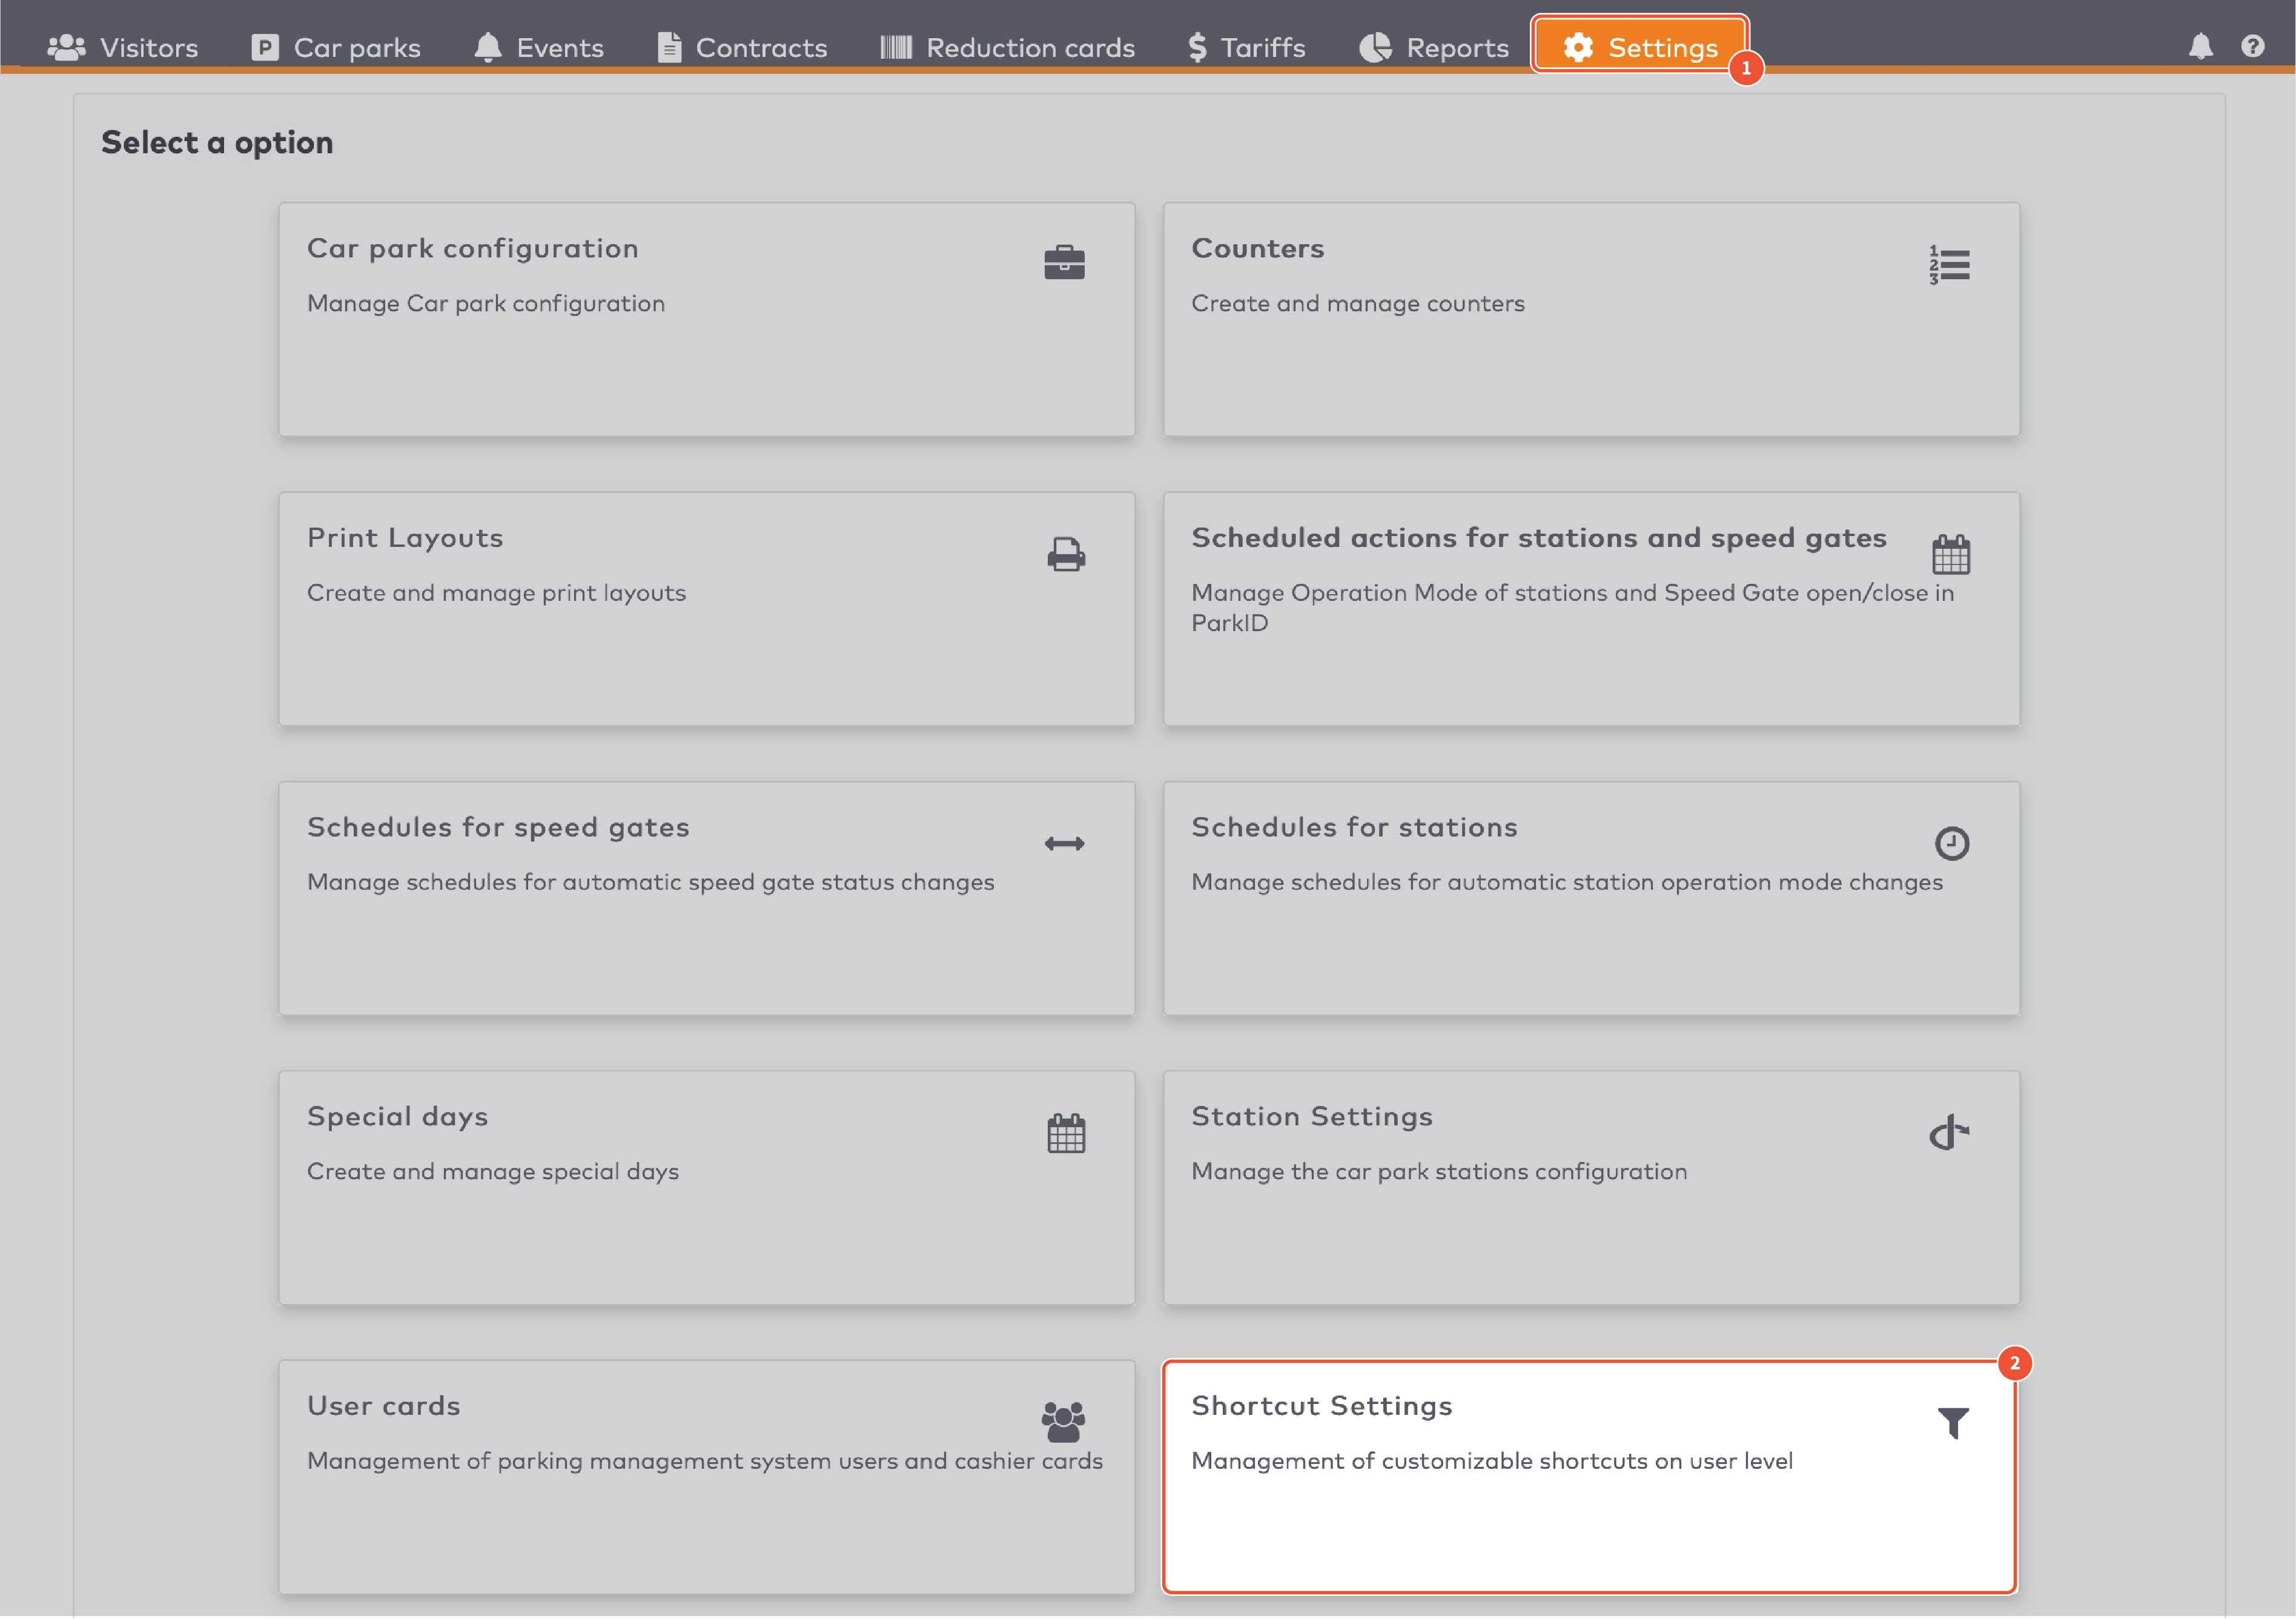
|
Click Shortcut Settings.
Select a Car park from the dropdown menu.

|
Select a shortcut Set from the dropdown menu. Sets are used to group shortcuts.
Click Search.
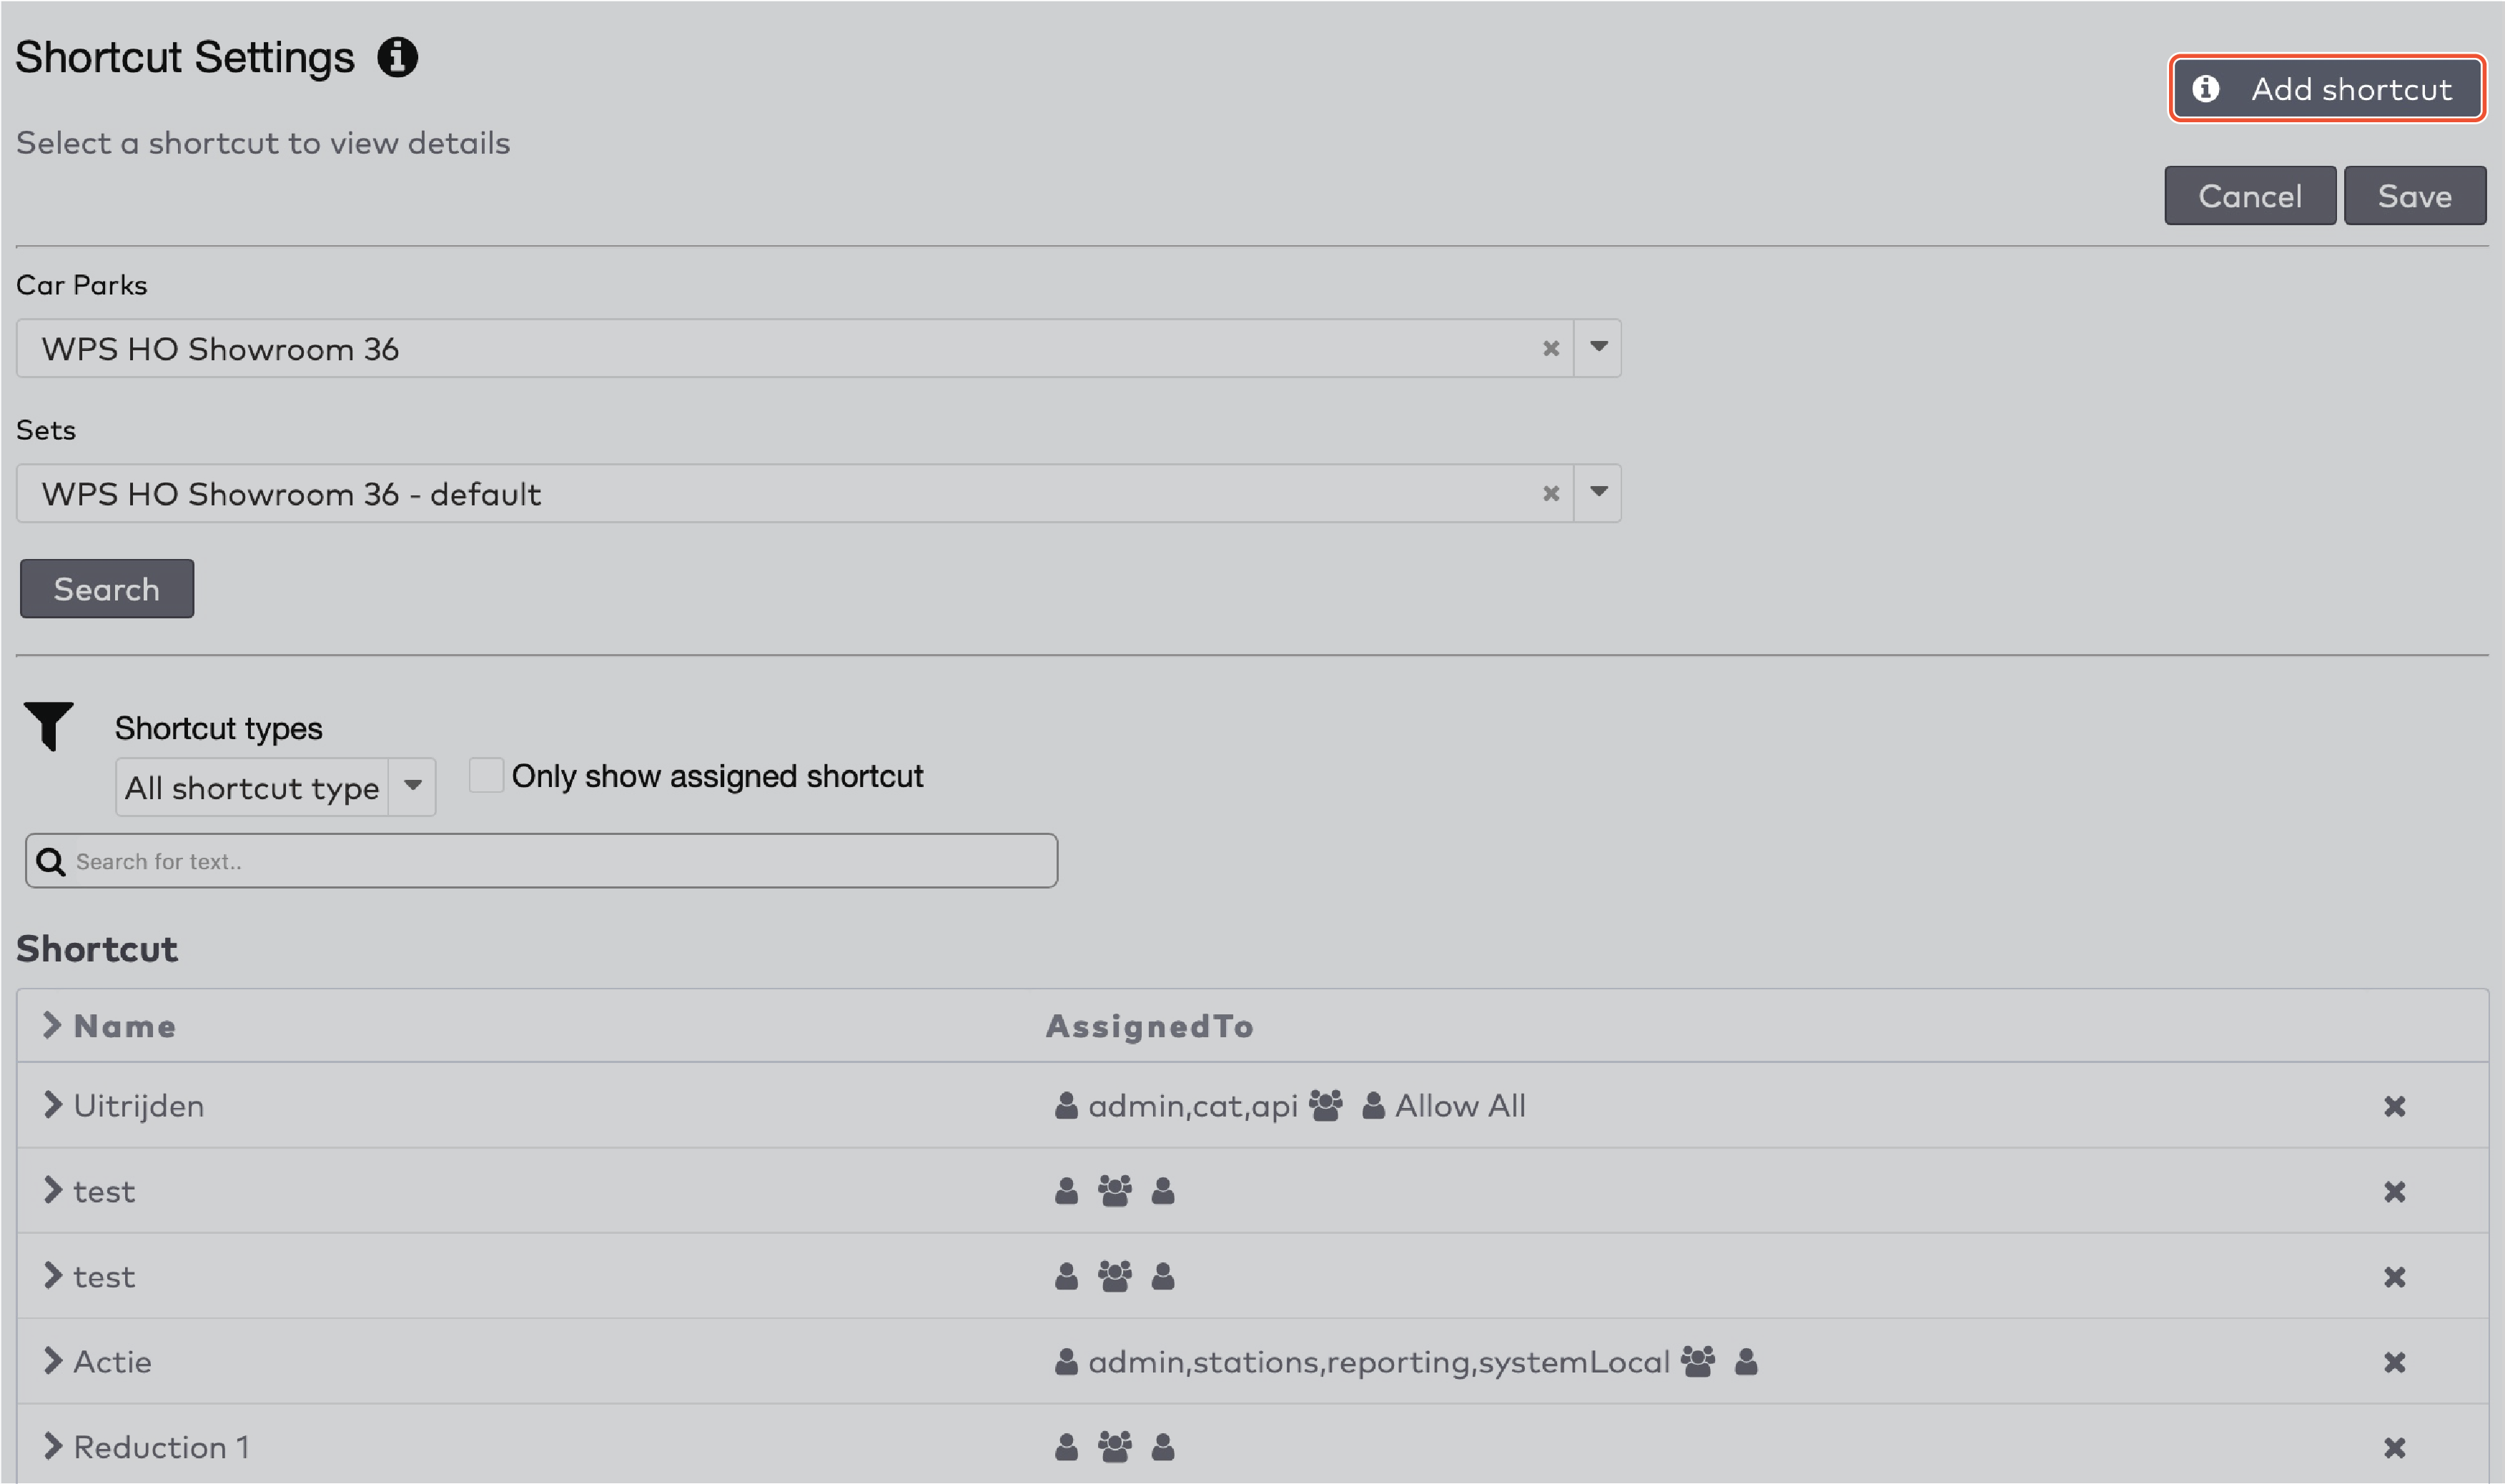
|
A list of shortcuts is displayed.
To create a new shortcut:
Click Add shortcut.
Enter a name for your shortcut.
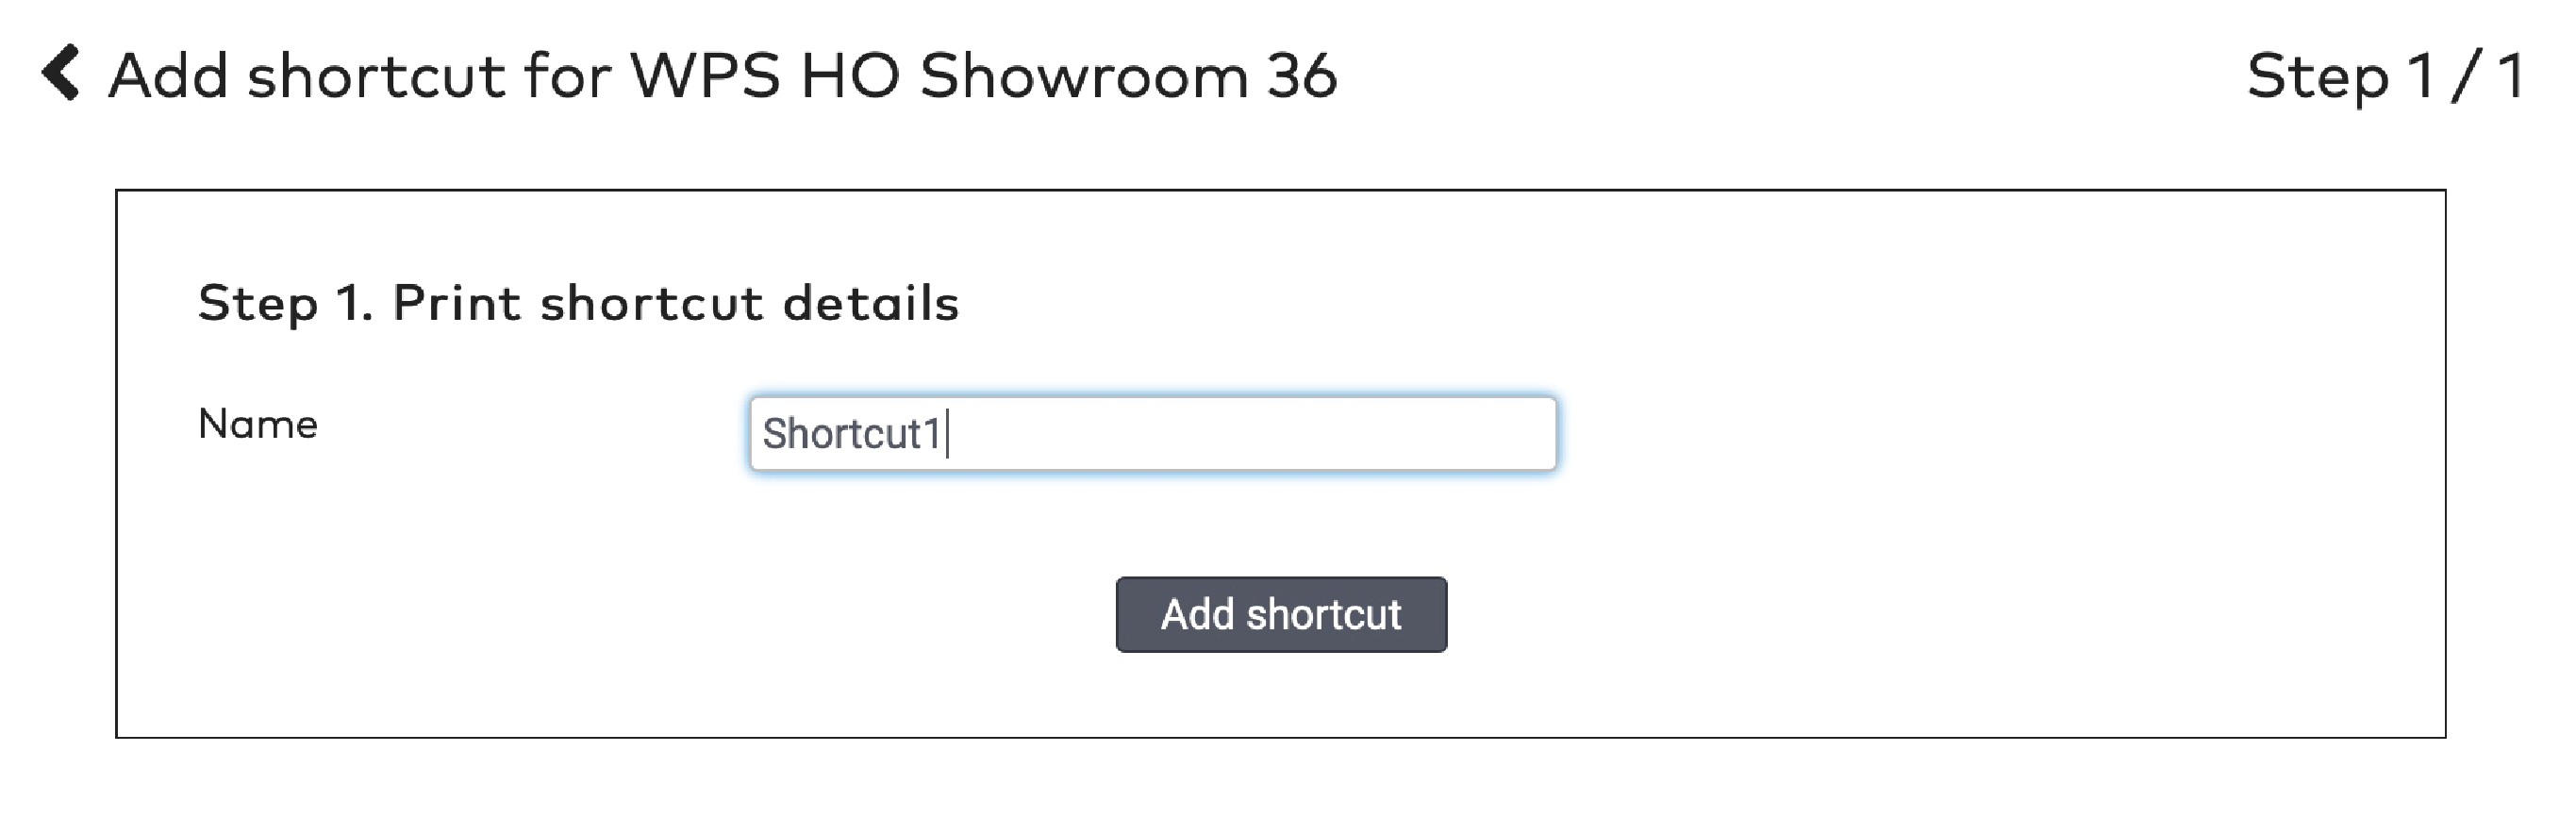
|
Click Add shortcut.
The shortcut is added to the set. To edit a shortcut:
Click next to the shortcut’s name.

|
To edit the actions performed by the shortcut, click Edit.
Select an action from the dropdown menu. Scroll down the list to see all options.
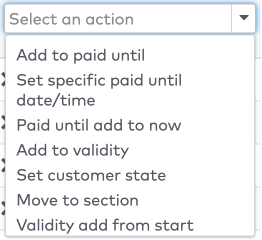
|
Enter the specific details required to complete your action.
Click Add action to shortcut.
Add another action to this shortcut, or
Click Save.
Shortcuts need to be assigned before they can be used. You can assign shortcuts to:
Specific users and/or
Roles and/or
Customer types
Shortcuts assigned to specific users are only shown to those users. Shortcuts assigned to specific roles are shown to all users with that role. Shortcuts assigned to CustomerTypes are shown to visitors at payment stations.
To assign a shortcut:
Select a type from the dropdown menu.
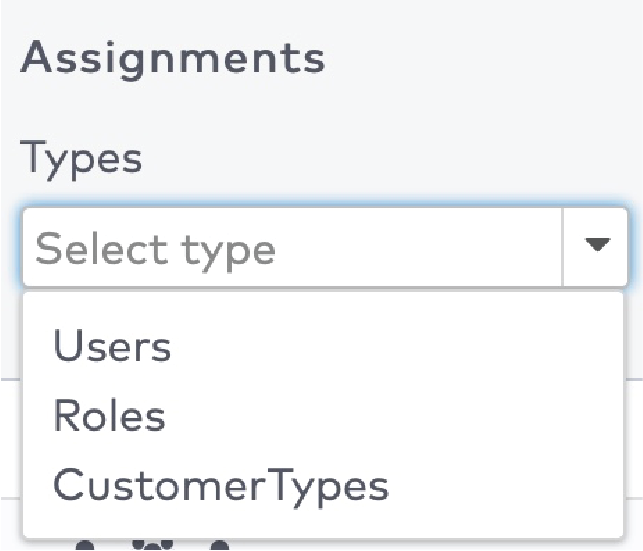
|
Use the checkboxes to assign the shortcut.

|
Click Save.
Your shortcut can now be used.
Audit logging
All actions performed by users in ParkID are logged for auditing purposes. In the audit log, you can view the actions and see the details of the actions.
To access the audit log:
Click in the menu bar.
in the menu bar.
Then click Audit Logging.

|
Filtering actions
In the audit log, you can filter actions by:
Date and time (From and To)
Car park
Action type
User
Location
Details (any detail linked to the action, such as user name, card number, amount, the last four digits of a credit card, etc.)
Click Apply to apply the filters.
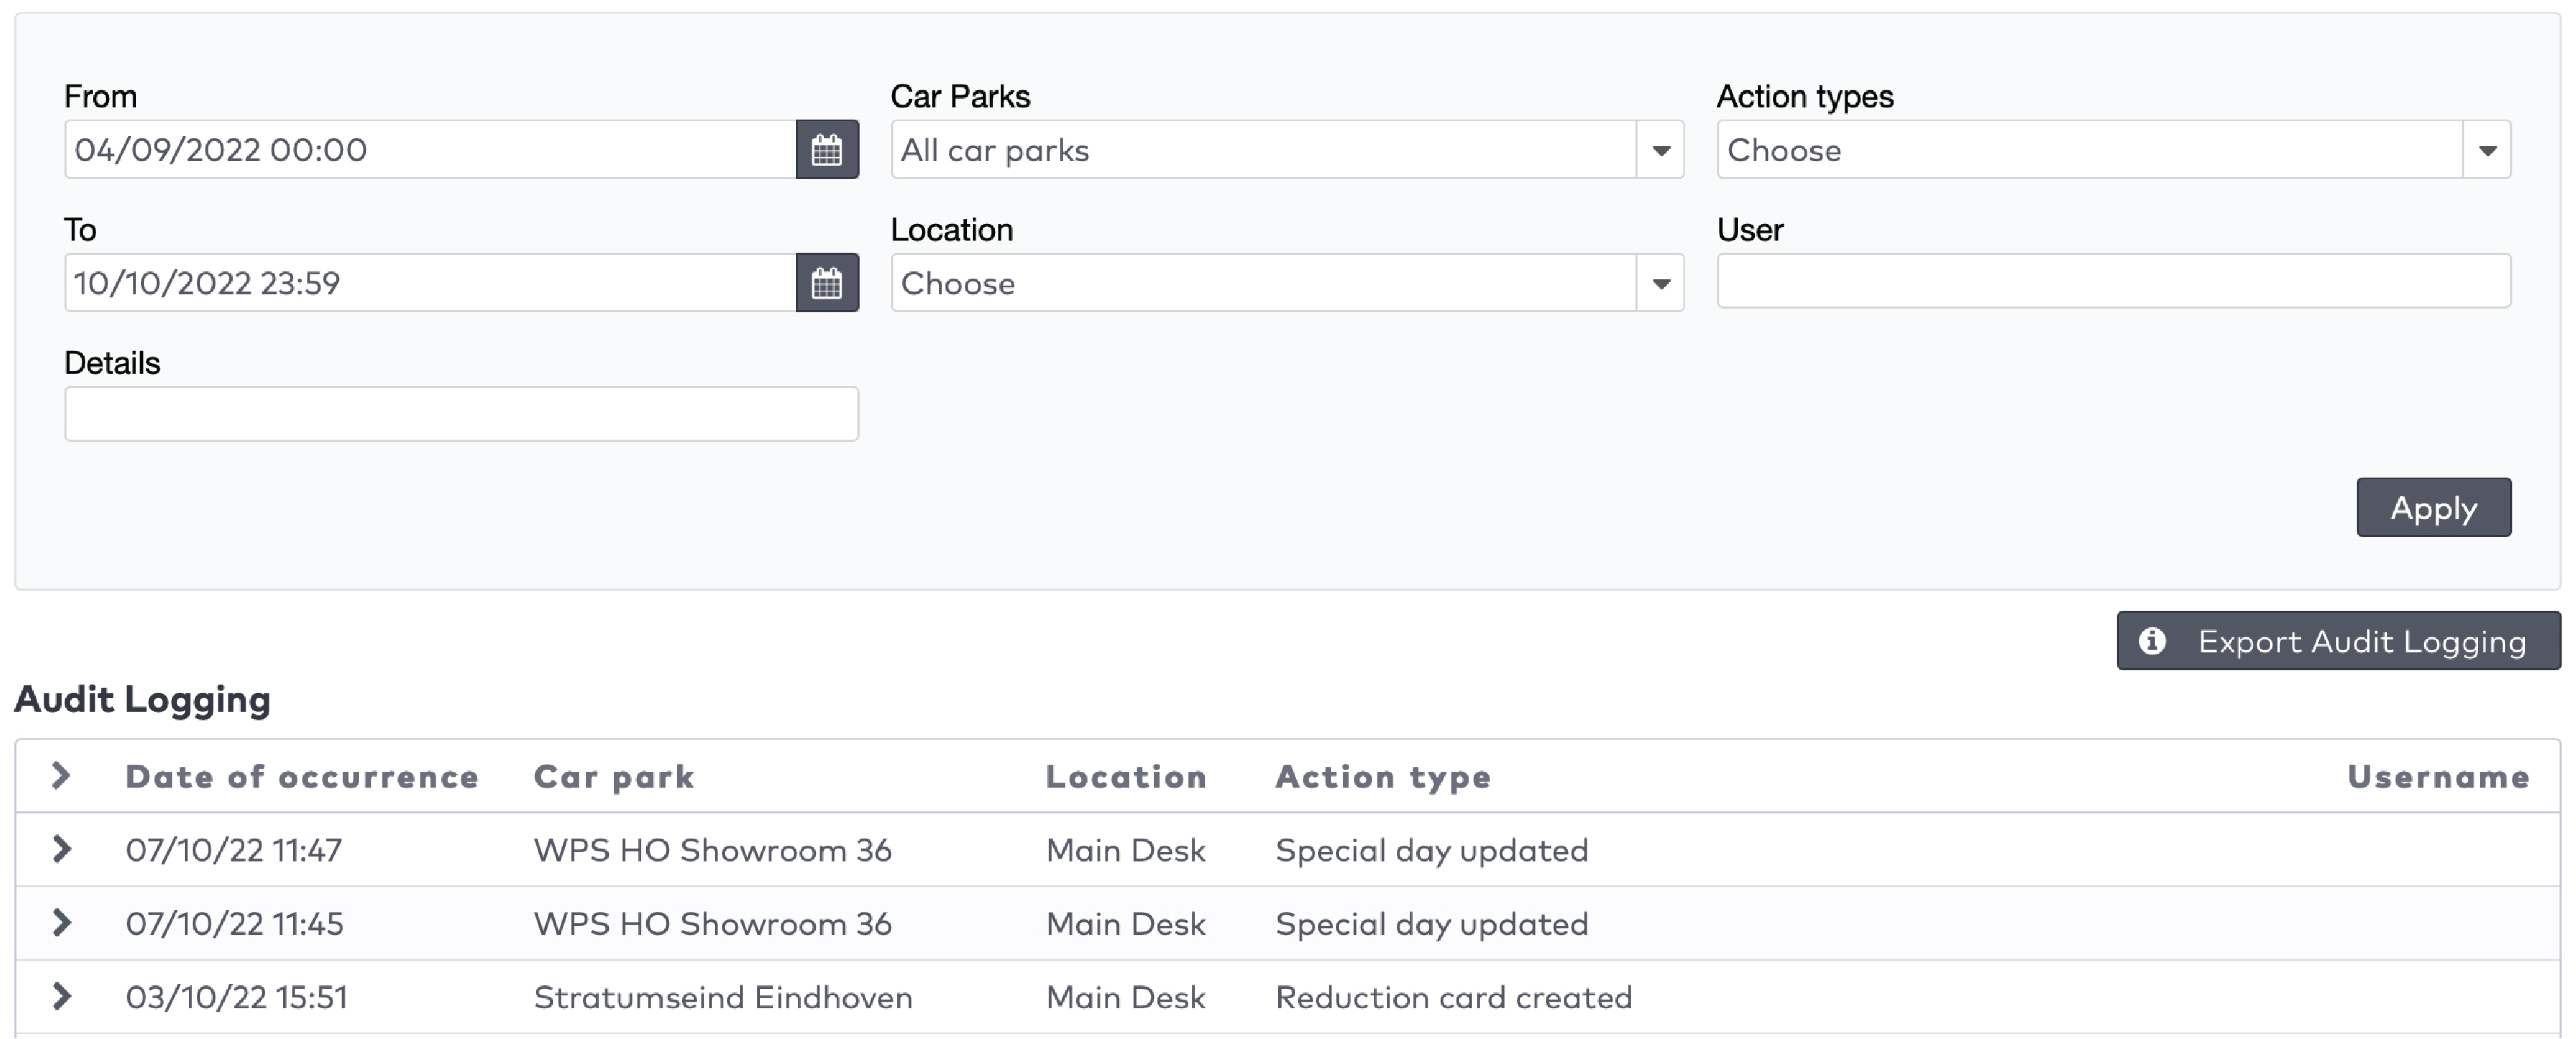
|
Checking the details of an action
To check the details of an action:
Click next to the action

|
To check what is changed after the action, click Show.
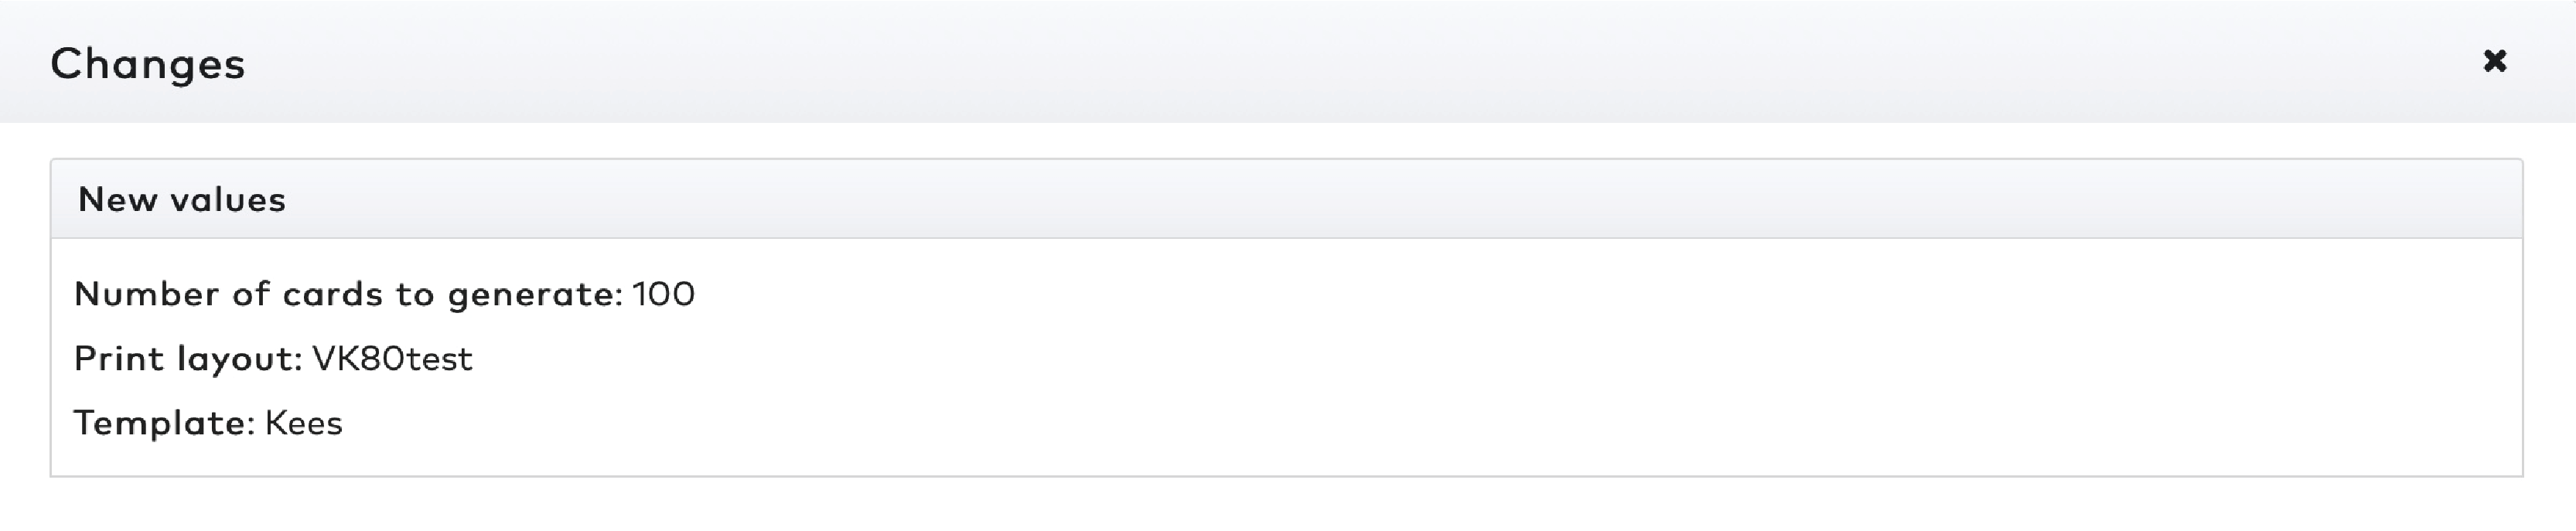
|
Preferences
You can customize the user interface of ParkID through the Preferences menu.
To access Preferences:
Click your name in the top right corner.

|
Click Preferences

|
In Preferences, you can:
Change your language
Choose to show or hide station names in the car park overview
Select which car parks to display in the overview
Choose whether to show system warnings on every page or not
Choose which page is shown as default start page.
Select Show stations view to enable the old style of car park overview.
Click Save to save any changes.
Bezoekers
Iedere persoon met een auto en toegangsrechten tot de parkeerplaats is een bezoeker.
Dit hoofdstuk gaat over het tabblad Bezoekers in de gebruikersinterface. Op dit tabblad kunt u snel bezoekers vinden en veelgebruikte acties uitvoeren. Ga naar Contracten > Bezoekers voor uitgebreidere functionaliteiten met betrekking tot bezoekers.
|
Spring naar:
|
Een bezoeker vinden
Klik in de menubalk op Bezoekers om een bezoeker te vinden.
Gebruik de zoekbalk en voer de bezoekersnaam in, het identificatornummer of de groep van de bezoeker. Wacht totdat de resultaten op het scherm worden weergegeven en klik op een van de resultaten om rechtstreeks naar de bezoeker te gaan of klik op Zoeken.
|
|
Wanneer u op Zoeken hebt geklikt, wordt er een lijst met resultaten weergegeven. U ziet standaard alleen bezoekers die in de afgelopen 7 dagen zijn gearriveerd.
|
|
Gebruik het dropdown-menu Inrijden om een andere periode te selecteren.
Gebruik het dropdown-menu Parkeerplaatsen om een of meer parkeerplaatsen uit te sluiten van de zoekopdracht.
Gebruik het dropdown-menu Zone om resultaten te filteren op zone. Deze optie is alleen beschikbaar wanneer u slechts één parkeerplaats in het dropdown-menu Parkeerplaats hebt geselecteerd.
Schakel Alleen actieve bezoeken weergeven in om bezoekers die de parkeerplaats hebben verlaten uit te sluiten.
Klik op Toepassen om de zoekresultaten te vernieuwen.
Klik op Bezoekerspagina weergeven om de bezoekerspagina te openen.
De bezoekerspagina gebruiken
Wanneer u een bezoekersprofiel opent via het tabblad Bezoekers ziet u een overzicht met:
De naam of het nummer van de bezoeker
Een rijtje snelkoppelingen en contracttypen die u kunt toewijzen
Een lijst met gebeurtenissen met betrekking tot de bezoeker
Een lijst met acties
|
|
Snelkoppelingen gebruiken
Met snelkoppelingen in het bezoekersprofiel kunt u
Het huidige contract van een bezoeker wijzigen of
Het contracttype van de bezoeker wijzigen
Oranje snelkoppelingen worden gebruikt om het huidige contract van de bezoeker te wijzigen. Bijvoorbeeld:
Korting op de prijs geven
De geldigheid van het contract wijzigen
De bezoeker vrijgeven om de parkeerplaats te verlaten
Enz.
Grijze snelkoppelingen worden gebruikt om het contracttype van de bezoeker te wijzigen. Bijvoorbeeld:
Een abonnement voor kort parkeren voor een bezoeker wijzigen naar een abonnement voor meerdere dagen
Een abonnement voor kort parkeren voor een bezoeker wijzigen naar een eenmalige uitrijkaart
Enz.
Ga naar Instellingen voor snelkoppelingen om te leren hoe u snelkoppelingen kunt configureren.
Gebeurtenissen voor bezoekers weergeven
Onder ‘Gebeurtenissen’ wordt een logbestand voor gebeurtenissen weergegeven. Dit is standaard een logbestand voor de afgelopen zeven dagen.
Klik in het dropdown-menu en selecteer een andere periode om gebeurtenissen eerder dan zeven dagen geleden weer te geven.
|
|
Acties uitvoeren
U kunt:
Een anti-passbackreset uitvoeren
Opmerkingen toevoegen aan bezoekersinformatie
Contractgegevens weergeven en bewerken
Handmatig uitchecken met facturering
Een anti-passbackreset uitvoeren
ParkID detecteert misbruik van bezoekersidentificatoren. Dit staat bekend als anti-passback. Bijvoorbeeld wanneer dezelfde bezoekersidentificator tegelijkertijd wordt gebruikt door twee of meer bezoekers.
De informatie van de anti-passbackdetectie kan incorrect zijn in de volgende gevallen:
Na een noodgeval, als de uitgangen niet correct zijn geregistreerd.
Na de storing van een automaat of een onderhoudsupdate.
Ga als volgt te werk om een anti-passback uit te voeren voor een bezoeker:
Klik op Anti-passbackreset
U ziet een melding wanneer de anti-passbackreset met succes is uitgevoerd.
Een opmerking toevoegen aan bezoekersinformatie
Opmerkingen worden weergegeven in de lijst met Gebeurtenissen. Ga als volgt te werk om een opmerking toe te voegen:
Klik op Opmerking toevoegen aan bezoekersinformatie.
Typ uw opmerking in de balk.
|
|
Klik op Opslaan.
De opmerking wordt opgeslagen en is zichtbaar in Gebeurtenissen.
Contractgegevens weergeven en bewerken
Klik op Contractgegevens weergeven om contractgegevens weer te geven en te bewerken. Het contractscherm wordt weergegeven.
Raadpleeg ‘Gegevens bewerken’ om meer te leren over het bewerken van de gegevens van een bezoeker.
Raadpleeg ‘Een contract bewerken’ om meer te leren over het bewerken van contracten.
Handmatig uitchecken met facturering
Houd er rekening mee dat handmatig uitchecken met facturering alleen mogelijk is als de facturatiegegevens van een bezoeker bekend zijn. Voorbeelden van facturatiegegevens zijn: een waardepas, een abonnement, een bankrekeningnummer, een creditcardnummer of een groepsaccount.
Ga als volgt te werk om handmatig uit te checken met facturering:
Klik op Uitchecken met facturering.
Selecteer een Buitenzone waarnaar u deze bezoeker wilt verplaatsen.
|
|
Voer ofwel een bedrag in en selecteer een valuta of
Voer een Uitrijdatum en tijdstip in. Het systeem zal de kosten berekenen op basis van de regels in het contract van de bezoeker.
Klik op Verzenden.
Het vertrek van de bezoeker wordt geregistreerd en het bezoek zal worden gefactureerd.
Parkeerplaatsen
Vanuit het tabblad Parkeerplaatsen kunt u uw parkeerplaatsen beheren.
Overzicht parkeerplaatsen
Klik voor een overzicht van de parkeerplaatsen op Parkeerplaatsen in de menubalk.
|
|
Het systeem toont status- en meldingsberichten in een gele balk (1). Een offline parkeerplaats kan niet worden gebruikt. Een niet gesynchroniseerde parkeerplaats kan worden gebruikt, maar de feedback van de parkeerplaats kan onnauwkeurig zijn. De status van de barrières kan bijvoorbeeld incorrect zijn, of de toegangen en uitgangen worden niet correct weergegeven.
Om een specifieke parkeerplaats te bekijken, selecteert u deze uit het dropdown-menu Tonen (2). Kies in het dropdown-menu alle parkeerplaatsen om alle parkeerplaatsen te tonen.
U kunt uw voorkeuren aanpassen om te wijzigen welke parkeerplaatsen standaard worden getoond.
|
In dit artikel:
Individuele automaten bedienen. De automaten worden gegroepeerd per zone in de parkeerplaats (5)
|
De algemene bedrijfsmodus wijzigen
Er zijn drie bedrijfsmodi voor parkeerplaatsen:
Actief. Alle automaten functioneren normaal.
Blijf open. Alle automaten blijven open. Bezoekers kunnen inrijden en uitrijden.
Blijf gesloten. Alle automaten blijven gesloten. Bezoekers hebben geen doorgang.
De bedrijfsmodus veranderen:
Klik op Actief, Blijf open of Blijf gesloten.
|
|
Klik op Alle toegangen, Alle uitgangen of Beide.
|
|
Een anti-passbackreset uitvoeren
ParkID detecteert misbruik van toegangsidentificatoren. Dit staat bekend als anti-passback. Bijvoorbeeld wanneer dezelfde toegangsidentificatoren tegelijkertijd worden gebruikt door twee of meer bezoekers.
De informatie van de anti-passbackdetectie kan incorrect zijn in de volgende gevallen:
Na een noodgeval, als de uitgangen niet correct zijn geregistreerd.
Na de storing van een automaat of een onderhoudsupdate.
Een reset uitvoeren:
Klik op APB resetten.
|
|
Klik op Nee voor een algemene reset van de anti-passback.
Klik op Ja voor een groepsgewijze reset van de anti-passback.
|
|
Indien u op Ja hebt geklikt, selecteert u een groep via Groep kiezen in het dropdown-menu. Alle bezoekers uit deze groep worden naar een buitenzone verplaatst. Kies een buitenzone via Zone kiezen in het dropdown-menu.
|
|
Klik op APB resetten.
Klik op Ja om de reset van de anti-passback te bevestigen.
|
|
Automaten beheren
Er zijn vijf verschillende soorten automaten:
Inrij-automaten (1)
Uitrij-automaten (2)
Betaalautomaten (3)
Deuren (4)
Tweerichtingsbanen (5)
|
|
Het icoon voor iedere automaat toont hun status:
|
|
De automaat is actief en werkt normaal.
|
|
|
De bedrijfsmodus van deze automaat is ingesteld op Blijf gesloten. Bezoekers hebben geen doorgang.
|
|
|
De bedrijfsmodus van deze automaat is ingesteld op Blijf open. Bezoekers kunnen inrijden en uitrijden.
|
|
|
De bedrijfsmodus van deze automaat is ingesteld op Onderhoud. De automaat staat in de onderhoudsmodus. De automaat accepteert geen bezoekers.
|
|
|
De bedrijfsmodus van deze automaat is ingesteld op Vol. De barrière gaat alleen open voor bezoekers met toegang tot parkeerplaatsen die vol zijn. Dit zijn bijvoorbeeld medewerkers, onderhoudspersoneel of andere personen die te allen tijde toegang tot de parkeerplaats moeten hebben.
|
|
|
De bedrijfsmodus van deze automaat is ingesteld op Vrije doorgang. Accepteert bezoekers zonder te controleren op hun geldigheid, toestemming of schema.
|
|
|
De bedrijfsmodus van deze automaat is ingesteld op Buiten werking. Deze automaat is buiten werking en de barrière is gesloten.
|
|
|
De automaat is offline en de status is onbekend.
|
|
|
De bedrijfsmodus van deze automaat wordt afgedwongen. Alle schema's voor deze automaat worden overschreven.
|
De pagina van de automaat openen
De pagina van de automaat openen:
Klik op het icoon van een automaat in de parkeerplaats.
|
|
De pagina van de automaat wordt getoond.
|
|
U kunt:
Pop-upberichten van het intercomsysteem bekijken.
De status van deze automaat controleren (1).
De laatste geïdentificeerde bezoeker controleren (2).
De laatste belangrijke gebeurtenissen controleren (3).
Een afbeelding van de automaat bekijken (4).
De beveiligingscamera’s van deze automaat bekijken (5).
Een langere gebeurtenissenlijst bekijken (11).
* Dit is een afzonderlijk systeem. Oproepen worden niet gelogd in ParkID.
Onderhoudsberichten controleren en wissen
Onderhoudsberichten worden getoond in de onderhoudsomgeving:
|
|
Zodra het probleem is verholpen, kunt u het bericht verwijderen door te klikken op . Deze actie wordt gelogd in het systeem als een gebeurtenis.
De bedrijfsmodus van een automaat wijzigen
U kunt de automaten in de volgende bedrijfsmodi zetten:
|
Bedrijfsmodus
|
Inrij-automaat
|
Uitrij-automaat
|
Betaalautomaat
|
Deur
|
|
Actief. Deze automaat werkt normaal.
|
X
|
X
|
X
|
X
|
|
Blijf gesloten. De automaat is continu gesloten. Bezoekers hebben geen doorgang.
|
X
|
X
|
X
|
|
|
Blijf open. De automaat is continu open. Bezoekers kunnen inrijden en uitrijden.
|
X
|
X
|
X
|
|
|
Onderhoud. De automaat staat in de onderhoudsmodus. De automaat accepteert geen bezoekers.
|
X
|
X
|
X
|
X
|
|
Vol. De barrière gaat alleen open voor bezoekers met toegang tot parkeerplaatsen die vol zijn. Dit zijn bijvoorbeeld medewerkers, onderhoudspersoneel of andere personen die te allen tijde toegang tot de parkeerplaats moeten hebben.
|
X
|
|||
|
Vrije doorgang Accepteert bezoekers zonder te controleren op hun geldigheid, toestemming of schema.
|
X
|
X
|
X
|
|
|
Buiten werking Deze automaat is buiten werking en de barrière is gesloten.
|
X
|
X
|
X
|
X
|
Het systeem beheert de volgende bedrijfsmodi:
Slaapstand. Het scherm van de automaat wordt uitgeschakeld om energie te besparen. Het scherm wordt ingeschakeld bij aankomst van een bezoeker en de automaat schakelt over op de bedrijfsmodus Actief.
Offline. Er is geen verbinding tussen het systeem en de automaat. De automaat heeft beperkte functionaliteit.
De bedrijfsmodus van een automaat wijzigen:
Klik op Actief, Blijf gesloten, Blijf open, Onderhoud, Vol, Vrije doorgang of Buiten werking. U kunt de Slaapstand niet handmatig activeren vanuit dit scherm.
Kies Bedrijfsmodus forceren als u bijvoorbeeld een schema wilt negeren.
|
|
Klik op Ja om uw keuze te bevestigen.
Een tweerichtingsbaan configureren
Een tweerichtingsbaan is een baan met:
Eén barrière met terminals aan weerszijden of
|
|
Twee barrières met een eigen terminal.
|
|
Een tweerichtingsbaan kan zo worden geconfigureerd dat deze fungeert als inrij- of uitrij-automaat.
U kunt de configuratie van een tweerichtingsbaan handmatig instellen op een inrij- of uitrij-automaat.
Dit werkt als volgt:
Klik in het gedeelte voor tweerichtingsbanen op .
|
|
Selecteer in het dropdown-menu de inrij- of uitrij-automaat die actief is voor deze baan.
|
|
Klik op Opslaan.
Voer een reden in voor de wijziging.
|
|
Selecteer Bedrijfsmodus forceren alleen als u een schema wilt overschrijven.
Klik op Opslaan.
De configuratie wordt opgeslagen en de tweerichtingsbaan functioneert nu naar wens.
De barrière openen of sluiten
Deuren en inrij- en uitrij-automaten kunnen worden gesloten of geopend.
De barrière openen of sluiten:
Klik op de knop Barrière openen of Barrière sluiten op de pagina van de automaat.
|
|
Kies in het dropdown-menu Optie kiezen een voorgedefinieerde reden of kies Stuur een bericht naar de automaat om handmatig een korte beschrijving van de reden voor deze actie in te voeren.
Klik op Verzenden.
Een vervangende kaart aanmaken
U kunt een vervangende kaart aanmaken bij betaalautomaten en uitrij-automaten met een betaalfunctie.
Een vervangende kaart aanmaken:
Klik op de knop Vervangende kaart.
|
|
Indien het kaartnummer van de bezoeker bekend is of het kenteken werd geregistreerd bij binnenkomst, dan kunt u op basis van deze informatie een vervangende kaart aanmaken. Dit werkt als volgt:
Klik op Gebruik kaartnummer of kenteken.
|
|
Voer het kaartnummer, kenteken of een ander geregistreerd gegeven in en klik op Verzenden of klik op of zoek naar bezoek.
Filter de bezoekerslijst op Bezoekersidentificator of gegevens, datum van Inrijden, en/of automaat. Zoek en selecteer de bezoeker en klik op Kaart aanmaken voor deze bezoeker.
|
|
U kunt ook een vervangende kaart aanmaken zonder bezoekersgegevens in te voeren. U kunt:
Een kaart aanmaken voor een vooraf bepaalde prijs: Verloren kaart.
Een datum en tijd van inrijden invoeren om een kaart aan te maken op basis van de parkeertijd. U kunt eventueel een boete toevoegen.
Een kaart aanmaken voor een aangepast bedrag.
Dit werkt als volgt:
Klik op Kaartnummer of kenteken niet gebruiken.
|
|
Om een vervangende kaart aan te maken met een vooraf bepaalde prijs, klikt u op Verloren kaart en op Verzenden.
Om een kaart aan te maken op basis van parkeertijd klikt u op Datum/tijd van inrijden invoeren.
|
|
Klik op om een datum en tijd in te voeren.
om een datum en tijd in te voeren.
Klik op Verzenden.
U kunt eventueel kiezen voor Een boete toevoegen.
Kies het type tarief uit het dropdown-menu. Kies Gebruik tarief verloren kaart om de prijs te berekenen met het tarief voor verloren kaarten. Kies Gebruik tarief klanttype om te kiezen uit een lijst kortlopende contracten om de prijs te berekenen.
Klik op Verzenden.
Om een vervangende kaart aan te maken en te verkopen voor een aangepast bedrag, kiest u Voer een aangepast bedrag in.
|
|
Kies een valuta in het dropdown-menu en voer een bedrag in.
Klik op Verzenden.
De bezoeker wordt ingevoerd in de betaalstroom van de automaat.
Een automaat opnieuw opstarten
Een automaat opnieuw opstarten:
Klik op de knop Opnieuw opstarten op de pagina van de automaat.
|
|
Kies in het dropdown-menu Optie kiezen een voorgedefinieerde reden of kies Stuur een bericht naar de automaat om handmatig een korte beschrijving van de reden voor deze actie in te voeren.
Klik op Verzenden.
Tellers
Via tellers kunt u de volgende informatie weergeven:
Het aantal bezoekers in de parkeerplaats
Het aantal bezoekers in een zone van de parkeerplaats
Het aantal bezoekers met een abonnement
En vele andere variabelen.
Tellers worden weergegeven in het parkeerplaatsoverzicht, ofwel in een specifieke zone of in een daarvoor bestemd veld onder de zones.
|
|
Als een teller het verkeerde aantal weergeeft, dan kunt u deze handmatig aanpassen. Sommige tellers worden door het systeem beheerd en kunt u niet aanpassen. Een niet door het systeem beheerde teller aanpassen:
Klik op naast de teller die u wilt aanpassen.
naast de teller die u wilt aanpassen.
Pas de waarde aan en klik op Opslaan. Klik op om de wijzigingen te annuleren.
om de wijzigingen te annuleren.
|
|
U kunt de minimum- en maximumwaarden van de teller aanpassen en de zone waaraan hij is gekoppeld. Dit werkt als volgt:
Klik op naast de teller die u wilt aanpassen.
naast de teller die u wilt aanpassen.
Voer uw wijzigingen in en klik op Opslaan.
|
|
Gebeurtenissen
De volgende typen gebeurtenissen worden gelogd:
Bezoekers die inrijden en uitrijden
Problemen met inrijden of uitrijden
Problemen met automaten
Handelingen van een beheerder in het systeem
Systeemberichten
Klik op Gebeurtenissen in de menubalk voor een lijst van gebeurtenissen.
|
|
|
De vijf meest recente systeemmeldingen (2)
|
Statusberichten van de parkeerplaats
Het systeem toont status- en meldingsberichten in een gele balk. Een offline parkeerplaats kan niet worden gebruikt. Een niet gesynchroniseerde parkeerplaats kan worden gebruikt, maar de feedback van de parkeerplaats kan onnauwkeurig zijn. De status van de barrières kan bijvoorbeeld incorrect zijn, of de toegangen en uitgangen worden niet correct weergegeven.
|
|
Systeemmeldingen controleren en verwijderen
Systeemmeldingen vereisen actie. Als het papier van een automaat bijvoorbeeld bijna op is, dan moet dit worden gecontroleerd en verholpen.
Als de systeemmelding is gecontroleerd en de oorzaak is verholpen:
Klik op Verwijderen.
|
|
Klik op OK om de melding goed te keuren.
|
|
Voor een volledige lijst van systeemmeldingen:
Klik op Naar overzicht systeemmeldingen of
Klik op in de menubalk.
in de menubalk.
|
|
|
|
U kunt meldingen filteren op:
Datum en tijd (Van en Tot)
Parkeerplaats
Locatie: waar de gebeurtenis plaatsvond.
Type gebeurtenis
Status: of de melding openstaat of is verholpen.
Klik op Toepassen om de filters toe te passen op de lijst met meldingen.
Er worden drie soorten meldingen weergegeven:
|
|
Kritieke melding
Een zeer belangrijk bericht aan de gebruiker over een onverwachte gedraging of status van het systeem die grote gevolgen kan hebben voor de systeemprestatie, gebruikerservaring of bezoekerservaring.
|
|
|
Melding
Een belangrijk bericht aan de gebruiker over een onverwachte gedraging of status van het systeem
|
|
|
Verzoek tot gebruikersactie
Een bericht om de gebruiker aan te zetten tot actie
|
U kunt alle meldingen in één keer verwijderen. Zorg dat alle problemen zijn verholpen voordat u dit doet. De lijst van open meldingen is leeg nadat u de meldingen heeft verwijderd. Klik op Verwijderd in het dropdown-menu Status om alle gewiste meldingen te bekijken.
Klik op Verwijder alle systeemmeldingen.
Klik op OK.
Alle meldingen zijn verwijderd.
|
|
Gebeurtenissen filteren
In het tabblad Gebeurtenissen kunt u gebeurtenissen filteren op:
Datum en tijd (Van en Tot)
Parkeerplaats
Type gebeurtenis
Automaten
Gegevens (alle gegevens van een gebeurtenis, zoals bezoekersnaam, betaalkaartnummer, bedrag, de laatste vier getallen van een creditcard, enz.)
Klik op Toepassen om de filters toe te passen.
|
|
U ziet een gefilterde lijst van gebeurtenissen.
Lijst van gebeurtenissen
Klik in het tabblad Gebeurtenissen naast een gebeurtenis op voor een gedetailleerde beschrijving ervan.
voor een gedetailleerde beschrijving ervan.
|
|
Links naar bezoekers
Gebeurtenissen van bezoekers kunnen diepe links bevatten naar een bezoekersprofiel:
|
|
Ga als volgt te werk om een bezoeker weer te geven:
Klik op de blauwe naam of identificator van de bezoeker in de lijst met gebeurtenissen.
|
|
Op dit scherm kunt u:
De automaat en de camerafeed (1) zien
Een lijst met gebeurtenissen voor deze bezoeker (2) zien
Acties uitvoeren voor de bezoeker en automaat (3)
Een snelkoppeling uitvoeren of een ander contract toewijzen (4)
Acties uitvoeren voor de bezoeker en automaat
U kunt:
Een anti-passbackreset uitvoeren
Opmerkingen toevoegen aan bezoekersinformatie
Contractgegevens weergeven en bewerken
Handmatig uitchecken met facturering
De automaat op afstand bedienen
De barrière openen of sluiten
De automaat opnieuw opstarten
Een anti-passbackreset uitvoeren
ParkID detecteert misbruik van toegangsidentificatoren. Dit staat bekend als anti-passback. Bijvoorbeeld wanneer dezelfde toegangsidentificatoren tegelijkertijd worden gebruikt door twee of meer bezoekers.
De informatie van de anti-passbackdetectie kan incorrect zijn in de volgende gevallen:
Na een noodgeval, als de uitgangen niet correct zijn geregistreerd.
Na de storing van een automaat of een onderhoudsupdate.
Ga als volgt te werk om een anti-passback uit te voeren voor een bezoeker:
Klik op Anti-passbackreset
Klik op ...
Een opmerking toevoegen aan bezoekersinformatie
Opmerkingen worden weergegeven in de lijst met Gebeurtenissen. Ga als volgt te werk om een opmerking toe te voegen:
Klik op Opmerking toevoegen aan bezoekersinformatie.
Typ uw opmerking in de balk.
Klik op Opslaan.
De opmerking wordt opgeslagen en is zichtbaar in Gebeurtenissen.
Contractgegevens weergeven en bewerken
Klik op Contractgegevens weergeven om contractgegevens weer te geven en te bewerken. Het contractscherm wordt weergegeven.
Raadpleeg ‘Gegevens bewerken’ om meer te leren over het bewerken van de gegevens van een bezoeker.
Raadpleeg ‘Een contract bewerken’ om meer te leren over het bewerken van contracten.
Handmatig uitchecken met facturering
Ga als volgt te werk om handmatig uit te checken met facturering:
Klik op Uitchecken met facturering.
Selecteer een Buitenzone waarnaar u deze bezoeker wilt verplaatsen.
Voer ofwel een bedrag in en selecteer een valuta of
Voer een Uitrijdatum en tijdstip in. Het systeem zal de kosten berekenen op basis van de regels in het contract van de bezoeker.
Klik op Verzenden.
Het vertrek van de bezoeker wordt geregistreerd en zal worden gefactureerd.
De automaat op afstand bedienen
Gebruik bediening op afstand om:
Verwerking van de bezoeker opnieuw in te stellen
De software in de automaat opnieuw op te starten
De automaat uit te schakelen
De automaat te stoppen
Ga als volgt te werk om de bediening op afstand te gebruiken:
Klik op Bediening op afstand.
Selecteer een optie in het dropdown-menu.
Voer een opmerking in voor de actie.
Klik op Verzenden.
De actie wordt uitgevoerd.
|
|
De barrière openen of sluiten
Deuren en inrij- en uitrij-automaten kunnen worden gesloten of geopend.
De barrière openen of sluiten:
Klik op de knop Barrière openen of Barrière sluiten.
Kies in het dropdown-menu Optie kiezen een voorgedefinieerde reden of kies Stuur een bericht naar de automaat om handmatig een korte beschrijving van de reden voor deze actie in te voeren.
Klik op Verzenden.
Een automaat opnieuw opstarten
Een automaat opnieuw opstarten:
Klik op de knop Opnieuw opstarten.
Kies in het dropdown-menu Optie kiezen een voorgedefinieerde reden of kies Stuur een bericht naar de automaat om handmatig een korte beschrijving van de reden voor deze actie in te voeren.
Klik op Verzenden.
Kortingskaarten
Kortingskaarten worden door groepen gebruikt om hun bezoekers gratis of goedkopere parkeerplaatsen te bieden. Een kortingskaart is meestal een papieren kaart met een unieke barcode en volgnummer. Kortingskaarten zijn alleen geldig in combinatie met een parkeerkaart of andere identificator.
|
|
|
|
Voorbeeld kortingskaart met barcode.
|
Voorbeeld kortingskaart met QR-code.
|
klik hier als u meer wilt weten over het aanmaken van eenmalige uitrijkaarten.
Kortingskaarten aanmaken
U kunt een nieuwe set kortingskaarten aanmaken op basis van een kortingskaartsjabloon of u kunt een set aangepaste kortingskaarten aanmaken.
Aangepaste kortingskaarten aanmaken
Eén of meer gepersonaliseerde kortingskaarten aanmaken voor een groep:
Klik op Kortingskaarten in de menubalk.
Klik vervolgens op Kortingen.
|
|
Kies uit het dropdown-menu Parkeerplaatsen de parkeerplaats waarvoor de kortingskaarten moeten worden aangemaakt.
Klik vervolgens op Korting toevoegen.
|
|
Klik op Aangepaste kortingen aanmaken.
|
|
Kortingsspecificaties
Kies de Verstrekkende groep uit het dropdown-menu.
Kies het Type korting uit het dropdown-menu.
|
|
Er zijn vijf typen korting:
Kortingsbedrag
Bepaalde tijd
Percentage
Verkoopbedrag
Tariefwisseling
Kortingsbedrag
Een bepaald bedrag wordt in mindering gebracht van het verschuldigde bedrag.
Bijvoorbeeld: een bezoeker die €10 moet betalen en een kortingskaart heeft met een bepaald bedrag van €6, betaalt €4.
Vul het Kortingsbedrag in.
Kies de toepasbare valuta uit het dropdown-menu.
|
|
Bepaalde tijd
Een bepaalde tijdsperiode wordt afgetrokken van de totale parkeertijd.
Bijvoorbeeld: een bezoeker die 1,5 uur heeft geparkeerd en een kortingskaart heeft met een bepaalde tijd van twee uur mag gratis uitrijden.
Vul het aantal Dagen, Uren en Minuten in in de bijbehorende velden.
|
|
Percentage
Het verschuldigde bedrag wordt verlaagd met een bepaald percentage van het oorspronkelijke bedrag.
Bijvoorbeeld: een bezoeker die €10 moet betalen en een kortingskaart heeft van 50%, betaalt €5.
Vul het Percentage in in hele getallen, zonder decimalen.
Vul een maximaal kortingsbedrag in, indien van toepassing.
Bijvoorbeeld: het maximale kortingsbedrag is €10 en een bezoeker moet €50 euro betalen. Hij heeft een kortingskaart van 50%, ontvangt de maximale korting van €10 en betaalt €40.
|
|
Verkoopbedrag
Het verschuldigde bedrag wordt vervangen met een bepaald bedrag.
Bijvoorbeeld: een bezoeker die €10 moet betalen en een kortingskaart heeft met verkoopbedrag van €3, betaalt €3.
Vul het Verkoopbedrag in in hele getallen, zonder decimalen.
|
|
Tariefwisseling
Het tarief dat wordt toegepast op de parkeertijd wordt gewijzigd.
Bijvoorbeeld: een bezoeker die 4 uur overdag heeft geparkeerd voor €2,50/uur en een kortingskaart met tariefwisseling heeft voor het gunstigere nachttarief van €2/uur, betaalt €8.
Kies een Tarief uit het dropdown-menu.
|
|
Kortingskaarten worden betaald door de verstrekkende groep. U kunt de kosten bij de groep in rekening brengen:
Wanneer de kaarten worden aangemaakt (in rekening brengen bij uitgifte). Alle kaarten worden betaald, ongeacht of ze gebruikt worden.
Wanneer de kaarten daadwerkelijk worden gebruikt (in rekening brengen bij transactie). Ongebruikte kaarten worden niet in rekening gebracht.
Als u de kosten bij de groep in rekening brengt wanneer de kaarten daadwerkelijk worden gebruikt, kunt u:
Een bepaalde prijs per kaart bepalen (bepaalde prijs bij transactie), ongeacht de daadwerkelijke waarde van de korting. Bijvoorbeeld: u kunt een set kortingskaarten aanmaken met een percentagekorting van 50% en ze verkopen voor €2,50 per stuk.
Het exacte kortingsbedrag in rekening brengen (exacte prijs bij transactie).
Wanneer u uw keuze heeft gemaakt:
Kies het Type afrekening uit het dropdown-menu.
|
|
Vul het In rekening gebrachte bedrag in, indien van toepassing.
|
|
Kies een valuta uit het dropdown-menu.
Klik op Volgende stap.
Geldigheid
Kortingskaarten zijn beperkt geldig. U moet een datumbereik invoeren waarbinnen de kortingskaarten geldig zijn. U kan ook een tijdvak instellen waarbinnen ze geldig zijn. Bijvoorbeeld tussen 09:00 en 18:00.
|
|
Kies een Geldigheidstype uit het dropdown-menu. Dit kan een periode zijn in dagen vanaf de aanmaakdatum of een specifiek datumbereik.
Indien u kiest voor Periode, vul dan de Periode in dagen in.
|
|
Indien u kiest voor Specifiek, kies dan een startdatum en een einddatum.
|
|
Een tijdvak instellen waarbinnen de korting kan worden toegepast:
Vul een start- en eindtijd in bij het veld Toegestaan gebruik.
|
|
U kunt kortingskaarten geldig maken voor één of meerdere keren of voor een ongelimiteerd aantal keren. Onder Aantal gebruiken
Zet Onbeperkt op Ja als u kaarten wilt zonder gebruiksbeperking.
Zet Onbeperkt op Nee als u het gebruik van de kaarten wilt beperken. Vul het maximaal Aantal gebruiken in.
|
|
Klik op Volgende stap.
Afdrukopties
Stel het Aantal kortingskaarten in om aan te maken. Het maximale aantal kaarten is 9.999.
Kies de gewenste Papierinstellingen.
Vink Exporteer als CSV aan als u de volgnummers en barcodenummers in een apart bestand wilt bewaren.
Klik op Kortingskaarten aanmaken.
|
|
Een PDF-bestand met kortingskaarten wordt aangemaakt voor het afdrukken. Een CSV-bestand wordt aangemaakt om te downloaden, indien aangevinkt.
Belangrijk! Dit bestand wordt nergens anders in het systeem opgeslagen. Het is alleen toegankelijk op het moment van aanmaken, vanuit dit venster.
Bewaar of print het PDF-bestand met de kortingskaarten rechtstreeks vanuit dit venster.
Sjablonen maken voor kortingskaarten
Gebruik sjablonen indien u dezelfde set kortingskaarten meerdere keren wilt aanmaken. Iedere set kortingskaarten die via een sjabloon wordt aangemaakt:
is voor dezelfde parkeerplaats,
voor dezelfde verstrekkende groep,
heeft hetzelfde type korting,
en dezelfde geldigheid.
Een sjabloon aanmaken:
Klik op Kortingskaarten in de menubalk.
Klik vervolgens op Sjabloon kortingskaart.
|
|
Kies uit het dropdown-menu Parkeerplaatsen de parkeerplaats waarvoor het sjabloon moet worden aangemaakt.
Klik vervolgens op Sjabloon toevoegen.
|
|
Geef dit sjabloon een Naam.
Kies de Verstrekkende groep uit het dropdown-menu.
Kies het Type korting uit het dropdown-menu.
|
Type korting
|
|
Er zijn vijf typen korting:
Kortingsbedrag
Bepaalde tijd
Percentage
Verkoopbedrag
Tariefwisseling
Kortingsbedrag
Een bepaald bedrag wordt in mindering gebracht van het verschuldigde bedrag.
Bijvoorbeeld: een bezoeker die €10 moet betalen en een kortingskaart heeft met een bepaald bedrag van €6, betaalt €4.
Vul het Kortingsbedrag in.
Kies de toepasbare valuta uit het dropdown-menu.
Bepaalde tijd
Een bepaalde tijdsperiode wordt afgetrokken van de totale parkeertijd.
Bijvoorbeeld: een bezoeker die 1,5 uur heeft geparkeerd en een kortingskaart heeft met een bepaalde tijd van twee uur mag gratis uitrijden.
Vul het aantal Dagen, Uren en Minuten in in de bijbehorende velden.
Percentage
Het verschuldigde bedrag wordt verlaagd met een bepaald percentage van het oorspronkelijke bedrag.
Bijvoorbeeld: een bezoeker die €10 moet betalen en een kortingskaart heeft van 50%, betaalt €5.
Vul het Percentage in in hele getallen, zonder decimalen.
Vul een maximaal kortingsbedrag in, indien van toepassing.
Bijvoorbeeld: het maximale kortingsbedrag is €10 en een bezoeker moet €50 euro betalen. Hij heeft een kortingskaart van 50%, ontvangt de maximale korting van €10 en betaalt €40.
Verkoopbedrag
Het verschuldigde bedrag wordt vervangen met een bepaald bedrag.
Bijvoorbeeld: een bezoeker die €10 moet betalen en een kortingskaart heeft met verkoopbedrag van €3, betaalt €3.
Vul het Verkoopbedrag in in hele getallen, zonder decimalen.
Tariefwisseling
Het tarief dat wordt toegepast op de parkeertijd wordt gewijzigd.
Bijvoorbeeld: een bezoeker die 4 uur overdag heeft geparkeerd voor €2,50/uur en een kortingskaart met tariefwisseling heeft voor het gunstigere nachttarief van €2/uur, betaalt €8.
Kies een Tarief uit het dropdown-menu.
|
Kies het Type afrekening uit het dropdown-menu.
|
Type afrekening
|
|
Kortingskaarten worden betaald door de verstrekkende groep. U kunt de kosten bij de groep in rekening brengen:
Wanneer de kaarten worden aangemaakt (in rekening brengen bij uitgifte). Alle kaarten worden betaald, ongeacht of ze gebruikt worden.
Wanneer de kaarten daadwerkelijk worden gebruikt (in rekening brengen bij transactie). Ongebruikte kaarten worden niet in rekening gebracht.
Als u de kosten bij de groep in rekening brengt wanneer de kaarten daadwerkelijk worden gebruikt, kunt u:
Een bepaalde prijs per kaart bepalen (bepaalde prijs bij transactie), ongeacht de daadwerkelijke waarde van de korting. Bijvoorbeeld: u kunt een set kortingskaarten aanmaken met een percentagekorting van 50% en ze verkopen voor €2,50 per stuk.
Het exacte kortingsbedrag in rekening brengen (exacte prijs bij transactie).
Wanneer u uw keuze heeft gemaakt:
Kies het Type afrekening uit het dropdown-menu.
Vul het In rekening gebrachte bedrag in, indien van toepassing.
Kies een valuta uit het dropdown-menu.
Klik op Volgende stap.
|
Vul het In rekening gebrachte bedrag in, indien van toepassing.
Kies een valuta uit het dropdown-menu.
Klik op Volgende stap.
Kies de geldigheid
|
Geldigheid
|
|
Kortingskaarten zijn beperkt geldig. U moet een datumbereik invoeren waarbinnen de kortingskaarten geldig zijn. U kan ook een tijdvak instellen waarbinnen ze geldig zijn. Bijvoorbeeld tussen 09:00 en 18:00.
Kies een Geldigheidstype uit het dropdown-menu. Dit kan een periode zijn in dagen vanaf de aanmaakdatum of een specifiek datumbereik.
Indien u kiest voor Periode, vul dan de Periode in dagen in.
Indien u kiest voor Specifiek, kies dan een startdatum en een einddatum.
Een tijdvak instellen waarbinnen de korting kan worden toegepast:
Vul een start- en eindtijd in bij het veld Toegestaan gebruik.
U kunt kortingskaarten geldig maken voor één of meerdere keren of voor een ongelimiteerd aantal keren. Onder Aantal gebruiken
Zet Onbeperkt op Ja als u kaarten wilt zonder gebruiksbeperking.
Zet Onbeperkt op Nee als u het gebruik van de kaarten wilt beperken. Vul het maximaal Aantal gebruiken in.
Klik op Volgende stap.
|
Klik op Sjabloon toevoegen.
Aanmaken kortingskaarten op basis van een sjabloon
Een set kortingskaarten aanmaken met een sjabloon:
Klik op Kortingskaarten in de menubalk.
Klik vervolgens op Kortingen.
|
|
Kies uit het dropdown-menu Parkeerplaatsen de parkeerplaats waarvoor de kortingskaarten moeten worden aangemaakt.
Klik vervolgens op Korting toevoegen.
|
|
Kies een sjabloon uit het dropdown-menu
|
|
Klik op Volgende stap.
Stel de afdrukopties
|
Afdrukopties
|
|
Stel het Aantal kortingskaarten in om aan te maken. Het maximale aantal kaarten is 9.999.
Kies de gewenste Papierinstellingen.
Vink Exporteer als CSV aan als u de volgnummers en barcodenummers in een apart bestand wilt bewaren.
|
Klik op Kortingskaarten aanmaken.
Een PDF-bestand met kortingskaarten wordt aangemaakt voor het afdrukken.
Belangrijk! Dit bestand wordt nergens anders in het systeem opgeslagen. Het is alleen toegankelijk op het moment van aanmaken, vanuit dit venster.
U kunt ook deze stappen volgen:
Klik op Kortingskaarten in de menubalk.
Klik vervolgens op Sjabloon kortingskaart.
|
|
Kies een Parkeerplaats of een Groep en klik op Zoeken om een sjabloon te vinden.
Klik op het sjabloon dat u wilt bewerken.
|
|
Klik op Korting toevoegen.
|
|
Klik op Volgende stap.
Stel de afdrukopties in
|
Afdrukopties
|
|
Stel het Aantal kortingskaarten in om aan te maken. Het maximale aantal kaarten is 9.999.
Kies de gewenste Papierinstellingen.
Vink Exporteer als CSV aan als u de volgnummers en barcodenummers in een apart bestand wilt bewaren.
|
Klik op Kortingskaarten aanmaken.
Een sjabloon bewerken
Gegevens in een sjabloon aanpassen:
Klik op Kortingskaarten in de menubalk.
Klik vervolgens op Sjabloon kortingskaart.
|
|
Kies een Parkeerplaats of een Groep en klik op Zoeken om een sjabloon te vinden.
Klik op het sjabloon dat u wilt bewerken.
|
|
Klik op Gegevens aanpassen.
|
|
Voer uw wijzigingen in en klik op Opslaan.
Kortingskaarten gebruiken
Een kortingskaart kan worden gebruikt wanneer:
Het moment van gebruik binnen de geldigheidsduur valt.
De kaart nog één of meerdere keren kan worden gebruikt.
De kaart is geactiveerd.
De verstrekkende groep in het systeem bestaat.
Let op:
Een kortingskaart kan slechts één keer per parkeertransactie worden gebruikt.
Per parkeertransactie kunnen meer dan één kortingskaarten worden gebruikt.
Wanneer een bezoeker in het betaalproces van een parkeertransactie zit, de kortingskaart heeft gebruikt, maar besluit de transactie te annuleren en later terug te komen, dan blijft de korting bewaard. De korting wordt toegepast wanneer de bezoeker terugkeert.
Kortingskaarten kunnen niet worden gebruikt voor het kopen van abonnementen of het aanvullen van tegoedkaarten.
Kortingskaarten zijn wel te combineren met een betaling via een tegoedkaart.
Kortingskaarten zijn niet geldig voor vervangende parkeerkaarten, vervallen producten of voorafbetaalde parkeerkaarten
Kortingskaarten zoeken
U kunt kortingskaarten vinden door te zoeken op:
volgnummer
barcode
parkeerplaats
verstrekkende groep
Zoeken naar het volgnummer of de barcode:
Klik op Kortingskaarten in de menubalk.
Voer in het zoekveld het volgnummer of de barcode in.
Klik op de kortingskaart in het dropdown-menu.
|
|
Zoeken op parkeerplaats of verstrekkende groep:
Klik op Kortingskaarten in de menubalk.
Klik op Kortingen.
Kies de Parkeerplaats uit het dropdown-menu.
Of kies de verstrekkende Groep uit het dropdown-menu.
Klik op Zoeken.
Kies de gewenste kortingskaart.
|
|
LET OP: Sommige kortingen in de lijst hebben geen volgnummer of barcode. Dit zijn directe kortingen of kortingen met andere identificatoren, zoals:
AWID
HID
het kenteken
MAGSTRIPE
MIFARE
NEDAP
RFID
Token
PROTON
Contracten
Contracten bevatten regels omtrent betaling, toegangsrechten en andere parkeergerelateerde overeenkomsten.
Contracten worden toegewezen aan bezoekers. Iedere bezoeker heeft een contract.
Een bezoeker is een persoon met toegangsrechten.
Een groep is gewoonlijk een bedrijf dat de betaling en toegang voor meerdere bezoekers regelt.
Een contract wordt als volgt toegewezen:
Automatisch, bijvoorbeeld wanneer een nieuwe bezoeker een kaart krijgt van de inrij-automaat.
Handmatig, bijvoorbeeld wanneer een bezoeker wordt aangemaakt met een groepsabonnement of bij het aanmaken van een eenmalige uitrijkaart.
Contracttypen
Contracttypen zijn sjablonen voor contracten. Iedere parkeerplaats heeft haar eigen verzameling contracttypen. Indien u hetzelfde type contract wilt gebruiken op meerdere parkeerplaatsen, dan dient u deze handmatig aan te maken voor iedere parkeerplaats.
Een contracttype vinden
Een contracttype vinden:
Klik op Contracten in de menubalk.
Klik vervolgens op Contracttypen.
|
|
Maak vervolgens een keuze uit het volgende:
Typ de naam van het contracttype in de zoekbalk en klik op Zoeken.
|
|
Klik rechtstreeks op het contracttype, kies een parkeerplaats om te filteren op parkeerplaats of typ de naam van het contracttype in de zoekbalk en klik op Zoeken.
Een nieuw contracttype aanmaken
Een nieuw contracttype aanmaken:
Klik op Contracten in de menubalk.
Klik vervolgens op Contracttypen.
|
|
Kies uit het dropdown-menu Parkeerplaatsen de parkeerplaats waarvoor het contracttype moet worden aangemaakt.
|
|
Klik vervolgens op Contract toevoegen.
|
|
Vul een Naam in voor het nieuwe contracttype.
Zet Gegevens op Ja indien u adresgegevens nodig heeft. Dit is de standaard voor bezoekers met een abonnement.
Zet Gegevens op Nee indien er geen adresgegevens nodig zijn. Bijvoorbeeld als u een contracttype aanmaakt voor kortetermijnklanten.
Negeer het dropdown-menu Toekenbaar contracttype. Deze functie is momenteel niet in gebruik.
Stel het Geldigheidstype in. Kies tussen Onbeperkt, Tot datum en tijd, Tot periode na aanmaak. Deze instelling wordt alleen toegepast op automatisch toegevoegde bezoekers.
Controleer Standaard betaald tot indien dit contracttype gratis parkeertijd biedt. Bijvoorbeeld: het eerste uur is altijd gratis. Vul de gratis Dagen, Uren en Minuten in. Deze instelling wordt alleen toegepast op automatisch toegevoegde bezoekers.
Klik op Volgende stap.
|
|
Kies een Abonnementstype uit het dropdown-menu.
Er zijn vijf typen abonnementen:
kortetermijnklanten
groepsabonnement
voorafbetaald abonnement
reservering
waarde-abonnement
kortetermijnklanten
Kortetermijnklanten zijn bezoekers die voor een korte tijdsperiode blijven en achteraf voor hun bezoek betalen.
|
|
groepsabonnement
Een groep kan de toegang en betaling voor meerdere bezoekers regelen met een groepsabonnement. Het regelen van de betaling is optioneel; de kosten kunnen ook rechtstreeks bij bezoekers in rekening worden gebracht.
|
|
Kies in het dropdown-menu Vergeet bezoeker de optie Wanneer geldigheid afloopt om de link tussen de bezoeker en zijn identificatoren te verwijderen wanneer het contract ongeldig wordt. De identificatoren kunnen dan worden hergebruikt voor een andere bezoeker. Kies Nooit om de link tussen de bezoeker en zijn identificatoren altijd te bewaren. De identificatoren kunnen worden hergebruikt voor dezelfde bezoeker bij vernieuwing van het contract.
Kies in het dropdown-menu betalingsmethode de optie Via groepsfactuur om de groep een factuur te sturen. Kies Bij betaalautomaat wanneer de bezoekers van de groep zelf betalen.
Kies een Tarief poelschending uit het dropdown-menu. Lees hier meer over poelen.
voorafbetaald abonnement
Met een voorafbetaald abonnement kan een bezoeker per jaar, maand of week betalen voor het parkeren. Als er een tolerantieperiode is gespecificeerd, dan heeft de bezoeker ook toegang nadat zijn abonnement is verlopen. De bezoeker kan deze tolerantieperiode gebruiken om de parkeerplaats te betreden om zijn abonnement te verlengen.
reservering
Dit contracttype is voor reserveringen die gemaakt worden via externe systemen.
waarde-abonnement
Met een waarde-abonnement kan een bezoeker vooraf betalen voor een bepaalde parkeertijd. Na ieder bezoek worden de daadwerkelijke parkeerkosten afgetrokken van het voorafbetaalde bedrag. Parkeertijd kan volgens ieder tariefprofiel in rekening worden gebracht.
|
|
Wanneer u uw keuze heeft gemaakt:
Kies het gewenste Tariefprofiel.
Kies een aangepaste teller, indien van toepassing. Lees meer over aangepaste tellers hier.
Geef vervolgens de toegangsrechten per zone aan.
Zet Behoort tot op Ja als het normale tarief geldt voor deze zone. Zet deze instelling op Nee als het schendingstarief geldt voor deze zone.
Zet Toegestaan in op Ja als bezoekers met dit contracttype deze zone mogen betreden. Zo niet, zet deze instelling dan op Nee. Deze optie is alleen beschikbaar als deze parkeerplaats beperkt toegankelijke zones heeft.
Kies het Tariefprofiel voor dit contracttype in deze zone.
Wijs één zone aan als de Standaardzone. Slechts één zone kan de standaardzone zijn.
Klik op Volgende stap.
In het scherm voor geavanceerde instellingen:
Kunt u Speciale toegangsrechten instellen. Kies Bezoeker mag de parkeerplaats inrijden als de parkeerplaats vol is als dit contracttype van toepassing is op medewerkers, onderhoudspersoneel of andere personen die te allen tijde toegang tot de parkeerplaats moeten hebben. Kies Geen voor andere bezoekers.
|
ParkID detecteert misbruik van bezoekersidentificatoren. Dit staat bekend als anti-passback. Bijvoorbeeld wanneer dezelfde bezoekersidentificator tegelijkertijd wordt gebruikt door twee of meer bezoekers.
|
Gebruik het dropdown-menu Indien locatie onbekend om te bepalen wat er moet gebeuren als het in- of uitrijden niet correct wordt geregistreerd. Bijvoorbeeld in een noodgeval of wanneer een kortetermijnklant wordt omgezet naar een abonnement en een nieuwe kaart krijgt.
|
|
Gebruik het dropdown-menu Controleer huidige locatie bezoeker om te controleren op anti-passbackgedrag.
|
|
Gebruik het dropdown-menu Bezoekersidentificatoren om te bepalen hoe bezoekers toegang krijgen.
|
|
Kies voor dit contracttype de Verplichte identificatoren. Kies Geen als geen van de identificatoren verplicht zijn.
|
|
Zet Bezoeker bevestigt handmatig bij inrijden op Ja als bezoekers van dit contracttype hun inrijden moeten bevestigen. Bijvoorbeeld wanneer een bezoeker een identificator van een derde gebruikt, zoals ParkMobile. Zet deze instelling op Nee als het inrijden automatisch wordt geregistreerd.
|
|
Klik op Contract toevoegen.
Een contracttype aanpassen
Contracttypen en contracten zijn aan elkaar gekoppeld. De aanpassingen aan een bepaald contracttype worden toegepast op de contracten die dat contracttype gebruiken. Als u een van de velden in een contract aanpast, dan wordt de koppeling tussen dat veld en het bijbehorende veld in het contracttype verwijderd. Alle andere velden blijven gekoppeld.
Een contracttype aanpassen:
Klik op Contracten in de menubalk.
Klik vervolgens op Contracttypen.
|
|
Doorzoek de lijst en klik op het contracttype dat u wilt aanpassen of gebruik het zoekveld bij Type om het type te vinden en klik op het gewenste type.
|
|
Klik op Gegevens aanpassen of Contract aanpassen om het contracttype aan te passen.
|
|
Voer uw wijzigingen in en klik op Opslaan. Klik op Annuleren om de wijzigingen te annuleren.
Een schema toevoegen aan een contract
U kunt schema's met contracten gebruiken om toegang tot zones van de parkeerplaats te beperken op bepaalde dagen en tijdstippen.
Ga als volgt te werk om een schema toe te voegen aan een contract:
Klik op Contracten in de menubalk.
Klik vervolgens op Contracttypen.
|
|
Doorzoek de lijst en klik op het contracttype dat u wilt aanpassen of gebruik het zoekveld bij Type om het type te vinden en klik op het gewenste type.
|
|
Klik op Contract aanpassen.
Klik op Zoneschema toevoegen.
|
|
Selecteer de zones waarop dit schema van toepassing is.
|
|
Het schema wordt wekelijks herhaald. Binnen schema wordt getoond in oranje. Onder ‘Binnen schema’ wordt de bezoeker toegelaten. Buiten schema wordt grijs weergegeven. Onder ‘Buiten schema’ wordt de bezoeker niet toegelaten.
Sleep de oranje balk om Binnen schema te wijzigen.
|
|
Klik op om de oranje balk te verwijderen.
om de oranje balk te verwijderen.
Klik waar dan ook op de grijze balk om een nieuwe oranje balk te maken en sleep deze om de maat te bepalen.
|
|
Groepen
Een groep:
is een bedrijf dat de betaling en toegang voor meerdere bezoekers regelt en/of
een bedrijf dat kortingskaarten verstrekt.
Iedere groep behoort tot één parkeerplaats. Een groep kan niet behoren tot meerdere parkeerplaatsen. Als een bedrijf klant is van meerdere parkeerplaatsen, dan dient u bij iedere parkeerplaats een nieuwe groep aan te maken.
Een groep vinden
Een groep vinden:
Klik op Contracten in de menubalk.
Klik vervolgens op Groepen.
|
|
Maak vervolgens een keuze uit het volgende:
Typ de naam van de groep in de zoekbalk en klik op Zoeken.
|
|
Klik op de groep, kies een parkeerplaats om te filteren op parkeerplaats of typ de naam van de groep in de zoekbalk en klik op Zoeken.
Een groep aanmaken
Een nieuwe groep aanmaken:
Klik op Contracten in de menubalk.
Klik vervolgens op Groepen.
|
|
Kies uit het dropdown-menu Parkeerplaatsen de parkeerplaats waarvoor het contracttype moet worden aangemaakt.
|
|
Klik op Groep toevoegen.
Voer de groepsgegevens in en klik op Volgende stap.
|
|
Specificeer een Startdatum en een Einddatum voor de geldigheidsperiode van deze groep. Bezoekers in deze groep kunnen de parkeerplaats alleen betreden binnen de geldigheidsperiode.
|
|
|
Met Poelen kunt u het aantal bezoekers van een groep beperken. Er zijn drie soorten poelen:
1.
Bezoekers wordt de toegang geweigerd wanneer het maximaal aantal bezoekers is bereikt.
2.
Als poelschending wordt de gehele parkeertijd in rekening gebracht bij de bezoekers.
Bijvoorbeeld: een bezoeker (bezoek 1) rijdt de parkeerplaats in en maakt gebruik van de poel. Bezoek 1 wordt in rekening gebracht volgens het standaardtarief dat is ingesteld voor de groep. Wanneer bezoek 2 aankomt, is de poel vol. Voor bezoek 2 wordt voor de gehele parkeertijd een ander tarief in rekening gebracht.
3.
Alleen de parkeertijd gedurende de poelschending wordt in rekening gebracht bij de bezoekers.
Bijvoorbeeld: een bezoeker (bezoek 1) rijdt de parkeerplaats in en maakt gebruik van de poel. Bezoek 1 wordt in rekening gebracht volgens het standaardtarief dat is ingesteld voor de groep. Wanneer bezoek 2 aankomt, is de poel vol. Voor bezoek 2 wordt een ander tarief in rekening gebracht. Wanneer bezoek 1 uitrijdt, komt er een plek beschikbaar in de poel. Voor bezoek 2 wordt vanaf dat moment het standaardtarief in rekening gebracht.
|
Klik op Ja in het instellingenscherm voor Poelen als u wilt dat dit een poelgroep wordt. Klik op Nee als dit geen poelgroep betreft.
|
|
|
|
Specificeer het Maximaal aantal bezoekers in de poel.
|
|
Kies wat er gebeurt Als het maximale aantal is bereikt.
|
|
Klik op Groep toevoegen.
Een groep aanpassen
Een groep aanpassen:
Klik op Contracten in de menubalk.
Klik vervolgens op Groepen.
|
|
Doorzoek de lijst en klik op de groep die u wilt aanpassen of gebruik het zoekveld bij Naam groep om de groep te vinden en klik erop.
Klik op Gegevens aanpassen om de groep aan te passen.
|
|
Voer uw wijzigingen in en klik op Opslaan. Klik op Annuleren om de wijzigingen te annuleren.
Bezoekers
Iedere persoon met een auto en toegangsrechten tot de parkeerplaats is een bezoeker.
Bezoekers worden ingedeeld op basis van het abonnementstype van hun contract.
Kortetermijnklanten zijn bezoekers die voor een korte tijdsperiode blijven en achteraf voor hun bezoek betalen.
Bezoekers met een groepsabonnement maken deel uit van een groep. Leer hoe u een bezoeker aan een groep toevoegt en hoe u een bezoeker uit een groep verwijdert.
Andere abonnementstypen zijn een voorafbetaald abonnement, reservering en waarde-abonnement.
Iedere bezoeker krijgt toegang met tenminste één bezoekersidentificator. Voorbeelden van identificatoren zijn:
de barcode op de inrijkaart
het kenteken
een persoonlijke token op basis van een betaalkaart
een persoonlijke RFID
magstripe-kaarten
oplossingen voor toegangsbeheer van AWID, HID, MIFARE en NEDAP
Het contract van de bezoeker bepaalt welke identificator gebruikt dient te worden.
Een bezoeker vinden
Klik op Contracten in de menubalk om een bezoeker te vinden. Maak vervolgens een keuze uit het volgende:
Gebruik de zoekbalk en voer de bezoekersnaam in, het identificatornummer of de groep van de bezoeker. Wacht totdat de resultaten op het scherm worden weergegeven of klik op Zoeken.
|
|
Klik op Bezoekers, voer de zoekparameters in en klik op Zoeken.
|
|
Klik op het profiel van een bezoeker om:
Een bezoeker toevoegen
U gebruikt Bezoeker toevoegen om:
Aanmaken van een eenmalige uitrijkaart
Een eenmalige uitrijkaart aan te maken
Klik op Contracten in de menubalk.
Klik op Bezoekers.
|
|
Kies uit het dropdown-menu Parkeerplaatsen de parkeerplaats waarvoor de eenmalige uitrijkaart moet worden aangemaakt.
|
|
Klik op Bezoeker toevoegen.
Klik op Nee onder Is de bezoeker lid van een groep?
|
|
Kies het contracttype voor een eenmalige uitrijkaart uit het dropdown-menu Contract kiezen.
Klik op Volgende stap.
Klik nogmaals op Volgende stap.
|
|
Voer de data in waartussen de eenmalige uitrijkaart geldig is.
|
|
Klik op Volgende stap.
Vink Kaarten aanmaken aan.
|
|
Kies de gewenste Papierinstellingen.
Specificeer het Aantal aan te maken klanten.
Klik op Bezoeker toevoegen.
Er wordt een eenmalige uitrijkaart aangemaakt.
|
|
Een bezoeker aan een groep toevoegen
U kunt een bestaande bezoeker of een nieuwe bezoeker aan een groep toevoegen.
Ga als volgt te werk om een nieuwe bezoeker aan een groep toe te voegen:
Klik op Contracten in de menubalk.
Klik vervolgens op Groepen.
|
|
Doorzoek de lijst en klik op de groep die u wilt aanpassen of gebruik het zoekveld bij Naam groep om de groep te vinden en klik erop.
Klik op Leden toevoegen.
|
|
Selecteer in het dropdown-menu het contract voor deze bezoeker. Klik op Configuratie van contracttype weergeven om de details van dit contract weer te geven.
|
|
Klik op Volgende stap.
Voer de bezoekersgegevens in en klik op Volgende stap.
De volgende stap is afhankelijk van het gekozen contract. Sommige contracten bevatten een verplichte toegangsidentificator. Andere contracten geven de keuze welke toegangsidentificator u gebruikt.
Ga als volgt te werk als het contract geen verplichte bezoekersidentificator bevat:
Klik op Andere bezoekersidentificator toevoegen om een bezoekersidentificator toe te voegen.
|
|
Kies het type identificator in het dropdown-menu.
|
|
Kiest u voor Barcode, dan wordt er automatisch een barcode aangemaakt. Kiest u een ander type, dan voert u de bezoekersidentificator in in het tekstveld.
Klik, indien van toepassing, op Andere bezoekersidentificator toevoegen.
Klik op Volgende stap.
Stel een startdatum en een einddatum in om dit abonnement geldig te maken. Of kies Instellen op oneindig als er geen einddatum vereist is.
Klik op Volgende stap als u ‘Barcode’ als bezoekersidentificator hebt gekozen of klik op Bezoeker toevoegen als u een andere bezoekersidentificator hebt gekozen.
Als een barcode de enige identificator is:
Vink Kaarten aanmaken aan.
|
|
Kies de gewenste Papierinstellingen.
Specificeer het Aantal aan te maken klanten.
Klik op Bezoeker toevoegen.
Als de barcode niet de enige identificator is, dan kunt u de barcode uitprinten vanuit het bezoekersprofiel:
Klik op Bezoeker toevoegen.
Klik op om de barcode te printen.
om de barcode te printen.
|
|
Ga als volgt te werk om een bestaande bezoeker aan een groep toe te voegen:
Klik op Contracten in de menubalk.
|
|
Klik op Bezoekers.
Kies de Parkeerplaats uit het dropdown-menu.
|
|
Klik op Bezoeker toevoegen.
Klik op Ja bij de vraag ‘Is de bezoeker lid van een groep?’
|
|
Kies de groep in het dropdown-menu.
Kies een contract voor deze groep in het dropdown-menu. Klik op Configuratie van contracttype weergeven om de details van dit contract weer te geven.
Klik op Volgende stap.
Voer de bezoekersgegevens in en klik op Volgende stap.
De volgende stap is afhankelijk van het gekozen contract. Sommige contracten bevatten een verplichte bezoekersidentificator. Andere contracten geven de keuze welke bezoekersidentificator u gebruikt.
Ga als volgt te werk als het contract geen verplichte bezoekersidentificator bevat:
Klik op Andere bezoekersidentificator toevoegen om een bezoekersidentificator toe te voegen.
|
|
Kies het type identificator in het dropdown-menu.
|
|
Kiest u voor Barcode, dan wordt er automatisch een barcode aangemaakt. Kiest u een ander type, dan voert u de bezoekersidentificator in in het tekstveld.
Klik, indien van toepassing, op Andere bezoekersidentificator toevoegen.
Klik op Volgende stap.
Stel een startdatum en een einddatum in om dit abonnement geldig te maken. Of kies Instellen op oneindig als er geen einddatum vereist is.
Klik op Volgende stap als u ‘Barcode’ als bezoekersidentificator hebt gekozen of klik op Bezoeker toevoegen als u een andere bezoekersidentificator hebt gekozen.
Als een barcode de enige identificator is:
Vink Kaarten aanmaken aan.
|
|
Kies de gewenste Papierinstellingen.
|
|
Kies de gewenste Papierinstellingen.
Specificeer het Aantal aan te maken klanten.
Klik op Bezoeker toevoegen.
Als de barcode niet de enige identificator is, dan kunt u de barcode uitprinten vanuit het bezoekersprofiel:
Klik op Bezoeker toevoegen.
Klik op om de barcode te printen.
om de barcode te printen.
|
|
Een bezoeker toevoegen zonder groep
Een bezoeker zonder groep toevoegen:
Klik op Contracten in de menubalk.
Klik op Bezoekers.
|
|
Kies de parkeerplaats uit het dropdown-menu Parkeerplaatsen.
|
|
Klik op Bezoeker toevoegen.
Klik op Nee onder Is de bezoeker lid van een groep?
|
|
Kies het contracttype uit het dropdown-menu Contract kiezen.
|
|
Klik op Configuratie van contracttype weergeven om de details van dit contract weer te geven.
|
|
Klik op Volgende stap.
De volgende stap is afhankelijk van het gekozen contract. Sommige contracten bevatten een verplichte bezoekersidentificator. Andere contracten geven de keuze welke bezoekersidentificator u gebruikt.
Ga als volgt te werk als het contract geen verplichte bezoekersidentificator bevat:
Klik op Andere bezoekersidentificator toevoegen om een bezoekersidentificator toe te voegen.
|
|
Kies het type identificator in het dropdown-menu.
|
|
Kiest u voor Barcode, dan wordt er automatisch een barcode aangemaakt. Kiest u een ander type, dan voert u de bezoekersidentificator in in het tekstveld.
Klik, indien van toepassing, op Andere bezoekersidentificator toevoegen.
Klik op Volgende stap.
Kies het geldigheidstype voor dit contract. Dit kan ‘Periode’, ‘Duur’ of ‘Onbeperkt’ zijn.
|
|
Stel een startdatum en een einddatum in om dit contract geldig te laten zijn als het geldigheidstype op ‘Periode’ is ingesteld.
Als het geldigheidstype op ‘Duur’ is ingesteld, moet u de geldigheid invoeren in dagen, uren en minuten.
|
|
Klik op Volgende stap als u ‘Barcode’ als bezoekersidentificator hebt gekozen of klik op Bezoeker toevoegen als u een andere bezoekersidentificator hebt gekozen.
Als een barcode de enige identificator is:
Vink Kaarten aanmaken aan.
|
|
Kies de gewenste Papierinstellingen.
Specificeer het Aantal aan te maken klanten.
Klik op Bezoeker toevoegen.
Als de barcode niet de enige identificator is, dan kunt u de barcode uitprinten vanuit het bezoekersprofiel:
Klik op Bezoeker toevoegen.
Klik op om de barcode te printen.
om de barcode te printen.
|
|
Een bezoeker uit groep verwijderen
Klik op Contracten in de menubalk om een bezoeker uit een groep te verwijderen. Maak vervolgens een keuze uit het volgende:
Gebruik de zoekbalk en voer de bezoekersnaam in, het identificatornummer of de groep van de bezoeker. Druk op Zoeken.
|
|
Druk op Bezoekers, voer de zoekparameters in en druk op Zoeken.
|
|
Klik op het profiel van de bezoeker.
Klik op Contract aanpassen.
Klik op in het dropdown-menu Groep.
in het dropdown-menu Groep.
|
|
Klik op Opslaan.
De bezoeker is nu uit de groep verwijderd.
Gegevens aanpassen
Klik op Gegevens aanpassen in het profiel van de bezoeker.
|
|
Voer uw wijzigingen in en klik op Opslaan.
Klik op Annuleren om de wijzigingen te annuleren.
Een bezoeker op de zwarte lijst zetten
Ga naar het profiel van een bezoeker om deze op een zwarte lijst te zetten.
Klik op Contract aanpassen.
|
|
Scrol naar Geavanceerde instellingen en zet Bezoeker staat op zwarte lijst op Ja.
|
|
Geef een Reden voor zwarte lijst op en klik op Opslaan.
Klik op Annuleren om de wijzigingen te annuleren.
Identificatoren beheren
Klik op Identificatoren beheren in het profiel van de bezoeker.
|
|
Klik op Identificator toevoegen om nog een identificator toe te voegen. Kies het type identificator in het dropdown-menu, geef het identificatornummer op in het veld Bezoekersidentificator en zet de status op Actief.
Belangrijk! Er verschijnt een pop-upmelding indien een bepaalde identificator al wordt gebruikt door een andere bezoeker. U kunt de identificator van de andere bezoeker loskoppelen en toewijzen aan de bezoeker die u nu aanpast.
|
|
Klik op om een identificator te verwijderen.
om een identificator te verwijderen.
Klik op Opslaan om de wijzigingen op te slaan.
Klik op Annuleren om de wijzigingen te annuleren.
Een contract beëindigen
Klik op Contract beëindigen in het profiel van de bezoeker.
|
|
Voer de einddatum in en klik op Volgende stap.
|
|
Bepaal wat er gebeurt met de gegevens van de bezoeker als u het contract nu wilt beëindigen. Kies Wis bezoekersgegevens of Bewaar bezoekersgegevens. Deze optie is niet beschikbaar als u het contract wilt beëindigen op een specifieke datum in de toekomst.
|
|
Klik op Contract beëindigen om het contract te beëindigen.
Een contract aanpassen
Klik op Contract aanpassen in het profiel van de bezoeker.
|
|
Voer uw wijzigingen in en klik op Opslaan.
Klik op Terugzetten naar standaardinstellingen om alle aanpassingen aan het contracttype te verwijderen.
Klik op Annuleren om de wijzigingen te annuleren.
Afwijkingen van het contracttype worden in oranje weergegeven. Het contracttype zelf wordt niet gewijzigd.
|
|
Bezoekers in bulk bijwerken
Werk bij in bulk om:
Het systeem op te schonen.
Kortetermijnklanten naar buiten te schuiven en te beëindigen.
Een partij bezoekers te verplaatsen naar een nieuwe groep.
Het contracttype te wijzigen voor een partij bezoekers.
De geldigheidsperiode te wijzigen voor een partij bezoekers.
Meerdere bezoekers tegelijkertijd bijwerken:
Klik op Contracten in de menubalk.
Klik op Bezoekers.
|
|
Kies een Parkeerplaats.
|
|
Kies de gebruikers die u tegelijkertijd wilt bijwerken.
|
|
Klik op In bulk bijwerken.
Kies de eigenschappen om bij te werken.
LET OP: indien u Naar buiten verplaatsen gebruikt voor kortetermijnklanten, vergeet dan niet om ook Bezoeker beëindigen aan te vinken om uw systeem schoon te houden.
|
|
Klik op Bezoekers bijwerken.
LET OP: Het bijwerken van alle bezoekers kan even duren. Wacht totdat het blauwe lint met “Aan het bijwerken in bulk” verdwijnt.
|
|
Bezoekers exporteren
U kunt een .csv- of .pdf-bestand exporteren met gegevens over bezoekers van een parkeerplaats.
Ga als volgt te werk om bezoekersgegevens te exporteren:
Klik op Contracten in de menubalk.
Klik op Bezoekers.
|
|
Kies een Parkeerplaats.
|
|
Klik op Bezoekers exporteren.
|
|
Selecteer de indeling voor uw exportbewerking.
|
|
Selecteer of u de gegevens wilt sorteren op voornaam of achternaam.
Gebruik de selectievakjes in het dropdown-menu Gegevens om te bepalen welke gegevensvelden worden geëxporteerd en welke niet.
Klik op Bezoekers exporteren.
Er wordt een bestand met bezoekersgegevens in de geselecteerde indeling gegenereerd.
Monitoren van contractgebruik
U kunt contractgebruik monitoren:
Per bezoeker
Per groep
Vanuit een overzicht
Om contractgebruik te monitoren per bezoeker of groep klikt u op Contracten in de menubalk en maakt u een keuze uit het volgende:
Gebruik de zoekbalk en voer de bezoekersnaam in, het identificatornummer of de groep van de bezoeker. Druk op Zoeken.
|
|
Klik op Bezoekers ofGroepen en zoek op naam en/of parkeerplaats. Klik op Zoeken.
Klik op het profiel van een bezoeker of groep.
Scrol naar Contractgebruik.
Contractgebruik monitoren vanuit een overzicht:
Klik op Contracten in de menubalk.
|
|
Klik op Contractgebruik.
In dit overzicht worden alle gebeurtenissen met contracten getoond.
|
|
Klik op een rij voor details over een gebeurtenis.
Voer zoekparameters in en klik op Zoeken.
Tarieven
Tariefprofielen bevatten de regels voor het berekenen van het bedrag dat de bezoeker moet betalen voor de parkeertijd.
Bezoekers met een tariefprofiel volgens het model Vaste Prijs-tarief betalen parkeerkosten onafhankelijk van de parkeertijd.
Bezoekers met een tariefprofiel met een Tarieven-model betalen parkeerkosten afhankelijk van de parkeertijd.
Bezoekers met een tariefprofiel met een Tarieven met Schending-model betalen een extra bedrag wanneer ze parkeren buiten de toegestane uren. Dit model is voornamelijk van toepassing op abonnementhouders.
Welk tariefprofiel van toepassing is op een bezoeker wordt bepaald door het contract van de bezoeker.
Een tariefprofiel aanmaken
Klik op Tarieven in de menubalk.
|
|
Kies een Parkeerplaats uit het dropdown-menu.
Klik op Nieuw tariefprofiel toevoegen.
|
|
Voer een Naam in voor dit profiel.
|
|
Kies een Model voor dit profiel.
Tarief berekenen is van toepassing bij een tariefwisseling. U kunt dit op de standaardinstelling laten staan wanneer u een nieuw Tariefprofiel aanmaakt.
|
|
Een profiel met Vaste Prijs-tarief aanmaken
Voer de gegevens in voor het tariefplan om een profiel met Vaste Prijs-tarief af te ronden:
Stel een Startdatum in voor dit plan. Deze datum en tijd moeten in het verleden liggen.
|
|
Kies de valuta uit het dropdown-menu naast Bedrag.
Voer het Bedrag in.
Stel de schuifknop Overal in op Ja, tenzij u de bezoeker wilt laten betalen voor iedere zone die hij binnengaat.
Klik op Opslaan.
Een Tarieven-profiel aanmaken
Voor een Tarieven-profiel is het verkoopbedrag afhankelijk van het inrijmoment en de parkeerduur van de bezoeker.
Met dit type tariefprofiel kunt u bijvoorbeeld een ander tarief in de ochtend dan in de avond hanteren. Of een ander tarief op weekdagen dan in het weekend. U kunt met dit profiel ook tijdens het eerste uur parkeren een ander bedrag rekenen dan voor het tweede uur en verder.
Voor een Tarieven-profiel stelt u een reeks tariefvensters in. Een tariefvenster loopt bijvoorbeeld van 07:00 tot 19:00 of gewoon van 00:00 tot 00:00.
|
|
Binnen een tariefvenster kunt u meerdere tijdvakken kiezen met een tijdsduur en prijs (bedrag).
|
|
Het eerste tijdvak heeft in dit voorbeeld een Tijdsduur van 60 minuten, een prijs (Bedrag) van €0,00 per 60 minuten en is 1 keer actief (Activatie). Het tweede tijdvak heeft een Tijdsduur van 10 minuten en een prijs van €0,70 per 10 minuten. Dit herhaalt zich tot het einde van het tariefvenster (de Activatie staat ingesteld op 0, waardoor de Totale Tijdsduur oneindig is). Het bedrag van €0,70 wordt aan het totaal verschuldigde bedrag toegevoegd bij aanvang van ieder tijdvak, tot het einde van het tariefvenster of tot de bezoeker de parkeerplaats verlaat.
Scrol in het zojuist aangemaakte Tarieven-profiel naar de opties voor het Tariefplan om uw tariefvensters te bepalen.
Voer de Periode in voor het eerste tariefvenster.
|
|
Kies de dagen waarop dit tariefvenster van toepassing is. Dit kunnen gewone weekdagen zijn of speciale dagen. U kunt een tariefvenster met speciale dagen bijvoorbeeld instellen met een nultarief voor de feestdagen.
|
|
Klik op Tariefvenster toevoegen om een ander tariefvenster aan te maken. In dit voorbeeld hebben we twee tariefvensters per dag aangemaakt voor weekdagen en één tariefvenster per dag voor het weekend.
|
|
Klik op om de tijdvakken voor dit tariefvenster in te stellen. Klik op om een nieuw tijdvak toe te voegen.
om een nieuw tijdvak toe te voegen.
|
|
Stelt u een eindtijd in die gelijk is aan of eerder is dan de begintijd, dan valt de eindtijd op de volgende dag.
U kunt nog meer geavanceerde opties en voorwaarden instellen om ieder tariefvenster verder op maat te maken. Leer hoe.
Herhaal de vorige stappen voor de andere tariefvensters.
Scrol omhoog naar de opties voor het Tariefplan.
|
|
Kies een Valuta voor dit profiel.
Kies in het dropdown-menu Tariefvensters beëindigen de optie Volgens de ingestelde eindtijd om de tijdvakken te beëindigen volgens de ingestelde eindtijd van het tariefvenster. Kies Wanneer alle tijdvakken zijn toegepast om de tijdvakken voor hun totale tijdsduur te activeren.
In het voorbeeld van eerder is het tweede tijdvak ingesteld op een oneindige tijdsduur. Met de optie Volgens de ingestelde eindtijd zal dit tijdvak niet langer actief zijn zodra het tariefvenster eindigt. Na 19:00 start een nieuw tariefvenster. Het eerste tijdvak van dat nieuwe tariefvenster start op hetzelfde tijdstip. Met de optie Wanneer alle tijdvakken zijn toegepast zou het tweede tariefvenster actief blijven na 19:00 en wordt het nieuwe tariefvenster genegeerd.
|
|
Kiest u voor Volgens de ingestelde eindtijd, dan wordt de optie Beëindigen na tijdvak beschikbaar.
Voorbeeld 1: tijdvakken beëindigen
Laten we een voorbeeld nemen voor het effect van de beschikbare instellingen voor beëindiging. Het voorbeeld is gebaseerd op een tariefplan met een avondtariefvenster en opvolgend nachttariefvenster:
Het avondtariefvenster loopt van 20:00 tot 24:00.
Dit tariefvenster heeft vier tijdvakken van 60 minuten (in de afbeeldingen hieronder zijn er slechts drie zichtbaar).
Het tarief voor het eerste tijdvak is €1,00.
Het tarief voor het tweede en de volgende tijdvakken is €2,00.
Het volgende tariefvenster (het nachttariefvenster) begint om 0:00.
Het nachttariefvenster heeft meerdere tijdvakken van 120 minuten (in de afbeeldingen hieronder zijn er slechts twee zichtbaar).
Het tarief voor het ieder nachttijdvak is €5,00.
Beëindigen na tariefvenster staat ingesteld op Nee
Een bezoeker rijdt de parkeerplaats in om 22:45.
De bezoeker rijdt de parkeerplaats uit om 23:59.
De bezoeker betreedt de parkeerplaats tussen 20:00 en 24:00, dus het avondtariefvenster is toegepast. De tariefberekening start bij het eerste tijdvak van dat avondtariefvenster. Dit tijdvak begint om 22:45 en geldt voor 60 minuten, tot 23:45. Aangezien de bezoeker de parkeerplaats verlaat na 23:45, wordt het volgende tijdvak toegevoegd. Omdat 23:45 nog valt binnen het avondtariefvenster, wordt dit tweede tijdvak toegevoegd.
In totaal moet de bezoeker betalen voor de twee volledige tijdvakken:
€1,00 + €2,00 = €3,00
|
|
Als de bezoeker was vertrokken om 0:10 (dus 11 minuten later), dan had hij ook moeten betalen voor de twee volledige avondtijdvakken, omdat hij vertrok voordat het tweede avondtijdvak eindigt:
€1,00 + €2,00 = €3,00
|
|
In deze situatie maakt de vertraging van 11 minuten geen verschil. Deze 11 minuten (of zelfs minder) kunnen echter een groot verschil maken. Bijvoorbeeld wanneer beëindiging na tariefvenster is ingeschakeld.
In deze nieuwe situatie wordt het tweede avondtijdvak beëindigd nadat het avondtariefvenster eindigt (dus om 24:00).
Als de bezoeker vertrekt om 23:59, dan blijft hij binnen het avondtariefvenster en betaalt hij alleen voor de avondtijdvakken. De bezoeker moet nu betalen voor het eerste en tweede avondtijdvak:
€1,00 + €2,00 = €3,00
|
|
Maar vertrekt de bezoeker om 0:10, dan loopt zijn parkeertijd over in het nachttariefvenster. Dit betekent dat een nachttijdvak wordt toegevoegd aan de berekening. De bezoeker moet nu beide avondtijdvakken betalen plus één volledig nachttijdvak:
€1,00+ €2,00 + €5,00 = €8,00
|
|
Voorbeeld 2: tijdvakken beëindigen met een tariefvenster van meerdere dagen
Om de berekening te illustreren voor een tariefvenster van meerdere dagen, kunnen we kijken naar het volgende tariefplan:
Tijdvakken beëindigen is ingesteld op Wanneer alle tijdvakken zijn toegepast.
Er is één tariefvenster dat loopt van maandag tot en met zondag van 00:00 tot 24:00.
Het eerste tijdvak duurt 12 uur en kost EUR 10,00.
Het tweede tijdvak duurt 12 uur en kost EUR 7,50.
Het derde tijdvak duurt 24 uur en kost EUR 5,00.
Een bezoeker rijdt de parkeerplaats in op dinsdag om 12:00 en vertrekt op zaterdag om 10:00 (vier dagen).
Het is in deze situatie belangrijk om de activatie van het laatste (derde) tijdvak te onthouden. Als alle tijdvakken zijn opgebruikt, dan begint de berekening van voor af aan, alsof de bezoeker een nieuw bezoek brengt aan de parkeerplaats. Op basis van het tariefvenster bij aankomst, gebruikt de berekening de toepasbare tariefopbouw.
Als het derde tijdvak is ingesteld met een activatie van 2 (situatie A), dan betaalt de bezoeker:
€10,00 + €7,50 + €5,00 + €5,00 + €10,00 + 7,50 = €45,00
Als het derde tijdvak is ingesteld met een ‘oneindige’ activatie (situatie B), dan betaalt de bezoeker:
€10,00 + €7,50 + €5,00 + €5,00 + €5,00 = €32,50
|
|
U kunt deze voorbeelden gebruiken om de optie Beëindigen na tijdvak beter te begrijpen.
Stel de optie Beëindigen na tijdvak in volgens uw vereisten.
Stel Exacte betaling in op Ja om de bezoeker alleen toe te staan om op de ingestelde uitrijtijd zijn voertuig op te halen en de parkeerplaats te verlaten. Stel Exacte betaling in op Nee om de bezoeker de ingestelde uitrijtijd te verlenen plus de resterende tijd in zijn huidige tijdvak.
Stel de gemiddelde Wachttijd in die de bezoeker naar schatting in de rij zal staan bij de betaalautomaat. Deze wachttijd wordt afgetrokken van de parkeertijd.
U kunt ook een Maximale dagprijs, maximale weekprijs en/of maximale absolute prijs invoeren om het tarief te beperken.
Stel de Beëindigen einde-dagtijd in op Ja om een aangepaste einde-dagtijd op te geven. De standaard einde-dagtijd is 00:00.
Scrol omhoog en klik op Test tariefprofiel.
Voer een Begindatum en -tijd en een Einddatum en -tijd in om verschillende parkeerscenario’s te testen. Pas uw tariefvensters, tijdvakken en bedragen aan, indien nodig.
|
|
Klik op Opslaan.
Een Tarieven met Schending-profiel aanmaken
Dit profiel is een variant op het Tarieven-profiel. Het enige verschil is dat ieder tariefvenster moet worden aangemerkt als Normaal bezoek of een Schending:
|
|
Bijvoorbeeld: binnen het tariefplan voor een abonnementhouder kan parkeren tijdens kantoortijden (werkdagen van 07:00 tot 19:00) beschouwd worden als normaal bezoek en parkeren buiten kantoortijden (alle andere uren) als schending.
Opties en voorwaarden instellen voor tariefvensters voor geavanceerd gebruik
U kunt voorwaarden instellen voor een toe te passen tariefvenster.
Als het tariefvenster pas van toepassing is als het bezoek is begonnen tijdens dit venster, stel Begint binnen dan in op Ja. Bijvoorbeeld als een bezoeker alleen in aanmerking komt voor een speciaal tarief als hij op tijd inrijdt.
|
|
Als het tariefvenster pas van toepassing is als het bezoek eindigt tijdens dit venster, stel Eindigt binnen dan in op Ja.
Voor de optie Valt binnen dient het gehele bezoek te vallen binnen dit tariefvenster. Door Valt binnen op Ja te zetten, wordt dit tariefvenster ongeldig als er tijdens het bezoek een ander tariefvenster actief werd.
Als het tariefvenster pas van toepassing is als de startdag binnen dit tijdvak valt, stel Startdag dan in op Ja. Hetzelfde geldt voor Einddag.
De velden Begint voor, Begint na, Eindigt voor en Eindigt na laten u specifieke tijden kiezen binnen of buiten dit tariefvenster.
Voor een limiet op het bedrag dat dit tariefvenster toevoegt aan het totale bedrag voor de volledige dag, geeft u een limiet aan in het veld Maximale dagprijs.
|
|
De instelling Beëindigen na kan worden gebruikt om de beëindigingsinstellingen van het tariefplan te omzeilen. Kies Tariefplan uit het dropdown-menu om de instellingen voor het tariefplan op te volgen. Kies Beëindigen om het tijdvak te beëindigen wanneer het tariefvenster eindigt. Kies Geen beëindiging als het vorige tijdvak mag overlopen in het volgende tariefvenster.
Tariefplannen gebruiken om een tariefwisseling in te plannen
Een tariefwisseling inplannen voor een tariefprofiel:
Klik op Tarieven in de menubalk.
|
|
Zoek het tariefprofiel in de lijst. Gebruik het dropdown-menu Parkeerplaatsen om de lijst te filteren, indien nodig.
Klik op het tariefprofiel om dit te openen.
Zoals u wellicht hebt gemerkt bij Een tariefprofiel aanmaken, heeft ieder tariefplan een Startdatum.
|
|
Om een tariefwisseling in te plannen, dient u een nieuw tariefplan aan te maken voor dit tariefprofiel met een toekomstige startdatum. Zorg dat u het huidige tariefplan niet verwijdert.
Klik op Plan beheren.
|
|
Klik op Plan toevoegen.
|
|
Stel de toekomstige Startdatum in voor dit plan. Vanaf deze datum zal dit plan worden gebruikt in plaats van het plan met de oudere startdatum.
Ga naar Tarief berekenen om te bepalen hoe de overgang van het oude naar het nieuwe plan verloopt.
Bijvoorbeeld als een bezoeker de parkeerplaats betreedt op 31 december en vertrekt op 1 januari, dan kan een hoger uurtarief gelden in het nieuwe jaar. Tariefplan bij inrijden betekent dat het totale bedrag wordt berekend volgens het tarief dat gold op 31 december. Het te betalen bedrag voor 1 januari wordt berekend volgens de tarieven van 31 december. Tariefplan bij betaling betekent dat het totale bedrag wordt berekend volgens de tarieven die gelden op 1 januari. Het te betalen bedrag voor 31 december wordt berekend volgens de tarieven van 1 januari. Alle tariefplannen van het bezoek betekent dat het bedrag wordt berekend volgens de tarieven die vanaf die dag geldig zijn. De bezoeker betaalt voor zijn parkeertijd op 31 december volgens de tarieven van die dag en betaalt voor 1 januari volgens de nieuwe tarieven.
Een nieuw tariefplan aanmaken Zie Een tariefprofiel aanmaken voor meer informatie over deze stap.
Scrol omhoog en klik op Test tariefprofiel.
|
|
Voer een Begindatum en -tijd en een Einddatum en -tijd in om verschillende parkeerscenario’s te testen. Pas uw tariefvensters, tijdvakken en bedragen aan, indien nodig.
|
|
Klik op Opslaan.
Rapporten
Rapporten bieden details en overzichten van wat er gebeurt in het parkeersysteem.
Een rapport genereren:
Klik op Rapporten in de menubalk.
|
|
Kies een Parkeerplaats uit het dropdown-menu.
Kies een Rapporttype uit het dropdown-menu.
|
|
Een algemeen rapport genereren
Een algemeen rapport genereren:
Klik op Algemeen en op Zoeken.
Klik op een rapportnaam uit de lijst.
|
|
Vul de vereiste gegevens in en klik op Volgende stap tot u de keuze voor Exporteren naar XLS-formaat en de knop Uitvoeren ziet.
|
|
Rapporten worden standaard gegenereerd als PDF-bestand. Vink het vakje Exporteren naar XLS-formaat aan als u het rapport in Microsoft Excel wilt genereren.
Klik op Uitvoeren.
Het rapport wordt gegenereerd en gedownload in het door u aangegeven bestandstype.
Een kassier- of automaatdienstrapport genereren
Een automaatdienstrapport is een verslag over de activiteiten van een automaat over een bepaalde tijdsperiode. Een kassierdienstrapport is een verslag over de activiteiten van een kassier tijdens een bepaalde dienst.
Een van deze rapporten genereren:
Kies een Parkeerplaats.
|
|
Kies een Rapporttype.
Kies een datum Vanaf en Tot.
U kunt eventueel zoeken op Naam of Status.
Klik op Zoeken.
Instellingen
In de instellingen kunt u het volgende configureren:
Configuratie van de parkeerplaats
Het scherm met de configuratie van de parkeerplaats wordt gebruikt om tweerichtingsbanen toe te voegen of te bewerken.
Een tweerichtingsbaan is een baan met:
Eén barrière met terminals aan weerszijden of
|
|
Twee barrières met een eigen terminal.
|
|
Een tweerichtingsbaan kan zo worden geconfigureerd dat deze fungeert als inrij- of uitrij-automaat.
Ga als volgt te werk om het scherm met de configuratie van de parkeerplaats te openen:
Klik op Instellingen in de menubalk.
|
|
Klik op Configuratie van parkeerplaats.
|
|
Kies een parkeerplaats in het dropdown-menu.
Klik op Zoeken.
Klik op (Tweerichtings)banen beheren.
|
|
Selecteer welke automaat fungeert als Automaat A. Deze automaat is actief in ‘Binnen schema’. Raadpleeg ‘Schema’s’ voor meer informatie over schema’s.
Selecteer welke automaat fungeert als Automaat B. Deze automaat is actief in ‘Buiten schema’.
Selecteer de Bedrijfsmodus voor de inactieve automaat.
Selecteer Handmatige overname toestaan wanneer u wilt toestaan dat het schema handmatig wordt genegeerd.
Raadpleeg ‘Automaten beheren’ om te leren hoe tweerichtingsbanen in een parkeerplaats worden gebruikt.
Tellers
Tellers worden gebruikt om bijvoorbeeld het volgende bij te houden:
Het aantal bezoekers in de parkeerplaats
Het aantal bezoekers in een groep dat nu aanwezig is op de parkeerplaats
Het aantal bezoekers met een bepaald type contract op de parkeerplaats
Enz.
Tellers kunnen worden weergegeven in het overzicht van de parkeerplaats:
|
|
Er kunnen minimum- en maximumwaarden voor tellers worden geconfigureerd. De teller die het aantal bezoekers op de parkeerplaats bijhoudt, heeft bijvoorbeeld een maximumwaarde die overeenkomt met het totale aantal parkeerplaatsen.
Tellers kunnen zo worden geconfigureerd dat ze een signaal afgeven dat gelijk is aan of hoger is dan een ingestelde maximumwaarde. Het signaal kan worden geconfigureerd om een actie te activeren, zoals sluiting van de parkeerplaats wanneer deze vol is.
Het signaal wordt uitgeschakeld wanneer de waarde van de teller gelijk is aan of lager is dan de ingestelde maximumwaarde.
|
Voorbeeld
U kunt een teller gebruiken om het aantal bezoekers op een parkeerplaats te tellen. Uw parkeerplaats heeft plaats voor maximaal 100 bezoekers. U configureert een signaal dat wordt geactiveerd wanneer er 100 bezoekers op de parkeerplaats zijn. De parkeerplaats wordt gesloten en het bericht ‘Vol’ wordt getoond. U hebt als minimumwaarde voor opheffing van het signaal ‘98’ ingesteld. Wanneer minimaal twee bezoekers uitrijden, wordt de parkeerplaats weer geopend en verdwijnt het bericht ‘Vol’.
|
Tellers maken en bewerken
Ga als volgt te werk om een teller te maken of bewerken:
Klik op Instellingen in de menubalk.
|
|
Klik op Tellers.
Kies een Parkeerplaats.
|
|
Klik op Teller toevoegen.
Voer een naam in voor uw teller.
|
|
Selecteer een type.
Een aangepaste teller telt bezoekers met contracttypen die expliciet door deze teller moeten worden geteld. Nadat u de aangepaste teller hebt gemaakt, kunt u dit configureren in ‘Contracttypen’.
Een reserveringsteller telt bezoekers met een reservering.
Een totaalteller kan de hoeveelheden van andere tellers optellen of aftrekken. Een totaalteller kan bij een parkeerplaats van een hotel bijvoorbeeld de teller voor medewerkers en de teller voor bezoekers optellen.
Voer eventueel een beschrijving in voor uw teller.
|
|
Klik op Volgende stap.
Voor de minimum- en maximum-waarde in voor deze teller.
|
|
Stel Zichtbaar in op ‘Ja’, zodat de teller in het overzicht van parkeerplaatsen wordt weergegeven.
Stel Statistieken in op ‘Ja’ om deze teller te gebruiken in de statistiekenrapporten van de parkeerplaats.
Stel het Steekproefinterval in voor de rapportage van statistieken. Dit is meestal 15 minuten.
Wanneer u een aangepaste teller configureert, kunt u een automaat selecteren.
|
|
Klik op Actie toevoegen.
Selecteer een richting voor de teller. Gebruik Verlagen voor uitrij-automaten en Verhogen voor inrij-automaten.
|
|
Wanneer u een totaalteller configureert, moet u de formule invoeren. U kunt de symbolen ‘+’ en ‘-’ gebruiken om tellers op te tellen en af te trekken. Bijvoorbeeld: Teller+Teller2–Teller3.
|
|
Klik op Teller toevoegen.
Ga als volgt te werk om een teller te bewerken:
Selecteer een parkeerplaats en klik op ‘Zoeken’ om een lijst met tellers weer te geven.
|
|
Klik op de teller die u wilt bewerken.
|
|
Klik op Gegevens aanpassen.
Voer uw wijzigingen in en klik op Opslaan.
Signalen en acties configureren
Ga als volgt te werk om signalen en acties te configureren:
Selecteer de teller.
Klik op Tellersignalen beheren.
|
|
Klik op Signaal toevoegen om een signaal toe te voegen.
Voor een minimum- en maximumwaarde in voor uw signaal.
|
|
Klik naast het signaal op .
|
|
Vul de gegevens in voor de beschikbare actie.
Klik op Opslaan.
Het signaal wordt aan de teller toegevoegd.
Afdrukindelingen
Afdrukindelingen gebruikt u om kaarten, zoals bezoekerskaarten, uitrijkaarten en kortingskaarten, te printen op een desktopprinter. Deze indelingen worden niet gebruikt om kaarten te printen bij automaten. Afhankelijk van de papierafmetingen en afdrukstand kunnen er meerdere kaarten op één vel papier worden afgedrukt.
U kunt afdrukindelingen aanpassen of een nieuwe afdrukindeling aanmaken op basis van een bestaande versie.
Een afdrukindeling aanpassen, een nieuwe afdrukindeling aanmaken
Een bestaande afdrukindeling aanpassen of een nieuwe aanmaken:
Klik op Instellingen in de menubalk.
|
|
Klik op Afdrukindelingen.
Om een afdrukindeling aan te passen, kiest u een indeling uit de lijst of gebruikt u het zoekveld bij Parkeerplaatsen om een lijst van indelingen van een bepaalde parkeerplaats weer te geven.
|
|
Om een nieuwe afdrukindeling aan te maken, kiest u een Parkeerplaats via de zoekbalk en klikt u op Afdrukindeling toevoegen.
Kies de gewenste afdrukindeling om als sjabloon te gebruiken in het dropdown-menu Kopiëren van, geef de nieuwe indeling een naam en klik op Afdrukindeling toevoegen.
|
|
U kunt de afdrukindeling nu aanpassen.
De Afmetingen afdrukindeling bepalen de grootte van de individuele kaarten, de marges en het aantal kolommen en rijen. Pas deze alleen aan als u overstapt op een ander type papier.
|
|
In de sectie Kaartindeling kunt u items verplaatsen, aanpassen, verwijderen of toevoegen aan de kaart.
Waarschuwing! Let er bij het aanpassen op dat de barcode zich altijd in het midden van de kaart bevindt. Anders wordt de kaart mogelijk geweigerd.
Klik op een item om dit aan te passen.
Als het item een barcode is:
Vink Ondertitel aan om de barcode in cijfers te weergeven.
|
|
Vink Hoogte aan om een grote barcode te gebruiken, vink Hoogte niet aan voor een kleine barcode.
Vink QR-code aan om naast de barcode een QR-code aan te maken.
Vink Onbekend niet weergeven aan om de barcode niet weer te geven als deze niet wordt aangemaakt.
Vink Centreren aan om de barcode horizontaal te centreren.[PS7] [PS8]
Als het een ander item betreft:
Kies een Type uit het dropdown-menu.
|
|
Verander de weergegeven Tekst.
Verander de opmaak van de tekst.
Vink Onbekend niet weergeven aan om dit item niet te weer te geven als dit niet beschikbaar is.
Gebruik de toetsen Omhoog en Omlaag om een item te verplaatsen.
Klik op Verwijderen om een item te verwijderen.
Klik op Toevoegen om een item toe te voegen.
Klik op Kaartindeling opslaan om alle wijzigingen op te slaan. Klik op Terugzetten om alle veranderingen aan de kaartindeling te annuleren.
Schema’s
Met schema’s en geplande handelingen plant u de status van speedgates en automaten. Bijvoorbeeld wanneer speedgates open of gesloten zijn en wanneer automaten actief of uitgeschakeld zijn.
Gebruik schema’s om te bepalen wanneer speedgates en automaten binnen schema of buiten schema zijn. Gebruik Geplande handelingen om de status te bepalen wanneer ze binnen schema en buiten schema zijn.
Een schema bekijken of wijzigen:
Klik op Instellingen in de menubalk.
|
|
Klik op Schema’s voor speedgates of Schema’s voor automaten.
Kies een Parkeerplaats uit het dropdown-menu.
|
|
Kies een Set uit het dropdown-menu. Een set groepeert automaten of speedgates. U kunt bijvoorbeeld verschillende sets gebruiken als u verschillende openingstijden hanteert voor verschillende zones van de parkeerplaats.
Klik op Zoeken.
Het schema voor deze set wordt getoond. Binnen schema wordt getoond in oranje. Buiten schema wordt getoond in grijs.
Sleep de oranje balk om Binnen schema te wijzigen.
|
|
Klik op om de oranje balk te verwijderen.
om de oranje balk te verwijderen.
Klik waar dan ook op de grijze balk om een nieuwe oranje balk te maken en sleep deze om de maat te bepalen.
|
|
Schema’s herhalen zich iedere week. Om een uitzondering te maken, voor bijvoorbeeld een officiële feestdag, kiest u een Speciale dag uit het dropdown-menu en klikt u op Toevoegen. Als u het schema wilt verwijderen voor een speciale dag, kiest u de Speciale dag uit het dropdown-menu en klikt u op Verwijderen.
Geplande handelingen
Met schema’s en geplande handelingen plant u de status van speedgates en automaten. Bijvoorbeeld wanneer speedgates open of gesloten zijn en wanneer automaten actief of uitgeschakeld zijn.
Gebruik schema’s om te bepalen wanneer speedgates en automaten binnen schema of buiten schema zijn. Gebruik Geplande handelingen om de status te bepalen wanneer ze binnen schema en buiten schema zijn.
Geplande handelingen bekijken of wijzigen:
Klik op Instellingen in de menubalk.
|
|
Klik op Schema’s voor speedgates of Schema’s voor automaten.
Kies een Parkeerplaats uit het dropdown-menu.
|
|
Klik op Wijzigen om de Schema-instellingen te wijzigen voor automaten of speedgates.
Kies een Binnen schema-status en een Buiten schema-status uit de dropdown-menu’s.
|
|
Vink de hokjes voor Hoge prioriteit aan om standaard handmatige wijzigingen te negeren. Deze prioriteitsinstelling wordt weer genegeerd wanneer een handmatige wijziging wordt geforceerd.
Klik op Opslaan om de wijzigingen op te slaan of op Annuleren om ze te annuleren.
Speciale dagen
Gebruik speciale dagen om verschillende schema’s aan te maken voor officiële feestdagen of andere speciale dagen.
Speciale dagen bekijken of wijzigen:
Klik op Instellingen in de menubalk.
|
|
Klik op Speciale dagen.
Kies een Parkeerplaats uit het dropdown-menu.
Kies een Set uit het dropdown-menu.
Klik op Zoeken.
|
|
Klik op Speciale dag toevoegen om een speciale dag toe te voegen.
|
|
Vul een Naam in voor de speciale dag.
Bepaal of deze speciale dag Eenmalig of Jaarlijks voorkomt in het dropdown-menu Type.
Voer de Datum in en klik op Toevoegen.
Klik op Opslaan.
Pas speciale dagen aan door hun Naam, Type of Datum te wijzigen en klik op Opslaan.
Verwijder een speciale dag door te klikken op Verwijderen en klik op Opslaan.
Instellingen voor automaten
Met automaatinstellingen kunt u
Details over automaten weergeven
De videolink voor een automaat bekijken, indien beschikbaar
Mogelijkheden voor automaten in- en uitschakelen Onder ‘mogelijkheid’ worden alle apparaten of services verstaan die nodig zijn voor het functioneren van de automaat.
Ga als volgt te werk om toegang te krijgen tot een automaat:
Klik op Instellingen in de menubalk.
|
|
Klik op Automaatinstellingen.
Kies een parkeerplaats in het dropdown-menu.
|
|
Klik op Zoeken.
|
|
Klik in de lijst op een automaat.
|
|
Klik op Testen om de mogelijkheden van de automaat te testen.
Klik eerst op Mogelijkheden beheren om een mogelijkheid in of uit te schakelen.
|
|
Gebruik de selectievakjes om een mogelijkheid in of uit te schakelen. U kunt een mogelijkheid opnieuw instellen door deze eerst uit te schakelen en op Opslaan te klikken. Schakel deze vervolgens weer in en klik opnieuw op Opslaan.
Instellingen voor snelkoppelingen
Snelkoppelingen worden in het scherm voor bezoekers gebruikt om snel acties uit te voeren en contracttypen te wijzigen. U kunt in Instellingen voor snelkoppelingen:
Snelkoppelingen maken en bewerken
Snelkoppelingen toewijzen aan gebruikers, rollen of klanttypen
Ga als volgt te werk om een snelkoppeling te maken of bewerken:
Klik op Instellingen in de menubalk.
|
|
Klik op Instellingen voor snelkoppelingen.
Kies een Parkeerplaats uit het dropdown-menu.
|
|
Kies een snelkoppelingset in het dropdown-menu. Sets worden gebruikt om snelkoppelingen te groeperen.
Klik op Zoeken.
|
|
Er wordt een lijst met snelkoppelingen weergegeven.
Ga als volgt te werk om een nieuwe snelkoppeling te maken:
Klik op Snelkoppeling toevoegen.
Voer een naam in voor uw snelkoppeling.
|
|
Klik op Snelkoppeling toevoegen.
De snelkoppeling wordt aan de set toegevoegd. Ga als volgt te werk om een snelkoppeling te bewerken:
Klik op naast de naam van de snelkoppeling.
|
|
Klik op Bewerken om de acties te bewerken die door de snelkoppeling worden uitgevoerd.
Selecteer een actie in het dropdown-menu. Schuif omlaag in de lijst om alle opties weer te geven.
|
|
Voer de specifieke details in die nodig zijn om uw actie te voltooien.
Klik op Actie toevoegen aan snelkoppeling.
Voeg nog een actie toe aan deze snelkoppeling of
Klik op Opslaan.
Snelkoppelingen moeten zijn toegewezen voordat ze kunnen worden gebruikt. U kunt snelkoppelingen toevoegen aan:
Specifieke gebruikers en/of
Rollen en/of
Klanttypen
Snelkoppelingen die aan specifieke gebruikers worden toegewezen, worden alleen weergegeven voor deze gebruikers. Snelkoppelingen die aan specifieke rollen worden toegewezen, worden weergegeven voor alle gebruikers met die rol. Snelkoppelingen die aan klanttypen worden toegewezen, worden weergegeven aan bezoekers van betaalautomaten.
Ga als volgt te werk om een snelkoppeling toe te wijzen:
Selecteer een type in het dropdown-menu.
|
|
Gebruik de selectievakjes om de snelkoppeling toe te wijzen.
|
|
Klik op Opslaan.
Uw snelkoppeling kan nu worden gebruikt.
Auditregistratie
Alle acties die door gebruikers in ParkID worden uitgevoerd, worden geregistreerd voor audits. U kunt in het auditlogbestand de acties en uitgebreide informatie voor deze acties weergeven.
Ga als volgt te werk om het auditlogbestand te openen:
Klik op in de menubalk.
in de menubalk.
Klik daarna op Auditregistratie.
|
|
Acties filteren
U kunt in het auditlogbestand acties filteren op:
Datum en tijd (van en tot)
Parkeerplaats
Actietype
Gebruiks
Locatie
Details (alle gegevens met betrekking tot de actie, zoals gebruikersnaam, kaartnummer, bedrag, de laatste vier getallen van een creditcard, enz.)
Klik op Toepassen om de filters toe te passen.
|
|
De details van een actie bekijken
Ga als volgt te werk om de details van een actie te bekijken:
Klik naast de actie op
|
|
Klik op Weergeven om te controleren wat er na de actie is veranderd.
|
|
Voorkeuren
U kunt de gebruikersinterface van ParkID aanpassen via het menu Voorkeuren.
Ga als volgt te werk om Voorkeuren te openen:
Klik op uw naam in de rechterbovenhoek.
|
|
Klik op Voorkeuren.
|
|
U kunt onder ‘Voorkeuren’:
Uw taal wijzigen
Kiezen om namen van automaten weer te geven of te verbergen in het overzicht van de parkeerplaats
Selecteren welke parkeerplaatsen in het overzicht moeten worden weergegeven
Kiezen of systeemmeldingen op elke pagina moeten worden weergegeven of niet
Kiezen welke pagina als standaard startpagina wordt weergegeven.
Automaatweergave inschakelen selecteren om het oude overzicht van parkeerplaatsen weer te geven.
Klik op Opslaan om de wijzigingen op te slaan.
Visiteurs
Toute personne disposant d’une voiture et de droits d’accès au parking est un visiteur.
Cette section concerne l'onglet « Visiteurs » (Visitors) de l'interface utilisateur. Cet onglet vous permet de trouver rapidement des visiteurs et d'effectuer des actions fréquemment utilisées. Pour des fonctions plus détaillées sur les visiteurs, allez sur Contrats > Visiteurs.
|
Allez rapidement à :
|
Recherche d’un visiteur
Pour rechercher un visiteur, cliquez sur « Visiteurs » (Visitors) dans la barre de menu.
Utilisez la barre de recherche : entrez le nom du visiteur, le numéro d’identifiant ou le groupe du visiteur. Attendez que les résultats s'affichent à l'écran et cliquez sur un des résultats pour accéder directement au visiteur ou cliquez sur « Rechercher » (Search).
|
|
Si vous avez cliqué sur « Rechercher » (Search), une liste de résultats s'affiche. Par défaut, seuls les visiteurs entrés au cours des 7 derniers jours sont affichés.
|
|
Utilisez le menu déroulant « Entrée » (Entrance) pour sélectionner une autre créneau.
Utilisez la liste déroulante des « Parkings » (Car parks) pour exclure un ou plusieurs parkings de la recherche.
Utilisez la liste déroulante Section pour filtrer les résultats par section. Cette option n'est disponible que si vous avez sélectionné un seul parking dans la liste déroulante « Parking » (Car park).
Cochez « Afficher uniquement les visites actives » (Show only active visits) pour exclure les visiteurs qui ont quitté le parking.
Cliquez sur « Appliquer » (Apply) pour rafraîchir les résultats de la recherche.
Cliquez sur « Afficher la page visiteur » (View visitor page) pour accéder à la page du visiteur.
Utilisation de la page visiteur
Lorsque vous accédez à l’enregistrement du visiteur par l'onglet « Visiteurs » (Visitors), vous pouvez consulter les éléments suivants :
Le nom ou le numéro du visiteur
Un ensemble de raccourcis et de types de contrats à attribuer
Une liste d'événements concernant le visiteur
Un ensemble d'actions
|
|
Utilisation de raccourcis
Dans l’enregistrement du visiteur, des raccourcis vous permettent de
Apporter une modification au contrat actuel d'un visiteur ou
Modifier le type de contrat du visiteur
Les raccourcis en orange sont utilisés pour apporter un changement au contrat actuel du visiteur. Par exemple :
Accorder une réduction sur le prix
Modifier la validité du contrat
Autoriser le visiteur à quitter le parking
Etc.
Les raccourcis en gris sont utilisés pour modifier le type de contrat du visiteur. Par exemple :
Changer un visiteur de courte durée en un abonnement de plusieurs jours
Changer un visiteur de courte durée en une carte de sortie à usage unique
Etc.
Découvrez comment configurer des raccourcis dans « Paramètre des raccourcis » (Shortcut settings).
Affichage des événements de visiteur
Dans événements, un journal des événements est affiché. Par défaut, il s'agit d'un journal des sept derniers jours.
Pour afficher les événements antérieurs aux sept derniers jours, cliquez sur le menu déroulant et sélectionnez une autre plage.
|
|
Réalisation d’actions
Vous pouvez :
Exécuter une réinitialisation de la fonction antiretour (anti-pass back)
Ajouter des commentaires aux informations sur le visiteur
Afficher et modifier les informations du contrat
Effectuer un paiement manuel avec facturation
Exécution d’une réinitialisation de la fonction antiretour (anti-pass back)
ParkID détecte toute mauvaise utilisation des identifiants de visiteur. C’est ce qu’on appelle l’anti-pass back (ou anti-retour). Par exemple : lorsque le même identifiant de visiteur est utilisé par deux visiteurs ou plus en même temps.
Les informations de détection antiretour (ou anti-pass back) peuvent être incorrectes dans les cas suivants :
Après une urgence, lorsque des sorties n’ont pas été correctement enregistrées.
Après le dysfonctionnement d’une station ou une mise à jour de maintenance.
Pour exécuter une fonction antiretour (anti-pass back) pour un visiteur :
Cliquez sur « Réinitialisation de la fonction antiretour » (Anti-pass back reset)
Vous recevrez une notification une fois que la réinitialisation de la fonction antiretour aura été effectuée avec succès.
Ajout d'un commentaire aux informations sur le visiteur
Les commentaires sont affichés dans la liste des « Événements » (Events). Pour ajouter un commentaire :
Cliquez sur « Ajouter des commentaires aux informations sur le visiteur » (Add comment to visitor information).
Tapez votre commentaire dans la barre.
|
|
Cliquez sur « Enregistrer » (Save).
Le commentaire est enregistré et visible dans « Événements » (Events).
Affichage et modification des informations du contrat
Pour afficher et modifier les informations du contrat, cliquez sur « Afficher les informations du contrat » (View contract details) L'écran du contrat s'affiche.
Pour en savoir plus sur la modification des informations d'un visiteur, consultez Modification d’informations.
Pour en savoir plus sur la modification de contrats, consultez Modification d'un contrat.
Réalisation d’un paiement manuel avec facturation
Veuillez noter qu'un paiement manuel avec facturation ne peut être effectué que si les informations de facturation d'un visiteur sont connues. Les informations de facturation peuvent être par exemple : une carte de valeur, un abonnement, un numéro de compte bancaire, un numéro de carte de crédit ou un compte de groupe.
Pour réaliser un paiement manuel avec facturation :
Cliquez sur « Paiement avec facturation » (Checkout with billing).
Sélectionnez une « Section externe » (Outside section) vers laquelle vous souhaitez déplacer ce visiteur.
|
|
Saisissez un « Montant » (Amount) et sélectionnez une « Devise » (Currency), ou
Saisissez une « Date » et une « heure de sortie » (Exit date et time). Le système calculera les coûts sur la base des règles du contrat du visiteur.
Cliquez sur « Soumettre » (Submit).
La sortie du visiteur est enregistrée et la visite sera facturée.
Parkings
Vous pouvez gérer vos parkings depuis l’onglet « Parkings ».
|
Allez rapidement à :
|
Aperçu des parkings
Pour obtenir un aperçu des parkings, cliquez sur « Parkings » (Car parks) dans la barre de menu.
|
|
Vous verrez les messages de statut et d’avertissement du système dans une barre jaune (1). Lorsqu’un parking est « Hors ligne » (offline), il ne peut être géré. Lorsqu’un parking est « Hors synchronisation » ( out of sync), il peut être géré, mais son feedback peut ne pas être exact. Par exemple, le statut des barrières peut être incorrect, et les entrées et sorties peuvent ne pas être correctement affichées.
Pour afficher un parking spécifique, sélectionnez-en un dans le menu déroulant « Afficher » (Show) (2). Sélectionnez « Tous les parkings » (all car parks) dans le menu déroulant pour afficher tous les parkings.
Pour changer les parkings affichés par défaut, modifiez vos préférences.
|
Dans cet article :
Gérez les stations individuelles. Les stations sont groupées par section dans le parking (5)
|
Modification du mode de fonctionnement général
Il existe trois modes de fonctionnement des parkings :
Active (Actif). Toutes les stations fonctionnent normalement.
Stay open (Rester ouvert). Toutes les stations restent ouvertes. Les visiteurs peuvent entrer et sortir librement.
Stay closed (Rester fermé). Toutes les stations restent fermées. Les visiteurs ne peuvent ni entrer ni sortir.
Pour modifier le mode de fonctionnement :
Cliquez sur « Actif » (Active), « Rester ouvert » (Stay Open) ou « Rester fermé » (Stay Closed).
|
|
Cliquez sur « Toutes les entrées » (All entries), « Toutes les sorties » (All exits) ou « Toutes les entrées et sorties » (Both).
|
|
Exécution d’une réinitialisation de la fonction antiretour (anti-pass back)
ParkID détecte toute mauvaise utilisation des identifiants d’accès. C’est ce qu’on appelle l’anti-pass back (ou anti-retour). Par exemple : lorsque le même identifiant d’accès est utilisé par deux visiteurs ou plus en même temps.
Les informations de détection antiretour (ou anti-pass back) peuvent être incorrectes dans les cas suivants :
Après une urgence, lorsque des sorties n’ont pas été correctement enregistrées.
Après le dysfonctionnement d’une station ou une mise à jour de maintenance.
Pour effectuer une réinitialisation :
Cliquez sur « Réinitialisation d’APB » (APB Reset).
|
|
Pour exécuter une réinitialisation générale antiretour (ou anti-pass back), cliquez sur « Non » (No).
Pour exécuter une réinitialisation antiretour (ou anti-pass back) par groupe, cliquez sur « Oui » (Yes).
|
|
Si vous avez cliqué sur « Oui » (Yes), sélectionnez le groupe (Select the group) dans le menu déroulant. Tous les visiteurs de ce groupe seront déplacés vers une section externe. Choisissez une section externe dans le menu déroulant « Sélectionner une section » (Select the section).
|
|
Cliquez sur « Réinitialisation d’APB » (APB Reset).
Cliquez sur « Oui » (Yes) pour confirmer l’opération de réinitialisation antiretour (ou anti-pass back).
|
|
Gestion des stations
Il existe cinq types différents de stations :
Stations d’entrée (1)
Stations de sortie (2)
Stations de paiement (3)
Portes (4)
Voies bidirectionnelles (5)
|
|
Les icônes représentant les stations affichent leur statut :
|
|
La station est active et fonctionne normalement.
|
|
|
Le mode de fonctionnement de cette station est réglé sur « Rester fermé » (Stay closed). Les visiteurs ne peuvent pas passer.
|
|
|
Le mode de fonctionnement de cette station est réglé sur « Rester ouvert » (Stay closed). Les visiteurs peuvent entrer et sortir librement.
|
|
|
Le mode de fonctionnement de cette station est réglé sur « Service » (Service). La station est en mode de maintenance. La station n’accepte pas les visiteurs.
|
|
|
Le mode de fonctionnement de cette station est réglé sur « Complet » (Full). La barrière ne s’ouvre que pour les visiteurs autorisés à accéder aux parkings lorsqu’ils sont pleins. Par exemple, les employés, le personnel de maintenance ou toute autre personne qui doit pouvoir accéder au parking à tout moment.
|
|
|
Le mode de fonctionnement de cette station est réglé sur « Accès libre » (Free to pass). Les visiteurs sont admis sans contrôler leur validité, leur autorisation ou leur planning.
|
|
|
Le mode de fonctionnement de cette station est réglé sur « Hors service » (Out of order). La station est hors service et la barrière est fermée.
|
|
|
La station est hors ligne et le statut est inconnu.
|
|
|
Le mode de fonctionnement de la station est imposé. Tous les plannings de cette station sont outrepassés.
|
|
Dans cet article :
|
Ouverture de la page de la station
Pour ouvrir la page de la station :
Cliquez sur l’icône de la station dans le parking.
|
|
La page de la station est affichée.
|
|
Vous pouvez :
Voir les messages contextuels du système d’intercommunication.
Contrôler le statut de cette station (1).
Contrôler le dernier visiteur identifié (2).
Contrôler les derniers évènements significatifs (3).
Voir une image de la station (4).
Contrôler le flux vidéo CCTV (vidéosurveillance) de cette station (5).
Redémarrer la station (10).
Contrôler une liste d’évènements plus longue (11).
* Il s’agit d’un système séparé. Les appels ne sont pas enregistrés dans ParkID.
Vérification et effacement des messages de maintenance
Les messages de maintenance sont affichés dans la section Maintenance :
|
|
Une fois le problème résolu, vous pouvez effacer le message en cliquant sur . Cette action est enregistrée dans le système comme un évènement.
Changement du mode de fonctionnement d’une station
Vous pouvez paramétrer des stations dans le mode de fonctionnement suivant :
|
Mode de fonctionnement
|
Station d’entrée
|
Station de sortie
|
Station de paiement
|
Porte
|
|
Active (Actif). La station fonctionne normalement.
|
X
|
X
|
X
|
X
|
|
Stay closed (Rester fermé). La station est toujours fermée. Les visiteurs ne peuvent pas passer.
|
X
|
X
|
X
|
|
|
Stay open (Rester ouvert). La station est toujours ouverte. Les visiteurs peuvent entrer et sortir librement.
|
X
|
X
|
X
|
|
|
Service. (Maintenance) La station est en mode de maintenance. La station n’accepte pas les visiteurs.
|
X
|
X
|
X
|
X
|
|
Full (Complet). La barrière ne s’ouvre que pour les visiteurs autorisés à accéder aux parkings lorsqu’ils sont pleins. Par exemple, les employés, le personnel de maintenance ou toute autre personne qui doit pouvoir accéder au parking à tout moment.
|
X
|
|||
|
Free to pass (Accès libre). Les visiteurs sont admis sans contrôler leur validité, leur autorisation ou leur planning.
|
X
|
X
|
X
|
|
|
Out of order (Hors service). La station est hors service et la barrière est fermée.
|
X
|
X
|
X
|
X
|
Les modes de fonctionnement suivants sont gérés par le système :
Sleep (Veille). L’écran de la station s’éteint pour économiser l’énergie. Il se rallume lorsqu’un visiteur arrive et le mode de fonctionnement passe à « Actif » Active.
Offline (Hors ligne). La connexion entre le système et la station est perdue. Le fonctionnement de la station est limité.
Pour changer le mode de fonctionnement d’une station :
Cliquez sur « Actif » (Active), « Rester fermé » (Stay Closed), « Rester ouvert » (Stay Open), « Maintenance » (Service), « Complet » (Full), « Accès libre » (Free to pass) ou « Hors service » (Out of order). Vous ne pouvez pas activer le « Mode Veille » (Sleep mode) manuellement depuis cet écran.
Sélectionnez « Imposer le mode de fonctionnement » (Enforce operation mode) si vous voulez passer un planning par exemple.
|
|
Cliquez sur « Oui » (Yes) pour confirmer votre choix.
Configuration d'une voie bidirectionnelle
Une voie bidirectionnelle comprend soit :
Une barrière avec des bornes des deux côtés, soit
|
|
Deux barrières avec une borne qui leur est propre.
|
|
Une voie bidirectionnelle peut être configurée pour agir comme une station d'entrée ou de sortie.
Vous pouvez définir manuellement la configuration d'une voie bidirectionnelle en une station d'entrée ou de sortie.
Pour cela :
Cliquez sur dans la zone de voie bidirectionnelle.
|
|
Sélectionnez la station d'entrée ou de sortie qui sera la station active dans le menu déroulant.
|
|
Cliquez sur « Enregistrer » (Save).
Indiquez le motif de la modification.
|
|
Sélectionnez « Imposer le mode de fonctionnement » (Enforce operation mode) si vous voulez outrepasser un planning.
Cliquez sur « Enregistrer » (Save).
La configuration est enregistrée et la voie bidirectionnelle fonctionne désormais comme souhaité.
Ouverture ou fermeture de la barrière
Les portes ainsi que les stations d’entrée et de sortie peuvent être ouvertes et fermées.
Pour ouvrir ou fermer la barrière :
Cliquez sur le bouton « Ouvrir la barrière » (Open barrier) ou « Fermer la barrière » (Close barrier ) sur la page de la station.
|
|
Dans le menu déroulant « Sélectionner une option » (Select an option), sélectionnez soit un motif prédéfini, soit « Envoyer un message à la station » (Supply a message to the station) et entrez manuellement un courte description du motif de cette action.
Cliquez sur « Soumettre » (Submit).
Génération d’un ticket de remplacement
Vous pouvez générer un ticket de remplacement aux stations de paiement et de sortie avec une caractéristique de paiement.
Pour générer un ticket de remplacement :
Cliquez sur le bouton « Ticket de remplacement » (Replacement ticket ).
|
|
Si le numéro du ticket du visiteur est connu, ou si le numéro minéralogique est enregistré au moment de l’entrée, vous pouvez générer un ticket de remplacement sur la base de ces informations. Pour cela :
Cliquez sur « Utiliser le numéro du ticket ou le numéro minéralogique » (Use ticket number or the license plate).
|
|
Saisissez le numéro du ticket, le numéro minéralogique ou toute autre information enregistrée puis cliquez sur « Envoyer » (Submit) ou sur « Rechercher un visiteur » (or search for a visit).
Filtrez la liste des visiteurs par identifiant ou coordonnées du visiteur, date d’entrée et/ou station. Recherchez le visiteur, sélectionnez-le et cliquez sur « Créer un ticket pour ce visiteur » (Create ticket for this visitor).
|
|
Sinon, vous pouvez générer un ticket de remplacement sans saisir les informations du visiteur. Vous pouvez :
Générer un ticket pour un prix prédéterminé : Ticket perdu.
Saisissez une date et une heure d’entrée pour générer un ticket sur la base du délai de stationnement. Vous pouvez optionnellement ajouter une pénalité.
Générez un ticket avec un montant personnalisé.
Pour cela :
Cliquez sur « Ne pas utiliser le numéro du ticket ou le numéro minéralogique » (Do not use ticket number or the license plate).
|
|
Pour générer un ticket de remplacement avec un prix prédéterminé, sélectionnez « Ticket perdu » (Lost Ticket) et cliquez sur « Envoyer » (Submit).
Pour générer un ticket établi sur le délai de stationnement, sélectionnez « Saisir une date et une heure d’entrée » (Enter an entry date time).
|
|
Cliquez sur pour saisir la date et l’heure d’entrée.
pour saisir la date et l’heure d’entrée.
Cliquez sur « Soumettre » (Submit).
Vous pouvez optionnellement sélectionner « Ajouter une pénalité » (Add a penalty fee).
Sélectionnez un type de tarif dans le menu déroulant. Sélectionnez « Utiliser le tarif d’un ticket perdu » (Use lost ticket tariff) pour calculer le prix du ticket à partir du tarif d’un ticket perdu. Sélectionnez « Utiliser le tarif client » (Use customer type tariff) pour faire votre choix dans une liste de types de contrat court et calculer le prix du ticket.
Cliquez sur « Soumettre » (Submit).
Pour générer un ticket de remplacement et le vendre à un prix personnalisé, sélectionnez « Saisir un prix personnalisé » (Enter a custom amount).
|
|
Sélectionnez une devise (Select a currency) dans le menu déroulant et entrez un montant.
Cliquez sur « Soumettre » (Submit).
Le visiteur est introduit dans le flux de paiement de la station.
Redémarrage d’une station
Pour redémarrer une station :
Cliquez sur le bouton « Redémarrer » (Reboot) sur la page de la station.
|
|
Dans le menu déroulant « Sélectionner une option » (Select an option), sélectionnez soit un motif prédéfini, soit « Envoyer un message à la station » (Supply a message to the station) et entrez manuellement un courte description du motif de cette action.
Cliquez sur « Soumettre » (Submit).
Compteurs
Les compteurs peuvent être utilisés pour afficher :
Le nombre de visiteurs du parking
Le nombre de visiteurs dans une section du parking
Le nombre de visiteurs possédant un abonnement
Et bien d’autres variables.
Les compteurs sont affichés dans l’aperçu du parking, soit dans une section spécifique, soit dans le champ dédié sous les sections.
|
|
Si un compteur affiche un nombre incorrect, vous pouvez le régler manuellement. Certains compteurs sont gérés par le système et ne peuvent être réglés. Pour effectuer un réglage sur un compteur non géré par le système :
Cliquez sur près du compteur que vous souhaitez régler.
près du compteur que vous souhaitez régler.
Réglez la valeur puis cliquez sur « Enregistrer » (Save). Cliquez sur pour supprimer les modifications.
pour supprimer les modifications.
|
|
Vous pouvez modifier les valeurs minimales et maximales du compteur, ainsi que la section à laquelle il appartient. Pour cela :
Cliquez sur près du compteur que vous souhaitez régler.
près du compteur que vous souhaitez régler.
Modifiez les informations puis cliquez sur « Enregistrer » (Save).
|
|
Évènements
Les types d’évènements suivants sont enregistrés :
Visiteurs entrants et sortants
Problèmes concernant l’entrée ou la sortie
Problèmes concernant les stations
Actions effectuées par un opérateur dans le système
Messages système
Pour consulter une liste d’évènements, cliquez sur « Évènements » (Events) dans la barre de menu.
|
|
|
Les cinq avertissements système les plus récents (2)
|
Les messages de statut de parking
Vous verrez les messages de statut et d’avertissement du système dans une barre jaune. Lorsqu’un parking est « Hors ligne » (offline), il ne peut être géré. Lorsqu’un parking est « Hors synchronisation » ( out of sync), il peut être géré, mais son feedback peut ne pas être exact. Par exemple, le statut des barrières peut être incorrect, et les entrées et sorties peuvent ne pas être correctement affichées.
|
|
Contrôle et effacement des avertissements système
Les avertissements système requérant une action. Par exemple, lorsque le papier manque dans une station, ce problème doit être examiné et résolu.
Une fois que l’avertissement système est examiné et que la cause est résolue :
Cliquez sur « Effacer » (Clear).
|
|
Cliquez sur « OK » pour supprimer le message d’avertissement.
|
|
Pour voir une liste complète d’avertissements système :
Cliquez sur « Aller à l’aperçu des avertissements système » (Go to system warnings overview) ou
Cliquez sur dans la barre de menu.
dans la barre de menu.
|
|
|
|
Vous pouvez filtrer les avertissements par :
Date et heure (« De » (From) et « À » (To))
Parking
« Lieu » (Location) : lieu où l’évènement s’est produit.
« Type d’évènement » (Event type)
« Statuts » (States) : si l’avertissement est en cours ou supprimé.
Cliquez sur « Appliquer » (Apply) pour appliquer les filtres à la liste d’avertissements.
Trois types d’avertissements sont affichés :
|
|
« Avertissement critique » (Critical warning)
Un message très important envoyé à l’utilisateur concernant un comportement inattendu du système ou un statut qui peut avoir des répercussions importantes sur la performance du système, l’expérience de l’utilisateur ou celle du visiteur.
|
|
|
« Avertissement » (Warning)
Un message important envoyé à l’utilisateur concernant un comportement ou un statut inattendu du système.
|
|
|
« Demandes d’actions de la part de l’utilisateur » (User action requests)
Un message destiné à inciter l’utilisateur à prendre des mesures.
|
Vous pouvez effacer tous les avertissements d’un seul coup. Veuillez toutefois vous assurer que tous les problèmes sont résolus avant de le faire. La liste des avertissements en cours sera vide après l’effacement. Sélectionnez « Effacé » (Cleared) dans le menu déroulant « Statuts » (States) pour voir tous les avertissements effacés.
Cliquez sur « Effacer tous les avertissements système » (Clear all system warnings).
Cliquez sur OK.
Tous les avertissements sont effacés.
|
|
Filtrage d’évènements
Dans l’onglet « Évènements » (Events), vous pouvez filtrer les évènements par :
Date et heure (« De » (From) et « À » (To))
Parking
« Type d’évènement » (Event type)
Stations
« Informations » (Details) (toute information liée à l’évènement, comme le nom du visiteur, le numéro de carte, le montant, les quatre derniers chiffres d’une carte de crédit, etc.)
Cliquez sur « Appliquer » ( Apply) pour appliquer les filtres.
|
|
Une liste filtrée d’évènements est affichée.
Liste d’évènements
Dans l’onglet « Évènements » (Events), pour voir la description détaillée d’un évènement, cliquez sur près de celui-ci :
près de celui-ci :
|
|
Liens vers visiteurs
Les événements du visiteur contiennent des liens profonds vers l'enregistrement du visiteur :
|
|
Pour afficher un visiteur :
Cliquez sur le nom ou l'identifiant bleu du visiteur dans la liste des événements.
|
|
Dans cet écran, vous pouvez :
Voir la station et son flux de caméras (1)
Voir la liste des événements de ce visiteur (2)
Effectuer des actions sur le visiteur et la station (3)
Exécuter un raccourci ou assigner un contrat différent (4)
Effectuer des actions sur le visiteur et la station
Vous pouvez :
Exécution d’une réinitialisation de la fonction anti-retour (anti-passback)
Ajouter des commentaires aux informations sur le visiteur
Afficher et modifier les informations du contrat
Effectuer un paiement manuel avec facturation
Contrôler la station à distance
Ouvrir ou fermer la barrière
Redémarrer la station
Exécution d’une réinitialisation de la fonction antiretour (anti-pass back)
ParkID détecte toute mauvaise utilisation des identifiants d’accès. C’est ce qu’on appelle l’anti-pass back (ou anti-retour). Par exemple : lorsque le même identifiant d’accès est utilisé par deux visiteurs ou plus en même temps.
Les informations de détection antiretour (ou anti-pass back) peuvent être incorrectes dans les cas suivants :
Après une urgence, lorsque des sorties n’ont pas été correctement enregistrées.
Après le dysfonctionnement d’une station ou une mise à jour de maintenance.
Pour exécuter une fonction antiretour (anti-pass back) pour un visiteur :
Cliquez sur « Réinitialisation de la fonction antiretour » (Anti-pass back reset)
Cliquez sur ...
Ajout d'un commentaire aux informations sur le visiteur
Les commentaires sont affichés dans la liste des « Événements » (Events). Pour ajouter un commentaire :
Cliquez sur « Ajouter des commentaires aux informations sur le visiteur » (Add comment to visitor information).
Tapez votre commentaire dans la barre.
Cliquez sur « Enregistrer » (Save).
Le commentaire est enregistré et visible dans « Événements » (Events).
Affichage et modification des informations du contrat
Pour afficher et modifier les informations du contrat, cliquez sur « Afficher les informations du contrat » (View contract details) L'écran du contrat s'affiche.
Pour en savoir plus sur la modification des informations d'un visiteur, consultez Modification d’informations.
Pour en savoir plus sur la modification de contrats, consultez Modification d'un contrat.
Réalisation d’un paiement manuel avec facturation
Pour réaliser un paiement manuel avec facturation :
Cliquez sur « Paiement avec facturation » (Checkout with billing).
Sélectionnez une « Section externe » (Outside section) vers laquelle vous souhaitez déplacer ce visiteur.
Saisissez un « Montant » (Amount) et sélectionnez une « Devise » (Currency), ou
Saisissez une « Date » et une « heure de sortie » (Exit date et time). Le système calculera les coûts sur la base des règles du contrat du visiteur.
Cliquez sur « Soumettre » (Submit).
La sortie du visiteur est enregistrée et il sera facturé.
Contrôle de la station à distance
Utiliser la télécommande pour :
Réinitialiser le traitement des visiteurs
Redémarrer le logiciel de la station
Éteindre la station
Arrêter la station
Pour utiliser la télécommande :
Cliquez sur « Télécommande » (Remote Control).
« Sélectionnez une option » (Select an option) depuis le menu déroulant.
Entrez un commentaire sur l'action.
Cliquez sur « Soumettre » (Submit).
L'action est exécutée.
|
|
Ouverture ou fermeture de la barrière
Les portes ainsi que les stations d’entrée et de sortie peuvent être ouvertes et fermées.
Pour ouvrir ou fermer la barrière :
Cliquez sur le bouton « Ouvrir la barrière » (Open barrier) ou « Fermer la barrière » (Close barrier).
Dans le menu déroulant « Sélectionner une option » (Select an option), sélectionnez soit un motif prédéfini, soit « Envoyer un message à la station » (Supply a message to the station) et entrez manuellement un courte description du motif de cette action.
Cliquez sur « Soumettre » (Submit).
Redémarrage d’une station
Pour redémarrer une station :
Cliquez sur le bouton « Redémarrer » (Reboot).
Dans le menu déroulant « Sélectionner une option » (Select an option), sélectionnez soit un motif prédéfini, soit « Envoyer un message à la station » (Supply a message to the station) et entrez manuellement un courte description du motif de cette action.
Cliquez sur « Soumettre » (Submit).
Cartes de réduction
Des cartes de réduction peuvent être utilisées par des groupes qui veulent offrir le stationnement gratuit ou à prix réduit à leurs visiteurs. Une carte de réduction est généralement une carte en papier portant un code-barres et un numéro de séquence uniques. Les cartes de réduction doivent être utilisées en combinaison avec un ticket de stationnement ou tout autre identifiant.
|
|
|
|
Exemple de carte de réduction avec code-barres.
|
Exemple de carte de réduction avec code QR.
|
Si vous voulez savoir comment générer des cartes de sortie à usage unique, cliquez ici.
Génération de cartes de réduction
Vous pouvez générer un nouveau groupe de cartes de réduction sur la base d’un modèle de réduction ou choisir de générer un groupe de cartes de réduction personnalisé.
Génération de cartes de réduction personnalisée
Pour générer une ou plusieurs cartes de réduction personnalisées pour un groupe :
Cliquez sur « Cartes de réduction » (Reduction cards) dans la barre de menu.
Cliquez ensuite sur « Réductions » Reductions.
|
|
Sélectionnez le parking pour lequel les cartes de réduction doivent être générées depuis le menu déroulant « Parkings » (Car Parks).
Puis cliquez sur « Ajouter une réduction » (Add reduction.).
|
|
Cliquez sur « Générer des réductions personnalisées » (Generate custom reductions.).
|
|
Spécifications de la réduction
Sélectionnez le « Groupe émetteur » (Issuing Group) dans le menu déroulant.
Sélectionnez le « Type de réduction » (Reduction Type) dans le menu déroulant.
|
|
Il existe cinq types de réduction :
Réduction du montant
Durée fixe
Pourcentage
Montant des ventes
Changement de tarif
Réduction du montant
Un montant fixe est soustrait du montant dû.
Par exemple : un visiteur qui doit payer une somme de 10 € et qui dispose d’une carte de réduction d’un montant fixe de 6 € paiera 4 €.
Complétez la « réduction du montant » (Amount reduction.)
Sélectionnez la « Devise applicable » (currency) dans le menu déroulant.
|
|
Durée fixe
Une durée fixe est soustraite du temps de stationnement total.
Par exemple, un visiteur qui aura stationné une heure et demie et qui dispose d’une carte de réduction d’un montant fixe de deux heures bénéficiera de la sortie gratuite.
Indiquez le nombre de « Jours » (Days), « Heures » (Hours ) et « Minutes » (Minutes) dans les champs respectifs.
|
|
Pourcentage
Le montant dû sera réduit d’un pourcentage défini de la somme d’origine.
Par exemple : un visiteur qui doit payer une somme de 10 € et qui dispose d’une carte de réduction de 50 % paiera 5 €.
Complétez le « Pourcentage » (Percentile) en nombres entiers, sans décimales.
Indiquez le cas échéant un « Montant de réduction maximal » maximum reduction.
Par exemple, si le montant maximal de réduction est de 10 €, un visiteur qui doit payer la somme de 50 € et qui dispose d’une carte de réduction de 50 % bénéficiera de la réduction maximale de 10 € et ne paiera que 40 €.
|
|
Montant des ventes
Le montant dû est remplacé par un montant défini.
Par exemple : un visiteur qui doit payer une somme de 10 € et qui dispose d’une carte de réduction avec un montant de ventes de 3 € paiera 3 €.
Complétez le champ « Montant des ventes » (Sales Amount) en nombres entiers, sans décimales.
|
|
Changement de tarif
Le tarif appliqué à la durée de stationnement est modifié.
Par exemple : un visiteur qui aura stationné 4 heures au cours de la journée à 2,50 €/heure et qui dispose d’une carte de réduction avec changement de tarif et offrant le tarif de nuit plus avantageux de 2 €/heure paiera 8 €.
Sélectionnez un « Tarif » Tariff dans le menu déroulant.
|
|
Les cartes de réduction sont payées par le groupe émetteur. Vous pouvez faire payer le groupe
Lorsque les cartes sont créées (paiement à l’émission). Toutes les cartes sont payées, qu’elles soient utilisées ou non.
Lorsque les cartes sont réellement utilisées (paiement à la transaction). Les cartes non utilisées ne seront pas facturées.
Si vous facturez le groupe lorsque les cartes sont réellement utilisées, vous pouvez soit
Définir un montant fixe par carte (facturation fixe par transaction) quelle que soit la valeur réelle de la réduction. Par exemple, vous pourriez créer un groupe de cartes de réduction avec un pourcentage de réduction de 50 % et les vendre 2,50€ chacune.
Facturer le montant de réduction exact (facturation exacte par transaction).
Lorsque vous avez fait votre choix :
Sélectionnez le « Type de facturation » (Charge Type) dans le menu déroulant.
|
|
Indiquez le « Montant de facturation » (Charge amount), le cas échéant.
|
|
« Sélectionnez une devise » (Select a currency) depuis le menu déroulant.
Cliquez sur « Aller à l’étape suivante » (Go to next step).
Validité
Les cartes de réduction ont une validité limitée. Vous devez spécifier une plage de dates pendant laquelle la carte de réduction peut être utilisée. En outre, vous pouvez définir une fenêtre horaire pendant laquelle elle peut aussi être utilisée. Par exemple entre 9 h et 18 h.
|
|
Sélectionnez un « Type de validité » (Validity type) dans le menu déroulant. Il peut s’agir d’une « durée » (duration) en jours à compter de la date de création, ou d’une plage de dates spécifiques (specific).
Si vous avez sélectionné « Durée » (Duration), complétez le champ « Durée en jours » (Duration in days).
|
|
Si vous avez sélectionné « Plage de dates spécifique » (Specific), choisissez une « date de début » (start ) et une « date de fin » (end).
|
|
Pour définir la plage de temps dans laquelle la réduction peut être appliquée :
Indiquez une « heure de début » (start ) et une « heure de fin » (end) dans le champ « Utilisation autorisée » (Allowed usage).
|
|
Vous pouvez définir des cartes de réduction à usage unique, à usages multiples ou à usage illimité. Dans « Nombre d’utilisations » (Usage count)
Placez « Illimité » (Unlimited) sur « Oui » (Yes) si vous voulez des cartes sans limite d’utilisation.
Placez « Illimité » (Unlimited) sur « Non » (No) si vous voulez limiter l’utilisation des cartes. Indiquez le « nombre d’utilisations » maximal (Number of uses).
|
|
Cliquez sur « Aller à l’étape suivante » (Go to next step).
Options d’impression
Définissez le « nombre de cartes de réduction » (Number of reduction cards) à générer. Le nombre maximal de cartes est 9 999.
Sélectionnez la « configuration de papier » (Paper configuration) appropriée.
Cochez « Exporter en fichier csv » (Export to CSV) si vous voulez enregistrer les numéros de séquence et les numéros de code-barres dans un fichier séparé.
Cliquez sur « Génération de cartes de réduction » (Generate reduction cards).
|
|
Un fichier PDF contenant les cartes de réduction est généré pour impression. Un fichier CSV est généré pour le téléchargement (si l’option est activée).
Important ! Ce fichier ne sera enregistré nulle part dans le système. Il n’est accessible qu’au moment de sa génération, depuis cette fenêtre.
Enregistrez ou imprimez le fichier PDF contenant les cartes de réduction directement depuis cette fenêtre.
Création de modèles pour les cartes de réduction
Utilisez des modèles si vous voulez générer le même groupe de cartes de réduction plusieurs fois. Chaque groupe de cartes de réduction généré par un modèle :
est associé au même parking,
pour le même groupe émetteur,
comporte le même type de réduction,
et la même validité.
Pour créer un modèle :
Cliquez sur « Cartes de réduction » (Reduction cards) dans la barre de menu.
Puis cliquez sur « Modèles de réduction » (Reduction templates).
|
|
Sélectionnez le parking pour lequel le modèle de réduction doit être généré depuis le menu déroulant « Parkings » (Car Parks).
Puis cliquez sur « Ajouter un modèle » (Add template).
|
|
Donnez un « Nom » (Name) à ce modèle.
Sélectionnez le « Groupe émetteur » (Issuing Group) dans le menu déroulant.
Sélectionnez le Type de réduction depuis le menu déroulant.
|
Type de réduction
|
|
Il existe cinq types de réduction :
Réduction du montant
Durée fixe
Pourcentage
Montant des ventes
Changement de tarif
Réduction du montant
Un montant fixe est soustrait du montant dû.
Par exemple : un visiteur qui doit payer une somme de 10 € et qui dispose d’une carte de réduction d’un montant fixe de 6 € paiera 4 €.
Complétez la « réduction du montant » (Amount reduction.)
Sélectionnez la « Devise applicable » (currency) dans le menu déroulant.
Durée fixe
Une durée fixe est soustraite du temps de stationnement total.
Par exemple, un visiteur qui aura stationné une heure et demie et qui dispose d’une carte de réduction d’un montant fixe de deux heures bénéficiera de la sortie gratuite.
Indiquez le nombre de « Jours » (Days), « Heures » (Hours ) et « Minutes » (Minutes) dans les champs respectifs.
Pourcentage
Le montant dû sera réduit d’un pourcentage défini de la somme d’origine.
Par exemple : un visiteur qui doit payer une somme de 10 € et qui dispose d’une carte de réduction de 50 % paiera 5 €.
Complétez le « Pourcentage » (Percentile) en nombres entiers, sans décimales.
Indiquez le cas échéant un « Montant de réduction maximal » maximum reduction.
Par exemple, si le montant maximal de réduction est de 10 €, un visiteur qui doit payer la somme de 50 € et qui dispose d’une carte de réduction de 50 % bénéficiera de la réduction maximale de 10 € et ne paiera que 40 €.
Montant des ventes
Le montant dû est remplacé par un montant défini.
Par exemple : un visiteur qui doit payer une somme de 10 € et qui dispose d’une carte de réduction avec un montant de ventes de 3 € paiera 3 €.
Complétez le champ « Montant des ventes » (Sales Amount) en nombres entiers, sans décimales.
Changement de tarif
Le tarif appliqué à la durée de stationnement est modifié.
Par exemple : un visiteur qui aura stationné 4 heures au cours de la journée à 2,50 €/heure et qui dispose d’une carte de réduction avec changement de tarif et offrant le tarif de nuit plus avantageux de 2 €/heure paiera 8 €.
Sélectionnez un « Tarif » Tariff dans le menu déroulant.
|
Sélectionnez le Type de facturation depuis le menu déroulant.
|
Type de facturation
|
|
Les cartes de réduction sont payées par le groupe émetteur. Vous pouvez faire payer le groupe
Lorsque les cartes sont créées (paiement à l’émission). Toutes les cartes sont payées, qu’elles soient utilisées ou non.
Lorsque les cartes sont réellement utilisées (paiement à la transaction). Les cartes non utilisées ne seront pas facturées.
Si vous facturez le groupe lorsque les cartes sont réellement utilisées, vous pouvez soit
Définir un montant fixe par carte (facturation fixe par transaction) quelle que soit la valeur réelle de la réduction. Par exemple, vous pourriez créer un groupe de cartes de réduction avec un pourcentage de réduction de 50 % et les vendre 2,50€ chacune.
Facturer le montant de réduction exact (facturation exacte par transaction).
Lorsque vous avez fait votre choix :
Sélectionnez le « Type de facturation » (Charge Type) dans le menu déroulant.
Indiquez le « Montant de facturation » (Charge amount), le cas échéant.
« Sélectionnez une devise » (Select a currency) depuis le menu déroulant.
Cliquez sur « Aller à l’étape suivante » (Go to next step).
|
Indiquez le « Montant de facturation » (Charge amount), le cas échéant.
« Sélectionnez une devise » (Select a currency) depuis le menu déroulant.
Cliquez sur « Aller à l’étape suivante » (Go to next step).
Spécifiez la validité
|
Validité
|
|
Les cartes de réduction ont une validité limitée. Vous devez spécifier une plage de dates pendant laquelle la carte de réduction peut être utilisée. En outre, vous pouvez définir une fenêtre horaire pendant laquelle elle peut aussi être utilisée. Par exemple entre 9 h et 18 h.
Sélectionnez un « Type de validité » (Validity type) dans le menu déroulant. Il peut s’agir d’une « durée » (duration) en jours à compter de la date de création, ou d’une plage de dates spécifiques (specific).
Si vous avez sélectionné « Durée » (Duration), complétez le champ « Durée en jours » (Duration in days).
Si vous avez sélectionné « Plage de dates spécifique » (Specific), choisissez une « date de début » (start ) et une « date de fin » (end).
Pour définir la plage de temps dans laquelle la réduction peut être appliquée :
Indiquez une « heure de début » (start ) et une « heure de fin » (end) dans le champ « Utilisation autorisée » (Allowed usage).
Vous pouvez définir des cartes de réduction à usage unique, à usages multiples ou à usage illimité. Dans « Nombre d’utilisations » (Usage count)
Placez « Illimité » (Unlimited) sur « Oui » (Yes) si vous voulez des cartes sans limite d’utilisation.
Placez « Illimité » (Unlimited) sur « Non » (No) si vous voulez limiter l’utilisation des cartes. Indiquez le « nombre d’utilisations » maximal (Number of uses).
Cliquez sur « Aller à l’étape suivante » (Go to next step).
|
Puis cliquez sur « Ajouter un modèle » (Add template).
Génération de cartes de réduction sur la base d’un modèle
Pour générer un groupe de cartes de réduction à l’aide d’un modèle :
Cliquez sur « Cartes de réduction » (Reduction cards) dans la barre de menu.
Cliquez sur « Réductions » Reductions.
|
|
Sélectionnez le parking pour lequel les cartes de réduction doivent être émises depuis le menu déroulant « Parkings » (Car Parks).
Puis cliquez sur « Ajouter une réduction » (Add reduction.).
|
|
« Sélectionnez un modèle » (Select a template) depuis le menu déroulant.
|
|
Cliquez sur « Aller à l’étape suivante » (Go to next step).
Paramétrez les options d’impression
|
Options d’impression
|
|
Définissez le « nombre de cartes de réduction » (Number of reduction cards) à générer. Le nombre maximal de cartes est 9 999.
Sélectionnez la « configuration de papier » (Paper configuration) appropriée.
Cochez « Exporter en fichier csv » (Export to CSV) si vous voulez enregistrer les numéros de séquence et les numéros de code-barres dans un fichier séparé.
|
Cliquez sur « Génération de cartes de réduction » (Generate reduction cards).
Un fichier PDF contenant les cartes de réduction est généré pour impression.
Important ! Ce fichier ne sera enregistré nulle part dans le système. Il n’est accessible qu’au moment de sa génération, depuis cette fenêtre.
Sinon :
Cliquez sur « Cartes de réduction » (Reduction cards) dans la barre de menu.
Puis cliquez sur « Modèles de réduction » (Reduction templates).
|
|
Pour rechercher un modèle, sélectionnez un « parking » (Car park) ou un « groupe » (Group) et cliquez sur « Rechercher » (Search).
Cliquez sur le modèle que vous voulez modifier.
|
|
Puis cliquez sur « Ajouter une réduction » (Add reduction.).
|
|
Cliquez sur « Aller à l’étape suivante » (Go to next step).
Paramétrez les options d’impression
|
Options d’impression
|
|
Définissez le « nombre de cartes de réduction » (Number of reduction cards) à générer. Le nombre maximal de cartes est 9 999.
Sélectionnez la « configuration de papier » (Paper configuration) appropriée.
Cochez « Exporter en fichier csv » (Export to CSV) si vous voulez enregistrer les numéros de séquence et les numéros de code-barres dans un fichier séparé.
|
Cliquez sur « Génération de cartes de réduction » (Generate reduction cards).
Modification d’un modèle
Pour modifier les informations dans un modèle :
Cliquez sur « Cartes de réduction » (Reduction cards) dans la barre de menu.
Puis cliquez sur « Modèles de réduction » (Reduction templates).
|
|
Pour rechercher un modèle, sélectionnez un « parking » (Car park) ou un « groupe » (Group) et cliquez sur « Rechercher » (Search).
Cliquez sur le modèle que vous voulez modifier.
|
|
Cliquez sur « Modifier des informations » (Edit details).
|
|
Modifiez les informations puis cliquez sur « Enregistrer » (Save).
Utilisation de cartes de réduction
Une carte de réduction peut être utilisée quand
Le temps d’utilisation se situe dans sa période de validité.
Il reste une ou plusieurs utilisations.
Elle est activée.
Le groupe émetteur existe dans le système.
Remarque :
Une carte de réduction ne peut être utilisée qu’une seule fois par transaction de stationnement.
Il est possible d’utiliser plus d’une carte de réduction par transaction de stationnement.
Si un visiteur est en cours de procédure de paiement d’une transaction de stationnement, qu’il a utilisé la carte de réduction, mais qu’il décide d’annuler la transaction et de revenir plus tard, la réduction est enregistrée. La réduction est appliquée lorsque le visiteur revient.
Les cartes de réduction ne peuvent pas être utilisées pour acheter des abonnements ou pour recharger des cartes de valeur.
Les cartes de réduction peuvent être utilisées avec le paiement par carte de valeur.
Les cartes de réduction ne peuvent pas être utilisées avec les tickets de remplacement, les produits supprimés ou les cartes prépayées.
Recherche de cartes de réduction
Vous pourrez trouver des cartes de réduction en :
Faisant une recherche par numéro de séquence
Faisant une recherche par code-barres
Faisant une recherche par parking
Faisant une recherche par groupe émetteur
Pour effectuer une recherche par numéro de séquence ou code-barres :
Cliquez sur « Cartes de réduction » (Reduction cards) dans la barre de menu.
Saisissez le numéro de séquence ou le code-barres dans le champ de recherche.
Cliquez sur la carte de réduction dans le menu déroulant.
|
|
Pour effectuer une recherche par parking ou par groupe émetteur :
Cliquez sur « Cartes de réduction » (Reduction cards) dans la barre de menu.
Cliquez sur « Réductions » (Reductions).
Sélectionnez le « Parking » (Car park) dans le menu déroulant.
Ou sélectionnez le « groupe » (Group) émetteur dans le menu déroulant.
Cliquez sur « Rechercher » (Search).
Cliquez sur la carte de réduction correspondante.
|
|
REMARQUE Certaines réductions de la liste n’ont pas de numéro de séquence ou de code-barres. Ce sont des réductions directes ou des réductions avec différents identifiants comme :
AWID
HID
la plaque minéralogique
MAGSTRIPE
MIFARE
NEDAP
RFID
Jeton
PROTON
Contrats
Les contrats contiennent des règles pour le paiement, les droits d’accès et d’autres accords liés au stationnement.
Les contrats sont attribués aux visiteurs. Chaque visiteur dispose d’un contrat.
Un visiteur est une personne disposant de droits d’accès.
Un groupe est généralement une société prenant en charge le paiement et l’accès pour le compte de plusieurs visiteurs.
Un contrat est attribué :
automatiquement, par exemple, lorsqu’un nouveau visiteur obtient un ticket de la station d’entrée.
manuellement, par exemple, lors de la création d’un visiteur avec un abonnement de groupe ou de la génération d’une carte de sortie à usage unique.
Types de contrats
Les types de contrats sont des modèles de contrat. Chaque parking possède sa propre collection de types de contrat. Si vous voulez utiliser le même type de contrat dans plusieurs parkings, vous devez le recréer manuellement pour chaque parking.
Rechercher un type de contrat
Pour rechercher un type de contrat :
Cliquez sur « Contrats » Contracts dans la barre de menu.
Puis cliquez sur « Types de contrats » (Contract types).
|
|
Effectuez ensuite l’une des actions ci-dessous :
Entrez le nom du type de contrat dans la barre de recherche et cliquez sur « Rechercher » (Search).
|
|
Cliquez directement sur le type de contrat, choisissez un parking à filtrer par parking, ou entrez le nom du type de contrat dans la barre de recherche et cliquez sur « Rechercher » (Search).
Créer un nouveau type de contrat
Pour créer un nouveau type de contrat :
Cliquez sur « Contrats » Contracts dans la barre de menu.
Puis cliquez sur « Types de contrats » (Contract types).
|
|
Sélectionnez le parking pour lequel le type de contrat doit être créé depuis le menu déroulant « Parkings » (Car Parks).
|
|
Puis cliquez sur « Ajouter un contrat » (Add Contrat).
|
|
Saisissez un « Nom » (Name) pour le nouveau type de contrat.
Pour les « Détails » (Details) choisissez « Oui » (Yes) si vous devez ajouter des détails. C’est la pratique habituelle pour les visiteurs avec abonnement.
Sinon, paramétrez les « Détails » (Details) sur « Non » (No) si l’ajout de détails n’est pas requis. Par exemple, si vous créez un type de contrat pour des clients de court terme.
Ignorez le menu déroulant « Type de contrat attribuable » (Assignable contract type). Cette fonction n’est pas utilisée pour le moment.
Paramétrez le « Type de validité » (Validity type). Choisissez entre « Illimité » (Unlimited), « Jusqu’à (date et heure) » (Until date and time), « Jusqu’à (durée après création) » (Until duration after creation). Ce paramètre est appliqué aux visiteurs ajoutés automatiquement uniquement.
Vérifiez « Payé par défaut jusqu’à » (Default paid until) si ce type de contrat offre un temps de stationnement gratuit. Par exemple, si la première heure est toujours gratuite. Saisissez les « Jours » (Days), « Heures » (Hours) et « Minutes » (Minutes) gratuits. Ce paramètre est appliqué aux visiteurs ajoutés automatiquement uniquement.
Cliquez sur « Aller à l’étape suivante » (Go to next step).
|
|
Sélectionnez un « Type d’abonnement » (Subscription type) dans le menu déroulant.
Il existe cinq types d’abonnement :
Clients de court terme
Abonnement de groupe
Abonnement prépayé
Réservation
Abonnement à valeur définie
Clients de court terme
Les visiteurs de court terme sont des visiteurs qui restent pour une courte période de temps et payent leur visite ensuite.
|
|
Abonnement de groupe
Un groupe peut prendre en charge l’accès et le paiement pour plusieurs visiteurs par le biais d'un abonnement de groupe. La prise en charge du paiement est optionnelle : les visiteurs peuvent aussi être facturés directement.
|
|
Dans le menu déroulant « Oublier le visiteur » (Forget visitor), sélectionnez « À la fin de validité » (When validity ends) pour effacer le lien entre le visiteur et ses identifiants lorsque le contrat est invalidé. Les identifiants peuvent ensuite être réutilisés pour un autre visiteur. Sélectionnez « Jamais » (Never) pour conserver le lien entre le visiteur et ses identifiants. Les identifiants pourront être réutilisés par le même visiteur en cas de renouvellement.
Dans le menu déroulement de la méthode de paiement, sélectionnez « Par facture de groupe » (By group invoice) pour facturer le groupe. Sélectionnez « À la station de paiement » (At payment station) lorsque les visiteurs du groupe payent eux-mêmes.
Sélectionnez un « Tarif de violation du regroupement » (Pooling violation tariff) depuis le menu déroulant. Informez-vous sur le regroupement ici.
Abonnement prépayé
Avec un abonnement prépayé, un visiteur peut payer le stationnement à l’année, au mois ou à la semaine. Lorsqu’une période de tolérance est spécifiée, un visiteur dispose d’un accès autorisé même après expiration de son abonnement. Le visiteur peut utiliser cette période de tolérance pour entrer dans le parking afin de renouveler son abonnement.
Réservation
Ce type de contrat concerne les réservations effectuées par le biais de systèmes externes.
Abonnement à valeur définie
Avec un abonnement à la valeur, un visiteur peut payer un montant défini d’avance pour le temps de stationnement. Après chaque visite, le coût réel du stationnement est déduit du montant prépayé. Le temps de stationnement peut être facturé en fonction de n’importe quel profil tarifaire.
|
|
Lorsque vous avez fait votre choix :
Sélectionnez le « Profil tarifaire » (Tax profile) approprié.
Sélectionnez un « Compteur personnalisé » (custom counter), le cas échéant. Obtenez plus d’informations sur les compteurs personnalisés ici.
Spécifiez ensuite les droits d’accès par section.
Paramétrez « Appartient à » (Belongs in) sur « Oui » (Yes) si le tarif normal s’applique à cette section. Paramétrez « Appartient à » sur « Non » (No) si le tarif d’infraction s’applique à cette section.
Paramétrez « Autorisé dans » (Allowed in) sur « Oui » (Yes) si des visiteurs sur ce type de contrat peuvent entrer dans cette section. S’ils ne le peuvent pas, paramétrez sur « Non » (No). Cette option n’est disponible que s’il y a des sections limitées dans ce parking.
Sélectionnez le « profil de tarif » (Tariff profile) pour ce type de contrat dans cette section.
Choisissez une section comme « section par défaut » (Default). Une seule section peut être définie par défaut.
Cliquez sur « Aller à l’étape suivante » (Go to next step).
Dans l’écran de configuration avancée :
Vous pouvez configurer des Droits d’accès spéciaux. Sélectionnez « Le visiteur est autorisé à entrer dans le parking lorsqu’il est plein » (Visitor is allowed to enter the car park when car park is full) si ce type de contrat est utilisé pour les employés, le personnel de maintenance ou toute autre personne qui doit pouvoir accéder au parking à tout moment. Sélectionnez « Aucun » (None) pour les autres visiteurs.
|
ParkID détecte toute mauvaise utilisation des identifiants de visiteur. C’est ce qu’on appelle l’anti-pass back (ou anti-retour). Par exemple : lorsque le même identifiant de visiteur est utilisé par deux visiteurs ou plus en même temps.
|
Utilisez le menu déroulant « Lorsque l’emplacement est inconnu » (When location is unknown) pour déterminer ce qu’il faut faire si une entrée ou une sortie n’est pas correctement enregistrée. Par exemple, en cas d’urgence ou lorsqu’un client de court terme est converti en abonnement et reçoit un nouveau ticket.
|
|
Utilisez le menu déroulant « Contrôler l’emplacement du visiteur actuel » (Check current visitor location) pour déterminer un comportement antiretour (anti pass-back).
|
|
Utilisez le menu déroulant « Identifiants de visiteur » (Visitor identifiers) pour déterminer le mode d’accès des visiteurs.
|
|
Sélectionnez les « Identifiants obligatoires » (Mandatory identifiers) pour ce type de contrat. Sélectionnez « Aucun » (None) si aucun des identifiants n’est obligatoire.
|
|
Paramétrez « Le visiteur confirme manuellement à l’entrée » (Visitor confirms manually at entry) sur « Oui » (Yes) si ce type de contrat requiert que les visiteurs confirment leur entrée. Par exemple, lorsqu’un visiteur utilise un identifiant tiers (ParkMobile par exemple). Paramétrez-le sur « Non » (No) si l’entrée est enregistrée automatiquement.
|
|
Cliquez sur « Ajouter un contrat » (Add contract).
Modification d’un type de contrat
Les types de contrat et les contrats sont liés. Les modifications que vous apportez à un certain type de contrat seront appliquées aux contrats qui utilisent ce type de contrat. Si vous apportez une modification à l’un des champs d’un contrat, le lien entre ce champ et le champ correspondant dans le type de contrat est effacé. Tous les autres champs restent liés.
Pour modifier un type de contrat :
Cliquez sur « Contrats » Contracts dans la barre de menu.
Cliquez sur « Types de contrats » (Contract types).
|
|
Parcourez la liste et cliquez sur le type de contrat que vous voulez modifier ou utilisez la barre de recherche « Type » (Type) pour le trouver et cliquez dessus.
|
|
Cliquez sur « Modifier les informations » (Edit details) ou « Modifier le contrat » (Edit contract) pour modifier le type de contrat.
|
|
Modifiez les informations puis cliquez sur « Enregistrer » (Save). Cliquez sur « Annuler » (Cancel) pour supprimer les modifications.
Ajout d’un planning à un contrat
Vous pouvez utiliser des plannings avec des contrats pour limiter l'accès à certaines parties du parking certains jours et à certaines heures.
Pour ajouter un planning à un contrat :
Cliquez sur « Contrats » Contracts dans la barre de menu.
Puis cliquez sur « Types de contrats » (Contract types).
|
|
Parcourez la liste et cliquez sur le type de contrat que vous voulez modifier ou utilisez la barre de recherche « Type » (Type) pour le trouver et cliquez dessus.
|
|
Cliquez sur « Modifier un contrat » (Edit Contrat).
Cliquez sur « Ajouter un planning de section » (Add section schedule).
|
|
Sélectionnez les sections auxquelles s'applique ce planning.
|
|
Le planning se répète chaque semaine. Le statut « Dans le planning » (In schedule) est affiché en orange. Dans Dans le planning, le visiteur est autorisé à entrer. Le statut « Hors planning » (Out schedule) est affiché en gris. Dans le Hors planning, le visiteur n'est pas autorisé à entrer.
Déplacez la barre orange pour changer le statut « Dans le planning » (In schedule).
|
|
Cliquez sur pour supprimer la barre orange.
pour supprimer la barre orange.
Cliquez n’importe où sur la barre grise pour créer une nouvelle barre orange et faites-la glisser pour la redimensionner.
|
|
Groupes
Un « groupe » (group) est :
une société prenant en charge le paiement et l’accès pour le compte de plusieurs visiteurs et/ou
une société émettant des cartes de réduction.
Chaque groupe est associé à un seul parking. Un groupe ne peut pas être associé à plusieurs parkings. Si une société est cliente de plusieurs parkings, vous devez créer un nouveau groupe dans chaque parking.
Recherche d’un groupe
Pour rechercher un groupe :
Cliquez sur « Contrats » Contracts dans la barre de menu.
Cliquez sur « Groupes » (Groups).
|
|
Effectuez ensuite l’une des actions ci-dessous :
Entrez le nom du groupe dans la barre de recherche et cliquez sur « Rechercher » (Search).
|
|
Cliquez directement sur le groupe, choisissez un parking à filtrer par parking, ou entrez le nom du groupe dans la barre de recherche et cliquez sur « Rechercher » (Search).
Création d’un groupe
Pour créer un nouveau groupe :
Cliquez sur « Contrats » Contracts dans la barre de menu.
Cliquez sur « Groupes » (Groups).
|
|
Sélectionnez le parking pour lequel le type de contrat doit être créé depuis le menu déroulant « Parkings » (Car Parks).
|
|
Cliquez sur « Ajouter un groupe » (Add group).
Entrez les informations sur le groupe et cliquez sur « Aller à l’étape suivante » (Go to next step).
|
|
Spécifiez une « date de début » (Start date) et une « date de fin » (End date) pour la période de validité de ce groupe. Les visiteurs faisant partie de ce groupe ne peuvent entrer dans le parking que pendant la période de validité.
|
|
|
Avec « Regroupement » (Pooling), vous pouvez limiter le nombre de visiteurs d’un groupe. Il existe trois types de regroupement :
1.
Les visiteurs se voient refuser l’accès lorsque le nombre maximal de visiteurs est atteint.
2.
Les visiteurs sont facturés pour la durée entière de stationnement au titre de violation du regroupement.
Par exemple : un visiteur (visit 1) entre dans le parking tout en utilisant le regroupement. « Visit 1 » est facturé au tarif normal configuré pour le groupe. Lorsque « visit 2 » arrive, le regroupement est complet. « Visit 2 » sera facturé pour la durée entière à un tarif différent.
3.
Les visiteurs ne sont facturés que pour la durée de stationnement en statut de violation du regroupement.
Par exemple : un visiteur (visit 1) entre dans le parking tout en utilisant le regroupement. « Visit 1 » est facturé au tarif normal configuré pour le groupe. Lorsque « visit 2 » arrive, le regroupement est complet. « Visit 2 » est facturé à un tarif différent. Lorsque « visit 1 » part, un emplacement devient disponible dans le regroupement. « Visit 2 » est, à partir de ce moment-là, facturé au tarif normal.
|
Cliquez sur « Oui » (Yes) dans l’écran de configuration de regroupement si vous voulez que ce soit un groupe de regroupement. Cliquez sur « Non » (No) si ce n’est pas un groupe de regroupement.
|
|
|
|
Spécifiez le « Nombre maximal de visiteurs dans le regroupement » (Maximum of visitors in pool).
|
|
Sélectionnez l’évènement déclenché « Lorsque le nombre maximal est atteint » (When maximum amount is reached).
|
|
Cliquez sur « Ajouter un groupe » (Add group).
Modification d’un groupe
Pour modifier un groupe :
Cliquez sur « Contrats » Contracts dans la barre de menu.
Cliquez sur « Groupes » (Groups).
|
|
Parcourez la liste et cliquez sur le groupe que vous voulez modifier ou utilisez la barre de recherche « Nom du groupe » (Group name) pour le trouver et cliquez dessus.
Cliquez sur « Modifier les informations »( Edit details) pour modifier le groupe.
|
|
Modifiez les informations puis cliquez sur « Enregistrer » (Save). Cliquez sur « Annuler » (Cancel) pour supprimer les modifications.
Visiteurs
Toute personne disposant d’une voiture et de droits d’accès au parking est un « Visiteur » (visitor).
Les visiteurs sont répartis en fonction du type d’abonnement de leur contrat.
Les Visiteurs de court terme sont des visiteurs qui restent pour une courte période de temps et payent leur visite ensuite.
Les visiteurs avec Abonnement de groupe font partie d’un groupe. Apprenez comment ajouter un visiteur à un groupe, et comment supprimer un visiteur d’un groupe.
Les autres types d’abonnements sont l’« Abonnement prépayé » (pre-paid subscription), la « Réservation » (reservation) et l’« Abonnement à valeur définie » (value subscription).
Chaque visiteur se voit accorder un accès avec au moins un « Identifiant de visiteur » (visitor identifier). Les exemples d’identifiants incluent :
le code-barres sur la carte d’entrée
la plaque minéralogique
un jeton personnalisé associé à une carte de paiement
un RFID personnalisé
des cartes à piste magnétique
des solutions de gestion d’accès de AWID, HID, MIFARE et NEDAP
Le contrat du visiteur détermine l’identifiant à utiliser.
Recherche d’un visiteur
Pour rechercher un visiteur, cliquez sur « Contrats » Contracts dans la barre de menu. Effectuez ensuite l’une des actions ci-dessous :
Utilisez la barre de recherche : entrez le nom du visiteur, le numéro d’identifiant ou le groupe du visiteur. Attendez que les résultats s'affichent à l'écran ou cliquez sur « Rechercher » (Search).
|
|
Cliquez sur « Visiteurs » (Visitors), spécifiez les paramètres de recherche puis cliquez sur « Rechercher » (Search).
|
|
Cliquez sur l’enregistrement d’un visiteur pour :
Ajout d’un visiteur
Vous utiliserez « Ajouter un visiteur » (Add Visitor) pour :
Génération d’une carte de sortie à usage unique
Pour générer une carte de sortie à usage unique :
Cliquez sur « Contrats » Contracts dans la barre de menu.
Cliquez sur « Visiteurs » (Visitors).
|
|
Sélectionnez le parking pour lequel les cartes de sortie à usage unique doivent être générées depuis le menu déroulant « Parkings » (Car Parks).
|
|
Cliquez sur « Ajouter un visiteur » (Add visitor).
Cliquez sur « Non » (No) en dessous de « Le visiteur est-il membre d’un groupe ? » (Is the visitor member of a group?)
|
|
Choisissez le type de contrat pour une carte de sortie à usage unique depuis le menu déroulant « Sélectionner le contrat » (Select the contract).
Cliquez sur « Aller à l’étape suivante » (Go to next step).
Cliquez à nouveau sur « Aller à l’étape suivante » (Go to next step).
|
|
Spécifiez les dates entre lesquelles la carte de sortie à usage unique est valide.
|
|
Cliquez sur « Aller à l’étape suivante » (Go to next step).
Cochez « Générer des cartes » (Generate Cards).
|
|
Sélectionnez la « configuration de papier » (Paper configuration) appropriée.
Définissez le « nombre de clients à générer » (Number of customers to generate).
Cliquez sur « Ajouter un visiteur » (Add visitor).
Une carte de sortie à usage unique est générée.
|
|
Ajout d’un visiteur à un groupe
Pour ajouter un visiteur à un groupe, vous pouvez soit utiliser un visiteur existant, soit créer un nouveau visiteur.
Pour ajouter un nouveau visiteur à un groupe :
Cliquez sur « Contrats » Contracts dans la barre de menu.
Cliquez sur « Groupes » (Groups).
|
|
Parcourez la liste et cliquez sur le groupe que vous voulez modifier ou utilisez la barre de recherche « Nom du groupe » (Group name) pour le trouver et cliquez dessus.
Cliquez sur « Ajouter un membre » (Add member).
|
|
Sélectionnez le contrat pour ce visiteur depuis le menu déroulant. Cliquez sur « Afficher la configuration du type de contrat » (View the contract type configuration) pour voir les détails de ce contrat.
|
|
Cliquez sur « Aller à l’étape suivante » (Go to next step).
Entrez les informations sur le visiteur et cliquez sur « Aller à l’étape suivante » (Go to next step).
L’étape suivante dépend du contrat choisi. Certains contrats spécifient un identifiant d’accès obligatoire. D’autres contrats vous laissent choisir l’identifiant d’accès que vous devez utiliser.
S’il n’y a pas d’identifiant de visiteur obligatoire spécifié dans le contrat :
Cliquez sur « Ajouter un autre identifiant de visiteur » (Add another visitor identifier) pour ajouter un identifiant de visiteur.
|
|
Sélectionnez le type d’identifiant dans la liste déroulante.
|
|
Si vous sélectionnez « Code-barres » (Barcode), un code-barres sera généré automatiquement. Si vous sélectionnez un autre type, entrez l’« Identifiant visiteur » (the visitor identifier) dans le champ de texte.
Cliquez sur « Ajouter un autre identifiant de visiteur » (Add another vistor identifier) le cas échéant.
Cliquez sur « Aller à l’étape suivante » (Go to next step).
Définissez une « Date de début » (start date) et une « Date de fin » (end date) pour la validité de cet abonnement. Ou sélectionnez « Paramétrer sur Illimité » (Set to infinity) si aucune date de fin n’est requise.
Cliquez sur « Aller à l’étape suivante » (Go to next step) si vous avez sélectionné « Code-barres » comme identifiant de visiteur, ou cliquez sur « Ajouter un visiteur » (Add visitor) si vous choisissez d’utiliser un identifiant de visiteur différent.
Si un code-barres est le seul identifiant :
Cochez « Générer des cartes » (Generate Cards).
|
|
Sélectionnez la « configuration de papier » (Paper configuration) appropriée.
Définissez le « nombre de clients à générer » (Number of customers to generate).
Cliquez sur « Ajouter un visiteur » (Add visitor).
Si le code-barres n’est pas le seul identifiant, vous pouvez imprimer le code-barres à partir de l’enregistrement du visiteur :
Cliquez sur « Ajouter un visiteur » (Add visitor).
Cliquez sur pour imprimer le code-barres.
pour imprimer le code-barres.
|
|
Pour ajouter un visiteur existant à un groupe :
Cliquez sur « Contrats » Contracts dans la barre de menu.
|
|
Cliquez sur « Visiteurs » (Visitors).
Sélectionnez le « Parking » (Car park) dans le menu déroulant.
|
|
Cliquez sur « Ajouter un visiteur » (Add visitor).
Cliquez sur « Oui » (Yes) pour répondre à la question « Le visiteur est-il membre d’un groupe ? »
|
|
« Sélectionnez le groupe » ( Select the group) dans le menu déroulant.
« Sélectionnez un contrat » (Select a contract) pour ce groupe depuis le menu déroulant. Cliquez sur « Afficher la configuration du type de contrat » (View the contract type configuration) pour voir les détails de ce contrat.
Cliquez sur « Aller à l’étape suivante » (Go to next step).
Entrez les informations sur le visiteur et cliquez sur « Aller à l’étape suivante » (Go to next step).
L’étape suivante dépend du contrat choisi. Certains contrats spécifient un identifiant de visiteur obligatoire. D’autres contrats vous laissent choisir l’identifiant de visiteur que vous utilisez.
S’il n’y a pas d’identifiant de visiteur obligatoire spécifié dans le contrat :
Cliquez sur « Ajouter un autre identifiant de visiteur » (Add another visitor identifier) pour ajouter un identifiant de visiteur.
|
|
Sélectionnez le type d’identifiant dans la liste déroulante.
|
|
Si vous sélectionnez « Code-barres » (Barcode), un code-barres sera généré automatiquement. Si vous sélectionnez un autre type, entrez l’« Identifiant visiteur » (the visitor identifier) dans le champ de texte.
Cliquez sur « Ajouter un autre identifiant de visiteur » (Add another vistor identifier) le cas échéant.
Cliquez sur « Aller à l’étape suivante » (Go to next step).
Définissez une « Date de début » (start date) et une « Date de fin » (end date) pour la validité de cet abonnement. Ou sélectionnez « Paramétrer sur Illimité » (Set to infinity) si aucune date de fin n’est requise.
Cliquez sur « Aller à l’étape suivante » (Go to next step) si vous avez sélectionné « Code-barres » comme identifiant de visiteur, ou cliquez sur « Ajouter un visiteur » (Add visitor) si vous choisissez d’utiliser un identifiant de visiteur différent.
Si un code-barres est le seul identifiant :
Cochez « Générer des cartes » (Generate Cards).
|
|
Sélectionnez la « configuration de papier » (Paper configuration) appropriée.
|
|
Sélectionnez la « configuration de papier » (Paper configuration) appropriée.
Définissez le « nombre de clients à générer » (Number of customers to generate).
Cliquez sur « Ajouter un visiteur » (Add visitor).
Si le code-barres n’est pas le seul identifiant, vous pouvez imprimer le code-barres à partir de l’enregistrement du visiteur :
Cliquez sur « Ajouter un visiteur » (Add visitor).
Cliquez sur pour imprimer le code-barres.
pour imprimer le code-barres.
|
|
Ajout d’un visiteur sans groupe
Pour ajouter un visiteur sans groupe :
Cliquez sur « Contrats » Contracts dans la barre de menu.
Cliquez sur « Visiteurs » (Visitors).
|
|
Sélectionnez le parking depuis le menu déroulant « Parkings » (Car park).
|
|
Cliquez sur « Ajouter un visiteur » (Add visitor).
Cliquez sur « Non » (No) en dessous de « Le visiteur est-il membre d’un groupe ? » (Is the visitor member of a group?)
|
|
Choisissez le type de contrat depuis le menu déroulant « Sélectionner le contrat » (Select the contract).
|
|
Cliquez sur « Afficher la configuration du type de contrat » (View the contract type configuration) pour voir les détails de ce contrat.
|
|
Cliquez sur « Aller à l’étape suivante » (Go to next step).
L’étape suivante dépend du contrat choisi. Certains contrats spécifient un identifiant de visiteur obligatoire. D’autres contrats vous laissent choisir l’identifiant de visiteur que vous utilisez.
S’il n’y a pas d’identifiant de visiteur obligatoire spécifié dans le contrat :
Cliquez sur « Ajouter un autre identifiant de visiteur » (Add another visitor identifier) pour ajouter un identifiant de visiteur.
|
|
Sélectionnez le type d’identifiant dans la liste déroulante.
|
|
Si vous sélectionnez « Code-barres » (Barcode), un code-barres sera généré automatiquement. Si vous sélectionnez un autre type, entrez l’« Identifiant visiteur » (the visitor identifier) dans le champ de texte.
Cliquez sur « Ajouter un autre identifiant de visiteur » (Add another vistor identifier) le cas échéant.
Cliquez sur « Aller à l’étape suivante » (Go to next step).
Choisissez le « Type de validité » (Validity type) pour ce contrat. Il peut s'agir de Période, de Durée ou d’Illimité.
|
|
Si le type de validité est défini sur « Période » (Period), définissez une « Date de début » (start date) et une « Date de fin » (end date) pour la validité de ce contrat.
Si le type de validité est défini sur « Durée » (Duration), saisissez la validité en jours, heures et minutes.
|
|
Cliquez sur « Aller à l’étape suivante » (Go to next step) si vous avez sélectionné « Code-barres » comme identifiant de visiteur, ou cliquez sur « Ajouter un visiteur » (Add visitor) si vous choisissez d’utiliser un identifiant de visiteur différent.
Si un code-barres est le seul identifiant :
Cochez « Générer des cartes » (Generate Cards).
|
|
Sélectionnez la « configuration de papier » (Paper configuration) appropriée.
Définissez le « nombre de clients à générer » (Number of customers to generate).
Cliquez sur « Ajouter un visiteur » (Add visitor).
Si le code-barres n’est pas le seul identifiant, vous pouvez imprimer le code-barres à partir de l’enregistrement du visiteur :
Cliquez sur « Ajouter un visiteur » (Add visitor).
Cliquez sur pour imprimer le code-barres.
pour imprimer le code-barres.
|
|
Suppression d’un visiteur d’un groupe
Pour supprimer un visiteur d’un groupe : cliquez sur le menu déroulant « Contrats » Contracts. Effectuez ensuite l’une des actions ci-dessous :
Utilisez la barre de recherche : entrez le nom du visiteur, le numéro d’identifiant ou le groupe du visiteur. Cliquez sur « Rechercher » (Search).
|
|
Cliquez sur « Visiteurs » (Visitors), spécifiez les paramètres de recherche puis cliquez sur « Rechercher » (Search).
|
|
Cliquez sur l’enregistrement du visiteur.
Cliquez sur « Modifier un contrat » (Edit Contrat).
Cliquez sur dans le menu déroulant « Groupe ».
dans le menu déroulant « Groupe ».
|
|
Cliquez sur « Enregistrer » (Save).
Le visiteur est à présent supprimé du groupe.
Modification d’informations
Dans l’enregistrement du visiteur, cliquez sur « Modifier les informations » (Edit details).
|
|
Modifiez les informations puis cliquez sur « Enregistrer » (Save).
Cliquez sur « Annuler » (Cancel) pour supprimer les modifications.
Mise d’un visiteur sur liste noire
Pour mettre un visiteur sur liste noire, allez à l’enregistrement du visiteur.
Cliquez sur « Modifier un contrat » (Edit Contrat).
|
|
Faites défiler jusqu’à « Configuration avancée » et paramétrez « Le visiteur est mis sur liste noire » (Visitor is blacklisted) sur « Oui » (Yes).
|
|
Spécifiez un « Motif de mise sur liste noire » (blacklist reason) puis cliquez sur « Enregistrer » (Save).
Cliquez sur « Annuler » (Cancel) pour supprimer les modifications.
Gestion des identifiants
Dans l’enregistrement du visiteur, cliquez sur « Gérer les identifiants » (Manage Identifiers).
|
|
Cliquez sur « Ajouter un identifiant » (Add identifier ) pour ajouter un autre identifiant. Sélectionnez le « Type d’identifiant » (identifier type) dans le menu déroulant, entrez le numéro d’identifiant dans le champ « Identifiant visiteur » (Visitor Identifier) et paramétrez le statut sur « Actif » (Active).
Important ! Un message contextuel d’avertissement s’affiche si un certain identifiant est déjà utilisé par un autre visiteur. Il est possible de supprimer cet identifiant de l’autre visiteur et de l’attribuer à celui que vous modifiez.
|
|
Cliquez sur pour supprimer un identifiant.
pour supprimer un identifiant.
Cliquez sur « Enregistrer » (Save) pour sauvegarder les modifications.
Cliquez sur « Annuler » (Cancel) pour les supprimer.
Terminer un contrat
Dans l’enregistrement du visiteur, cliquez sur « Terminer un contrat » (End contrat).
|
|
Sélectionnez la date de fin et cliquez sur « Aller à l’étape suivante » (Go to next step).
|
|
Si vous terminez le contrat maintenant, définissez les mesures à prendre concernant les données du visiteur. Sélectionnez « Supprimer les données du visiteur » (Delete visitor data) ou « Conserver les données du visiteur » (Keep visitor data). Cette option n’est pas disponible si vous terminez le contrat à une date future spécifique.
|
|
Cliquez sur « Terminer le contrat » (End contract) pour terminer le contrat.
Modification d’un contrat
Dans l’enregistrement du visiteur, cliquez sur « Modifier un contrat » (Edit contract).
|
|
Modifiez les informations puis cliquez sur « Enregistrer » (Save).
Cliquez sur « Réinitialiser à la configuration par défaut » (Reset to default configuration) pour effacer les adaptations apportées au type de contrat.
Cliquez sur « Annuler » (Cancel) pour supprimer les modifications.
Les écarts par rapport au type de contrat sont affichés en texte orange. Le type de contrat lui-même n'est pas modifié.
|
|
Mise à jour en lot de visiteurs
Utilisez la mise à jour en lot pour :
Nettoyer le système.
Sortir des clients de court terme et les supprimer.
Déplacer un lot de visiteurs vers un nouveau groupe.
Modifier le type de contrat pour un lot de visiteurs.
Modifier la validité pour un lot de visiteurs.
Pour mettre à jour plusieurs visiteurs à la fois :
Cliquez sur « Contrats » Contracts dans la barre de menu.
Cliquez sur « Visiteurs » (Visitors).
|
|
Choisissez un « Parking » (Car park).
|
|
Sélectionnez les visiteurs que vous voulez mettre à jour en même temps.
|
|
Cliquez sur « Mise à jour en lot » (Bulk update).
Sélectionnez les propriétés à mettre à jour.
REMARQUE : si vous utilisez « Sortir » (Move to outside) pour les clients de court terme, n’oubliez pas de contrôler « Supprimer un visiteur » (Terminate visitor) et de nettoyer le système.
|
|
Cliquez sur « Mettre à jour des visiteurs » (Update visitors).
REMARQUE : La mise à jour de tous les visiteurs peut prendre un moment. Veuillez attendre que le ruban bleu signalant « Mise à jour en lot en cours » disparaisse.
|
|
Exportation de visiteurs
Vous pouvez exporter un fichier .csv ou .pdf contenant les données relatives aux visiteurs d'un parking.
Pour exporter les données des visiteurs :
Cliquez sur « Contrats » Contracts dans la barre de menu.
Cliquez sur « Visiteurs » (Visitors).
|
|
Choisissez un « Parking » (Car park).
|
|
Cliquez sur « Exporter des visiteurs » (Export visitors).
|
|
Sélectionnez le Format de votre export.
|
|
Sélectionnez si vous voulez « Trier » (Sort) les données par prénom ou nom.
Utilisez les cases à cocher du menu déroulant « Informations » (Details) pour déterminer les champs de données qui seront exportés et ceux qui ne le seront pas.
Cliquez sur « Exporter des visiteurs » (Export visitors).
Un fichier contenant les données des visiteurs est généré dans le format sélectionné.
Suivre l’utilisation d’un contrat
Vous pouvez suivre l’utilisation d’un contrat :
Par visiteur
Par groupe
À partir d’un récapitulatif
Pour suivre l’utilisation d’un contrat par visiteur ou par groupe, cliquez sur « Contrats » (Contracts) dans la barre de menu et exécutez les opérations suivantes :
Utilisez la barre de recherche : entrez le nom du visiteur, le numéro d’identifiant ou le groupe du visiteur. Cliquez sur « Rechercher » (Search).
|
|
Cliquez sur « Visiteurs » (Visitors) ou « Groupes » (Groups) puis faites une recherche par nom et/ou par parking. Cliquez sur « Rechercher » (Search).
Cliquez sur l’enregistrement d’un visiteur ou d’un groupe.
Faites défiler jusqu’à « Utilisation d’un contrat ».
Pour suivre l’utilisation d’un contrat à partir d’un récapitulatif :
Cliquez sur « Contrats » Contracts dans la barre de menu.
|
|
Cliquez sur « Utilisation d’un contrat » (Contract usage).
Dans le récapitulatif, tous les évènements avec un contrat sont affichés.
|
|
Cliquez sur une ligne pour afficher les informations de l’évènement.
Spécifiez des paramètres de recherche puis cliquez sur « Rechercher » (Search).
Tarifs
Les profils tarifaires décrivent les règles pour le calcul du montant que le visiteur doit payer pour son temps de stationnement.
Les visiteurs disposant d’un profil tarifaire avec modèle de « Tarif à prix fixe » (Fixed Price Tariff) payent une redevance de stationnement indépendante du temps de stationnement.
Les visiteurs sur un profil tarifaire avec un modèle « tarifaire » (Scheme Lookup Tariff) payent une redevance de stationnement qui dépend de l’heure d’entrée et de la durée de stationnement.
Les visiteurs sur un profil tarifaire avec un modèle « tarifaire avec violation » (Scheme Lookup Tariff with Violation) payent une redevance supplémentaire s’ils stationnent en dehors des heures qui leur sont accordées. Ce modèle est utilisé principalement par les titulaires d’abonnements.
Le profil tarifaire utilisé pour un visiteur est déterminé par le contrat du visiteur.
Création d’un profil tarifaire
Cliquez sur « Tarifs » Tariffs dans la barre de menu.
|
|
Sélectionnez un « Parking » (Car park) dans le menu déroulant.
Cliquez sur « Ajouter un nouveau profil tarifaire » (Add new tariff profile).
|
|
Donnez un « Nom » (Name) à ce profil.
|
|
Sélectionnez un « Modèle » (Model) pour ce profil.
La « Politique de calcul » (Calculation policy) est utilisée en cas de changement de tarif. Si vous créez un nouveau profil tarifaire, vous pouvez laisser la politique au paramétrage par défaut.
|
|
Création d’un profil tarifaire à prix fixe
Pour terminer la création d’un profil tarifaire à prix fixe, saisissez les informations pour le plan tarifaire :
Définissez une « date de début » (Starting from) pour ce plan. Il doit s’agir d’une date et d’une heure passées.
|
|
Choisissez la devise dans le menu déroulant près de « Montant » (Amount).
Entrez le « Montant » (Amount).
Paramétrez le curseur « Global » (Global) sur « Oui » (Yes), sauf si vous voulez facturer le visiteur chaque fois qu’il entre dans une section différente.
Cliquez sur « Enregistrer » (Save).
Création d’un profil tarifaire
Dans un profil tarifaire, le montant des ventes dépend de l’heure d’entrée du visiteur et de la durée de stationnement.
Ce type de profil tarifaire vous permet d’avoir un tarif différent le matin et le soir par exemple. Ou un tarif différent les jours de semaine et les week-ends. Il est également possible d’utiliser ce profil pour facturer un montant pour la première heure de stationnement différent de celui de la deuxième et des suivantes.
Dans un profil tarifaire, vous définirez une série de créneaux tarifaires. Un créneau tarifaire peut s’étendre par exemple de 7 h à 19 h, ou simplement de 0 h à 0 h.
|
|
À l’intérieur d’un créneau tarifaire, vous pouvez définir plusieurs enregistrements de durées avec une durée et un prix (montant) spécifiques.
|
|
Dans cet exemple, le premier enregistrement de durée inclut une « Durée » (Duration) de 60 minutes, un prix (Amount) de 0,00 € par 60 minutes et est valable pour une 1 fois (« Décompte » ou Count). Le second enregistrement de durée inclut une « Durée » (Duration) de 10 minutes, un prix de 0,70 € par 10 minutes et se répète jusqu’à la fin du créneau tarifaire (le « Décompte » (Count) est fixé à 0, ce qui rend la « Durée totale » (Total Duration ) indéfinie). Le montant de 0,70 € est ajouté au montant total dû chaque fois qu’un nouvel enregistrement de durée démarre, jusqu’à la fin du créneau tarifaire ou lorsque le visiteur quitte le parking.
Dans le profil tarifaire que vous venez de créer, faites défiler jusqu’aux options de plan tarifaire pour définir vos créneaux temporels.
Entrez la « Période » (Period ) du premier créneau tarifaire.
|
|
Sélectionnez les jours auxquels ce créneau tarifaire s’applique. Ce peuvent être des jours de semaine ordinaires ou des jours spéciaux. Vous pouvez utiliser un créneau tarifaire avec des jours spéciaux pour définir un tarif 0 pendant les vacances par exemple.
|
|
Cliquez sur « Ajouter un créneau tarifaire » (Add tariff slot) pour créer un autre créneau tarifaire. Dans cet exemple, nous avons créé deux créneaux tarifaires par jour pour les jours de semaine et un créneau tarifaire par jour pour le weekend.
|
|
Cliquez sur pour créer les enregistrements de durée pour ce créneau tarifaire. Appuyez sur pour ajouter un nouvel enregistrement de durée.
pour ajouter un nouvel enregistrement de durée.
|
|
Si vous définissez une heure de fin antérieure ou égale à l’heure de début, l’heure de fin s’appliquera au jour suivant.
Des options et conditions plus avancées peuvent être définies pour mieux personnaliser chaque créneau tarifaire. Découvrez comment.
Répétez les étapes précédentes pour les autres créneaux tarifaires.
Faites défiler jusqu’à « Options de plan tarifaire ».
|
|
Sélectionnez une « Devise » (Currency) pour ce plan.
Dans le menu déroulant « Terminer les créneaux tarifaires » (End tariff slots), sélectionnez « Tel que spécifié par leur heure de fin » (As specified in their end time) pour terminer les enregistrements de durée conformément à l’heure de fin spécifiée du créneau tarifaire. Sélectionnez « Lorsque toutes les durées ont été utilisées » (When all durations have been used) pour laisser les enregistrements de durée aller jusqu’à leur durée totale.
Dans l’exemple que nous avons précédemment créé, le second enregistrement de durée est défini pour courir indéfiniment. Si vous sélectionnez « Tel que spécifié par leur heure de fin » (As specified in their end time), cet enregistrement de durée sera interrompu à la fin de ce créneau tarifaire. Un nouveau créneau tarifaire démarre après 19 h, et le premier enregistrement de durée de ce nouveau créneau tarifaire démarre à la même heure. Si vous avez sélectionné « Lorsque toutes les durées ont été utilisées » (When all durations have been used), le second créneau tarifaire continue de courir après 19 h et le nouveau créneau tarifaire est ignoré.
|
|
Si vous avez sélectionné « Tel que spécifié par leur heure de fin » (As specified in their end time), l’option « Interruption après le créneau horaire » (Cut off after timeslot) devient disponible.
Exemple 1: interruption des enregistrements de durée
Voyons un exemple qui illustre l’effet des paramètres d’interruption disponibles. Il se fonde sur un plan tarifaire qui comporte un créneau tarifaire de soirée suivi d’un créneau tarifaire de nuit :
Le créneau tarifaire de soirée court de 20 h à 24 h
Ce créneau tarifaire comporte quatre enregistrements de durée de 60 minutes (seulement trois sont affichés dans les illustrations ci-dessous)
Le montant du tarif pour le premier enregistrement de durée est de 1,00 €.
Le montant du tarif pour le second enregistrement de durée et les suivants est de 2,00 €.
Le créneau tarifaire suivant (le créneau tarifaire de nuit) démarre à 0 h.
Le créneau tarifaire de nuit comporte plusieurs enregistrements de durée de 120 minutes (seulement deux sont affichés dans les illustrations ci-dessous)
Le montant du tarif pour chaque enregistrement de durée en nuit est de 5,00 €.
L' « Interruption après le créneau tarifaire » (Cut off after tariff slot) est paramétrée sur « Non » (No).
Un visiteur entre dans le parking à 22 h 45.
Ce visiteur quitte le parking à 23 h 59.
Le visiteur entre dans le parking entre 20 h et 24 h : c’est donc le créneau tarifaire soirée qui s’applique. Le calcul du tarif commence avec le premier enregistrement de durée de ce créneau tarifaire soirée. Cet enregistrement de durée débute à 22 h 45 et court 60 minutes (jusqu’à 23 h 45). Comme le visiteur quitte le parking après 23 h 45, l’enregistrement de durée suivant est ajouté. Parce que 23 h 45 se trouve toujours dans le créneau tarifaire soirée, ce second enregistrement de durée est utilisé.
Au total, le visiteur devra payer pour les deux enregistrements de durée soirée complets :
1,00 € + 2,00 € = 3,00 €
|
|
Si le visiteur était parti à 0 h 10 (c’est-à-dire 11 minutes plus tard), il aurait aussi dû payer les deux enregistrements de durée soirée complets, puisqu’il part avant la fin du second enregistrement de durée soirée :
1,00 € + 2,00 € = 3,00 €
|
|
Dans cette situation, les 11 minutes de retard ne font pas de différence. Ces 11 minutes (ou même moins) en revanche peuvent faire une large différence. Par exemple, lorsque l’interruption après le créneau tarifaire est activée.
Dans cette nouvelle situation, à la fin du créneau tarifaire soirée (c’est-à-dire à 24 h), le second enregistrement de durée soirée est suspendu.
Si le visiteur part à 23 h 59, il reste dans le créneau tarifaire soirée, et il ne doit payer que les enregistrements de durée soirée. Le visiteur doit maintenant payer le premier et le second enregistrement de durée soirée :
1,00 € + 2,00 € = 3,00 €
|
|
Mais s’il part à 0 h 10, il passe dans le créneau tarifaire nuit. Cela signifie qu’un enregistrement de durée nuit sera ajouté au calcul. Le visiteur doit maintenant payer les deux enregistrements de durée soirée plus un enregistrement de durée nuit complet :
1,00 € + 2,00 € + 5,00 € = 8,00 €
|
|
Exemple 2 : interruption des enregistrements de durée avec un créneau tarifaire à plusieurs jours
Pour illustrer le calcul avec un créneau tarifaire à plusieurs jours, prenons le plan tarifaire suivant :
« Terminer les créneaux horaires » (End time slots) est paramétré sur : « Lorsque toutes les durées ont été utilisées » (when all durations have been used).
Un seul créneau tarifaire qui court du lundi au dimanche de 0 h à 24 h.
Le premier enregistrement de durée comporte 12 heures et coûte 10,00 EUR.
Le second enregistrement de durée comporte 12 heures et coûte 7,50 EUR.
Le troisième enregistrement de durée comporte 24 heures et coûte 5,00 EUR.
Un visiteur entre dans le parking mardi à 12 h et part samedi à 10 h (quatre jours).
Un élément important à garder en tête dans cette situation est le décompte du dernier enregistrement de durée (c’est-à-dire le troisième). Si toutes les durées ont été utilisées, le calcul recommence comme si le visiteur refaisait une nouvelle visite dans le parking. Le calcul utilise la structure tarifaire applicable en fonction du créneau tarifaire d’arrivée.
Si le troisième enregistrement de durée est défini avec un décompte de 2 (situation A), le visiteur devra payer :
10,00 € + 7,50 € + 5,00 € + 5,00 € + 10,00 € + 7,50 = 45,00 €
Si le troisième enregistrement de durée est défini avec un décompte « Indéfini » (situation B), le visiteur devra payer :
10,00 €+ 7,50 €+ 5,00 € + 5,00 € + 5,00 € = 32,50 €
|
|
Utilisez ces exemples pour comprendre le paramètre « Interruption après le créneau horaire » (Cut off after timeslot).
Paramétrez « Interruption après le créneau horaire » (Cut off after timeslot) selon vos besoins.
Paramétrez « Paiement strict » (Strict payment) sur « Oui » (Yes) pour laisser au visiteur uniquement le temps de sortie configuré pour prendre son véhicule et quitter le parking. Paramétrez « Paiement strict » (Strict Payment) sur « Non » (No) pour laisser au visiteur le temps de sortie configuré plus le temps restant dans son enregistrement de durée actuel.
Paramétrez le « Temps d’attente » (Wait time) moyen du visiteur prévu dans une file d’attente à la station de paiement. Ce temps d’attente est déduit du temps de stationnement.
Optionnellement, entrez un « Prix par jour maximal » (Maximum day price), un « Prix par semaine maximal » (maximum week price) et/ou un « Prix absolu maximal » (maximum absolute price) pour limiter le tarif.
Paramétrez « Heure de fin de journée pour interruption » (Cut off end of day time) sur « Oui » (Yes) pour spécifier une heure de fin de journée personnalisée. L’heure de fin de journée standard est 0 h.
Faites défiler jusqu’à « Tester un profil tarifaire » (Test tariff profile) et cliquez dessus.
Entrez une « Date et une heure de début » (Start date time) ainsi qu’une « Date et une heure de fin » (End date time) pour tester différents scénarios de stationnement. Ajustez vos créneaux tarifaires, vos enregistrements de durées et vos montants si nécessaire.
|
|
Cliquez sur « Enregistrer » (Save).
Création d’un profil de tarif de consultation de régime avec violation
Ce profil est une variante du profil tarifaire. la seule différence étant que chaque créneau tarifaire doit être marqué comme une « Visite normale » (Normal visit) ou une « Violation » (Violation) :
|
|
Par exemple, le plan tarifaire pour un titulaire d’abonnement peut enregistrer le stationnement durant les heures de bureau (jours de semaine de 7 h à 19 h) comme « Visite normale » (normal visit) et le stationnement durant les heures hors bureau (tous les autres horaires) comme « Violation » (violation).
Paramétrage des options et conditions des créneaux tarifaires pour utilisation avancée
Vous pouvez paramétrer les conditions d’application du créneau tarifaire.
Si ce créneau tarifaire ne s’applique que si la visite a commencé durant ce créneau, paramétrez « Commence dans le créneau » (Starts within) sur « Oui » (Yes). Par exemple, si un visiteur est éligible à un tarif spécial uniquement s’il entre au bon moment.
|
|
Si ce créneau tarifaire ne s’applique que si la visite prend fin durant ce créneau, paramétrez « Prend fin dans le créneau » (Ends within) sur « Oui » (Yes).
« Se situe dans le créneau » (Is within) exige que la durée totale de la visite se situe dans ce créneau tarifaire. Paramétrer « Se situe dans le créneau » (Is within) sur « Oui » (Yes) invalide ce créneau tarifaire si un autre créneau tarifaire devient actif durant la visite.
Si ce créneau tarifaire ne s’applique que si le jour de début se situe dans ce créneau temporel, paramétrez « Jour de début » (Start day) sur « Oui » (Yes). C’est la même règle pour le « Jour de fin » (End day).
Les champs « Commence avant » (Starts before), « Commence après » (Starts after), « Se termine avant » (Ends before) et « Se termine après » (Ends after) vous permettent de choisir des heures spécifiques dans et en dehors de ce créneau tarifaire.
Pour limiter le montant représentant la contribution de ce créneau tarifaire dans le montant total de la journée complète, saisissez une limite dans le « Champ Prix par jour max. » (Max day price field).
|
|
Le paramétrage « Interruption après » (Cut off after) peut être utilisé pour passer outre les paramètres d’interruption spécifiés pour le plan tarifaire. Sélectionnez « Plan tarifaire » (Tariff plan) dans la liste déroulante pour suivre les paramétrages du plan tarifaire. Sélectionnez « Interruption » (Cut off) pour interrompre l’enregistrement de durée à la fin du créneau tarifaire. Sélectionnez « Pas d’interruption » (No cut off) si le dernier enregistrement de durée peut déborder sur le créneau tarifaire suivant.
Utilisation de plans tarifaires pour programmer un changement de tarif
Pour planifier un changement de tarif dans un profil tarifaire :
Cliquez sur « Tarifs » Tariffs dans la barre de menu.
|
|
Recherchez le profil tarifaire dans la liste. Utilisez le menu déroulant « Parkings » (Car parks) pour filtrer la liste, si nécessaire.
Cliquez sur le profil tarifaire pour l’ouvrir.
Comme vous avez pu le constater lors de la Création d’un profil tarifaire, chaque plan tarifaire a une « Date de début » (Starting date).
|
|
Pour planifier un changement de tarif, vous devez créer un nouveau plan tarifaire pour ce profil tarifaire avec une date de début future. Faites attention de ne pas supprimer le plan tarifaire actuel.
Cliquez sur « Gérer les plans » (Manage plan).
|
|
Cliquez sur « Ajouter un plan » (Add plan).
|
|
Définissez la « Date de début » (Starting date) future pour ce plan. À compter de cette date, ce plan sera utilisé à la place du plan portant l’ancienne date de début.
Sélectionnez la « Politique de calcul » (Calculation Policy) pour définir la transition entre l’ancien et le nouveau plan.
Par exemple, si un visiteur entre dans le parking le 31 décembre et le quitte le 1er janvier, un tarif plus élevé pourrait être appliqué l’année suivante. « Plan tarifaire à l’entrée » (Tariff plan at entry) signifie que le montant total est calculé selon le tarif qui était valable au 31 décembre. Le montant dû pour le 1er janvier sera calculé sur la base des tarifs du 31 décembre. « Plan tarifaire au moment du paiement » (Tariff plan at payment ) signifie que le montant total sera calculé sur la base des tarifs du 1er janvier. Le montant dû pour le 31 décembre sera calculé sur la base des tarifs du 1er janvier. « Tous les plans tarifaires de la visite » (All tariff plans of visit) signifie que le montant est calculé sur la base des tarifs valables à compter de ce jour Le visiteur paie son temps de stationnement au 31 décembre sur la base des tarifs de ce jour et pour le 1er janvier, il paie sur la base des nouveaux tarifs.
Créez le nouveau plan tarifaire. Voir Création d’un profil tarifaire pour plus de détails sur cette étape.
Faites défiler jusqu’à « Tester un profil tarifaire » (Test tariff profile) et cliquez dessus.
|
|
Entrez une « Date et une heure de début » (Start date time) ainsi qu’une « Date et une heure de fin » (End date time) pour tester différents scénarios de stationnement. Ajustez vos créneaux tarifaires, vos enregistrements de durées et vos montants si nécessaire.
|
|
Cliquez sur « Enregistrer » (Save).
Rapports
Des rapports présentent les détails et les récapitulatifs de ce qui arrive dans le système de parkings.
Pour générer un rapport :
Cliquez sur « Rapports » (Reports) dans la barre de menu.
|
|
Sélectionnez un « Parking » (Car park) dans le menu déroulant.
Sélectionnez un « Type de rapport » (Report Type) dans le menu déroulant.
|
|
Génération d’un rapport général
Pour générer un type de rapport général :
Sélectionnez « Général » (General) puis cliquez sur « Rechercher » (Search).
Cliquez sur un nom de rapport dans la liste.
|
|
Saisissez les informations requises puis cliquez sur « Étape suivante » (Next step) jusqu’à ce que la case à cocher « Exporter en format XLS » (Export to XLS format ) et le bouton « Exécuter » (Execute) soient affichés.
|
|
Par défaut, les rapports sont générés au format PDF. Cochez la case à cocher « Exporter au format XLS » (Export to XLS format) si vous voulez plutôt générer un rapport au format Microsoft Excel.
Cliquez sur « Exécuter » (Execute).
Le rapport est généré et téléchargé dans le format que vous souhaitez.
Génération d’un rapport de relevé de caisse ou de station
Un rapport de relevé de station est un rapport sur les activités d’une station dans une période de temps sélectionnée. Un rapport de relevé de caisse est un rapport sur les activités d’une caisse lors d’un tour sélectionné.
Pour générer l’un de ces rapports :
Sélectionnez un « Parking » (Car park).
|
|
Sélectionnez un « Type de rapport » (Report Type).
Sélectionnez une « Date de début » (From) et une « Date de fin » (To).
Optionnellement, faites une recherche par « Nom » (Name) ou par « Statut » (State).
Cliquez sur « Rechercher » (Search).
Paramètres
Dans les paramètres, vous pouvez gérer :
Configuration du parking
L'écran de configuration des parkings permet d'ajouter ou de modifier des voies bidirectionnelles.
Une voie bidirectionnelle comprend soit :
Une barrière avec des bornes des deux côtés, soit
|
|
Deux barrières avec une borne qui leur est propre.
|
|
Une voie bidirectionnelle peut être configurée pour agir comme une station d'entrée ou de sortie.
Pour accéder à l'écran de configuration du parking :
Cliquez sur « Paramètres » (Settings) dans la barre de menu.
|
|
Cliquez sur « Configuration du parking » (Car park configuration).
|
|
Sélectionnez un parking dans le menu déroulant.
Cliquez sur « Rechercher » (Search).
Cliquez sur « Gérer les voies (bi)directionnelles » (Manage (Bi)directional lanes).
|
|
Sélectionnez la station qui jouera le rôle de Station A. Cette station est active Dans le planning. Consultez « Planning » (Schedule) pour en savoir plus sur les plannings.
Sélectionnez la station qui jouera le rôle de Station B. Cette station est active dans le « Hors planning » (Out schedule).
Sélectionnez le « Mode de fonctionnement de la station inactive » (Operation mode for the inactive station).
Sélectionnez « Autoriser la commutation manuelle » (Allow manual switch) si vous souhaitez autoriser la possibilité d’outrepasser manuellement le planning.
Consultez « Gestion des stations » (Operating stations) pour savoir comment les voies bidirectionnelles sont utilisées dans un parking.
Compteurs
Les compteurs sont utilisés pour assurer un suivi, par exemple :
Le nombre de visiteurs du parking
Le nombre de visiteurs dans un groupe actuellement présents dans le parking
Le nombre de visiteurs avec un certain type de contrat dans le parking
Etc.
Les compteurs peuvent être affichés dans l'aperçu des parkings :
|
|
Les compteurs peuvent être configurés pour avoir des valeurs minimales et maximales. Par exemple, le compteur qui comptabilise le nombre de visiteurs dans le parking a une valeur maximale correspondant au nombre total de places de stationnement dans le parking.
Les compteurs peuvent être configurés pour activer un signal égal ou supérieur à une valeur maximale définie. Le signal peut être configuré pour déclencher une action, par exemple : fermer le parking lorsqu'il est complet.
Le signal sera désactivé lorsque la valeur du compteur sera égale ou inférieure à une valeur minimale définie.
|
Exemple
Vous utilisez un compteur pour compter le nombre de visiteurs dans un parking. La capacité maximale de votre parking est de 100 visiteurs. Vous configurez un signal pour qu'il s’active lorsque le parking atteint 100 visiteurs. Le parking est fermé et un message « Complet » est affiché. Vous avez configuré la valeur minimale pour que le signal soit désactivé à 98. Lorsqu'au moins deux visiteurs partent, le parking est à nouveau ouvert et le message « Complet » disparaît.
|
Création et modification de compteurs
Pour créer ou modifier un compteur :
Cliquez sur « Paramètres » (Settings) dans la barre de menu.
|
|
Cliquez sur « Compteurs » (Counters).
Sélectionnez un « Parking » (Car park).
|
|
Cliquez sur « Ajouter un compteur » (Add counter).
Donnez un « Nom » (Name) à votre compteur.
|
|
Sélectionnez un « Type » (Type).
Un compteur personnalisé compte les visiteurs avec des types de contrat qui sont explicitement configurés pour être comptés par ce compteur. Après avoir créé le compteur personnalisé, vous pouvez le configurer dans Types de contrat (Contract types).
Un compteur de « réservations » (reservation) compte les visiteurs ayant une réservation.
Un compteur de « sommes » (sum) peut ajouter ou soustraire les quantités d'autres compteurs. Par exemple, dans le parking d'un hôtel, un compteur de sommes peut additionner le compteur des employés et le compteur des visiteurs.
En option, saisissez une description pour votre compteur.
|
|
Cliquez sur « Aller à l’étape suivante » (Go to next step).
Entrez les valeurs Minimum et Maximum de ce compteur.
|
|
Définissez Visible sur Oui pour afficher le compteur dans l’aperçu des parkings.
Définissez « Statistiques » (Statistics) sur Oui pour utiliser ce compteur dans les rapports statistiques du parking.
Définissez l'« intervalle d’échantillonnage » (Sample interval) pour les rapports statistiques. En général, il s’agit de 15 minutes.
Si vous configurez un compteur personnalisé, vous pouvez sélectionner une station.
|
|
Cliquez sur « Ajouter une action » (Add action).
Sélectionnez une Direction pour le compteur. Utilisez la fonction « Diminuer » (Decrease) pour les stations de sortie et la fonction « Augmenter » Increase pour les stations d'entrée.
|
|
Si vous configurez un compteur de sommes, entrez la « Formule » (Formula). Vous pouvez utiliser les signes + et - pour ajouter et soustraire des compteurs. Par exemple : Compteur1+Compteur2–Compteur3.
|
|
Cliquez sur « Ajouter un compteur » (Add counter).
Pour modifier un compteur :
Sélectionnez un parking et cliquez sur recherche pour afficher une liste de compteurs.
|
|
Cliquez sur le compteur que vous voulez modifier.
|
|
Cliquez sur « Modifier des informations » (Edit details).
Modifiez les informations puis cliquez sur « Enregistrer » (Save).
Configuration de signaux et d’actions
Pour configurer des signaux et des actions :
Sélectionnez le compteur.
Cliquez sur « Gérer les signaux de compteur (Manage counter signals).
|
|
Cliquez sur « Ajouter un signal » (Add signal) pour ajouter un signal.
Entrez les valeurs Minimum et Maximum de votre signal.
|
|
Cliquez sur à côté du signal.
|
|
Remplissez les informations de l'action disponible.
Cliquez sur « Enregistrer » (Save).
Le signal est ajouté au compteur.
Les présentations d’impression
Les présentations d’impression sont utilisées pour imprimer des tickets, comme des cartes de visiteurs, des cartes de sortie et des cartes de réduction sur une imprimante de bureau. Ces présentations ne sont pas utilisées pour imprimer des tickets dans les stations. En fonction de la dimension du papier et de l’orientation, plusieurs tickets peuvent être imprimés sur une seule feuille.
Vous pouvez modifier des présentations d’impression ou créer une nouvelle présentation d’impression sur la base d’un modèle existant.
Modification d’une présentation d’impression/création d’une nouvelle présentation d’impression
Pour modifier une présentation d’impression existante ou en créer une nouvelle :
Cliquez sur « Paramètres » (Settings) dans la barre de menu.
|
|
Cliquez sur « Présentations d’impression » (Print Layouts).
Pour modifier une présentation d’impression, sélectionnez une présentation dans la liste ou utilisez la barre de recherche « Parkings » (Car Parks) pour afficher une liste de présentations appartenant à un parking.
|
|
Pour créer une nouvelle présentation d’impression, sélectionnez un « Parking » ( Car Park) par le biais de la barre de recherche puis cliquez sur « Ajouter une présentation d’impression » (Add print layout).
Sélectionnez la présentation d’impression que vous voulez utiliser comme modèle dans le menu déroulant « Copier à partir » (Copy from), entrez un « Nom » (name ) pour la nouvelle présentation puis cliquez sur « Ajouter une présentation d’impression » (Add print layout).
|
|
Vous pouvez maintenant modifier la présentation d’impression.
Les « Informations de la présentation d’impression » (Print layout details) définissent la taille des cartes individuelles, les marges et le nombre de colonnes et de lignes. Ne les modifiez pas à moins que vous ne vouliez utiliser un type de papier différent.
|
|
Dans la section « Présentation de ticket » (Ticket Layout), vous pouvez déplacer, modifier, supprimer ou ajouter des éléments au ticket.
Avertissement ! Quelles que soient les modifications que vous effectuez, assurez-vous toujours que le code-barres soit positionné au milieu du ticket. Sinon, le ticket pourrait ne pas être accepté.
Cliquez sur un élément pour le modifier.
Si l’élément est un code-barres :
Cochez « Sous-titre » (Subtitle) pour afficher le code-barres en chiffres.
|
|
Cochez « Hauteur » (Height) pour utiliser un code-barres plus grand ; décochez « Hauteur » (Height) pour utiliser un petit code-barres.
Cochez « Code QR » (QR Code) pour générer un code QR et un code-barres.
Cochez « Supprimer inconnu » (Suppress Unknown) pour que le code-barres ne soit pas affiché s’il n’est pas généré.
Cochez « Centrer » (Centre) pour aligner horizontalement le code-barres au centre.[PS7] [PS8]
Si l’élément est autre chose :
Sélectionnez un « Type » dans le menu déroulant.
|
|
Apportez toutes les modifications souhaitées au « Texte » (Text) affiché.
Apportez toutes les modifications souhaitées à la mise en forme du texte.
Cochez « Supprimer inconnu » (Suppress Unknown) pour que cet élément ne soit pas affiché s’il n’est pas disponible.
Utilisez les boutons « Haut » (Up) et « Bas » (Down) pour déplacer un élément.
Cliquez sur « Supprimer » (Delete) pour supprimer un élément.
Cliquez sur « Ajouter » (Add) pour ajouter un élément.
Cliquez sur « Enregistrer la présentation du ticket » (Save ticket layout) pour sauvegarder toutes les modifications. Cliquez sur « Revenir » (Revert) pour rejeter des modifications de la présentation d’impression.
Les plannings
Les plannings et les actions planifiées vous permettent de planifier le statut des portes express et des stations. Par exemple, si des portes express sont ouvertes ou fermées, et si des stations sont actives ou fermées.
Utilisez des plannings pour définir les portes express et les stations « Dans le planning » (in schedule) ou « Hors planning » (out schedule). Utilisez Les actions planifiées pour déterminer le statut « Dans le planning » et le statut « Hors planning ».
Pour consulter ou modifier un planning :
Cliquez sur « Paramètres » (Settings) dans la barre de menu.
|
|
Cliquez sur « Plannings pour portes express » (Schedules for speed gates) ou « Plannings pour stations » (Schedules for stations).
Sélectionnez un « Parking » (Car park) dans le menu déroulant.
|
|
Sélectionnez un « Ensemble » (Set) dans le menu déroulant. Un ensemble est utilisé pour grouper des stations ou des portes express. Utilisez différents ensembles lorsque par exemple différentes sections du parking affichent des heures d’ouverture différentes.
Cliquez sur « Rechercher » (Search).
Le planning de cet ensemble est affiché. Le statut « Dans le planning » (In schedule) est affiché en orange. Le statut « Hors planning » (Out schedule) est affiché en gris.
Déplacez la barre orange pour changer le statut « Dans le planning » (In schedule).
|
|
Cliquez sur pour supprimer la barre orange.
pour supprimer la barre orange.
Cliquez n’importe où sur la barre grise pour créer une nouvelle barre orange et faites-la glisser pour la redimensionner.
|
|
Les plannings sont répétés chaque semaine. Pour créer une exception, par exemple lorsqu’il y a un jour férié, sélectionnez un Jour spécial dans le menu déroulant puis cliquez sur « Ajouter » (Add). Si vous voulez supprimer le planning d’un jour spécial, sélectionnez le « Jour spécial » (Special day) du menu déroulant et cliquez sur « Supprimer » (Remove).
Les actions planifiées
Les plannings et les actions planifiées vous permettent de planifier le statut des portes express et des stations. Par exemple, si des portes express sont ouvertes ou fermées, et si des stations sont actives ou fermées.
Utilisez des plannings pour déterminer quand les portes express et les stations sont « Dans le planning » (in schedule) ou « Hors planning » (out schedule). Utilisez « Actions planifiées » (Scheduled Actions) pour déterminer le statut « Dans le planning » et le statut « Hors planning ».
Pour consulter ou modifier des actions planifiées :
Cliquez sur « Paramètres » (Settings) dans la barre de menu.
|
|
Cliquez sur « Plannings pour portes express » (Schedules for speed gates) ou « Plannings pour stations » (Schedules for stations).
Sélectionnez un « Parking » (Car park) dans le menu déroulant.
|
|
Cliquez sur « Modifier » (Edit) pour modifier la configuration de planning pour les stations ou les portes express.
Sélectionnez un statut « Dans le planning » (In Schedule) et un statut « Hors planning » (Out Schedule) depuis les menus déroulants.
|
|
Cochez les cases à cocher « Priorité activée » (Priority enabled) pour passer les modifications manuelles normales. Le paramétrage de la priorité est à son tour rejeté lorsqu’une modification manuelle est imposée.
Cliquez sur « Enregistrer » (Save) pour enregistrer les modifications ou cliquez sur « Annuler » (Cancel) pour les supprimer
Les jours spéciaux
Utilisez des jours spéciaux pour créer différents plannings pour les jours fériés ou d’autres jours spéciaux.
Pour consulter ou modifier des jours spéciaux :
Cliquez sur « Paramètres » (Settings) dans la barre de menu.
|
|
Cliquez sur « Jours spéciaux » (Special days).
Sélectionnez un « Parking » (Car park) dans le menu déroulant.
Sélectionnez un « Ensemble » (Set) dans le menu déroulant.
Cliquez sur « Rechercher » (Search).
|
|
Pour ajouter un jour spécial, cliquez sur « Ajouter un jour spécial » (Add special day).
|
|
Saisissez un « Nom » (Name) pour le jour spécial.
Sélectionnez si le jour spécial se présente « Une seule fois » Once ou « Chaque année » Yearly dans le menu déroulant Type.
Saisissez la Date et cliquez sur « Ajouter » (Add).
Cliquez sur « Enregistrer » (Save).
Pour modifier des jours spéciaux existants, changez leur Nom (Name), leur Type (Type) ou leur Date (date) et cliquez sur « Enregistrer » (Save).
Pour supprimer un jour spécial, cliquez sur « Supprimer » (Delete) puis sur « Enregistrer » (Save).
Paramètres de la station
Avec les paramètres de la station, vous pouvez
Consulter les informations de la station
Vérifier le lien vidéo d'une station, s'il est disponible
Activer et désactiver les capacités de la station. Une capacité est tout dispositif ou service nécessaire au fonctionnement de la station.
Pour accéder à une station :
Cliquez sur « Paramètres » (Settings) dans la barre de menu.
|
|
Cliquez sur « Paramètres de la station » Station Settings.
Sélectionnez un parking dans le menu déroulant.
|
|
Cliquez sur « Rechercher » (Search).
|
|
Cliquez sur une station dans la liste.
|
|
Pour tester une capacité de la station, cliquez sur Test.
Pour activer ou désactiver une capacité, cliquez d'abord sur « Gérer les capacités » Manage capabilities.
|
|
Utilisez les cases à cocher pour activer ou désactiver une capacité. Pour réinitialiser une capacité, désactivez-là d’abord et cliquez sur « Enregistrer » (Save). Activez-la ensuite et cliquez à nouveau sur « Enregistrer » (Save).
Paramètres des raccourcis
Des raccourcis sont utilisés dans l'écran visiteur pour des actions rapides et pour changer de type de contrat. Dans « Paramètres des raccourcis » (Paramètres des raccourcis), vous pouvez :
Créer et modifier des raccourcis
Attribuer des raccourcis à des utilisateurs, des rôles ou des types de clients
Pour créer ou modifier un raccourci :
Cliquez sur « Paramètres » (Settings) dans la barre de menu.
|
|
Cliquez sur « Paramètres des raccourcis » (Shortcut Settings).
Sélectionnez un « Parking » (Car park) dans le menu déroulant.
|
|
Sélectionnez un « Ensemble » (Set) de raccourcis dans le menu déroulant. Les ensembles sont utilisés pour regrouper les raccourcis.
Cliquez sur « Rechercher » (Search).
|
|
Une liste de raccourcis est affichée.
Pour créer un nouveau raccourci :
Cliquez sur « Ajouter un raccourci » (Add shortcut).
Donnez un « Nom » (Name) à votre raccourci.
|
|
Cliquez sur « Ajouter un raccourci » (Add shortcut).
Le raccourci est ajouté à l’ensemble. Pour modifier un raccourci :
Cliquez sur à côté du nom du raccourci.
|
|
Pour modifier les actions effectuées par le raccourci, cliquez sur « Modifier » (Edit).
Sélectionnez une action dans le menu déroulant. Faites défiler la liste pour voir toutes les options.
|
|
Saisissez les informations spécifiques nécessaires pour réaliser votre action.
Cliquez sur « Ajouter une action à un raccourci » (Add action to shortcut).
Ajouter une autre action à ce raccourci, ou
Cliquez sur « Enregistrer » (Save).
Les raccourcis doivent être attribués avant de pouvoir être utilisés. Vous pouvez attribuer des raccourcis à :
Des utilisateurs spécifiques,
Des rôles ou
Des types de clients
Les raccourcis attribués à des utilisateurs spécifiques ne sont montrés qu'à ces utilisateurs. Les raccourcis attribués à des rôles spécifiques sont montrés à tous les utilisateurs ayant ce rôle. Les raccourcis attribués aux types de clients sont montrés aux visiteurs aux stations de paiement.
Pour attribuer un raccourci :
Sélectionnez un type dans le menu déroulant.
|
|
Utilisez les cases à cocher pour attribuer le raccourci.
|
|
Cliquez sur « Enregistrer » (Save).
Votre raccourci peut maintenant être utilisé.
Journalisation d’audit
Toutes les actions effectuées par des utilisateurs dans ParkID sont enregistrées à des fins d'audit. Dans le journal d'audit, vous pouvez visualiser les actions et voir les détails de ces actions.
Pour accéder au journal d'audit :
Cliquez sur dans la barre de menu.
dans la barre de menu.
Cliquez sur « Journalisation d’audit » (Audit Logging).
|
|
Actions de filtrage
Dans le journal d'audit, vous pouvez filtrer les actions par :
Date et heure (« De » (From) et « À » (To))
Parking
Type d'action
Manuel
Localisation
« Informations » (Details) (toute information liée à l’action, comme le nom de l’utilisateur, le numéro de carte, le montant, les quatre derniers chiffres d’une carte de crédit, etc.)
Cliquez sur « Appliquer » ( Apply) pour appliquer les filtres.
|
|
Vérification des détails d'une action
Pour vérifier les détails d'une action
Cliquez sur à côté de l’action.
|
|
Pour vérifier ce qui a été modifié après l'action, cliquez sur « Afficher » (Show).
|
|
Préférences
Vous pouvez personnaliser l'interface utilisateur de ParkID par le menu « Préférences » (Preferences).
Pour accéder aux « Préférences » (Preferences) :
Cliquez sur votre nom dans le coin supérieur droit.
|
|
Cliquez sur « Préférences » (Preferences)
|
|
Dans les Préférences, vous pouvez :
Changer votre langue
Choisir d'« afficher » (show) ou de masquer les « noms des stations » (noms des stations) dans l'aperçu des parkings
Sélectionner les « parkings » (car parks) à afficher dans l’aperçu
Choisir d'« afficher les avertissements du système sur chaque page » (show system warnings on every page) ou non
Choisir la page qui s'affiche comme « page de démarrage par défaut » (default start page).
Sélectionner « Afficher l’aperçu des stations » (Show stations view) pour activer l'ancien style d'aperçu des parkings.
Cliquez sur « Enregistrer » (Save) pour sauvegarder les modifications.